Leaderboard


Popular Content
Showing content with the highest reputation since 03/06/2025 in Posts
-
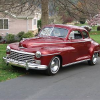
As a follow up here.... After taking my time and being meticulous in double checking my work. I'm happy to report the engine fired off and settled into a melodic rumble with no fanfare. Minute leaks at the waterpump bypass and fuel pump were quickly handled. After stationary break in was completed, a short test drive shows promise.7 points
-
When I pulled my engine, in a similar condition, I removed the transmission along with the clutch and brake pedals. I was then able to pull the engine out with the bell housing attached. This is tricky as the steering column interferes with things a bit. But it'll come out. I then laid the block on it's side, on a solid bench and removed the crankshaft out the bottom with the Fluid Drive attached. I could then access all of the FD nuts to separate the FD and Crank. Then a lot of cleaning with wire wheels and flapper sanding drums, and a lot of penetrating oil. I was finally able to drive all of the pistons out with a BFH and a block of wood. Then I focused on the valves. I gripped the cam sprocket with a large channel lock pliers and rotated it back and forth, a little at a time, until all of the valves were stuck open. I could then tip the block upside down and slide the came out, followed by the tappets. I then hammered the valves back closed to remove the keepers and springs. Then, with the aid of a long punch, I drove the valves up and out of the block. Then I hauled it all to a machine shop where they bored it, decked the block and milled the head, replaced the valve guides and seats, as they were also trashed. They provided the pistons and rings when I picked it all up. I then reassembled it and it's been a solid engine ever since.3 points
-
Regardless of political bend...the planet is changing. We are currently between ice ages...a cycle well documented by the people smarter than me. We are also in a time when we actually have polar ice caps...90% of the planet's history (they say) there were no ice caps. We are warming per the earth's cycles...we THINK we can control it, but we can't. That's where politics comes in and that's where I'll leave it.3 points
-
Or, you can stick a large cork plug in there. That'll sure look fancy, and be a great conversation starter 😁2 points
-
Have not posted for awhile. Injured left leg. Starting to not hurt so much. Hope to get back after it Monday. I did manage to seam seal back of cab and make adapter a bracket for brake pedal. Also received my new u-bolts. Ray J.


 2 points
 -
Ha, my son needs to build up his guns, mine can do the job lol.2 points
-
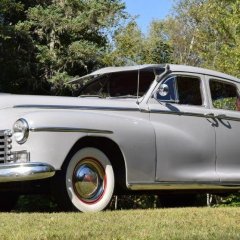
Tucker on display for the buying public...low miles2 points
-
That looks terrible. But, I'd bet it has existed since the block was cast. I'd run it as is and this is why: There is no oil under pressure in that area of the block. There is almost zero load on the tappet bore, just an up/down motion with a minimal side load from the cam contacting the lifter base. As evidence I offer the fact that I've never encountered a worn bore, even in engines with many, many, many accumulated miles. And have never heard of anyone else finding one. Yes I know it is a lot of work to remove and replace the block if it doesn't work out, but I'd gamble on it working fine. After all there is a lot of machine and assembly work done and salvaging that is worth the gamble in my mind.2 points
-
If oil can soak into metal, it can also be flung out when that metal is rotating several thousand rpms...diesel is a good solvent that can soften any buildup but leaves behind a thin layer of hydrocarbon to displace moisture...diesel can also get into the lubrication system without causing damage.1 point
-
Come back to visit MN I'll give you one 😁1 point
-
I remember watching that link awhile ago when it was posted .... there were a few things I did not agree with, I did think the guy was very knowledgeable. I also was reminded about how old men like to sit around and tell stories 🤣🤣🤣 The story about the camshaft was what caught my attention .... never in my years have I heard that.1 point
-
All I'll say is that I've been working on engine internals since 1959. Cams, cranks, blocks etc. Disassembled, cleaned, reassembled and installed. Never have I concerned myself with that question. Oh, and most of them ran when I finished.1 point
-
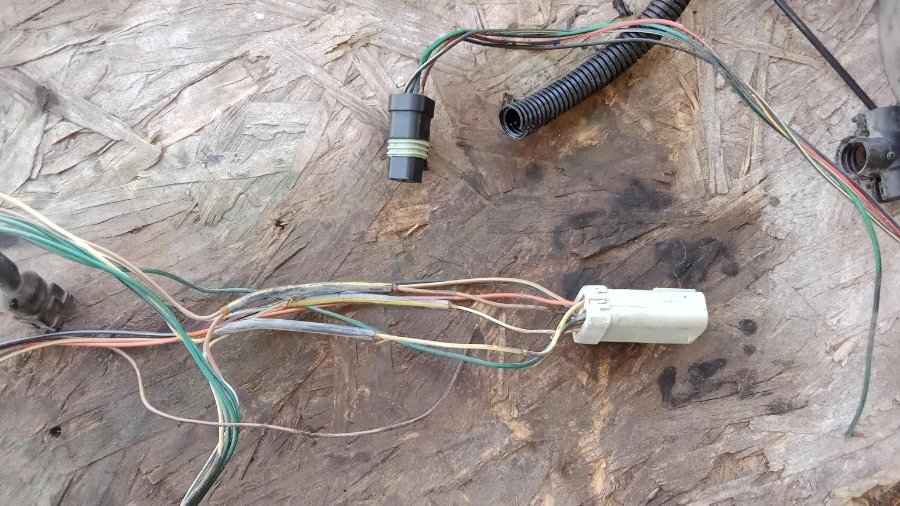
I feel sorry for you ... it has been a ongoing saga. I took a break from working on it recently and took time to think about it ... we just continued to drive the car around town. It has progressively gotten worse and for the first time I was able to create the situation in the driveway. Just using a in line spark plug tester I was able to monitor the spark going to one cylinder. When the engine ran smooth the spark was fine and steady .... at times the engine would act up and the spark turned very erratic or sparse ... sometimes there was no spark at all and engine died at a idle. I now know without a doubt, it is a spark issue and not a fuel issue. The engine has a cam/crank sensors and 1 coil with 6 plug wires coming from it. I replaced the crank sensor twice and no change, same with coil, it has a new ASD relay. I feel more then I know, it is losing power to the coil ... I should have done more testing on it to prove it. I still do not trust the wiring harness where it cross over the exhaust ... at one time the loom came loose and got hot. With the extra wire harness I have around, they all have repairs in that area. On this harness you can see 3 wires have some black shrink tubing with a yellow stripe on it. A previous repair where the harness crosses over the exhaust .... other people have had wiring issues in this area ... I have another harness and it also has repairs .... My original harness so far has no previous repairs done to it. Everything works with no issues, except erratic spark going to the coil. In the photo is a plug and 4 wires for the coil, I will cut my coil wires out and replace with a different one all the way from plug to plug. I spent the day inspecting and looking at all the wiring and since everything but the coil is working right ... I'm just going to wrap it back up and put everything back together ... with new coil wires. I'm hoping that will fix it, but prepared to accept it wont .... I will not have to wonder about condition of harness because it is inspected.
 1 point
 -
Trans comes out fairly easy. Remove shift linkages, the driveshaft, disconnect/remove e-brake (taking it off gives you more room to work). 4 bolts hold the trans to the bell housing. NOTE - the trans is heavy. Have another healthy & strong person under there with you and don’t put any crushable or critical body parts between the trans and Mother Earth. A transmission Jack strapped to the trans can kee it from killing you. Since the doghouse is off you can pull it out the front, but the bell housing overhangs the crankshaft. You might have to pull the bell housing (and the pedals ) as one unit. If I remember right, 4 bolts hold the engine to the bell housing. Out of the truck, you should have the room to unbolt the bell housing, separate it from the engine and lift it off. Good time to install new , rear motor mounts. Ii it was mine, I would my damndest to unbolt the fluid drive in the truck. It is also heavy as hell and the ring gear will eat you up, so be careful. When you get it out and put it on the engine stand, be aware that engine stands aren’t designed for the flathead 6 - the engine will be top heavy and flip a stand in a heartbeat. And it is move than capable of punishing you, any helper, or random engine parts. One last observation I’m sure you are learning - you will do damn little to your truck that costs less than $500. It costs as much to rebuild the flathead as it costs to rebuild a small block Chevy… And you haven’t started making your wiring harnesses yet 🙂. Good time to make them and get them installed. Make the behind the dash wires about 12” longer so you have more room to pull instruments and the few dash lights. Note where each wire goes to the wiper switch, then from the switch to the motor. Take LOTS of photos and notes.1 point
-
So, the car is not running very well, is that it? I would not panic just yet. First, get it into a warm garage and do a regular "tune-up". Check the spark quality, check the points, adjust timing, dwell, idle speed (use a vacuum gauge). Make sure that the carb is clean, not flooding, and you have no vacuum leaks. And, yes, do a proper compression check (no plugs, throttle all the way open) just to see what you are dealing with 🙂1 point
-
Thanks to Tom I cleaned the downshift “carb solenoid” and it FIXED my issue of not downshifting when coming to a stop! Thanks to Yom and EVERYONE who gave me suggestions for fixing my problem! I appreciate all the help!!
 1 point
 -
I vote Just live with it 😊 Looks great Brad!1 point
-
Had to re-use the old tappets (after cleaning). The engine is back together, compression is back in existence, and the car is running alright, thus far 😃 Happy End!1 point
-
At some point the pulley width changed and I’m not sure what year that was. I believe it will bolt on with no problem though.1 point
-
Here is one method of mounting a master/booster in a 40. Just kind of took what was needed from the 2 assemblies and made it work to retain the factory pedal look.

 1 point
 -
How long ago was it running the last time? If you are not very mechanically inclined, you might want to invite a buddy, familiar with old cars, to get it going. Depending upon the current condition, attempting to start it might mess things up even worse. If you watch some of those "will it run" tube videos - do not do what those people are doing. Most of them are doing bad things, just for show. Since this is your family car, you don't want that 😉1 point
-
That particular area I always had a bad feeling in my gut about it .... I really would not be surprised if that is where the problem is. Because I plan to change those wires and fix other possible issues at the same time .... I will never know if it were those wires, or possible grounds or other things I fix.1 point
-
I believe that Then and Now Automotive can revulcanize harmonic balancers. P.S. I have moved this thread to the classified ads parts wanted area as this topic is not allowed in the general forums.1 point
-
I agree with the above suggestions, but just to ensure there are no surprises, make sure your transmission is in neutral, or at least keep the clutch pedal pushed all the way in.1 point
-
I've got the motor mount I think is right for a p151 point
-
I have a balancer but the rubber in it is shot. I don't know if there is some way to replace the rubber?1 point
-
You have a point. I was checked the torque on the steering box mounting bolts on my 51 and they were loose1 point
-
Try wiggling all the wires connected to the engine while it's idling (be careful!) and see if doing that makes a difference in the way it runs.1 point
-
That coincides with what I found when I unwrapped the engine wire harness from the 93 T&C I scrapped out - various wires were broken, or so nearly severed that contact might have been intermittent at best. (In comparison to the wire on my P15, the strand count for a similar gauge wire is much higher on the old vehicle. I wonder when vehicle manufacturers started using lower strand-count wire, and if it was a slow transition.)1 point
-
I wasted a ton of time working on a friend's 03 CTS...durn thing would randomly brick. Long story short, GM ran a ECM ground wire so short that the conductor strands pulled apart inside the insulator at a 90° turn around one of the heads without tearing the insulator...so intermittent ground path would lead to ECM shutdown. Ya might want to run some temporary grounds parallel to see if that might help.1 point
-
It still sounds like a corrosion issue especially with it becoming more prevalent. What does the ground end of those sensors look like. Chrysler grounded O2 and EGR sensors to a common ground wire eyelet in later years, separate from the main battery to engine ground. I'd suggest visiting a dealership, buying a ground wire distribution schematic and hunt their grounds down as well as an ignition schematic. Schematics are available online as well. Are you still getting the same codes? The computers probably have default settings that may allow it to run, albeit poorly when receiving erratic signals.1 point
-
hmmm...the sign does not say learn to drive well1 point
-
Thanks, but it looks like we're going to do the upgrade. Knowing the difficulty of obtaining quality rebuild parts now, it only makes sense.1 point
-
no matter the weather, no matter the location....someone somewhere is not going to be happy....this prediction is about as 100% as you can get.1 point
-
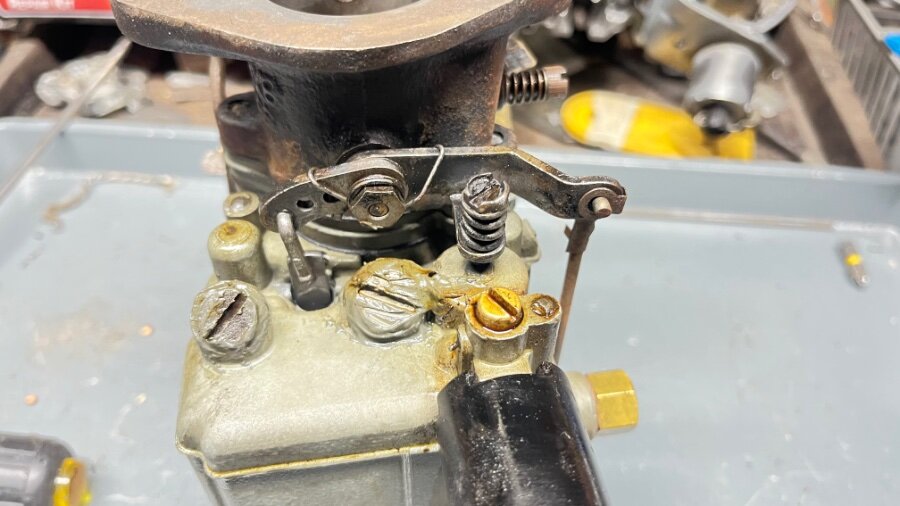
Pull the choke out about 1/2" and step on the gas once to the floor and release. This sets the choke butterfly. Then ignition on, press the starter and crank. If there is fuel in the carb bowl it should fire nearly immediately. Then as it warms up reduce choke to full open. If it seems like it wants to to stall give it a little more gas with the throttle control. If it's been sitting for a while and the fuel in the bowl has evaporated you may need to crank it first to get the carb bowl full again, then do the start sequence. If you are not sure how far to pull out the choke cable try it once without the air cleaner installed. You will se how it snaps shut with the first gas pedal depression.1 point
-
I'm no expert but I'd be surprised if the "clunk" on full lock is the kingpins, I'd think more likely its the steering box bearings and/or worm & sector......also as your 1937 plymouth steering box is mounted with a different arangement to the independant front ends from 1939 I'd also check the actual steering box mounting bolts and as it uses a drag link that moves forward & back also check it for any excessive wear or movement...........again I'm no expert so these are purely some ideas I've had sitting here in Oz 12,000 miles away.....lol.........andyd1 point
-
If stock you would turn the key on, give it a couple pumps of fuel, pull the choke, and then press the starter lever above the gas pedal. With that said being this old some of that could have changed depending on what people have done with it1 point
-
Holy cow, might be in jail! lol, what kinda operation are you Washingtonians running up there! If someone else doesn’t jump in I will measure the pulley I have tomorrow (no promises) as for the motor mount it’s probably not the same as what the trucks use. and next time let’s look for the ankle bracelets before we outsource our work 😂1 point
-
Nope, I'm not going down the fancy/original route. My biggest concern is parking, say in a tight spot which here in England is what you get in parking lots. Grabbing the steering wheel and muscling it is quite a workout.1 point
-
Gee I'm thinking about putting p245 in the front to match the Rears1 point
-
I don't think there is much to worry about as far as wear and tear. Skinnier tires will probably improve low speed and parking handling because they have a smaller contact patch with the pavement. I've read that bias-ply tires actually put more stress and strain on the steering and suspension components than radials, if so, then the components that were originally engineered for bias-ply would probably breathe a sigh of relief with radials. Story time - when I was working for the Border Patrol in west Texas, (early 1990's), we got a bunch of shiny new Ford Broncos for patrol vehicles that were delivered with radial tires. Border Patrol operations go through tires rather quickly. Someone got the bright idea that we could save money by buying a truck load of bias-ply tires to replace the radials when it came time. Bias-plies at the time being notably less expensive than radials. That idea drastically shortened the service life of those Broncos. Where usually a cruiser could go a normal 4 or 5 years of service with no major issues, just about every one of those Broncos had to have the steering rebuilt at least once, suspension components replaced, and they all developed body cracks. Only lasted 2 or 3 years. Moral of the story being that those Broncos were engineered for radials, running bias-ply tires destroyed them.1 point
-
The right tool makes the job easy https://www.ebay.com/itm/1854962528211 point
-
I always just push the panel in by hand and use needle nose pliers to insert the pin. It’s finicky but doable.1 point
-
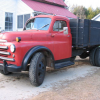
snow birds on the lot1 point
-
I always bring this up when people are working on the rear end. Check the vent and make sure it's clear. If it's plugged it will force the grease through the new seals and onto your new brakes when it heats up. I found this out the hard way when I had to replace the new brakes I had installed a month earlier.1 point
-
Been a couple weeks since a update .... I have been working on it when weather permits. I got hub caps from Hubcapmikes,com and happy with them Windshield wipers were a bit of a mess ... I finally got the parts and working wipers for way too much $$. I wonder if there is anything special to do with vacuum wipers? ... I saw where one person suggested ATF into the unit to lubricate them .... I dunno they work alright, but wonder if some maintenance can be done. Been working on the wiring and getting first class help from this forum, the best help anywhere period. Yesterday I finished up the wiring inside the engine bay, tail light wire been done for a long time. Today I worked on cleaning up the wiring inside the cab and the fuse panel .... All the lights except turn signals and brake lights are finished, connected to switches and harness is cleaned up .... The passenger side light is not on ... could be I damaged a splice or possibly the bulb is burnt out ... I have not checked it yet .... waiting for turn signals then will hunt down the issue. I have the wires ready for the turn signal switch and should be pretty simple to connect .... I'm just not happy with the used turn signal switch I bought off ebay a few years ago. Problem is the switch was rewired and the color of wires do not match original and it did not come with a proper clamp to connect to steering column ... I made one and it sucks, I do not like it ... A new reproduction is not that much and I have one on the way .... special thanks to @Young Edfor sending me good information a couple years ago ... My switch only has 6 wires, most have 8 or 10 .... the image Ed sent me that I thought was correct, has 7 .... I'm missing the main power wire that feeds the switch. .... So at this point, I will wrap things up tomorrow and Hound Dog is getting pushed to the side. I have parts on the way for it and not much more to do until they arrive .... I need to start working on the wife car again, I had sufficient time to cool off and not so angry with it ... It is time.


 1 point
 -
Congratulations on the truck and welcome to the forum. There is a wealth of information among the collective members and eager willingness to be of help. Granted the tank may need to be replaced with the years gone by, but it may make more sense to check out the engine attempting to revive it. Use the search feature. Changing oil, filters, cleaning carburetor, checking spark plugs and coil are all on the typical list. A good battery and a starter that works you can fire it up with a dribble of gas into the carb just to see if it will run...only for a moment. After that there are many things to check out before it is ready for the road. Also check some of the posts that have many pages, meaning they have been running a long time, and read them from the beginning. All of us have been there to start! And others will add to this meager advice.1 point
-
1 point
-
Glad to hear your thoughts on this. I stopped by the machine shop and his thoughts were the same. He was a bit perplexed as to how it could have happened. The machine shop owner gave me 3 options. 1) try to have it welded and repaired in place, 2) pull the engine, find a replacement block and he'll eat machining cost to get another engine going, 3) run it as it is and if there is an issue on the next year, revert to option 2. This is after I've sat on this engine for 2 years after they did their work. We'll hopefully fire it up this week.1 point
-
My$.02 is,I also would run it if I were into it as far as you are. Easy for me to say, I know, but I would.1 point