All Activity
- Past hour
-
1946 chevy truck 1.5 ton On Ebay https://www.ebay.com/itm/145911367961?
- Today
-
Sniper.........this is why I like this forum so much.......I don't need a heat shield, but your post of the McMaster standoffs link was things I did not know existed.........its nice to learn something new..........many thanks Mate............andyd
-
I agree, very unique. I have no idea that what I read was fact or fiction but they did say that it included a lighter. I believe that the bulk of it was to hold at least a pick of cigarettes lying on their side in an enclosed box that loaded from the top. At the front of it was a small bar that you would push down on it. Then a half cylindrical section would pop down and then one of the cigarettes would roll out on to that half cylindrical portion. All ready to fill the drivers lungs with cancer. 🤪
-
Not going to be of great help, but I did a Thickstun intake on my '54 last year while I rebult the engine and trans. Fair warning, My carb setup is very unconventional, but I went with a custom cable system that I made and did not use the shaft bosses on the intake. All the components are custom, and it works very smoothly. The cable is a generic motorcycle cable (read bicycle brake cable), but all other parts I machined and fabricated. I made the the remainder of the upper intake and all the flanges, brackets, etc. too. The carb is a Mikuni 44phh that I modified heavily to work and breathe properly with the 230. It's working at about 85% of really-good right now, but needs more finesse time to really get it tuned right. I still have to make the high idle cable lever system for the carb. This carb does not have a conventional choke/choke plates, so the enrichment and higher idle are achieved through a fuel enrichment/bypass valve. The high idle system will only be if I need RPM for something, like a future PTO, or just to make it work like it should. Sorry that last picture is sideways... The Thickstun manifold is very nicely made. I did also make some custom exhaust to intake flange stepped washers to get a good seal because of some thickness differences. It has dual Fenton style cast iron headers and a handmade stainless exhaust too. The NiCopp tubing is just a routing carrier for the cable sheathing. Both ends of the cable sheathes terminate in drilled and counterbored ball bearings so they can pivot smoothly as the throttle bellcranks go from one end or rotation, over center and to the other end of rotation without bending the cable itself against the end of the sheath. Maybe helps a bit? This was the most practical setup I found. It is the second iteration of it as well. The first was on the manifold side and looked really great, but it had more bends and was binding the cable a bit, so it got scrapped.


- Yesterday
-
Threaded standoffs might work https://www.mcmaster.com/91075A030/ Stainless https://www.mcmaster.com/93620A030/ zinc plated steel https://www.mcmaster.com/93505A033 aluminum https://www.mcmaster.com/92700A030/ zinc plated brass
-
Technically speaking, if there are no dedicated fuses then the wiring becomes the fuse. Not a good thing,
-

Head gasket sealant , recommended? Mopar Rtv?
spongebob replied to BayArea48Deluxe's topic in P15-D24 Forum
Reading this i realized that i never put thread sealant on head bolts that go into the water jacket. Why did i not know of this, as i have pulled and replaced many heads. never had any leaks that i know of. Just luck i guess. one thing i have learned is to get two head bolts that are extras , cut the head of the bolt off, and place one near the front of the block and one near the rear. Just thread them in a little way and they will guide the head on perfectly to the gasket. then you can pull them out and complete the job. capt den -

LED running lights and halogen headlights for my '47 Super De Luxe
Sam Buchanan replied to 46Chris's topic in P15-D24 Forum
Should work, the third terminal is for a dash indicator light. -

LED running lights and halogen headlights for my '47 Super De Luxe
EagleChief replied to 46Chris's topic in P15-D24 Forum
Related question regarding LED's... I'm trying to figure out ways to add some lighting to the rear of the car. Thinking about adding a light strip in the rear window, or the base of the bumper, the trunk lid - just something to add another set of lights to the rear. I even thought about using the gap between the fender and body to place a strip of lights there (vertically) instead of the chrome trim that fills that gap. What have any of you done to add lights? And also, if you have tried something like that, do these regular light strips (flexible LED strips) work on our systems, or do I still need to find some that are 6volt? -
LED running lights and halogen headlights for my '47 Super De Luxe
46Chris replied to 46Chris's topic in P15-D24 Forum
@Sam Buchanan question for you: reading the instructions in the above link, it appears this is a 2 prong. I'm guessing you have not yet received the flasher. I found a 3 prong 6v LED flasher on Amazon. Your thoughts? https://www.amazon.com/ZUNG-SUNG-0-1A-20A-Electronic-Flasher/dp/B0CR3X9T3D/ref=sr_1_2?crid=2Z3LV28PZLO1J&dib=eyJ2IjoiMSJ9.QUkCmacn5I4C7xYKvOVQPiUZKKToG-YWOpEiXa70QNmuMi79rBwn7QOZEGtKzxORZlPyKbJaGxkrpD7-m1GMfSciCKHOR9R5RYpQenUAm3ux0zT3Fzdk84Jxo-PR6ZDQXJ9JH_VasAYY9_Aa5ANm4ZGUhnnDX-sCgct3NFPcYXQ06tzWMRbaPj_8T1iXIXn8mjBL5sJCiWJuo0lpQfXO-Xro6HIQwKT3XvIgrRGppX4.T6kTnIuk4DOkJgGuGpbvMPVDfGY7Yd07AqplGLHedvg&dib_tag=se&keywords=6+Volt+LED+Flasher+Negative+Ground&qid=1722024586&sprefix=6+volt+led+flasher+negative+ground%2Caps%2C193&sr=8-2 -
since this was found near the door and side of the front set I would try to remove the bottom of the front seat and then check the brackets that hold the seat and allows you to move the seat forward and back or something with tilting of the back top half of the seat. This is just a wild asX guess. Rich Hartung Desoto1939@aol.com
-
I've read about the circa '42 DeSoto one (and I think there is a video out there about it); I recall it was mounted somehow in the steering wheel hub section, and was only a dispenser, not a lighter. Was the Chrysler one similar to this? I've never seen one in person, but I think it would be great to have for the uniqueness, if nothing else.
-

LED running lights and halogen headlights for my '47 Super De Luxe
9 foot box replied to 46Chris's topic in P15-D24 Forum
The flasher pictured is 68934 neg. ground. They sell a 84787 flasher for pos. ground. -
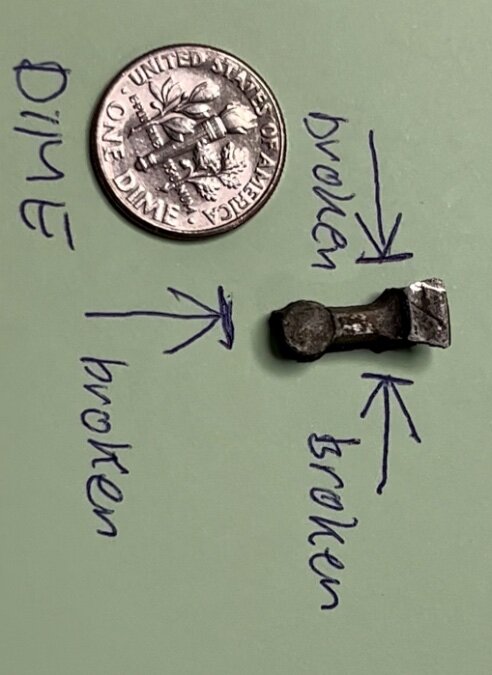
I'm asking for help in identifying this fragment. D19 3Window Business Coupe 1941 I found it on the passenger side on the carpet between the seat and the door. It has broken edges. Any idea? Thank you Joe

-

LED running lights and halogen headlights for my '47 Super De Luxe
GTfastbacker replied to 46Chris's topic in P15-D24 Forum
Two problems with a standard flasher relay. The LED will not have enough load to let work the bimetall inside proper. When you install a electronic flasher be sure it’s one for positive ground with the additional power wire. -
LED running lights and halogen headlights for my '47 Super De Luxe
46Chris replied to 46Chris's topic in P15-D24 Forum
Referenced also in later posts, but these are all 6v LEDs. Note, however, @Sam Buchanan's guidance on obtaining an LED flasher relay if you make the conversion. I'll have to order one, as the standard relay does not recognize the LEDs. Here's the link Sam provided: https://www.ledlight.com/flasher-cf13-6-volt-dc-led-compatible-3-terminal-150-watt.aspx -
LED running lights and halogen headlights for my '47 Super De Luxe
46Chris replied to 46Chris's topic in P15-D24 Forum
Sam, appreciate this info as I noticed the turn signals stopped working as soon as I installed the LED running lights. Many thanks! -
LED running lights and halogen headlights for my '47 Super De Luxe
GTfastbacker replied to 46Chris's topic in P15-D24 Forum
LED 6V in action Unfortunately my arms or legs were too short for a video of the brake lights … lol -
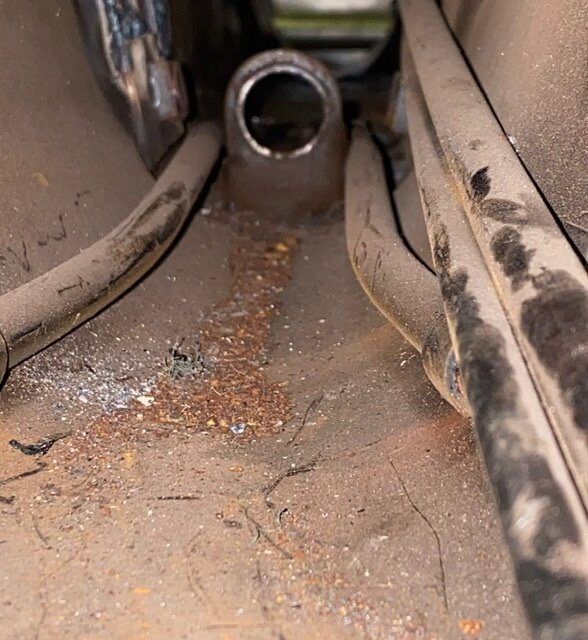
Today I finally got the accursed shifter rod out of the VW tunnel. The rod was shortened with a steel slug welded in. A bit. On one side only. ;( Clearly this was done while the rod was inside the car, perhaps because they had already assembled it all too far. The whole front suspension suspension adapter would have had to come off to get to the access port on the front of the VW frame. Or maybe they made it too long and had to mod it so the car would shift correctly. Who knows? The good news is that I have a new bushing and this good German rubber coupler assembly. Once the shift rod has been removed you can see even more clearance inside the tunnel. Also you see this little gun site which is where the plastic shifter bushing is supposed to remain. Because of the lumpy welding arrangement it simply could not happen and that was that. Looking inside from the back of the chassis I can see that there really is very little rust on the bottom of the tunnel floor. It is only superficial rust because of this drain hole that let the water run out back here. This is looking really good. After all of the vacuuming and hose washing and air hose blowing and more vacuuming and turning this thing practically on its head, I was very surprised to see that there are still some remains of mice nests inside the car. This is probably stuff that was caught in the seams and I vibrated it loose when I took a pneumatic muffler chisel to the steel.


-
LED running lights and halogen headlights for my '47 Super De Luxe
EagleChief replied to 46Chris's topic in P15-D24 Forum
Quick question on the 1158's... does that come as a 2-pack, or is that a single bulb? I don't see any info on that on their page. EDIT** Nevermind, I found the info I was looking for. I ordered a set to try out, including the flasher. -
I'm curious if anyone has any information about the post war Chrysler cigarette holder/dispenser/lighter. I understand that they came stock on the Traveler. I read that the Traveler didn't have an options, because Chrysler included every Chrysler option available from the factory. Is that fact or fiction? I did see a picture of one when viewing pictures of a '48 traveler online. But the picture was from a distance and it appears to be mounted on the steering column. Was it basically just a holder/dispenser, or did it also have a lighting feature on it? I'd love to see some close up pictures of it.
-
There is a very active group of Chrysler Corp cars in England. Robin Weathersby on this forum organizes couple events for the group. If he doesn't chime in to this thread, send him a PM. Welcome aboard, good luck with your project. Is the hood a 2 piece fold toward the center, or a the fire wall mounted assembly that opens from the front?Post up some pictures of what you are dealing with.
-
LED running lights and halogen headlights for my '47 Super De Luxe
martybose replied to 46Chris's topic in P15-D24 Forum
I would caution you to keep an eye on things like your dimmer switch. When I first installed 6V halogens a few decades ago I found the the oem bulbs were 30W, and the halogens were 60W, and both the headlight switch and the dimmer switch both started getting hot when the headlights were on. I eventually installed a 6V headlight relay to carry the load so that the headlight switch and the dimmer switch were only controlliing the headlight relay instead of carrying the total load. Marty -
LED running lights and halogen headlights for my '47 Super De Luxe
GTfastbacker replied to 46Chris's topic in P15-D24 Forum
I changed every single bulb for LED. even the headlight hi/lo beam. also I added a home made hazard warning light circuit. my car is bone stock 6V pos. ground. maybe I can upload a small video later. Joe -
 rickygill joined the community
 -
LED running lights and halogen headlights for my '47 Super De Luxe
9 foot box replied to 46Chris's topic in P15-D24 Forum
I looked at the taillight bulbs on my 46, with turn signals. The bulb is a 1154 that is Index style socket, not 1158 Bayonet. The front are probably the same, because I don’t have any 1158’s in stock. I would need 97465 for the taillight on my car. I have used the brightest 1129 bulb for my center brake light. I mention this for others that might want the LED bulbs, check the socket for pin orientation before buying. This is an old bulb download that I found. I’ve posted it before.


.thumb.jpg.d599d4c13e08899474e0348bd9baed3b.jpg)