


JBNeal
-
Posts
6,969 -
Joined
-
Last visited
-
Days Won
73
Content Type
Links Directory
Profiles
Articles
Forums
Downloads
Store
Gallery
Blogs
Events
Everything posted by JBNeal
-
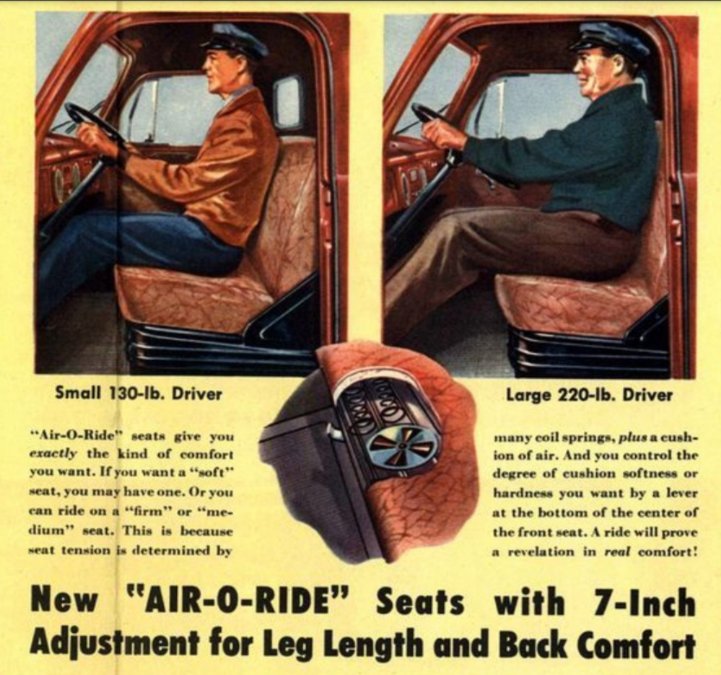
additional information - Air-O-Ride control tag
-
I did some work on the money pit recently, and had thought about doing a write-up on seat variations that I observed and findings that I had researched, but realized this is not a high priority topic for such in-depth analysis. The brief summary is that there are 3 basic seat designs that vary on seat spring design, bottom and back mounting, and the Air-O-Ride option, with optional seat padding, and upholstery colors that Bunn has adequately described. I could not find the part number in the parts book, but the seat control tag appears to be a B-1 / B-2 only application as the B-3 / B-4 cabs do not have the mounting holes in the header.. The 1948 Dodge Pilot-House poster shows the variety of improvements made for the B-series...here is the advertised seat detail: I have a few busted driver side coil springs that need repair, but studying the seat anatomies shows that there may be a way to fix these by moving coils around on the frame, kinda like flipping a mattress over. Oddly enough, coil spring design changed between seat designs, so I cannot really rob a B-3 spring to fix a B-1 seat or vice versa. Another small detail that changed was how the seat covers were held onto the frame. I made the mistake back in '05 by having a local upholstery guy recover the seat in the '49; he tossed the original cover remnants and used hog rings in place of the original frame clips. Apparently, the '48 bone seat cover was a kit from 1968 installed over the original brown; both have experienced excessive rodent exposure and need to be burned. Their anatomy of burlap and cotton padding match the advertisement and can be replaced with modern synthetic materials.
-
additional information - Reference additional information - Maintenance additional information - Tech Tips additional information - Enhancements
-
I have painted this water pump with Rustoleum primer + aluminum, ran it for years, still looks shiny ?
-
additional information - partial PCV conversion
-
The rear motor mount bolt should be 1/2 7/16" x 3-1/2". The bellhousing bracket bolts should be 1/2" x 2-1/2" but with a shank long enough to go through the casting and bracket. I was able to source what I needed from a local bolt supplier, but ya might need to get a longer bolt to get the right shank, may or may not need to trim off excess...or use extra flat washers as spacers.
-
Bondo is not for internal use, only for sheet metal repairs. If your pump backing plate is that rough, your impeller may be not far behind. Replacing that backing plate may be an option by fabricating a new one out of similar thickness steel. By comparison, Gates #42554 replacement pumps have zinc-plated backing plates to deal with this issue. additional information - water pumps
-
If ya have carbon accumulating above the tailpipe on the sheet metal, I believe that is burned oil or excess gasoline in the exhaust, but that looks like a haze and not a splatter.
-

Hello All. Newbie to flathead and forum
JBNeal replied to Bkelly401's topic in Mopar Flathead Truck Forum
That's one slick looking buggy...I don't think we ever stop working on these things, so enjoy the ride in between the tasks -
I enjoyed driving my old buggies around and would chew the fat with those interested in them...but I had to use my diplomacy skills on more than one occasion when approached by tire kicking vultures who were so enamored with my rides that they wanted to buy them, but only for scrap metal price, then wanted to make me feel bad when I balked at such a poorly negotiated low-ball offer. It was annoying, I got cussed at a few times by these a-wipes, but I kept my cool and stayed polite, even when I would tell them that their unsolicited offers would only make a fraction of the down payment for my licensed and registered rides. A couple of weeks ago I had 2 old blankety blanks roll up to the house, one was a self-proclaimed body man of 30yrs who wanted to buy the doors off of one of my trucks sitting by the house cuz his project had some rust damage to the skin...I tried to converse with that old bstrd about the project he was working on, but he quickly got short with me and stomped off before I could offer some spare doors I had at another location...bless his heart
-
Everything that I have read has pointed me towards 8:1 CR, 2bbl carb, split exhaust manifold for a definite bump in hp, as these improvements were noticeably done on later big truck flatheads...running a PCV setup with a 180°F thermostat helps keep engine compartment fumes to a minimum and reduce sludge formation, which kinda helps sustain those hp improvements ?
-
After the backing plate is removed, a flat bar with a hole drilled in it can be placed on the axle shaft, held in place with the axle nut, and a hammer can be used on that flat bar to knock the shaft out of the carrier...tho I believe the shop manual shows a special puller that threads onto the axle shaft and pushes against the axle housing flange. The tapered axles that I have dismantled had enough wear and were still lubricated so they came apart with little effort.
-
additional information - vintage jacks
-
if ya really want to save some big bucks, skip the lockwashers and tighten the nuts so that three bolt threads are visible, then hammer the end of the bolt to mushroom the threads out...that oughta keep that nut from going anywhere, and look at all the $$$ ya save
-
Start with the lowest pressure widest spread, working in small circles and back-n-forth manner to break the crud surface rather than trying to blast bug chunks off at a time...in other words, let the water pressure chip away at the crud, this keeps debris from going everywhere and any other damage that might result. Incrementally increase pressure / reduce spread to wear down stubborn accumulations. Preferably do the work on concrete, have a shovel on the ready to scoop up crud to fling at the bratty neighbor kids. Definitely protect yer peepers and feet, be prepared to strip down before stepping back into the house to prevent making a bigger mess. Water pressure alone works well on removing crud, the cleaners only work well on the last little surface films that are left after the big stuff is removed
-
I found a rim at a wrecking yard in '95 that was kinda beat up, like it discovered a curb at a cruising speed...formed it back with a 5# hammer as best as I could to make use for a spare tire. Its hubcap clips were intact, so I removed the rivets to re-use the clips on the rims that had broken clips. Ironically enough, the cardboard box of rivets that had been in Grandpa's toolbox since the 70s were the right size, Dad said those were used on the sickle bar for the combine grain cutting head. He said they would replace broken teeth with a cold chisel, 5# hammer and punch to remove, and set the rivets with the rail iron anvil with that 5#, all in the field if necessary. They make a tool to set those rivets without flattening the heads too much, but I opted to rig a die with some scrap steel by drilling the head diameter in one piece to attempt to set the rivet, and other pieces as spacers to keep the rim from bouncing around on the concrete. They came out OK, not show quality but look fine when covered with a hubcap and driving into town for a chicken fried steak ?
-
additional information - Marvel Mystery Oil
-
additional information - o-ring seals on oilpan seal plate Not wanting to dispute the replacement procedure, but I fiddled with this a few weeks ago to jog my memory. The timing cover does not need to be removed, but two (or three?) of the cover's bolts do thread into that seal plate so they have to come out.
-
Last week, I pulled an electric wiper setup from the '48 parts truck to clean up, and concur that the car setup pictured is similar in linkage and pivot orientation. Note that the linkages are not flat bars but have bends to keep the ends parallel but offset.
-
I looked in the B-3-J/K owner's manual and it has the same paragraph for dual wheels as the much smaller trucks, so I'm guessing that paragraph is more accurate for the larger trucks. Looked at my better 4-way wrenches, and they measured 18" across. Doing a rough calculation, if 200# was applied to the 4-way, the resulting torque would be 150 ft-lb. Older 4-ways usually measure shorter across, resulting in less applied torque. This falls in line with the other documented values cited. From what I recall from one of my elder engineering professors, foot-pound was used predominantly before the advent of the metric system, where torque is measured in Newton-meters. Doing a simple conversion to English units yields pound-feet. Either usage is correct as they derived from the same equation, but foot-pound can be thought of as the older or American presentation
-
On p.49 of the B-3-B owner's manual, it mentions that "wheel lock nuts should be tightened to a torque of 375 to 425 foot-pounds", with the same statement made in B-1 and B-2 manuals. In my opinion, that is extraordinarily high for the lugs and suspect of some kind of information mixup that was never corrected. The manuals have a list of specifications in the back that list air inflation pressures, but not lug torque. So I fall back on what I was told by several old timers when I was a kid: get as tight as possible with the 4-way lug wrench, since that might be the tool used to swap out the spare on the side of the road
-
The problem that I had with appliance paint on an oilpan was that it would chip, exposing bare metal that would eventually rust. I am in year 10 of my LPG tank paint experiment, and am still pleased with the results. This tank, mfd 1964, was covered with surface rust, and I needed to paint it outdoors as it was still in use. I followed the Rustoleum rusty metal primer instructions to the letter, applying 4 coats with a foam roller, wet sanding between coats, then 4 coats of Rustoleum aluminum, same technique...had to stop at 4 coats as the finish was blinding when the sun hit it midday. Sitting outside in the Texas sun near several oak and pecan trees, regularly decorated by mockingbirds having their meetings, and washed only occasionally, this tank still looks good, tho not as shiny as year one. I plan on using this paint method on most unseen parts as it is economical and durable, with a similar method on sheet metal.
-
additional information - spark plug wires
-
there may or may not be some salsa at your destination
-
Anchor bolt removal - 57 D100 - flathead 6
JBNeal replied to elane352's topic in Mopar Flathead Truck Forum
I have used a large crescent wrench to get more leverage on the bolt, then worked the nut back and forth to break the crud off the threads then clean off the threads. It probably would not hurt to tighten the nut back on the bolt and clean the threads with a steel bristle brush, lubricate with Marvel Mystery Oil and try loosening the nut again...probably will have to repeat this procedure several times. On old fasteners, mating surfaces have deteriorated, leaving more space for crud to accumulate, causing the threads to get in a bind with crud when trying to break them free after years of corrosion buildup.


