


JBNeal
-
Posts
6,979 -
Joined
-
Last visited
-
Days Won
74
Content Type
Links Directory
Profiles
Articles
Forums
Downloads
Store
Gallery
Blogs
Events
Everything posted by JBNeal
-
additional information - Pilot-House fluid drive general dimensions
-
I generally steer clear of other's projects because I've seen too many corners cut by guys wanting to flip for profit. Anything beyond stock makes me wonder what little surprises are hiding like little time bombs. Caveat Emptor ?
-
additional information - oil filters
-
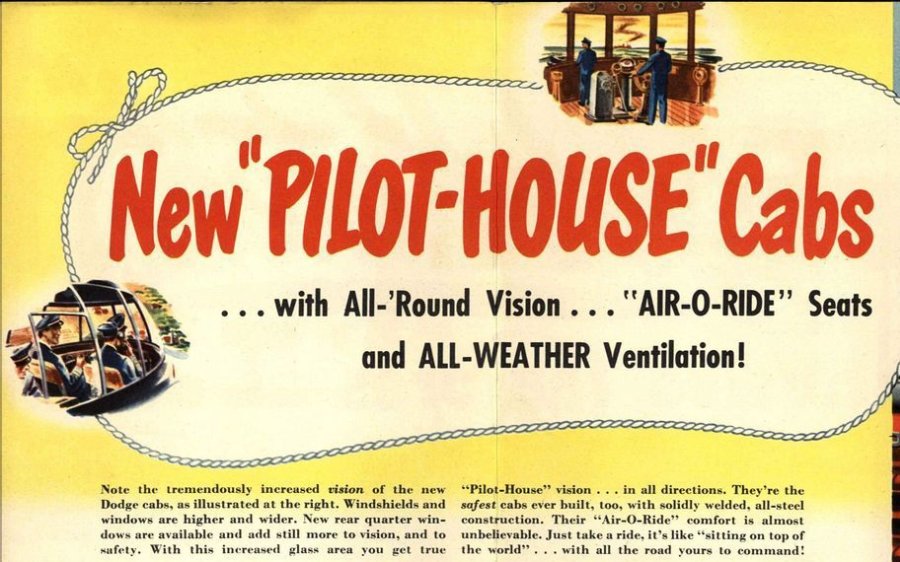
From my understanding of various pieces of sales literature and Bunn's books, Dodge truck salesmen were trained on selling to a customer's needs to maximize the customer's budget, which has become a lost art over time IMO, when sales are commission based and selling the most bells and whistles increases resale value blahblahblah which completely dismisses the importance of capital costs. This was the Dodge marketing approach as ford + gm dominated truck market share and salesmen had to chip away at that brand loyalty with whatever they could, from features to styling to utility...if a salesman could sell 11 Dodge trucks to a fleet manager for the same price the competition was offering for only 10, with the Dodge advantage of having only the options the fleet manager wanted, then the Dodge sale wins with rolling advertising in the streets to boot, cuz everybody knows 11 is 1 better than 10 Job-Rated was not only a marketing approach that was used for multiple model configurations, it was how the '39-'47 models were described, and it was on trim pieces from '51-'56. So Job-Rated could be used in some form for Dodge Trucks from 1939 through 1956. As for the term Pilot-House, I believe that this term was first used in marketing literature from 1948 model year, such as shown, referring to the new cab design that increased operator visibility forward and aft, which was used from '48-53. Even though the '54-early '55 cabs were similar, they were not referred to as Pilot-House trucks. additional information - 1948 Dodge Advertising Poster Confused? You're not the only one...yet another layer of confusion is what was happening with build cards. Without straying too far off topic, build cards for model years 1948-1953 varied year to year, which is the big reason why this important document for an owner cannot be readily deciphered with some kind of on-line database. So not only was marketing all over the map with model names, but manufacturing was "evolving" as to how they specified what they were cranking out of the assembly lines...even the leaping ram hood ornament changed part numbers when it went from being standard equipment to an option but the casting number was apparently unchanged When this website went through some changes a few years ago, I asked about correcting references on the main page and to the subheading to these trucks to reflect this original literature hyphenated nomenclature, which jived with the website's original address of pilot-house.com but that sorta hasn't happened yet. It's a minor thing but a unified approach to recalling historical documents helps avoid confusion. And apparently some identity confusion is part of Dodge Truck DNA to this day. It's been over 10 yrs since mgmt decided to call Dodge Truck the RAM brand for dubious marketing budgetary reasons. But local advertisers call them "Dodge Trucks", reporters call them "Dodge Trucks", parts dealers call them "Dodge Trucks", even the official Dodge new vehicle website has a link for Dodge Ram Trucks in their Vehicles drop-down menu
-
 I concur on the input shaft bushing and bearing wear...I had a Dakota 5spd that had a very similar vibration, but without any FD coupling. I could feather the clutch to get the vibration to go away at low rpms when in stop'n'go traffic, and it would disappear while on the highway. My thinking was that engine braking would help to force the input shaft to re-center itself, temporarily eliminating the vibration. With the longer FD input shaft, bushing and bearing wear that cause vibrations can be more pronounced. The droning noise also can be indicative of a worn bearing. Engine balancing issues would be repeatable at noted rpms as the only parts that could vary would be timing chain related, but that would produce a different sound as well as engine performance issues. The engine to transmission engagement is an area where there are several moving parts that need proper alignment for vibration-free operation. The variation here is the clutch, pressure plate and FD coupler, as anything out of tolerance will cause engagement issues. If there is a contact circle larger than the clutch diameter, that is indicative of a clutch that is sorta walking around in there as it is not staying centered.
 -
additional information - flathead starter performance minor upgrade
-
I found two complete 6V wiper systems in parts trucks, one I had to liberate in a hurry cuz that truck was 3rd next in line for the crusher (long story)...in my area of rolling hills and sudden summertime downpours, the vacuum setup just doesn't cut it. I've refurbished one 6V system (write-up pending) and was able to correct its age related deficiencies. Two speeds on demand is very nice, and the only indication that I'm running elec.wipers is the lack of a vac.hose going through the firewall...I consider this a safety device so it's like spending $$$ on seat belts ??
-
If your steering gearbox is not properly adjusted, then steering can be a handful to keep that buggy between the ditches.
-
I've heard rumors that some outfit has available a vacuum to electric wiper motor conversion...?
-
The flatheads should be interchangeable but you'll need to take a close look at the flywheel bolt pattern and teeth count.
-
Looking for 48' B-1-C bed cross-member dimensions
JBNeal replied to ketsair's topic in Mopar Flathead Truck Forum
additional information - B-2-C crossmember installation -
Links Directory updated with Coker Tire, Eaton Spring, White Post Restorations, and Burton L. Norton Company
-
Why not try some stainless steel in a can? ? https://steel-it.com/pages/automotive
-
I'm glad that ya avoided a crunchy disaster and got parts coming for a fun repair... but that stainless grille offsets all the blah with snazzy looks?
-
additional information - fuel tank spring details additional information - fuel tank frame flex springs
-
Sorry dude, ya didn't use a sarcasm font so your attempted burn is invalid...gaslighting to deflect that ya got p0ned by your own words--that's a great way to lead by example [/sarcasm]?
-
If ya can read and understand the content of my posts, the vast majority of information shared is truck stuff...I was under the impression that acceptable kidding around is part of the gig here
-
additional information - Links Directory
-
I have studied this problem over the years and have concluded that the flathead mechanical fuel pump falls into the category, that Dad explained to me as a kid when I asked why machines leaked oil, of a device that lets the bad oil out of the engine. He explained that ya only want good oil in the engine, so it was important to check the oil every day to make sure there was enough oil in the crankcase, and with the bad oil leaks out, to top off with good oil. He was explaining with reference to the various Briggs & Stratton and Farmall engines that I was being trained on but the advice stuck. That flathead fuel pump gets oil on the pin to keep it lubricated, and eventually that oil gums up with dust on the fuel pump body but doesn't completely stop the oil leak. Could this be sealed off as suggested? Maybe, but the flathead engine technology is concurrent with oil slingers, oil cups, and open lubricated joints to be serviced during lube jobs at the service station, years before contained lubrication systems were mainstreamed. Sealing the mounting gasket and mounting bolt threads can drastically reduce oil leakage at the fuel pump, but that durn pin may have been purposely designed to weep to keep oil passing over it. This weeping could be keeping contaminants from accumulating which could lead to premature wear on the pin and pump body.
-
During a recent outing to a small live music venue where a spirited relationship discussion was prompted when more than one gal was observed at different times leaning on me, the quiet guy standing against the wall, I raised a few eyebrows and elicited some guffaws from the guys by posing the question "who among us has thrown a fish back that jumped into the boat??" I keep my fireworks limited to Independence Day, New Years Day, and accidentally putting jumper cables on the wrong battery polarity I was going to write up something today on some work that I recently completed but hit a snag with a weather related hours-long area power outage that caused a few other problems that are ongoing...also, as it's raining cats and dogs this morning, 2 eldely neighbors txt me about mowing their acreage SOON...needlessly impatient much, fellas?? maybe I'll have something productive to share in a few days...
-
additional information - speedometer pinion seal replacement
-
I recalled the lug nut issue coming up a few weeks ago so I kinda got the gist of the OP question...I believe he meant to say "lug stud" instead of "bolt". I had not tried the modified bolt to chase hole threads but that sounds like a good idea as it emulates a tap but not as harsh on the threads...which is helpful cuz some taps are purt'near impossible to find or are $$$$$ that I'd rather spend on something shiny
-
additional information - safety rims
-
I'm in process of documenting this and a few other things that I'm working on but I'm holding off on sharing until I'm satisfied with the results. Not every fix I've attempted has worked so I only want to demonstrate working solutions. I've cleared a few time-consuming hurdles recently so I can get back to work on the old buggies for a little bit...unless one of my lady friends shows up with other ideas
-
A stiff steel bristle brush used for cleaning welds, worked parallel to the threads, could do a fair amount of cleaning...a small triangular file can be used to open up the starting thread on the lug stud to get lug nuts started, apply penetrating oil to lubricate the threads, and tighten by hand until binding occurs, then remove nut, clean threads with a rag, etc and repeat until satisfactory. The lug nut is slowly removing crud from the lug stud with this method, with the nut threads somewhat chiseling against the bolt threads. Using an impact wrench for nut removal is OK but running the nut up by hand reduces the risk of stripping threads.


