JBNeal
-
Posts
6,979 -
Joined
-
Last visited
-
Days Won
74
Content Type
Links Directory
Profiles
Articles
Forums
Downloads
Store
Gallery
Blogs
Events
Everything posted by JBNeal
-
originally, the manifolds were painted aluminum (silver) from the factory, but those castings were clean. Rust removal through electrolysis or Evaporust could prepare the metal surface for adequate coating adhesion. Also, these flatheads were low compression designs so I would be surprised if exhaust manifolds exceeded 500°F. If your header paint does not require a high heat primer, then stick with the paint instructions to the letter...I have found those instructions are your guide for best coating performance.
-
Dodge trucks upgraded to 12V in '56, so your gauges shouldn't need an extra voltage reducer. If the sending units you are using have a mismatched resistance range than the gauge, then the gauge will give you readings that won't make much sense. additional information - fuel level sending unit resistance ranges
-
the starter is easier to remove and install if'n your floorboards are removed additional information - starter ground performance upgrade
-
the FARGO dash emblem says it's a 1953 model
-
if ya really want to remove rust from the casting, remove all guts and externals so that the bare casting can go through an electrolysis treatment or evaporust soaking
-
Screenshot or it didn't happen
-
I have a '48 B-1-D-116 that the powertrain is kaput, so I've looked at options for this pie-in-the-sky project that has a half dozen other projects in front of it. The short answer is look at what the Power Wagon guys are doing for modern highway speed and braking
-
This oil pressure gauge appears out of calibration as it does not read zero with the engine not generating oil pressure. However, the pressure range that gauge is displaying appears consistent with the pressure range of a normally operating engine. From what I recall, the oil pressure gauge operates from direct oil pressure from the engine acting on a flat copper tube that is formed in a curve, acting like a spring, so that increasing oil pressure tries to straighten the copper, and the copper returns to its formed shape with decreasing pressure. At the end of this copper spring is a rod that contacts the gauge pointer mechanism. On my '48, its oil pressure gauge was not reading zero with the engine off. So I massaged the copper tube with my fingers and thumb carefully to make the gauge read zero with no oil pressure applied. This is a delicate operation so great care must be used when handling these parts. Once I made the gauge read zero at no oil pressure, the oil pressure gauge showed that the engine was operating at normal oil pressures, just as the shop manual listed. I verified my oil pressure readings with a new replacement mechanical oil pressure gauge that I bought at the auto parts store, made in Taiwan with a nylon pressure tube...my assumption was that the new gauge had been calibrated, and once my original gauge matched the readings of the new gauge, I assumed that my original gauge was then calibrated also. Generally speaking, the oil pressure gauge is only used to get an idea of engine operation, so it does not have to be accurate in pressures measured as much as the range of pressures measured.
-
additional information - rear axle breather bolt
-
that oughta buff out
-

1949 B-1-D 1-ton Pickup Value
JBNeal replied to akill's topic in DPETCA - Dodge Pilothouse Era Truck Club of America
Having a working key and a clear title can seal the deal for quicker sale...having gone thru the bonded title process, I would rather have a colonoscopy ? -
Miatae ? That's a sweet buggy ?
-
Wheel bearing grease works as long as brand and type remain consistent...I have a plastic knife from a restaurant take-out pkg that I dip the tip into the grease can and feed into the hole...when grease starts to come out of the hole, it's full ?
-
additional information - spark plug wire sleeve repurposing
-
Onward and upward...may the next chapter be more enjoyable than the one before
-
The Gallery feature may have changed a little bit since I opted to try photobucket in 2015. I had removed pictures in the gallery to clear storage space, but this picture appears to have been corrupted and I cannot find a way to delete it: when I try to insert the image URL, the window will not accept it and I cannot insert the picture. My memory is a little fuzzy, but I think this was what I ran into when I decided to go the photobucket route. What I was going to try to do was upload several reduced resolution pictures into an album and replace the same pictures that I have in my attachment quota. This would be a preliminary step to organize pictures in the gallery, reduce duplicate pictures in my attachment quota, and remove my photobucket pictures linked on this site in order to get off of photobucket altogether.
-
51 B3B build thread - after all these years
JBNeal replied to bkahler's topic in Mopar Flathead Truck Forum
that oil filter sure could use a big yeller sticker on it Are ya gonna fill the cooling system with tap water to flush out the assembly crud and act as a hose clamp leak detector? -
Were 1955/56 Dodge trucks 6 volt or 12 volt?
JBNeal replied to bkahler's topic in Mopar Flathead Truck Forum
According to Bunn's book on the C-series, 12 volt systems were standard for the C-3, which started in September 1955...the '55 C-1s were introduced in April 1955. -
51 B3B build thread - after all these years
JBNeal replied to bkahler's topic in Mopar Flathead Truck Forum
While removing wiper switches, I saw remnants of this similar gasket and thought that I could make my own from the smooth parts of a plastic milk jug...it's cheap, more durable material than the original, but slightly thicker. -
After seeing a variety of failures in several different kinds of engines, I am a strong proponent of flush + coolant renewal every 3 yrs, regardless of mileage. The coolant pH changes over time, causing damage to gaskets and castings etc. If it's time to flush coolant, then ya can readily inspect that head bolt for corrosion and apply fresh sealant. If the head gasket had a small leak, that could account for thread sealant erosion and the fluid observed.
-
10th Annual International Work On Your Truck Day!!!
JBNeal replied to 48Dodger's topic in Mopar Flathead Truck Forum
Since I've spent several previous IWOYTDs doing chores, this year I decided to be more proactive and get some work done in the evenings in case I got swamped with chores again...yep, we've got weather moving in so I gotta do blahblahblah on IWOYTD again... This year I opted to remove the electric wiper motor et al from the '48 B-1-D-116 parts truck to refurbish and install it in the '49 B-1-D-126. The '49 originally had a vac.motor, but I had a '53 parts truck with electric wipers and somehow made that work back in '05...something that I need to figure out how I did and document for future reference, because I vaguely remember that it took some finagling to get the wiper sweep to work out right. I took many pictures disassembling the crusty '48 wiper motor, cleaned it all up, inspected the innards, then started putting it all together when I realized how important it was to scribe an indexing mark on each crank, cuz I did not do that simple step and it took waaaaay too long to get things back to what they looked like in the pictures. I ended up pulling the wiper motor out of the '48 B-1-B-108 to compare and eventually refurbish that, and what I found partially explains why that truck's wipers seemed out of synch. I then went into my stash and found the electric wiper setup I liberated from the '48 B-1-D-126, but it appears to have been shut down in mid sweep, so I'll have to look into that one further to see how it is indexed. Of the 4 spare B-3 / B-4 wiper motors I have, none are indexed the same, one has longer crank arms, and another appears to have stripped gears. So now I'm thinking I need to pull the electric wiper motors from the '51 B-3-D-126 and the '53 B-4-B-116 to see how they were set up. While trying to refurb the electric motor, I realized that my Radio Shack and Bernzomatic soldering irons had bit the dust. Found a replacement Weller soldering iron, but haven't gotten around to trying it out yet, maybe in a few days when I get caught up on springtime chores. So what started out as a simple electric wiper motor refurb is now shaping up to be another reverse engineering project on two varieties of electric wiper motors that I was eventually going to get around to doing...and I'm not complaining one bit, cuz any time working on the old trucks is a good time indeed ?
-
The shop manual service details a major tune up that includes re-torquing the cylinder head when warm. It is possible that the head gasket has compressed due to heat cycling and the re-torque will improve gasket sealing. OT I diagnosed a faltering passivation device as the pressure vessel was literally losing steam very slowly which led to copper tubing being burned instead of being cleansed of impurities...the PV had metal alloy gaskets that I found from the gskt mfgr had usable thickness specifications; once the gasket had compressed beyond specifications, then it was to be discarded. Ultimately, I cleaned the PV, torqued the heads, and it was back in business, increasing yields from 25% to almost 100%, and increasing throughput by 500%...a week after I got that contraption back online, I got my pink slip...according to my former coworkers, I had stepped on some big toes by solving that problem in a few days that mgmt had not been able to address for years before I was hired, bless their hearts
-
additional information - body tag deciphering additional information - truck frame number
-
Change split tire rims to standard rims
JBNeal replied to ernie delgado's topic in Technical Archives
additional information - rim replacement -
51 B3B build thread - after all these years
JBNeal replied to bkahler's topic in Mopar Flathead Truck Forum
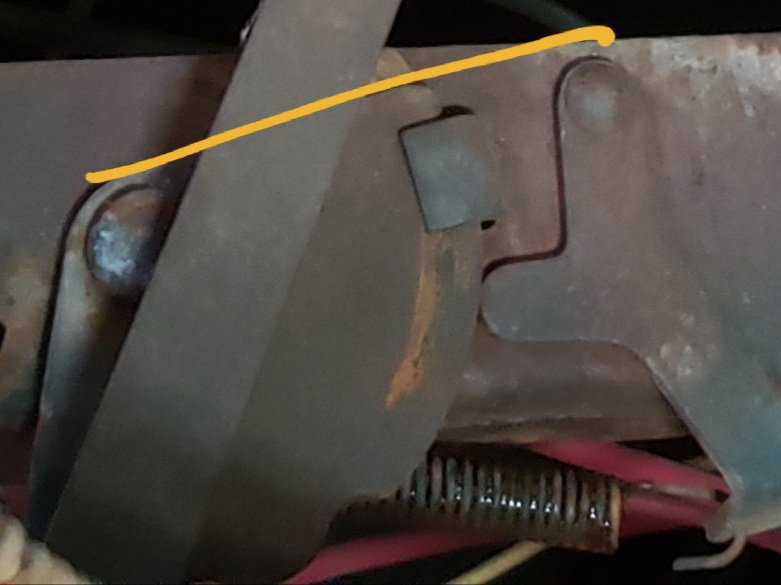
I was doing some work in preparation for IWOYTD and thought I'd check out a few things on the functionality of the vent door. I looked at the '48, '49, and '53 to see if there were any variations on the design and they all appear to be the same. The '48 works almost flawlessly, and when I put the vent handle in the shown position, the door is completely closed...any further movement of the handle to the lock position is unnoticeable on the door. I added the yellow reference line to show the relative position of the handle mechanism when the door is in full contact with the gasket. The '49 has an imperfect door operation, as I'm guessing from the amount of West Texas grit I scooped out of the cab when I rescued it in 2001, the door would get jammed up and extra oomph was required to open/close it, causing the handle parts to flex. With the door in the closed and locked position, I can flex the handle towards the passenger and driver sides when trying to unlock and open the door...this causes the door to partially open like your shown door, at its outside edges but not so much at the center. So ya might have some tweaked parts that are causing misalignment issues, including the door itself. I took several under dash pictures in the '48 as it has no heater and the rats ate the glovebox years ago, so access is less restricted, and it was still quite awkward to just get pictures, let alone massage tweaked metal back into conformance. One thing I did notice that might be helpful is to grasp the vent handle where it is spot welded onto the lock mechanism while on the bench seat, you might be able to see enough movement in the door to give an idea of what way to go with the massaging, or might be able to muscle the door into conformance from that position.