Leaderboard
Popular Content
Showing content with the highest reputation on 04/13/2021 in all areas
-
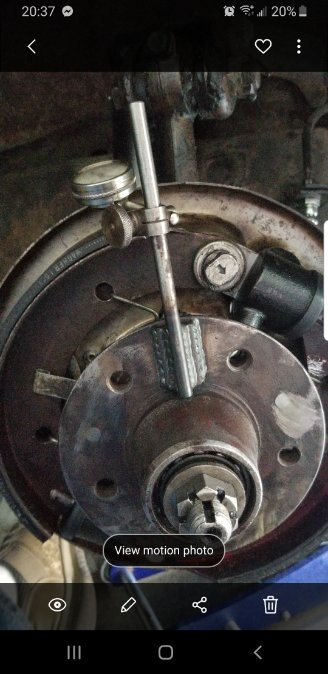
After fighting with my brakes for too long I opted to try my hand at making a tool. I found two rusted drums and removed the center hubs. I had a "arm" welded on to mount a dial indicator. I installed the drum and adjusted the minor adjustment untill brakes drag. I then removed drum and used dial indicator to locate highest point. I then adjusted brakes to that high point. I sure hope it works this time!! I am not opposed to purchasing the correct tool. I just cannot locate one!!4 points
-
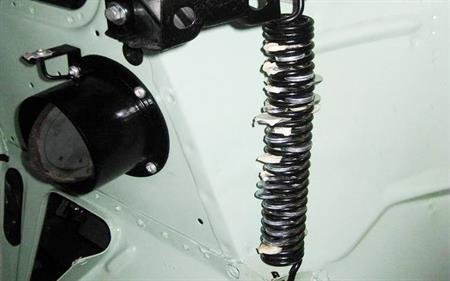
Nick, Congratulations on the progress on your car so far. Nice work! The trick that I have used in the past to install hood springs is this: Get a BUNCH of thick washers and insert them, one each in between the coils of the spring until the spring has been lengthened enough to install. After the spring is in place, pull down on the hood to put tension on the spring and release all of the washers. Now this is VERY important...make sure you loop a piece of string or wire through all of the washers, and tie the ends together. This will keep all of the washers from flying off into all directions after you release the spring tension. Take a look at the picture, it will give you an idea of how this method works. Good luck!3 points
-
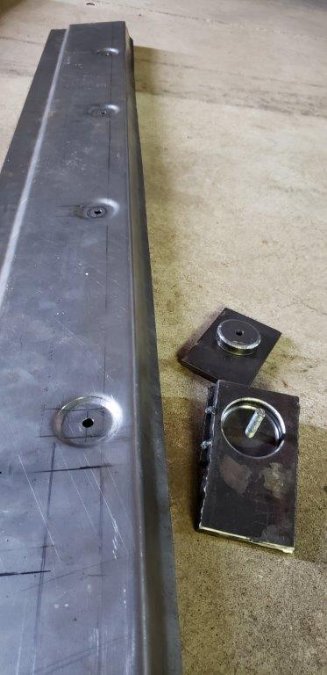
I know you guys probably get tired of seeing me post here, but the learning experience for me is so exciting and frankly there are so few people of my generation that are interested in these things that this forum is one of the few places I can show and get genuinely interested and supportive replies. I digress. Took the Sill to the local shop for their hydraulic press to make the sill dimple things. Didn't have one myself plus they are good family friends, retired, and more than happy to help me with this. Always great to bounce ideas off of others. Super pleased with the results. Came out fantastic. The doodad I made was with the hole saw worked well. Welded a plate with a bolt on it to line it up center. Just pressed it until the depth looked right. Need to get a 13/16 bit to drill out the center holes to fit the rubber grommets. Are they still making the rubber grommets for the sill?3 points
-
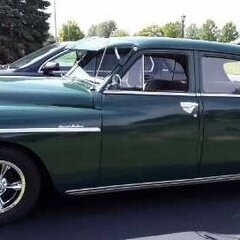
4-13: Here's the license plate that I originally wanted to use. But it has all numbers, and the state doesn't allow that. Minnesota requires at least one letter for the year of manufacture plate. Needed a little change so I put the plate on. Not even worried about the cops ?2 points
-
2 points
-
1 point
-
keep the whacky weed......nothing like the smell of bondo in the morning....1 point
-
show up at my house....I'll give you the chance to reek to high heaven.....!!!!! Plenty to do in Elko.....pick your poison, cutting/fabricating.....welding.....stripping (paint only please) sanding/grinding, painting...engine work....just about anything and more...even let you pull weeds, mow grass...cut firewood and tend the garden. Food is good, coffee better the best you can get, may even bake a pie.1 point
-
It's all good. I could have it mixed up as well but here is what I recall. Also glad to hear there is a member so close by. The bars on old Skokie rd were called "Down the Street" (country) and the other was called the "Night Gallery" (Rock). There was a third bar there also but it had burned down, I think it was called "The Mouse Trap". I worked the door at the Night Gallery up till they closed around 1980. It was later reopened as Blue Suede Shoes (50/60s music). The man that owned the Cheetah I club on 137 and 41 also owned the Cheetah II club on 173 and 41. When he passed the club on 173 became the 41club if I remember correctly. I'm on the north side of Waukegan in the township off Greenbay rd. used to stop in on some friends at the custard shop in Zion when they were doing their cruise night.1 point
-
Got Ol Bessy up to VA. First Dad has seen her together and first drive in nearly 40 years. After watching, you'll understand why we went with a 1st Gen Chevy V8. Dad will be 82 soon. And She is now the way he always wanted her........sometimes it takes a life time to get there. https://www.youtube.com/watch?v=SfrYDCttGW8&t=3s https://www.youtube.com/watch?v=kSnIt0hSwvU&t=11s1 point
-
Your idea sounds as though it should work. I am hoping I have better luck with this than I had the last--too many times!1 point
-
That's a great idea, I may cook one of these up. My idea, which is far down the list of things to do, is to take a piece of aluminum bar stock, have a machine shop bore a hole at the end large enough for the spindle to fit snugly. Cut a slot perpendicular to the width at the top, with a bolt threaded through it, parallel to the sides, so I can clamp a small engineer's square in the slot. For measuring the drum, I already have a big a$$ vernier caliper that I found cheap on ebay. I do wish those Ammco units were cheaper...paying $600 for that thing with missing parts makes my eye twitch.1 point
-
1 point
-
Love seeing your progress. I'm going to start tackling my floors this summer so am learning from your posts. Looks great!1 point
-
Someone else has been making them as well. Might be keithb7. You might ask him.1 point
-
Thanks, hope it gives you a couple of ideas!! I will see tomorrow if it worked!!1 point
-
Nice work! And thanks for sharing. I have been wanting to make my own tool for that as well, but had not imagined it the way you made yours. Brilliant...1 point
-
1 point
-
NICE WORK & should give desired results just fine. There are many specialized tools they should be bringing back. The leaf spring greasing rig immediately comes to mind.1 point
-
1/2"-20 = 55-60 ft-lbs, w/ greased threads. Fine threads require less torque than coarse thread to achieve the same clamping pressure.1 point
-
That doesn't impress me. Now if you had bought them in 1978, that would be more like it. If you want to join the Procrastinators Club, the dues are $50 a year which includes a full color newsletter that comes out bi-monthly! But as I said, I'm still working on the May-June issue for 1993. I haven't heard any complaints, but then I haven't received any dues either.1 point
-
Can't speak specifically about our older stuff but I used to Armstrong the 5 speed in my Daytona, the 3 speed in my 300, the 4 speed in my Diplomat and various automatic over the years. But that was decades and one triple bypass ago. I would at least buy/rent a transmission jack these days.1 point
-
I have never failed to remove a main cap by hand using the bolts when backed out and rocking it gently using the bolts as small levers...1 point
-
If it's running rich enough to stink, something's wrong with your fuel delivery system. Incorrect carburetor. Incorrect float setting, stuck step up valve, restricted air supply, late spark delivery, low compression, to low operating temperature, incorrect spark plugs, insufficient point gap, insufficient dwell time, weak coil, inefficient spark put wires, restricted exhaust. Get those sorted before adding stuff that wasn't originally engineered for the car.1 point
-
1 point
-
Well, the transmission is a bit heavy to be handled You laying under the car. Work is easier while standing and beeing able to hold the trans with an appropriate stand. In 2001, I had the propeller shaft installed inversely. Although beeing symmetrical, the shaft has a direction and the mechanic did not find my "front" sign. Having driven at city speeds since then, I realised vibrations only at Autobahn speed en route to the autotrain station. I had plenty of time before train departure into our holidays, so I turned the shaft on the parking ground (overall, protecting gloves, tools, light- everythig is always on board). Besides the comments of wife and daughters and having the possibility to wash me up later, I really don´t recommend to repeat even this simple action, even with the car raised on stands. So my advice: You better rent some shop and carlift hours, if You want to do it Yourself. And You better use the alignment tool - other approaches are very difficult! Good luck! Greetings from Düsseldorf! Go1 point
-
I buy these old beauties to “Work” on them what fun would an old car be if all you did is drive it? I want to reek of gas, grease and engine oil after a session of cussin’ and fussin’....lol. I’ll pass on the eau de huile pour d’engrenages brulee pourtant!1 point
-
yes, did that this past fall with my 51 Plymouth. Here's the link to the alternator swap I did, some say there is a 12v generator that fits as well, but I don't care for generators. Alternator is from an 87 Dodge Diplomat, 78A unit. I used the same regulator and wired it up like it is in the Diplomat. http://www.yourolddad.com/12-volt-conversion Of course all the bulbs will need to be changed to 12V units, I went with GE NightHawk LED headlights and took whatever I could not cross online to NAPA and asked for a 12v version of the bulb and they set me up.. Link to the rewire job I did, shows the headlights. http://www.yourolddad.com/rewire-it You will also need to replace the coil with a 12V one and run a ballast resistor to control the current through the points. Standard 12V Mopar coil and ballast used. You can see the voltage regulator and the ballast in the rewire link. I replaced my starter solenoid with a Ford 12v one that also has a S terminal, this will supply 12V in start mode which you will wire in to bypass the ballast in start feeding the coil full battery coltage, this helps compensate for the voltage drop caused by the starter drawing large amounts of current. I did not keep my stock gauges, I went with Autometer gauges but only the fuel gauge and ammeter are electrical and the ammeter doesn't care, not sure how your fuel gauge would work. You could use a 6v dropping resistor, I never tried that so I have no info on them. http://www.yourolddad.com/gauge-upgrade Kept the stock 6v starter, works fine on 12v. Any question, ask away. Someone will know.1 point
-
Camera technology has come a long way in the past 50-60 years. I have had a camera poked into every possible hole in my body. Last one was done last week with a camera stuck down my throat into my lungs along with a Brillo pad to clean my white walls. A few months before that a camera was poked into a small hole where stuff normally comes out. I am awake looking at a computer screen and I hear the nurse say hey look, there is your prostate, it looks good. I would have enjoyed it much more if the nurse would have said hey it looks good before sticking the camera into the hole. I also have what is called a port. It is an implant in my chest with a line that goes directly inside my heart. The port is used for drawing blood samples as opposed to an IV and I had a camera inserted in the port to take pictures of my heart. My point being I have no desire to use a camera to check my valves.1 point
-
I did a similar valve set video this summer past. I posted it in another thread. Thought I should maybe put it here for the technical archives. https://youtu.be/aameeYT7SXQ1 point


