

Los_Control
-
Posts
4,699 -
Joined
-
Last visited
-
Days Won
35
Content Type
Links Directory
Profiles
Articles
Forums
Downloads
Store
Gallery
Blogs
Events
Everything posted by Los_Control
-

Way off topic 1993 caravan transmission
Los_Control replied to Los_Control's topic in Off Topic (OT)
So I bought the cheapest used motor I could find Pretty amazing how prices fluctuate on used motors from one wrecking yard to the next. carpart.com I found them from $145-$650 and a rebuilt for $2k. All of them were 3.5 hours one way or more to go pick up. I called a local yard 1.5 hours away, asked them. They had 1 for $350. Cool, how many miles or compression check? He just laughed. "Son I put that motor in the shed 8 or 10 years ago, I got no idea about it ... Must have been good or would not have kept it" I offered $250 because it been sitting 10 years & he accepted. So thats what I am working with. The yard owner pointed out the pan was leaking, looks like they bumped the drain plug with the fork lift ... thats fine, looks like a easy fix pull & weld or replace with mine. I wanted to get a reading off of the plugs. Dang things are just too new to get a good reading other then it does not show anything bad. While I would change the 02 sensor while out, is just as new as the plugs. I have been soaking the cylinders with oil and turning it over daily for a week ... It has good compression, it will run but have no idea about it ... Trying to not go down the rabbit hole and rebuild it ... Just accept a $250 motor and run it .... but while it is sitting on the stand ... just how far do we go?

-
Way off topic 1993 caravan transmission
Los_Control replied to Los_Control's topic in Off Topic (OT)
Think what I really meant was, I was a idiot for letting the wife drive the car before I changed the cam sensor. Oh well. Been doing some more thinking about it, Yes I did have a code for no signal from cam sensor. That was after the crank sensor failed ... seems natural would also be no signal from cam ... After getting it running I needed to clear the codes and then check again to see if the issue was still there. In my defense, I already had a new cam sensor sitting on the bench, wife was happy to have her car running and asked if I could wait a few days before working on it some more. Giving it more thought, the van has just under 190k miles on it. If the timing chain was getting stretched, the computer would compensate and adjust for the timing fluctuations. Hiding the symptoms. When it did the dance, was always around town when you are letting off the gas pedal and coasting. Under load it did not dance it ran great. Sooo, wife cruising 75mph speed limit, creeps up to 80mph ... lets off the gas ... computer trying to compensate the fluctuating timing, kap0w! I have a 3" hole in the side of the block. Thats my best WAG until I get the motor out and look closer at it. -
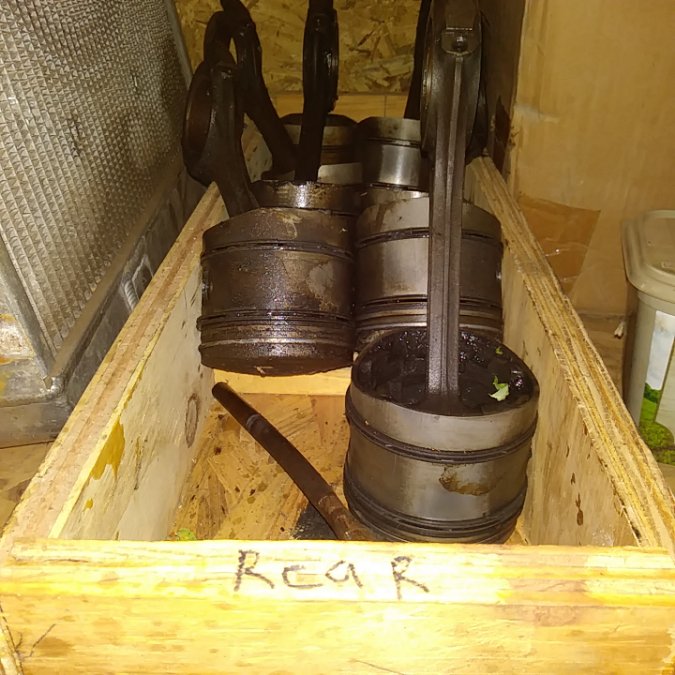
As others have said, label everything. Not high tech but works for me. Put the lid back on the coffee can & set it on a shelf, you can come back to it years later and know where everything goes. Here is how I stored the pistons for the engine. We all love a good laugh Just saying there is some order to it, the right rear piston is for the right rear cylinder. Don't do what I do! Would not take much to improve on my system. This particular engine is a 1951 Ford flathead V8. I have zero use for it and simply dissecting it and putting it away for future use. So the more oil on the pistons are good. May be 5 years or never before I put it back together. For now the pistons live in the attic of my garage. I just think it is important to try and keep some sort of organization while disassembling. While we all have the best intentions, sometimes life gets in the way and takes longer to do what we want. When I was a 30 year old kid I could rip the heads off and clean it up and put it back together in a weekend, driving it to work on Monday. As we get older we get more responsibilities. I never bagged & tagged anything when younger. Just amazing how quick our priorities can change. You own a house and you need to take care of the roof or the plumbing ... your project priority just got pushed to the back of the line. Blow up the engine in your wife car & see how quick your priorities change. We just call this life. bag & tag everything.

-
My truck is crapping on it self.......ideas?
Los_Control replied to Jeff Balazs's topic in Mopar Flathead Truck Forum
Crazy idea just a weird problem ... is it possible a critter moved into your exhaust and is now plugged up? -
Sorry for your loss Paul. We all know the body will slowly deteriorate as we get older. I hope the implant works for you. While I have bad hearing I can't imagine what it would be like in a silent world. Trying to make lemonade out of lemons, You still have friends here and can communicate through the internet. As my Uncle reached his older years it was his eyesight that went. In his 80's and good health. He was no longer independent, could not drive , He kept up a good front and showed a good attitude and always told you a joke ... He really did give up on life though at this time. If I live old enough to lose one or the other, I would prefer to have eyesight over hearing.
-
Paul I do not think it is the distributor. The 1987 Ford had a carburetor but it did not have points. It was electronic. I think the principle is proven when drag cars go to the track and the weather or humidity really has a factor in how well the car will run that day. We fine tune the air/fuel mixture but when we live in a area where the altitude changes the lean/rich on your carburetor also changes. Denver Colorado is touted as the mile high city. Fact is Albuquerque is higher altitude ... by a few hundred feet, Santa Fe is higher by a few thousand feet, Denver is recognized as mile high city because it is exactly 1 mile high. It is not the highest. So Cruising around New Mexico in a old car you will find carburetor issues. @pflaming how is your move going? Hope it is smooth.
-
My truck is crapping on it self.......ideas?
Los_Control replied to Jeff Balazs's topic in Mopar Flathead Truck Forum
Jeff I pray you get a full recovery and I love your truck .... Sometimes when troubleshooting is best to start with the last thing you changed. You say it was running fine. Then you went to work and it was not ..... Quit working and see if it runs better -
New Mexico is tough on cars with a carburetor. Albuquerque is over 5k feet altitude. So you tune your car to run with that spec. First time I drove to Santa Fe I fouled 4 spark plugs and had to limp home. It is over 7k feet. Just driving to the edge of town in the Sandia foot hills the altitude changes 500' and affect the way it ran. Go south of town and you drop down to 3k feet altitude. This was with my 1987 Ford work Van with a 351/C6 trans .... 500cfm Holley 4brl. It ran great around town, but the constant changes in altitude messing with the air/fuel ratio was murder. I just suspect your friend was fighting the same issues, not really under powered but fighting altitude issues. Northern New Mexico into Colorado is beautiful country.
-
I had to break out & laugh about that ... really is true though. Most of the gauges etc do not care ... mainly the lights. I think the radio is the biggest problem.
-
I probably not the right one to reply for your questions ... 1, I live in West Texas and no liquid ice removers on the road to worry about. 2, I also thought it was too shiny after it was first applied. Thinking this is why GOD created mud puddles. 3, I am just not particular about things that in my mind not worth worrying about. When you put the bed, fenders, tires on ... you will only see parts of the frame ... the sun will not reach it and turn it gray. It will be protected. Drive it some and the gloss will disappear. Personally I am fine with the gloss black frame & undercarriage. Although I am concerned about gloss paint for exterior ... not the look I want. I will add that I am using the reducer from Tractor supply, a universal hardener from Napa, And considering a additive Napa sells to take the gloss out of the paint. Thanks to @Plymouthy Adamsfor the tips. You would be better to talk to your local Napa dealer that provides custom paints ... You can add or remove gloss from the paint and they sell the products to do this.
-
Not sure if I have anything good to say about Ace paint, I do not have anything bad to say about it either. I used it on 1/2 my frame, front axle etc... I wire brushed all the loose surface rust off, coated everything with ospho then brushed on the Ace paint couple coats heavy. Obvious I am not a professional paint & body guy. I am ok so far with the results, no idea how long it will last but sitting in the driveway it has lasted 1 year. I was kinda turned off with it when I read the directions and it said it is not DTM (direct to metal) it wants primer first ... I put it DTM anyways. I was not happy with the packaging ... the lid on the can. I would open it and pour some in a bucket for my paint brush, the lid would never seal tight again. After working out of the gallon can for a few months ended up throwing 1/2 the can away. But what I applied is holding up just fine. Photos from A year ago I brushed the frame then I did spray some, I'm ok with it. A photo from yesterday.


-
Ask me how I know
-
Would have been a fun time ... not been paying attention to forums much lately ... trying to clear up some projects and getting ready for new projects. I hope someday we all get a chance to hang out. Just WoW!, I got nothing to add to that ...
-
I dunno, always been a idiot. I tend to watch youtube video's with a purpose. First issue is I am not in the market to buy a car. So when you have 2 idiots talking crap ... I am quick to close the channel and not watch the clown episode. While I watch many hours of video on other channels ... I just hope the car gets saved and I am not watching their BS.
-
I only have a opinion and not useful facts. I really appreciate your efforts to restore the vehicle and keep it stock. Whats your plan for the vehicle once it is done ... is it show only or do you want to drive it? For a few hundred bucks you could slap a 1990's chevy truck rear end in it with a 5 on 5 bolt pattern ... You will modify the rear end to fit the car, not modify the car. So you could slap a newer rear end in it and drive it while looking for a real replacement. If your goal is a show car then good luck with your search, I will certainly share any info if I see one.
-
Not sure what it is about the color combo. It does speak commercial or industrial .... Will not go out of style. My old house you can date the paneling to the 70's, the harvest gold linoleum to the 80's the brown carpet to the 90's the dual pane windows to the 2000's. The blue & yellow you can not tell if it was new equipment last week or if it was made 70 years ago. Never go out of style.
-
This might help you out with the brake adjustment. Just know there was a professional tool made for it. I have seen copies made from plastic pvc pipe to allthread ... you can get a idea from the thread. While adjusting mopar brakes is different then what you may be use too. They were way ahead of everyone at the time and if adjusted properly work great today.
-
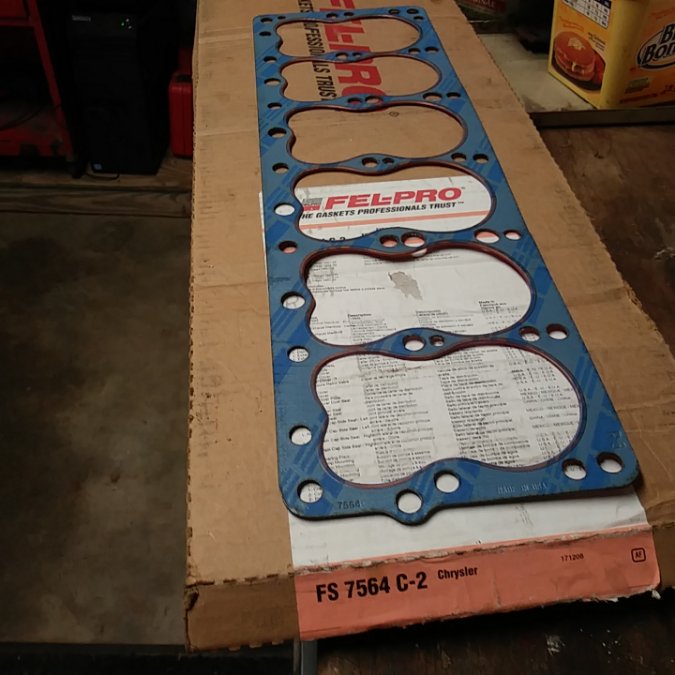
Not sure if it helps, I can show a gasket and part # I bought from Napa a few years ago.
-
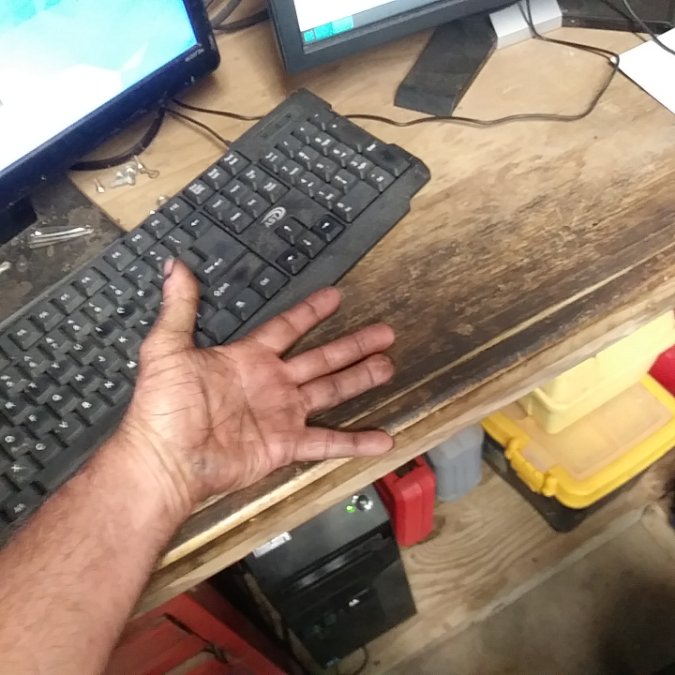
Problem with no paint is hard to clean. Just for laughs I took a photo of my hands at my desk. I just pulled the pistons/crank out of a engine and sitting to take a break. Maybe I am just a slob, but some nice oil base paint would be a lot easier to clean up ..... Maybe I should go wash my hands now
-
Go with Napa Yellow? Not sure why but the blue makes me think of Napa and just missing the yellow. Often a two tone paint looks pretty sharp. Maybe pick a lighter or darker blue and call it a feature?
-
There is many cracks from original casting that simply does not matter. Dodge magnum 360 heads in the ports is a common example. Old Ford Flathead V8's had many factory cracks from original casting. The list goes on, you need to figure out if it is a actual crack from stress or if it was created from birth. Your crack would either be from birth and 70 years old and never a issue ... or someone put it under high stress and broke it in the last few decades ... Whats your opinion?
-
LOL is the center section Ring & pinion ... it kinda sorta resembles a Hogs Head and been nick named that for years
-
Lots of fun to be had here. If you take 5 exact same cars then add 5 different drivers ...There will be a race of skills and guts. Would be a interesting race. Recently there was a plan from Mopar to use 10 cars all hemi and equal in power. The deal is, these are test cars donated to builders. The builders have a budget of $10K to make a race car out of it. ... These cars will be crushed after the event. Just saying starting with a equal pile of crap and a equal pile of cash ... It will separate the mechanics from the trunk monkey's . Who is going to follow the rules and build the fastest car in the race? All mechanics are not created equal. While one mechanic is trying to get more horsepower ... another is trying to get more traction and better gears ... Just saying I think a well laid out set of rules to build a car can be a lot of fun and a challenge.
-
1946 WD15 rear end swap...and full replumb of brakes
Los_Control replied to lostviking's topic in Mopar Flathead Truck Forum
Yeah I got that the other day ... Wife blows up the engine in her car ... papa gets a new engine crane I always wait until I need the tool then purchase. I have a chain hoist I can use on my truck, pull the engine then roll the truck away ... I can get by without the crane. But the wife front wheel drive car I think will want the crane and roll the engine not the car. Tools will always pay for themselves, often the first time you use them if you need it. You too can have your very own engine hoist, drain the oil from the wife car and send her shopping -
That is kinda sorta the key. Easier to pull the pipe plug on #6 cyl, get it on top dead center with compression stroke, see rotor is pointed at #6 wire on distributor cap. Really easy to read the manual on these engines then assume all before you did the same. Some like me do not read much ... oil pump installed wrong will cause this issue. Get #6 or #1 on TDC, then install your wires to match. See if it starts then.

