


Merle Coggins
-
Posts
9,394 -
Joined
-
Last visited
-
Days Won
87
Content Type
Links Directory
Profiles
Articles
Forums
Downloads
Store
Gallery
Blogs
Events
Everything posted by Merle Coggins
-
That would be a ferret, Bob...
-
1. do voltage regulators care if it is for an alternator or generator ? YES! Generator regulators function much differently than alternator regulators. 2. do they care if positive or negative ground? NO. A generator voltage regulator can be flashed after installation to conform it to the polarity of the vehicle. 3. is there an amperage max (I saw one listed for 15A)? If so what would you suggest getting - standard car, no stereo etc? YES. Voltage regulators also have an amperage limiter and should be matched to the generator. Also, voltage regulators for generators come in a couple different types. Type A and Type B, as I recall. It is very important that you get the proper type to match your generator. It has to do with the way it regulates the field coils.
-
When I got all the glass for my truck I was concerned about going with the tinted glass because the corner glass would be clear. However, If I had them made in clear glass I would have had to purchase 4 full sheets of glass to get 7 pieces with the DOT etching. Each full sheet has 2 etchings in opposite corners. However, if I went with tinted they had plenty of pieces left over from non-DOT projects to make my pieces. It saved me a couple hundred bucks. I thought I would just have to live with the corners being clear while the rest had a green tint. However, once everything was installed it's really not noticeable. It's interesting that someone is making the curved glass from laminated glass panels. It's probably easier to heat and bend lam glass than to form tempered glass.
-

Need some advise on tune up
Merle Coggins replied to 1952RedB2B's topic in Mopar Flathead Truck Forum
First off, welcome to the family... The first thing to check is the accelerator pump in the carburetor. Remove the air filter and look down the carb with a flashlight while moving the throttle linkage. When you open the throttle, as in stepping on the pedal, you should see a squirt of fuel from the accelerator pump jet. If not, then you'll need to open up the carb and clean out that circuit. May as well get a kit and do the whole carb at that point. -
The "peg" on the bottom edge of the cap must align with the "notch" in the distributor body to ensure proper alignment of the cap for timing purposes. When all is right the clips should also line up properly.
-
The problem with using horn relays in a headlight circuit is that the relays are switched with a grounding switch, such as in a horn button/ring. If you go back to the post you referenced and look at the diagram you'll see what I mean. You really need 4 pin relays that can be activated with the voltage from your headlight system.
-
Looks similar to the nuts that retain the B-series truck switches/cables. Are there small indentations around the outside of the nut? There is s special tool that sets into those indentations to remove/install the nuts. Before I had such tool I was able to remove them by taping up the jaws of pliers and carefully grip and twist.
-
Looks like jute
-
You have that right. The wood is attached to the cross members. The bed sides are attached to the wood. And 3 of the 4 cross members get bolted down to the frame with long bolts through wood and metal.
-
My First Car -- P15 1947 Plymouth Deluxe
Merle Coggins replied to NickPickToo's topic in P15-D24 Forum
I don't see the washers under the clips. Did you put them on the back side? I usually soak the felt washers in oil when I reassemble them to keep the pins lubed up. -
I've had one of those for many years. They are quite handy at times.
-
Interesting photos I have run across.
Merle Coggins replied to Don Coatney's topic in Off Topic (OT)
????? Undercarriage inspection station? -
Greg, Your current wiring bypasses the ammeter, which isn't a big deal, but I tend to use the ammeter to check that my brake light switch is working. After having a few failed switches I will often check that my switch is working before starting up my truck. With the key off I will step on the brake pedal. If the ammeter needle moves towards the negative side I know that I am sending current to the lights. No ammeter movements means it's time to dig out my spare switch...
-
Flathead block coolant drain plug
Merle Coggins replied to rottov's topic in Mopar Flathead Truck Forum
I have determined that the next time I have to drain the coolant I will be putting one of those in. I suppose I should get one to have on hand when that day comes... Here’s one on Amazon Dorman 61106 HELP! Radiator Drain Cock https://www.amazon.com/dp/B000C5CBD2/ref=cm_sw_r_cp_tai_AfMNDbM2RFFF1 Well, it seems that the Dorman one has some pretty poor reviews that the wing tends to come loose from the stem after one use, making it useless. Napa also lists one... Weatherhead brand. https://www.napaonline.com/en/p/WH_6783?partTypeName=Brass+Fitting+Drain+and+Drain+Cock&keywordInput=drain+cock And O’Rielly also lists a Gates brand on their web site. It doesn’t appear that the stores stock the, but they can get the ordered in. -
Flathead block coolant drain plug
Merle Coggins replied to rottov's topic in Mopar Flathead Truck Forum
Yup, like they said... Here’s a photo for your reference.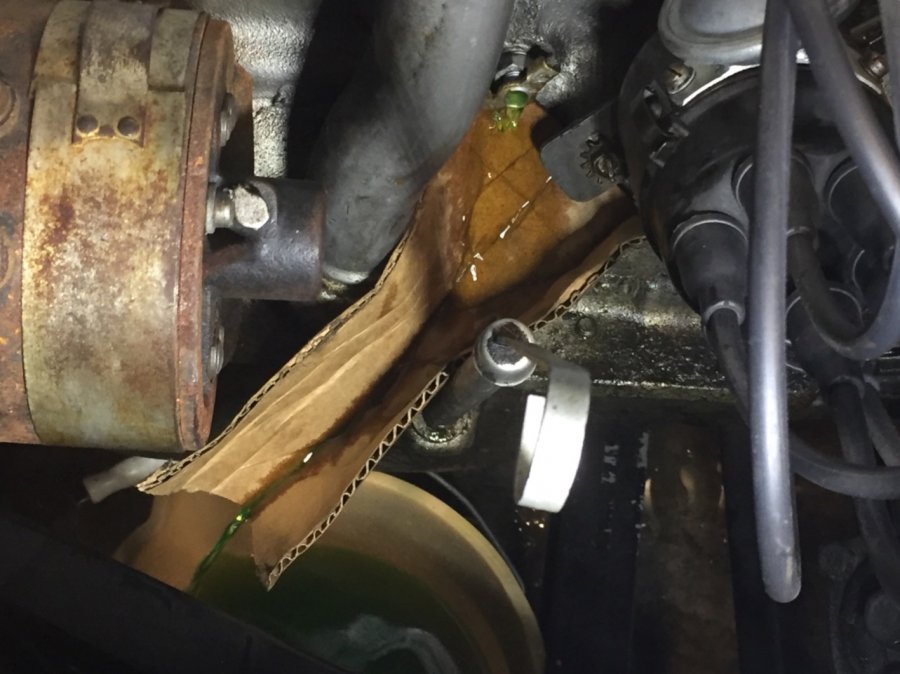
-
Off topic but found a product to kill Lantern Flies
Merle Coggins replied to desoto1939's topic in Off Topic (OT)
Lantern flies? Is that the same as Fire Flies, or Lightening Bugs? -
I ran across this video recently. I know it’s too late for you on this one, but may be useful in the future.
-
Lookin’ good. On the sticky throttle, I like to use some dry lube spray and spray it liberally on all of the pivot points of the throttle. Pay special attention to where the cross-over link runs behind the block, where the rod runs through the bracket. When these get dry and rusty they cause a bit of drag on the linkage movement. Some also add an additional spring, but I find that if I keep things lubed up one spring is fine.
-
Interesting photos I have run across.
Merle Coggins replied to Don Coatney's topic in Off Topic (OT)
That dent in the driver's side door is custom made too... -
Low oil pressure on inline 6 flathead
Merle Coggins replied to Phil Kelly's topic in Technical Archives
20 psi at idle isn't bad, with hot oil. Cold oil will usually net around 40-50 psi at idle and possibly slightly higher at higher RPM. If you have 0 at idle and while cruising when warmed up you have a problem. You could have a oil pressure relief valve stuck open. This is located along the lower block skirt near your oil dip stick tube. -
New door panels (interior)
Merle Coggins replied to lostviking's topic in Mopar Flathead Truck Forum
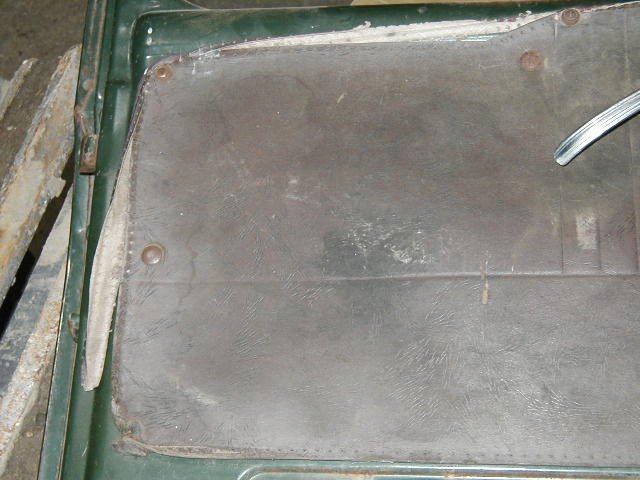
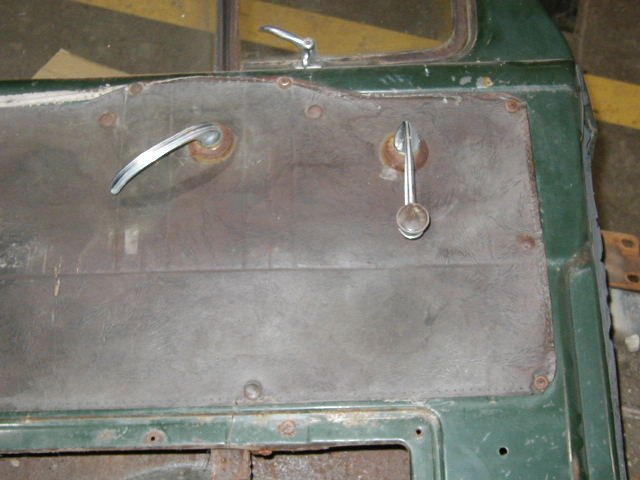
I did find some pics of my doors before disassembly, showing the original cardboard door card installation. I got my interior from Quiet Ride Solutions. https://www.quietride.com/index.html I've been very happy with it since completion. It is made from ABS plastic that can be painted, with the proper paint. I went through some struggles during the install process that I have documented on this forum. I didn't use the push button fasteners with the new one, just new stainless screws with trim washers.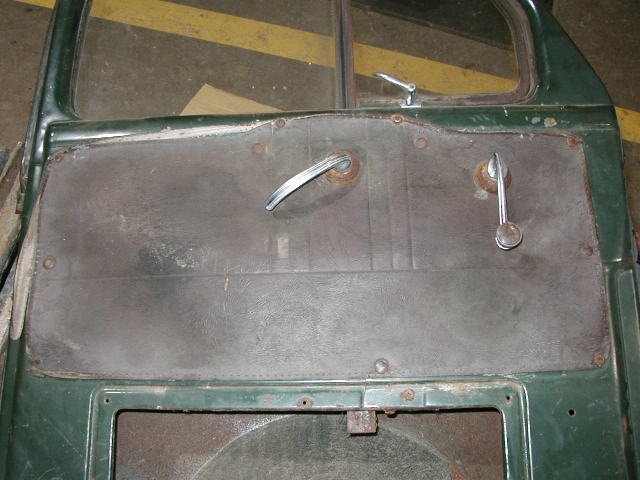

-
My engine usually doesn't get over 180-190ish, unless I''m on a long hard uphill climb. But with that constant load at very low RPM there wasn't enough air flow from the fan to keep up with the cooling demand. Removing the load and raising the RPM, to increase air flow, brought the temp back down.
-
I've never had an issue with my FD in those conditions, but then again there's no temp gauge in there so I have no idea how hot it was getting. However, this summer I got caught in a major traffic jam up in St Ignace, MI and after a half hour, or so, of stop and go (creeping ahead) my engine started running hot. I had to use the clutch and elevate the RPM to get more air flow through the radiator and cool it down. That's the first time I've had that issue.
-
??? Where was there an offer for part for sale, or a request?
-
Never mind...

