


Merle Coggins
-
Posts
9,394 -
Joined
-
Last visited
-
Days Won
87
Everything posted by Merle Coggins
-
Yes, I replaced the side angles too. And as baby_gonzo said, they are welded on. However, I believe their stainless side angle strips are designed to sit over the top of the, welded on, steel pieces. More of a 'dress up' item.
-
Most people wouldn’t notice the difference in strip profile unless the two were side by side. If you are worried about exact originality, go with Midwest Military. But since you are going with stainless strips I’ll assume you’re not concerned with the original profile. I got my strips from Mar-K and they were punched perfectly. I’m not near my truck this week and can’t measure the bolt spacing. Plus my 3/4 ton truck would likely be different than your 1/2 ton anyway.
-

New 1950 dodge Truck to me
Merle Coggins replied to 5027 steve's topic in Mopar Flathead Truck Forum
No. As long as the brake shoes aren’t holding the drum in place you just need to remove the bearing retaining nut and catch the outer bearing, and washer, as you slide the drum/hub off the spindle. -
New 1950 dodge Truck to me
Merle Coggins replied to 5027 steve's topic in Mopar Flathead Truck Forum
The anchor, eccentric, pins are the Major Adjustments. The cams are 3 o’clock and 9 o’clock are the Minor Adjustments. Adjusting the Minor Adjustments will shorten the brake pedal travel. Adjusting the Major Adjustments should only be needed for initial adjustment to ensure full shoe contact. -
New 1950 dodge Truck to me
Merle Coggins replied to 5027 steve's topic in Mopar Flathead Truck Forum
Adjust the brakes first. When you have too much shoe travel you will get that exact symptom. -
Bellhousing information needed
Merle Coggins replied to lonejacklarry's topic in Mopar Flathead Truck Forum
Yes, it’s from the B-Series parts book -
Diesels don’t make any vacuum. The intake is wide open so they can take in as much air as possible. Most diesel pickups have a hydraulic brake booster that runs off the power steering pump
-
Why be secretive about it. Post the pics on this forum for all to see. It sounds like an interesting modification. .
-
Bellhousing information needed
Merle Coggins replied to lonejacklarry's topic in Mopar Flathead Truck Forum
My parts book does not show an exploded view of the bell housing on the light trucks, but it appears that the P/N of the lower pan is 1266640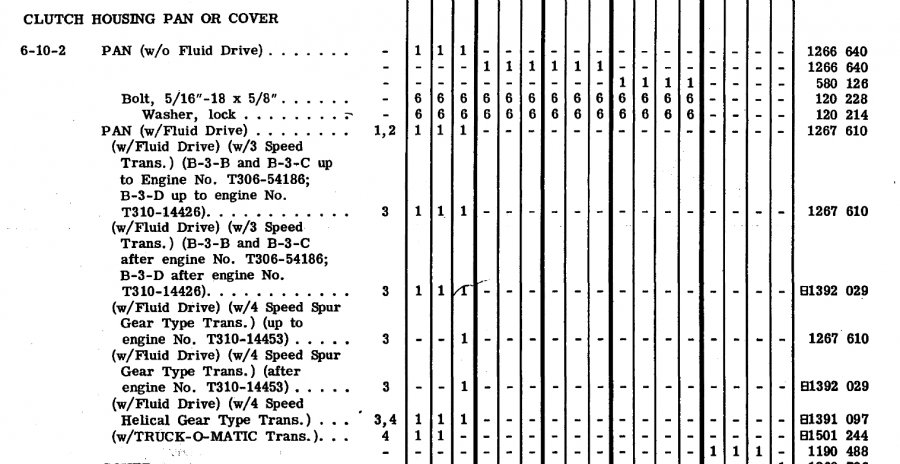
-
My First Car -- P15 1947 Plymouth Deluxe
Merle Coggins replied to NickPickToo's topic in P15-D24 Forum
You say the rubber is in good condition, but do you know that's it's compatible with modern ethanol blended fuels? Fuel pump kits are fairly inexpensive and good insurance. Check with the good folks at Then and Now Automotive. They may even have that screen for you. I don't believe it's part of a kit. http://www.then-now-auto.com/fuel-pumps/ -
51 B3B build thread - after all these years
Merle Coggins replied to bkahler's topic in Mopar Flathead Truck Forum
It's been too long since I've had mine apart so I don't recall if I had that spacer or not. I assume it's just there to keep the spring in alignment, or to keep it from sliding back and forth. If you need something for that maybe a small washer would do the job. -
51 B3B build thread - after all these years
Merle Coggins replied to bkahler's topic in Mopar Flathead Truck Forum
1) It appears I might have an issue with my heat riser spring. I'm not sure but it seems to operate backwards. Searching the forums it sounds like at one time Andy Bernbaum was selling some that were wound backwards. I bought my spring from Andy back in 1998. In order to be sure, what should the spring do when wind or unwind when heated? The spring should hold the counterweight at the 12:00(ish) position. Exhaust flow across the internal flap wants to rotate the counterweight clockwise to the 3:00 position. As the spring heats up it should relax and allow the weight to stay in the 3:00 position. 2) It also seems that I have lost the spacer that goes on the shaft of the heat riser. Anyone know of a source for one? What spacer? Are you referring to the little arm with a cushion on the end? 3) Brake backing plate shims for shimming to create the correct clearances for the axles. Anyone know of a source for them? No known shims for purchase that I am aware of. You will either need to get some from another axle or make some out of shim stock 4) I'm considering a dual horn setup. Anyone know of a source for a short version of the factory horn? I found mine at a swap meet. 5) When installing the brake switch and the 1/4" plug in the back of the master cylinder, should I use any kind of sealant on those threads? Yes. Use some pipe thread sealant. I wouldn't recommend Teflon tape here as little pieces could get into the system. Stick with a paste sealer on the threads.
-
Interesting photos I have run across.
Merle Coggins replied to Don Coatney's topic in Off Topic (OT)
You and your brother out for a Sunday picnic with Dad? Apparently Dad wouldn't share his Schlitz. The boy get 7-UP -
Seems that I remember getting the window run from Roberts. Do they not have it anymore?
-
On the door latch... take the linkage arm that goes to the inside handle pivot and swing it down parallel to the door edge. Then you can roll the latch mechanism out around the inside channel. No tugging and cursing needed.
-
New 1950 dodge Truck to me
Merle Coggins replied to 5027 steve's topic in Mopar Flathead Truck Forum
You could also put your timing light probe on the high voltage coil wire. It'll make the timing light seem brighter as it will flash 6 times as much. You'll also be able to see your timing marks at 120 degrees off since it'll also be flashing when 2 & 5 are at TDC, and with 3 & 4 at TDC, although that's not really useful. -
Water in oil (condensation) in my 251 engine
Merle Coggins replied to Fernando Mendes's topic in Mopar Flathead Truck Forum
The compression ratio is determined by the bore and stroke dimensions of the cylinders. The spark plug has no effect on this number at all. -
New 1950 dodge Truck to me
Merle Coggins replied to 5027 steve's topic in Mopar Flathead Truck Forum
It really doesn't matter. #1 and #6 will give you the same reading on the timing mark since they are pared cylinders. Both are at TDC at the same time. One will be in firing position and one will be about to start the intake stroke. The Mopar engineers seemed to gravitate towards #6 for all timing reference, as indicated by the timing plug in the head, and your reference in the manual. -
My First Car -- P15 1947 Plymouth Deluxe
Merle Coggins replied to NickPickToo's topic in P15-D24 Forum
By the way... what was the purpose for baking the manifold in the oven? -
New 1950 dodge Truck to me
Merle Coggins replied to 5027 steve's topic in Mopar Flathead Truck Forum
Steve, Are you looking for a procedure to static time your distributor for initial startup, or or for dynamic ignition timing with a running engine and a timing light? For static timing you need a test light to connect to the wire that connects the coil to the side of the distributor. Set the engine so that the proper timing mark aligns with the pointer. Then, with the key ON, adjust your distributor back and forth until the test light just lights up. At this position the points have just opened, and this is where the coil would fire high voltage through the ignition cables. Lock it down, install the rotor and cap, and see if it will fire up. Here's a good web site that also describes it. https://auto.howstuffworks.com/how-to-static-time-engine2.htm For dynamic timing I recommend a good timing light. I also like to use white-out, or similar, to mark the timing mark on my pulley so that it's easier to see. Connect the timing light per it's instructions. Then get the engine running at the lowest possible RPM. Disconnect the timing advance vacuum hose and cap it. Loosen the distributor clamp bolt just enough so that you can rotate the distributor, but not that it turns too easy. Then CAREFULLY hold the timing light so that the light flashes on the timing marks. CAUTION!!! You will be working closely to a spinning fan!! Adjust the distributor so that your timing mark lines up with the pointer, then tighten the clamp bolt. Some like to use a vacuum gauge for ignition timing, but I've always relied on my trusty timing light and it's never steered me wrong. -
Shock Absorber Replacements for Express Models
Merle Coggins replied to JBNeal's topic in Mopar Flathead Truck Forum
As I recall, I have Gabriel shocks on my truck. I got them from Auto Zone about 12 years ago. They had them listed on their web site, and even had the fronts in stock at my local store. The rear set was ordered in and I had them a day or two later. It even shocked the kid behind the counter when I asked him for shocks for a 1950 Dodge truck. His first reaction was, ”We won’t have anything for that.” I encouraged him to go ahead and look them up. (I already knew they were listed in their system) “WOW, we even have the fronts in stock!” Was his next comment. “I can have the rears here tomorrow.” ? I don’t have the P/N’s anymore, and the Auto Zone web site no longer lists them, but they were different numbers for the fronts and rears on my 3/4 ton truck. -
My First Car -- P15 1947 Plymouth Deluxe
Merle Coggins replied to NickPickToo's topic in P15-D24 Forum
Is the heat riser plate stuck in that position? If so, apply a bit of localized heat just above the shaft, on both sides, and it should loosen up. Then you could either put a working counterweight and spring on it to make it functional, or weld it in the horizontal position to disable it and keep the bulk of the heat away from the carburetor. If you’re going to end up with a dual carb intake then I would certainly weld it horizontal, or put a block off plate between the manifolds. -
1949 Dodge Pilot House Model W Fuel Pump
Merle Coggins replied to Chuck's topic in Mopar Flathead Truck Forum
Sweet!! Hopefully the good folks at Then and Now can help you with a kit for your fuel pump so that you can get that truck back on the road. -
Exhaust manifold nut problem--need ideas
Merle Coggins replied to Sam Buchanan's topic in P15-D24 Forum
The intake heater on your diesel engine serves a completely different purpose than the heat riser on the car. On the diesel it preheats the incoming air for better starting in cold weather. The heat riser in the gas engine helps warm the carb to prevent icing in cool damp weather. Without it you may only notice problems around this time of the year shortly after startup. But with a little extra warm up time it would become a moot point. Whatever you do, don’t leave it open all the time. That extra heat with a hot engine over heat the carb and cause other issues. -
1949 Dodge Pilot House Model W Fuel Pump
Merle Coggins replied to Chuck's topic in Mopar Flathead Truck Forum
Got a picture of your truck, Chuck? I’m still a little confused on your model designation. A ‘49 would be a B-1 series, and the next letter would designate the weight capacity. But I have never seen a W listed. The 170 would indicate the wheel base length. 16,500 GVW would be a good size truck. If you can read the serial number use it with this VIN decoder. http://www.t137.com/registry/help/decode.php

