


Sam Buchanan
-
Posts
2,558 -
Joined
-
Last visited
-
Days Won
83
Everything posted by Sam Buchanan
-

New Fuel Sender Issue - leaks - Anyone else
Sam Buchanan replied to James_Douglas's topic in P15-D24 Forum
Took a look at the sender today (Kanter) and it appears that is where fuel has been leaking. Mixed up a small batch of Flamemaster aircraft tank sealant and applied a glob over each pop rivet after scuffing with Scotchbrite and cleaning with acetone. That stuff will stick to anything! But I was surprised to find the terminal studs loose.....that could also cause leaks. Tightened the base nuts and reconnected everything, we'll see if that stops the leakage.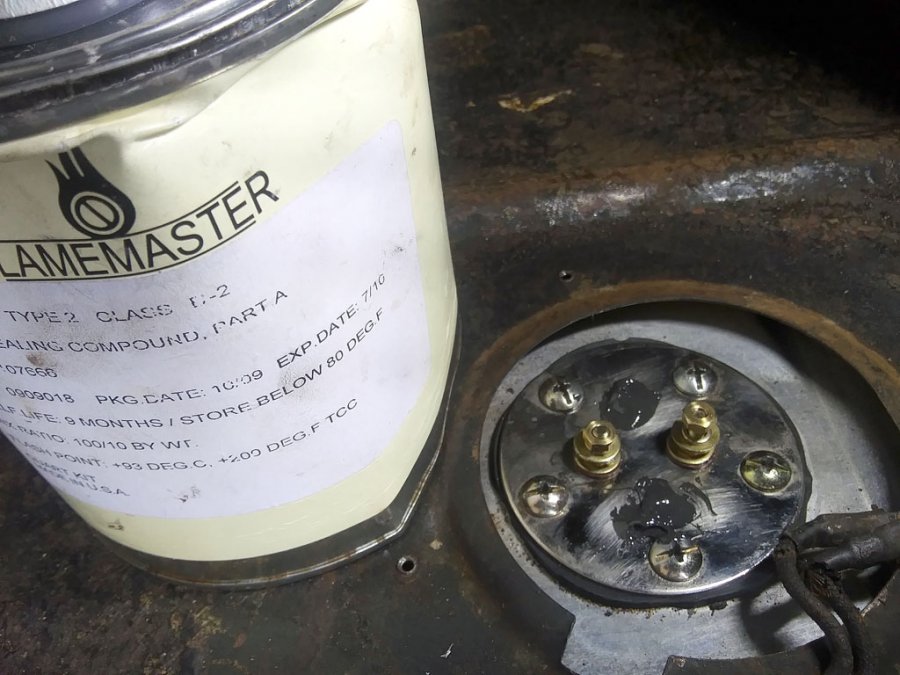
-
New Fuel Sender Issue - leaks - Anyone else
Sam Buchanan replied to James_Douglas's topic in P15-D24 Forum
Maybe apply some fuel tank sealant around and over the rivets? Yes...it is aggravating to have to address somebody's engineering flaw. My "new" tank (passed my pressure test prior to installation) leaks fuel when nearly full, I'm gonna have to take a look at the two-wire sender I installed a few months ago. -
A 10 gauge wire should handle 45-50 amp no longer than the run from alternator to battery, that will provide quite a bit of margin over what would be needed in normal ops. I put a 65a fuse in my alternator lead to protect against a dead short inside the alternator. Something is weird about your car's wiring---if wired per the schematic disconnecting the ammeter will kill the electrics since all loads go through the meter. Stay with it, this can be figured out.
-
Should be a great read.....but $95?
-
Ok...time to go to school, there is no point in being uninformed about what is inside your engine. Here is a video from one of our own forum members as he takes a look inside the flathead engine: https://www.youtube.com/watch?v=RQNszFmHJHQ
-
xxxxxxxxxxxxxxxxx
-
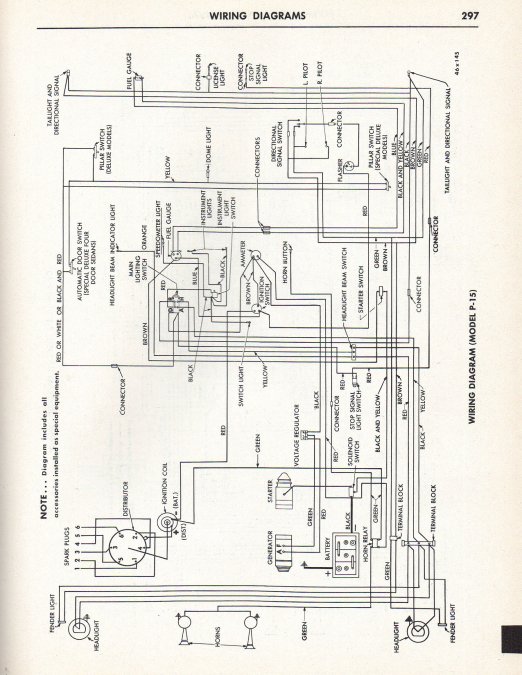
Here is the wiring schematic for a P15, it is scaled to print on 8.5x11 paper:
-
Glad you found a ground drain....but I'm struggling to visualize what is going on with your wiring....the comment about the starter solenoid is puzzling. I also don't understand the comments about multiple terminals and higher gauge wire.....maybe a photo would help? Do you have a service manual for your car with a wiring schematic? You would be ahead to return the ammeter to the original configuration, it really is a simple hookup. Without an ammeter or voltmeter you are flying blind with no way to see a charging failure in progress. As long as your car has bastardized wiring you will be chasing problems.....get it straightened out once and for all for maximum reliability and ease of maintenance. The original wiring is fine as long as the insulation is intact, some of the wiring firewall forward may be worse for wear and can be easily replaced.
-
Yes, let's revisit the alternator hook up, I thought we went through this earlier but now I'm wondering about it. The old, external regulator, if still in place, should ONLY be used as a terminal block to connect the wire from the alternator to the car's wire that goes to the ammeter. Disconnect everything from the A and F terminals on the regulator. Tell you what I would do (and did on my car)......remove the old regulator and toss in on the work bench (or trash). Then use a high-quality butt splice to connect the alternator lead and ammeter wire (the one that was connected to the BAT terminal of the old regulator). There MIGHT be a faulty internal drain to ground in the old regulator, removing it eliminates that possibility. One more test. With the ammeter lead disconnected from the alternator and the ignition switch off, check to see if there is any continuity between the ammeter wire and chassis ground. This will explore the possibility of a ground drain occurring in the harness or ignition switch (or headlight switch?). If your car passes that test and the alternator is connected to the ammeter, your alternator is good, the battery is good........this system has to work properly.
-
The relay is just a bandaid to fix a problem that shouldn't exist.
-
Coles notes on 12 volt conversion please...
Sam Buchanan replied to laynrubber's topic in P15-D24 Forum
Well.....it is called a Voltage Reducer Regulator........sounds regulated to me. https://www.ebay.com/itm/Voltage-Reducer-Regulator-12-VOLTS-to-6-VOLTS-25-AMPS-WITH-HD-heatsink/392272294231?hash=item5b55403157:g:5GAAAOSwGLZcjVzB -
Was the seller an established vendor? I purchased my 6v alternator from Quality Power and have been pleased with the performance and support: https://www.qualitypowerauto.com/category_2/Special-Applications--6-Volt-8-Volt-and-12-Volt-Positive-Ground.htm
-
Dual master cylinder - for stock drum brakes
Sam Buchanan replied to Thomba48's topic in P15-D24 Forum
This is a different car family but I had a dual-chamber master cylinder in the '74 Beetle fail last year. Fortunately I found it as I was preparing for a drive so danger was avoided. But the cylinder was mush with no braking action (discs on front, drums rear) and it had given no prior warning when the car was driven a few weeks previously. Guess this emphasizes the importance of a pre-flight inspection. -
Wow....that is a beauty!
-
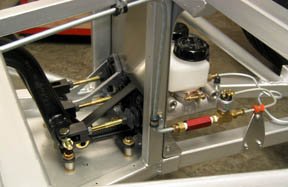
Custom dual master cylinder mount. Clearance concern
Sam Buchanan replied to 40desoto's topic in P15-D24 Forum
Actually this one is 4130 0.049" tube left over from one of my aircraft builds, the welds are always under compression. I'm not officially certified but I have flown aircraft with a steel tube fuselage that I welded. This pushrod is the same design as control surface pushrods that have been used on thousands of aircraft. The dual-chamber mod I fabricated mechanically worked very nicely, no flex, I just couldn't get a good pedal with the particular cylinder I used.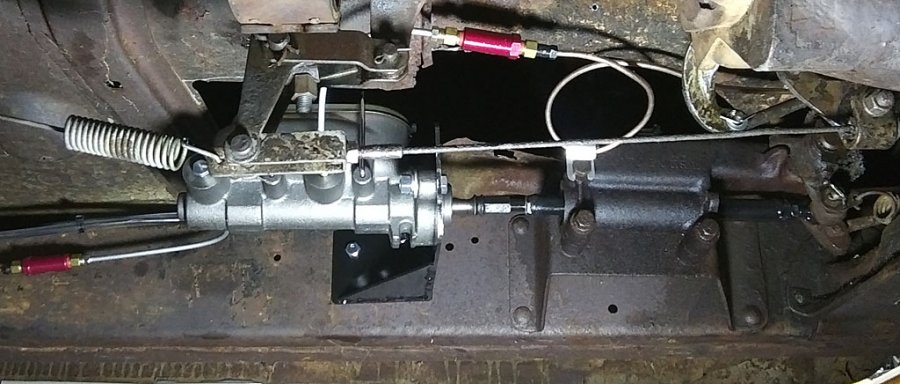
-
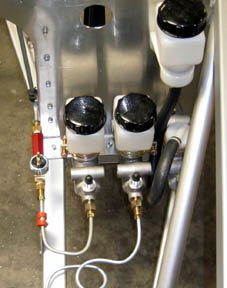
Custom dual master cylinder mount. Clearance concern
Sam Buchanan replied to 40desoto's topic in P15-D24 Forum
Using threaded rod in such a critical application is also outside my comfort level. Here is the pushrod I fabricated when I mocked up a dual-chamber master cylinder: It uses the ends of the stock pushrod which can be pressed back into use in the original configuration if needed. The pushrod is steel tubing with nuts welded on each end. The eye fitting screws into one of the nuts (with a jam nut), and the threaded shank of a grade 8 bolt threads into the other end (jam nut not shown in this photo). Very strong and stiff.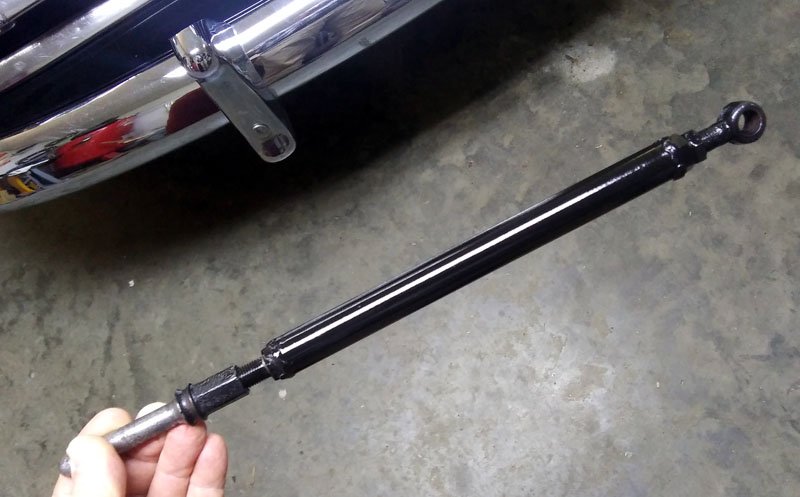
-
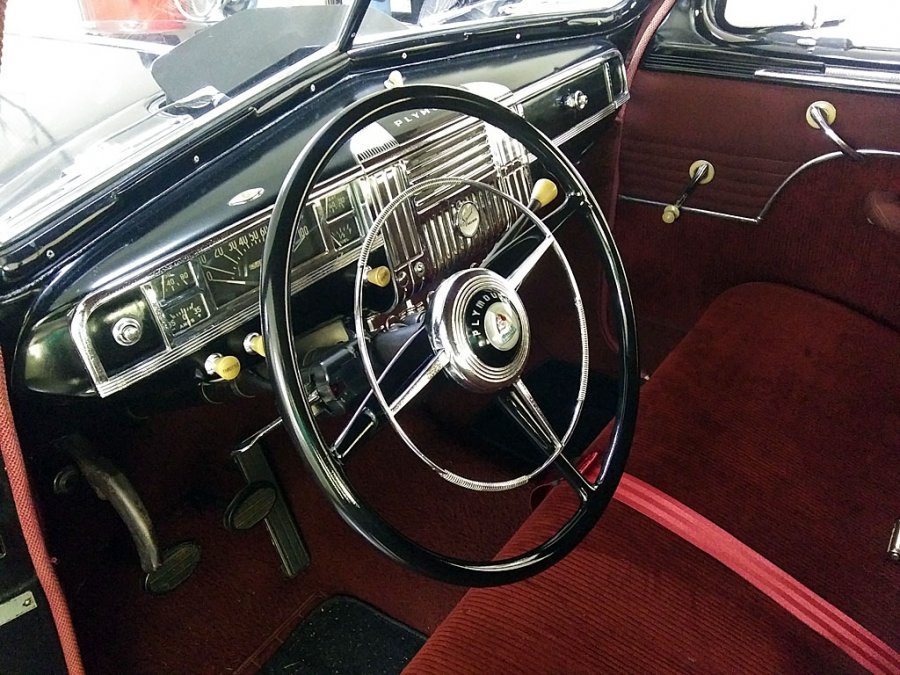
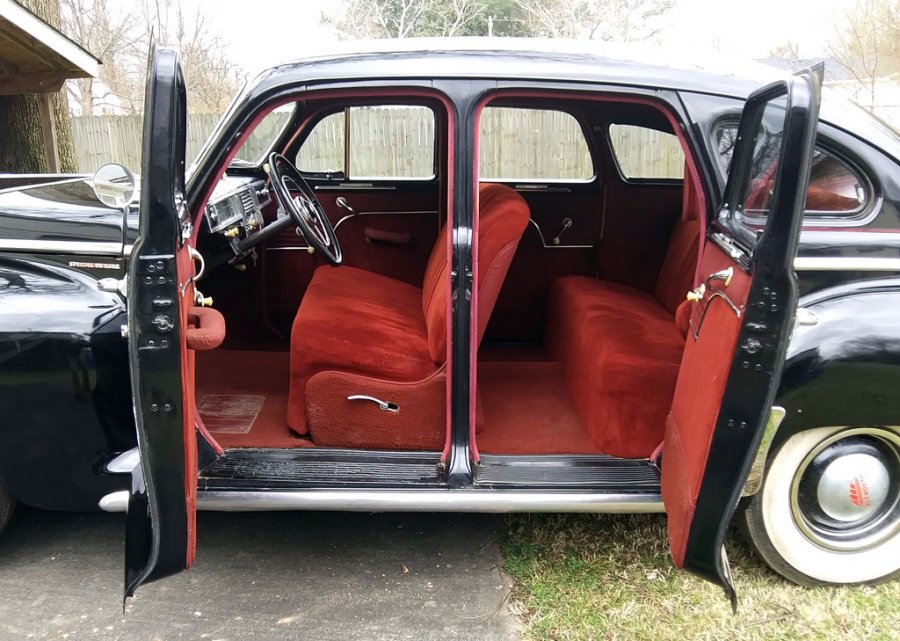
Here is another non-standard red interior that retains original trim in my car, the window trim and dash appears to have been painted when the interior was installed (1980's?):
-
And pre-flared 3/16" brake lines you purchase at your local auto parts emporium work very nicely.
-
Dual master cylinder - for stock drum brakes
Sam Buchanan replied to Thomba48's topic in P15-D24 Forum
I have conflicted feelings about the necessity of a dual-circuit cylinder. I had a brake failure in my 1964 Beetle as a young heathen when a line turned loose and we rolled past a stop sign out into an intersection, the only thing that saved me was the lady coming from my right being alert and nearly getting stopped before caving in the passenger door. That experience has remained stuck in the recesses of my brain.... On the other hand, my dad bought a new '56 Savoy which I learned to drive nearly ten years later and was still running when we sold it after his passing in the late '70's. The odometer showed 144K+ miles even though it had quit spinning a few years previously. That Plymouth never gave us a moment's trouble with the brakes....we never even considered that it had a single-circuit cylinder. So...after being determined to install a dual-circuit cylinder in the '48 P15 when I bought it a year ago, (and an abandoned attempt to convert to a dual-circuit cylinder) I'm attaining a level of peace with the single-chamber cylinder. I've replaced the entire brake system so have confidence in the integrity of the lines and cylinders. I also have a parking brake that works pretty well after careful adjustment. I also try to drive with a similar mindset I used on motorcycles years ago.....be conservative and try to leave an 'out'. Driving any machine is a risk........even though the dual-chamber vision hasn't disappeared completely....I'm coming around to depending on components what worked quite well so many decades ago. -
My bride enjoys riding in the '48 P15 so much she really doesn't like for me to work on it anymore.......she's afraid I'll break it! ?
-
Unusual ground wire to Voltage Regulator
Sam Buchanan replied to ChrisMinelli's topic in P15-D24 Forum
Excellent quality cables in the proper size custom-made at a very reasonable price: https://www.batterycablesusa.com/1-0-gauge-battery-cables-0-awg.html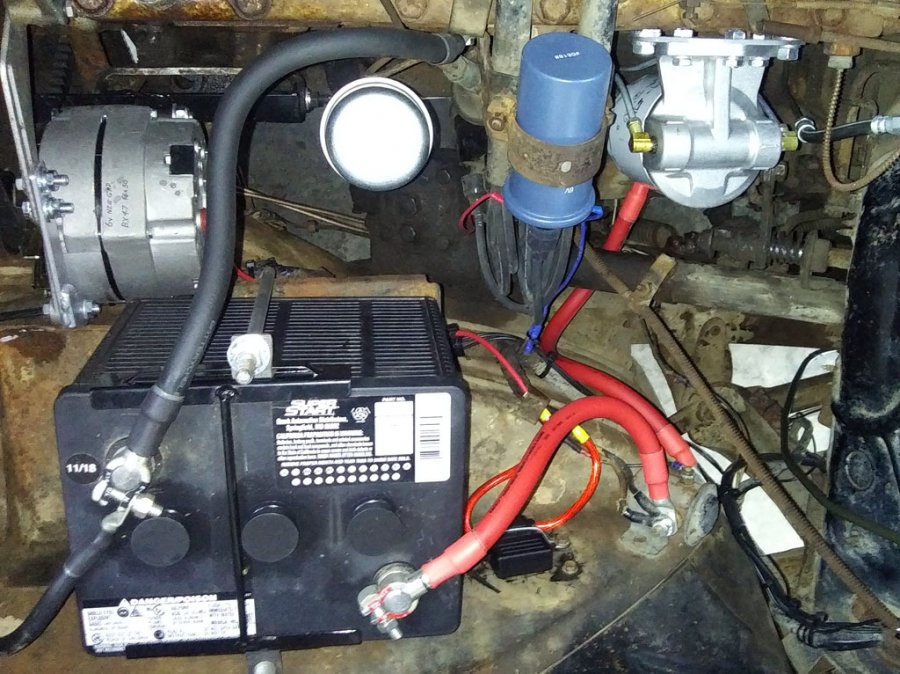
-
Dual master cylinder - for stock drum brakes
Sam Buchanan replied to Thomba48's topic in P15-D24 Forum
What I would really like is a dual cylinder setup like I had on the StalkerV6 kit car: That provides redundancy, ease of balance and a decent pedal even if one cylinder goes down. These were Wilwood components but coming up with a way to convert our brake pedal to something like this would be a challenge....hmmmmmm........a master pushrod going through a gutted master cylinder connected to a balance bar then two cylinder pushrods......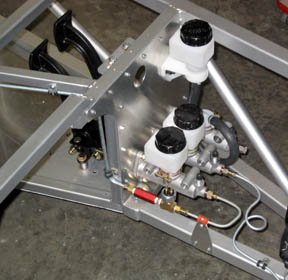
-
Unusual ground wire to Voltage Regulator
Sam Buchanan replied to ChrisMinelli's topic in P15-D24 Forum
A previous owner was probably having trouble getting the genny to charge and threw a Hail Mary hoping another ground for the voltage regulator would heal the affliction..... -
My First Car -- P15 1947 Plymouth Deluxe
Sam Buchanan replied to NickPickToo's topic in P15-D24 Forum
Yeah.....I think I can tell a difference......... ? -
Congratulations! Yes, reverse the wires on the ammeter. Disconnect your battery first.


