-
Posts
3,462 -
Joined
-
Last visited
-
Days Won
193
Content Type
Links Directory
Profiles
Articles
Forums
Downloads
Store
Gallery
Blogs
Events
Everything posted by keithb7
-
Seems the young folks there do indeed have things under control. Us old farts can be skeptical. ? Glad to hear it all worked out.
-
I read technical and reference books about automobiles and their various systems quite often. I crave the new (old) info that I learn. The most exciting book I acquired in recent memory was Dyke's Automotive Encyclopedia. It's a 3” thick tome of all things automotive. A great read for any newbie! Its like the big old bible of automotive. Recently I was reading my Motors Manual about valve guides. They claimed that excessive valve to guide clearance can cause a burnt valve. How so? I don't quite grasp that. Maybe the valve could eventually become cock-eyed in the guide? The valve sealing surface becomes uneven, sealing incomplete? The valve can't cool properly? That would be some serious valve guide clearance wear. I guess so...Pretty sure the average person here would know something was up, and needed attention before things go that bad.
-
Ran when parked....The scape goat to avoid any commitment that the engine may or may not run or have any usable life left in it. The glossy open-ended statement that implies that "There may be a good engine here! As a seller I just refuse to go any further and find out! Digging into the engine to truly find out, may open a can of worms and severely lower our chances of netting a higher dollar value for this car." So, as a buyer you get to roll the dice and take the financial hit. A rusty seized up engine may cost $3,500 to $7000 to rebuild. That could be more than the purchase price of the car. "Ran when new" is pretty useless statement that leads me to believe the seller might be hiding other things. Buyer beware. Get some coveralls and bring some tools and dig in to learn the true condition of the car. If the seller won't let you...Move on. Pay "core value" for an engine that ran when pulled, or parked. $100 is my max. Even then I'm rolling the dice. The last block I scrapped netted me $30. That's just me. Your opinion may vary.
-
1949 DODGE MEADOWBROOK specs: 230.2 cubic inch engine. Bore 3 ¼", stroke 4 ⅝". Conn rod crank journal 2.0615 to 2.0625" Main bearing crank journal 2.499" to 2.500" All from the period correct Motors Manual. I recommend as others have, to acquire a copy for yourself.
-
@DCJ is your Dodge Meadowbrook engine a 23 ½" long block, or the 25" long block?
-
Special tools are required to measure engine parts for wear. If you want to do it yourself. A snap-T gauge works with an outside micrometer to measure bore size. An outside micrometer will also measure crank main and rod surface sizes. A dial bore gauge is required to measure cylinder taper and out of round. Valve guides are $4 each at Andy Bernbaum. If you’ll only do this once, you may just want to let the machine shop measure all and advise. In my opinion the new learning is fun and worth the tools, so I bought them over a period of several years. Did you measure the stroke to verify engine size? When you pull your tappets keep them in order and position. If you plan to reuse them they should match their cam lobe positions. If you’re planning a proper rebuild with machining you’ll have to decide if it’s worth reusing several parts or not. I figured if I’m in that far, I’ve spent all the money on machining, I decided to order some questionable parts. Thats just me. Do what fits your budget. I just ordered my parts around xmas. From Vintage Power Wagons. Including new: pistons and rings piston pin bushings cam bushings both timing gears and new chain all valves and guides main and rod bearings block plugs head bolts all gaskets and seals
-
Curious, was there glycol coolant in the oil pan?
-
When I was 17 I bought a mid-70's green Dodge Dart. The engine was a Slant 6 225 if I recall. That was the first time I hoisted out an engine. My brother and I rebuilt it. We tore it down and did send it out for machining. I bought an exchange crank. We re-assembled the 225 in dad's 10x10 shed with no heat or electricity. Just an extension cord and a trouble-light. We did the best we knew how as teenagers. We had no mentor at home who knew mechanics. After the assembled engine was installed back in the car, I learned the tranny would not line up no-how. We had the wrong crank for the 727 tranny. So we took the torque out and had it worked to fit the crank that we had. Later in life I wanted an old car. Another green Mopar found its way to me. My green 1953 Chrysler. Why? It was a good looking car that was relatively cheap compared to other 50's cars. It was not a common, 5-6-7 Chevy, nor a Mustang, Camaro, or Corvette. It seems that there must be 50 of each at every car show that has 300 cars! So I liked the idea of having something different. 4 year later I see a derelict 1938 Plymouth on its last legs. I couldn't avoid it. After 3 weeks of not contacting the seller, I relented. Then the car was trailer'd home. Why? It was low priced. Good looking. It was unique. Again another green car as fate would have it. I just keep pouring time and some money at it. Enjoying the heck out of owing and driving it. So in summary: Why Did You Get The Cars You Have? 1. Good Looking 2. Unique among all the other cars out there 3. Low priced, great value. 4. Easy and fun to work on and drive I could add that now that I have owned a couple of old flathead Mopars, I have learned a few things that make me glad I choose them. 1. Well Engineered cars 2. Their flathead engines take a ton of abuse and run 3. This forum is a fun place to hang out (mostly) 4. Interchangeability of parts across many years 5. Parts availability is pretty decent
-
If I recall the move Mad Max was set in 2021. Looks about right. The producer nailed today's look 40 years ago!
-
Cool. Nice work. Nice shop too. I like it!
-
I suppose our perspective around how to rebuild an engine or not, is individual. Where we’ve been. Our experience. Cleanliness is a big factor that seems overlooked here. When investing considerable money in new parts, it seems wasteful to not try and make the rebuilt engine last. There were lots of steps in the video that appear to have been a little unorthodox. A person new to engine rebuilding may not understand this. Someone learning, watching this video may think this is how it’s done. The shop who you’re paying to rebuild your engine should be more familiar with “best practices”. Home, backyard mechanic’s rebuild? Yes it can often look like this. Sure you can refresh it as he did. Sure it started up. How long will it be before the engine needs another major intervention? Maybe he needed it running to get it across the auction ramp? Good enough. Some simple things he did are probably not conducive to engine life. Like scraping dirt, rust, and old gasket material off the block manifold port area, after the bottom end was partially re-assembled with brand new parts. Then hitting it with compressed air. So all the contamination is now airborne. Landing in your cylinder bores. Camshaft bushings. Maybe landing on your newly assembled pistons on the bench. I think that’s a recipe for contamination of vital parts. Better to have cleaned the block thoroughly before reassembly started. This video is probably not a very good learning aide for beginners. It is somewhat entertaining though.
-
Welcome! You found the right spot. The flatheads run pretty smooth. Getting them dialed in and tuned properly is a learned skill set. I like to set a base line and go from there, digging in further to find the cause. Here’s what I’d do to get that baseline. If you don’t know the condition of the listed items, I replace them. But that’s just me. compression test wet and dry fuel pressure test Intake vacuum test set idle A/F mixture with assistance of vacuum gauge New plugs New Points & set with assistance of a dwell meter New Condenser while in there inspect all wires and ground points for good connections new coil New plug wires New cap and rotor set timing set idle speed set valves What you find in these steps will determine where you’ll go further. Here’s my 1953 265ci engine at idle:
-
I’ll guess...Semi auto Vacuum operated M4? 1941–1942 M4 Vacamatic — 4-speed (2-range manual control with automatic 2-speed shift vacuum operated) with clutch and fluid coupling (Fluid Drive); also known as Simplimatic, Powermatic
-
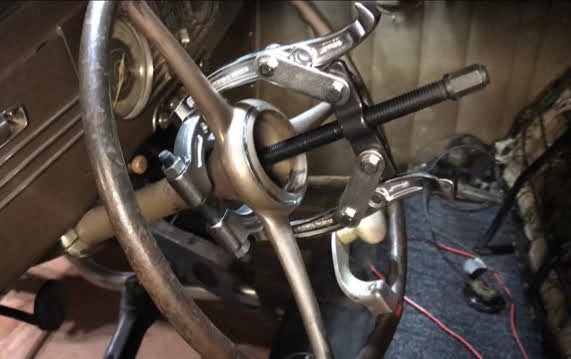
I have limited experience with getting the steering wheel off. My pulled easily with this contraption seen in the image. I'd be weary about tightening the steering shaft outer tube in a vice. Its hollow and not overly thick.
-
This is from my Canadian Mopar 1949 Service Manual. A little warning not to confuse this 25” long 218 engine, with the 23.5” long American 218 engine. Very different. This 3 ⅜” bore Canadian engine is difficult to find rings & pistons for. I have the same engine with a 4 ¼” stroke. It a 228 ci. I am boring it over now to the more popular 3 7/16” bore engine. Effectively making it the 236.6 ci Desoto engine shown here in these engine stats.
-
I bought my part here: https://cgfordparts.com/ufolder/selecttitle.php?c=1&s=7&g=64
-
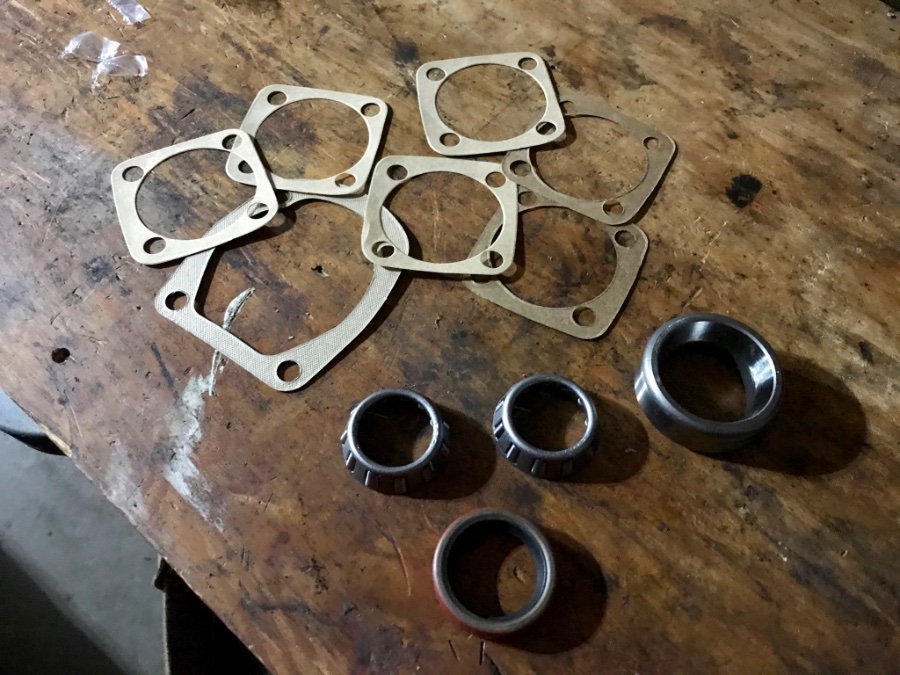
My Ford car steering Gearbox parts arrived. Looks like a perfect fit. I went with C&G Early Ford Parts based in Escondido Calif. Shipped Monday. At my door step in Canada 2 days later. I was pleasantly surprised. Both the Fords and my ‘38 Ply have Gemmer boxes. Not exactly the same housings and fit, however internal parts, gaskets etc appear identical. Laying them out side by side now. Looks good! I used the 6th Edition Motors Manual, and my Hollander Interchange books to do this detective work. Rolled the dice a bit too.
-
This tool is cheap. It is highly effective. I recommend. You can: Test fuel pump pressure. Test intake vacuum pressure. Open up pandora‘s box for only $15. Every flathead Mopar owner should own one. https://www.opentip.com/search.php?cPath=32168&ats=gs&products_id=3616828&gclid=Cj0KCQiArvX_BRCyARIsAKsnTxMUhaItI09H24vwE7WA1v8XJwUehBAbzL6hDCrWz8ETWsxXlaQ7hqQaAt7uEALw_wcB
-
I have done adjustments hot and cold. Cold works well too. You can add .002" to the spec and set 'em cold. I've had success both ways. Remove all plugs. Start at #1 TDC. Wiggle both tappets up and down. Both will move as both valves are fully closed at TDC only. The wiggle is your proof both valves are closed as there should be the clearance. Unless of course one is set too tight. Set #1 valves, both. Look at 1 fan blade and rotate it 120 degrees. Got to valves for #5. Repeat process above. Then carry on. The order is 1 5 3 6 2 4. When all 6 are done you will have rotated the fan blade two full revolutions.
-
Perfect. Every exhaust valve gets it’s own exhaust manifold leg. There are 6 exhaust manifold legs. 2 intake valves are shared between each intake manifold leg. There are only 3 intake manifold legs. Someone way smarter than me engineered that set up brilliantly! Are you tooling-up for a valve set?
-
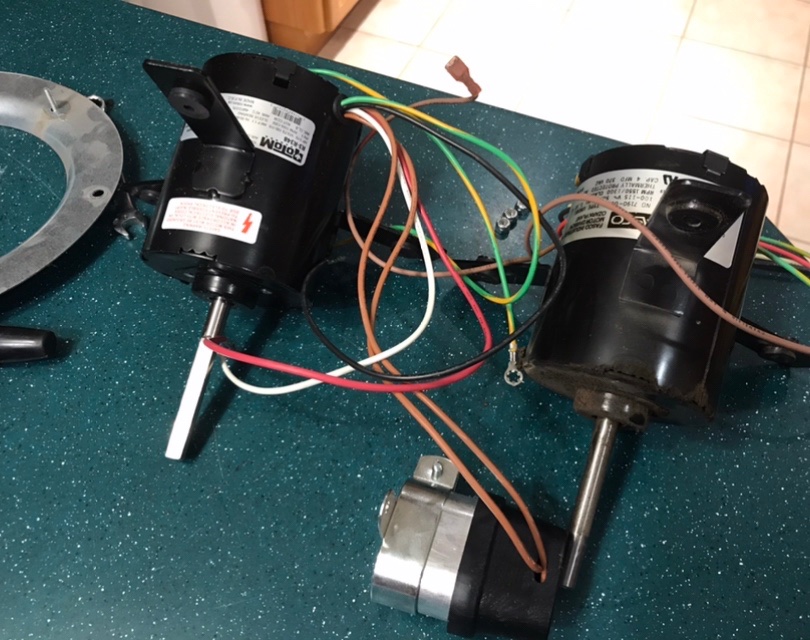
The motor is pooched. It is resists any turning by hand. I got a new motor today with a capacitor. Replacing everything now. Yesterday I became a welder. Today I am a HVAC guy. Lol. “Dabbles in everything. Good at nothing.” All back together working again now. I can tell someone was in there a few years ago and changed 1 of the motors. (There are two) We’ve owned the house for 3 years. The Recent failed motor, I’d wager was original. Made in USA. The House is about 25 years old. The motor changed by previous owner was made in Mexico. The exact same brand-name motor I bought today? Made in PRC. We just keep digging lower.
-
“Better you than me”, rings a bell. Lol. ?


