-
Posts
3,466 -
Joined
-
Last visited
-
Days Won
193
Content Type
Links Directory
Profiles
Articles
Forums
Downloads
Store
Gallery
Blogs
Events
Everything posted by keithb7
-
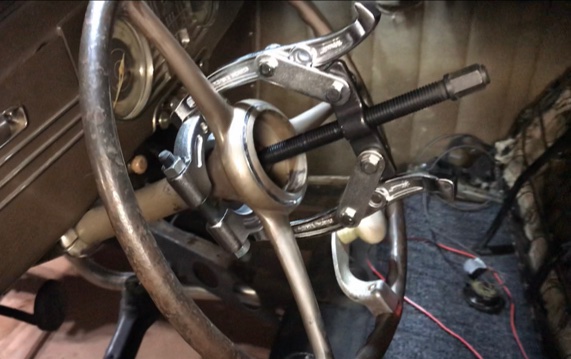
Thank you @Loren . Your description makes sense. I will pull it out and try brazing it. Hopefully it’ll secure and seal, holding oil. I saw some concerns about steering wheels being stubborn. A 3” bearing separator and a 2 jaw 6” puller made for quick removal. It took under a minute to have the steering wheel off.
-
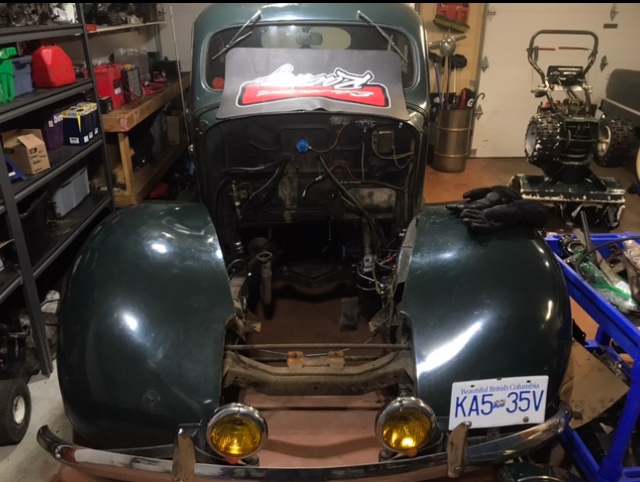
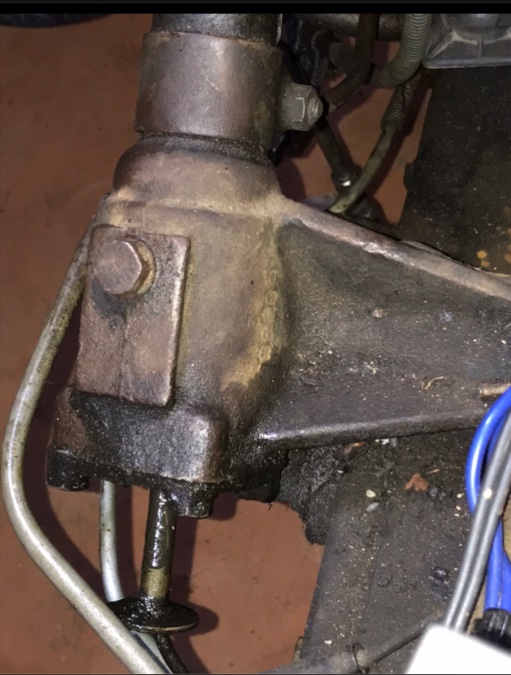
I’m this far into my ‘38. Seems like a great time to learn what exactly is going on with the steering gear box. At the low end of the box, where to horn wire comes out, there’s what looks like a poppet-valve. Its hanging down in the pics below. The wire goes In thru the piece. At this point I don’t quite grasp how it’s supposed to be retained in place. Looking in my service manual, the illustration there seems different than mine. As it sits, the gear box won’t hold oil. Nor grease. The grease gets hot in the engine compartment and globs out. It makes a fine mess. I figure I need to pull the gear box and have a look. A few questions I have about pulling it: It seems I need to pull the steering wheel. Then disconnect the drag link. Use a puller to remove the steering arm. Then lift the whole unit, including steering wheel shaft and tube, all out together. Is this correct? I’ve never done this sort of job before. I think its time. I’ve not looked into a seal kit yet. Fingers crossed I can find one somewhere. Thanks for any guidance or tips.
-
I should have clearly stated that there are generally two water valves. The manual shut-off valve, often seen at the left rear of the head. No cable attaches to it. You can use it to completely isolate your heater core up in the dash. It will shut off any water flow to the heater core, from the head. Any old manual valve will practically do in this spot. Which is often why we see garden tap shut off valves placed here. Then there is the auto regulating water valve that that regulates cab temperature. It has your heater temperature setting control cable hooked up to it. This is the pricey one to replace. As discussed in my post above.
-
Fluid drive is not directly referring to the transmission type. It is the fluid coupling between the engine and the transmission. There are two types: A simple fluid drive, or the more complex torque converter. The main difference being the torque converter has internal stators that multiply torque at lower RPM. The basic fluid drive does not have stators, nor multiply torque. The dry clutch is still present and used in both systems. I've never owned the basic fluid drive. My understanding is the basic fluid drive can be placed in front of a manual 3 speed tranny, or the semi-auto M5-M6. With the manual 3 speed you shift it manually still. A three on the tree shifter. The fluid coupling allows you to come to a stop and leave the tranny and clutch engaged. Still in gear. Engine won't stall with either fluid coupling type used. You only use the clutch to shift gears. You do not need it to come to a stop and take off again. The M5-M6, you are using the clutch way less, as it has an auto shift. The M5 or M6 semi-auto tranny you manually put in hi or low range. As engine RPM increases, you lift your foot off the throttle. The tranny hydraulic power creates a shift. 1 auto-shift only, either up or down. It too can be left in gear when stopped, clutch engaged. Engine will not stall. Here I explain some of the differences between the two types fluid drives: I suggest you get under your car. Look at the tranny. The right side. Does it appear to have a couple of cans bolted to the side of the tranny? Some wires? One can is a 6V shift solenoid, the other smaller can hosts a spinning set of contact points. Wires and cans indicate M5-M6 semi-auto tranny. If no cans or wires, you likely have a standard fluid drive that does not auto shift.
-
My 1953 is seen. The heater temperature control unit is located up in the heater core enclosure area shown. Bottom area. A temperature control cable from your heater control hooks up to it. It has a long small brass tube too. I believe it is filled with ether. As it heats up and cools down it regulates water flow through the heater core. The ether heats up and expands or cools as temperatures change, adjusting the water flow valve. It is a nice (also fairly expensive) luxury to have. However not many original ones left, still work. These temperature control valves are not required to have cab heat. You can fix it so the valve is wide open. Then you can control your cab temperature a few ways. By opening draft vents or windows slightly or adjusting your blower fan speeds. The heater will just put out maximum temperature all the time. Not a bad thing...
-
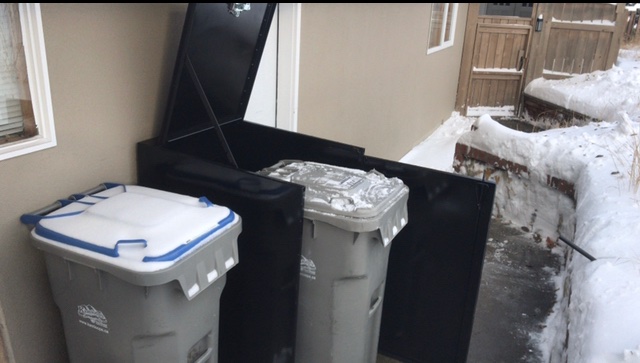
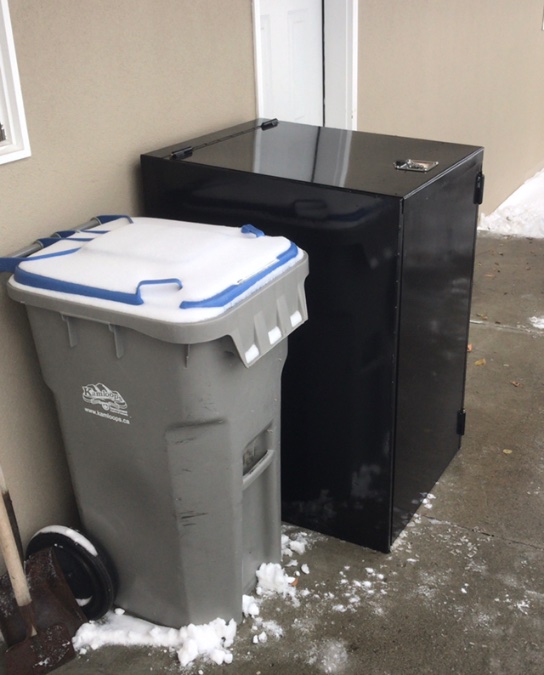
Well folks a few months later, I think I have a solution. I approached a retired friend. He can fab stuff up. He’s pretty well equipped. I asked if he’d realize an idea that I had. He built me a bear proof bin. All corners pinned or welded. Nowhere to pry with teeth or claws. Recessed top latch. Angle iron on all bottom surfaces. Drilled for anchor bolts. I’ll drill into my cement and bolt it down. I can easily open the top to add garbage. I can swing open the front door to wheel my garbage bin to curb on garbage day. Next year it will be put to the test when the bears come back around.
-
Speed wrench worked pretty well when hand cutting valve seats! Worked well for me.
-
Very dark here now. Cloud coverage again. No line of sight. Oh well. I missed it 400 years ago too. 800 years again before they line up as close again? Try and imagine what life on this planet might be like in another 800 years. If there's anything left here to support life. I read somewhere that they say it was the middle ages the last time the two planets were close. Maybe not as close as they are now. Let's go back to the middle ages. Think about what they might have guessed the year 2020 may look like. Lol. Internet? Chatting with Mopar fanatics from around the world instantaneously? A novel virus spreading rampant. People glued to cell phones walking into poles...Some serious changes. We are indeed all but a spec of sand through the hour glass of time. Now at this time, the most important little insignificant thing I need to do, in my limited time here on earth is clear snow.
-
I watched this and was entertained. Jay said he tries to include young kids in the vintage car culture. That's a good thing to do. That is indeed the future for old cars. Their keepers. Time passes, it's sometimes hard for me to believe how quickly things have changed. The next generations sneaking up behind us. Taking over what we have built. I have in the past coveted an old Ford. A Model A or a Model T interested me. However I have come to grips with the elevation changes around here, and the power limitations of these old cars. Climbing twisting steep hills at 7-10 mph speeds is fairly dangerous. Today's traffic coming up behind on a blind turn at 50 mph is not ideal. At this point I've decided the later 30's flatheads are better suited for me. Good on the kid for taking on the old car hobby. Cool on him for making the Model T his own...The man-bun I have trouble with. Lol. I can get past the GALP. The man buns?....? 60 years ago I guess it was the long hair hippy look. In many ways things are still the same. Generation changes. https://youtu.be/eUAMS9g_5bI
-
Last night we got the Christmas part, but not the Star portion. we had heavy cloud coverage. It snowed over a foot here yesterday, well into the evening. The first sizable dump of the year. Any systems on my snow removal equipment that needed attention, all showed up to ring-in the new season. A few cuss words, some skinned knuckles and and about 3 hours later, we got all the snow dealt with. This morning I expected to see a 2 foot high windrow at the front of my driveway from the road plow. The plow never came last night. I most certainly will be dealing with said windrow today. Maybe tonight I can view the aligned planets? Will this occur again for a few nights?
-
You are likely better off rebuilding the original made in USA fuel pump, versus buying a new pump today that is made overseas. Take your pump apart and look at it. In particular pay attention to the large diaphragm gasket shape. Compare it to pics of pump kits on e-bay or other web sites. You should be able to spot a matching rebuild kit. Make sure you are not buying a kit or fuel pump for a car that may use the fuel pump action for vacuum wipers. I found that if was difficult to keep the fulcrum pin in place after the rebuild. Several attempts at staking it in place, left me stranded roadside. The pin still found a way to walk out. JB Weld on both sides of the pin has worked well. 1500 miles and it has not walked out again. Some kits have a machined groove in the fulcrum pin. A c-clip is used to retain the pin. That seems to be the case the with kit shown below: Looks like a pretty good selection here: https://www.then-now-auto.com/product-category/fuel-pump-kits/desoto-fuel-pump-kits/ It's likely this one: https://www.then-now-auto.com/product/fpa48-fuel-pump-kit/ Ebay: This will probably be fine as well: https://www.ebay.com/itm/1941-1942-Plymouth-Desoto-Dodge-Chrysler-NEW-fuel-pump-REBUILDING-KIT-41-42/173237001394?_trkparms=ispr%3D1&hash=item2855badcb2:g:ZUQAAOSw64ha333R&amdata=enc%3AAQAFAAACgBaobrjLl8XobRIiIML1V4Imu%2Fn%2BzU5L90Z278x5ickkSG%2BOFgrj2Yvbvmrj2TAdM7fHpCF4nnDEyxazae7NqCed5ZVRbywI1YMWFoyjZxcQ0EmYGOTq3Uynogg8ijVnr3gMYdArnxrtOSeLSv0C1z2tnfqz3E5JTqDzBeUl1CyWep%2FKJrrX97yBTtIRW7o2PdF0oDn5WdVw2td1lLnk9Ce2AK6cru1xvNGLHIACENN3bkSPKFgRRT5pzaRytvqhGGQgfquLejpDDykqhkUdvmXaHuBgAFSgcN%2BbJanSSDUKs0%2BiWjGKCaH9tCRj1sxh4tWdZw4F2%2FByMSoKYWBUUd1heVSQxP%2F2ixGELlE6bcUv7VI2GE7cio06Vj5BccRF9bzevIoAwLD8Ea3HGGPxAo%2BVGeogHb%2F24oOzMHuCcxXzuLzssyFthN4SwK2EKCXQgNzemMMBoFBGaHEWoJlZ8cYuo63gd0yT1sJ4rO4odXdkgBJ%2BA8MAVedvNN8fVUpfsOGKm1yIh1%2FVXs8jHXsKMupkdyoq0haf8mg3CODRnSp39IWaUltM6NiJZ1ZuLtG0yjtm8gsn9iuRHMIzhltTqqOtBsL%2FpUey26MjhixqLBJPSRISZ8gmFUFVUCDfcwE4WiOYzwnca0HFEBz2D4vPIptM2upJA%2FmlLNEbxSyrNZqDn%2FERdcpEdKkmZOecOvRnNfyHqQfQftnz9TUG9MS7jI7tnbvOa1rm9CMMtvfJvypBcmX%2BZ863ofsb5%2FtrNNnKDMTHyN8E3%2Fxvva7Yd3kGqifg%2F5zXXVd90A0KkqmZrVdGU5WwVAixP8UvTn%2BM7%2BtCrQzvM2HseTBWflWfbPfibXw%3D|cksum%3A173237001394c93b7486192d45acbba4b7b48cfadeab|ampid%3APL_CLK|clp%3A2334524
-
Something to think about: Opening up the engine will likely lead you to much contemplation and decisions. One decision compounds another, and another, and another. Or you can pretend you'll didn't see what you found, button it back up and putter around like @Sniper does with 50 psi in the cylinders. If the car is new to you and you want to just drive it, I'd drop the pan, valve covers and oil filter. Clean all the sludge out of those areas. Install modern detergent oil. Pull the head. lap the valves. Set the valve lash. Forget about any top ridge, cylinder taper or out of round at this point. Just get it running. Drive it for a while. Tune it up. See how it performs. Hows the water at operating temps? Oil leaks? Oil burn? Enjoy it for a while. Sort out the bugs. Then decide how far you want to go with the powertrain. Make a plan, a budget. Start squirrel-ing money away. It's early in this honeymoom stage. Resist the temptation to pull and tear the engine down at this point. Because...Then there's always the clutch, tranny, park brake, trunniuons, diff, axle bearings, brakes.... And it hasn't even turned a wheel under its own power yet. Go enjoy the car. Pick away at it and drive it. That's what I did and I loved every minute of it. Its winter #2 here now for me and my honeymoon stage car , and guess what? The pic says it all.
-
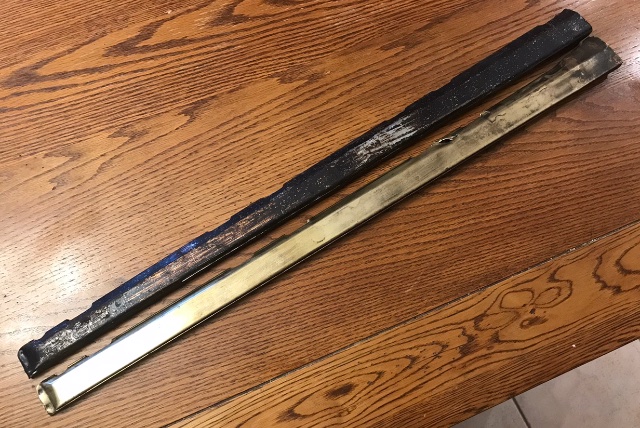
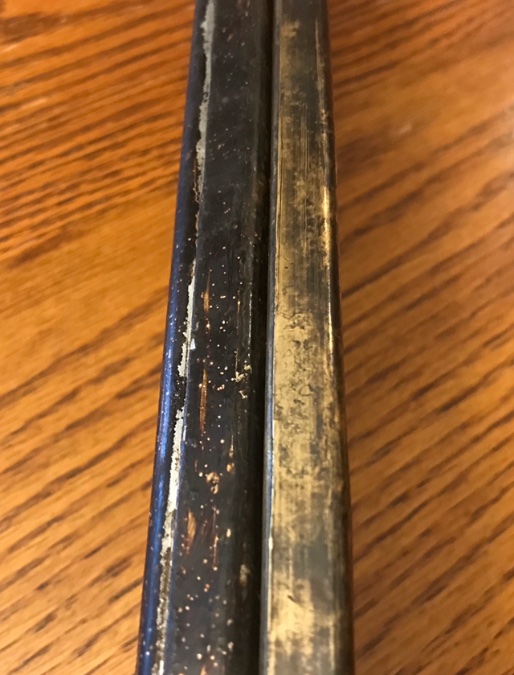
Brass is ideal. Shown here is the one pulled from a ‘53 Canadian 25” engine. I suspect I pulled it out for the very first time in 2020. The new aftermarket steel one would not fit in there. Too wide. My brass one went back in. I had ordered up a new steel one in advance. I was expecting the worst. I did not expect to find a nice non-corroded brass tube in there. Pic 2 shows the steel aftermarket width. Its too wide. I’m sending it off to a member here who has more skills and patience than I do!
-
You’ll need to decide if you want to invest the cash today to sleeve these cylinders. Sure then they’ll be great. However if you don’t need them, put them away and store for future options. Sleeved cylinders won’t improve braking performance. They will however address leaking cylinder problems. When I was scabbing together my ‘38 to make it at least rod worthy, I found very old leaking wheel cylinders. I cleaned them up and honed them. I installed all new seals. That worked well for 3 cylinders. The 4th one decided to leak again a little while later. I took it apart again. I spent some time polishing it up with emery cloth and my thumb. That was last May. Its been fine ever since. No more leaking. Many folks are upgrading to front disc brakes. I see you have some sets of upper and lower cylinders there, for the fronts. Likely many sets of these front cylinders are tossed in the scrap metal bin when folks upgrade to disc. I doubt theres too much interest in someone buying old rusty original cylinders. They’ll want a deal. For example you spend $250 sleeving them. Then buyers will likely want to pay $100 to buy them from you. Me? I’d put them aside as-is. Store them for possible future needs. You can always sleeve them when needed.
-
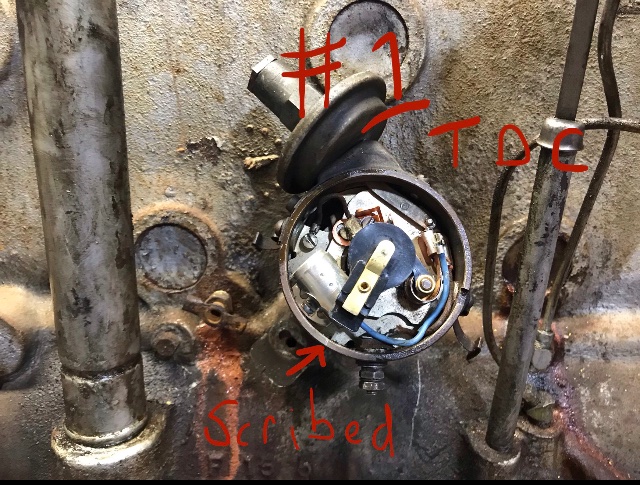
My notes from a recent removal. The rotor turns like a clock hand. See it pointing to where the 7 would be on a dial clock. Are they teaching kids how to read a clock any more? What will they do in another 30 years? Lol.
-
There are good arguments either way. 6V or 12V. Whatever works for you go for it. My personal experience is that I like to keep them 6V. When properly maintained, 6V works well for me. I have zero complaints. I own two 6V positive ground Mopars. I have no reason at this time, and no future plans to convert to 12V. Same could be said by someone who prefers 12V. What you choose to do with your car, is nobody's business really. I heard a great saying recently about working on old cars...."Doesn't matter how it's done as long as you have fun." So true. I also get a kick out of the younger crowd who come chat about my old Mopar car. "6V positive ground" I declare. They sorta go "Huh?" Or "Wow. Really?" Yep really...And a carburetor!
-
It was a different, challenging year for sure. The good news is our favorite hobby, old Mopars, could still be enjoyed. A lot of us work alone in the garage anyway. We still got to go for many drives in our old Mopars. It was pretty easy to self isolate if you’re a gear head anyway. Besides how often do you actually see any other old Mopars at car meets? Not many! Lol. Seasons Greetings to all. Wherever you are. Whatever you celebrate, enjoy. I look forward to interacting with you all some more in 2021. I heard a good saying the other day. Pertaining to home garage work. “It doesn’t matter how it gets done, as long as you are having fun!” Good one. I like it! Keith
-

A fun afternoon out in my 1953 Windsor...A performance review.
keithb7 replied to keithb7's topic in P15-D24 Forum
Sorry I don't know the gas milage. I really don't want to know either. Its purely driven for pleasure. Knowing my gas milage seems like a way to screw up the pleasure part of cruising about in a big old flathead powered car! lol. -
I don't do visual arts, but how about listening arts? I've been playing around with musical instruments since I was about 10. I've yet to master one. However I do like to mix it up, trying many types of instruments. Sometimes, especially in the winter when we experience long cold nights, I'll sit in front of my Mac computer and record something. This came out of me last week. I perform all parts except the drums. It's good clean fun. My number 2 hobby after my old Mopars.
-
Thanks for the info. I'll consider it. More engine pondering... I have asked some questions related to this topic before and you guys taught me a lot. I'm thinking deeper about this as I rebuild my 228 engine. I was recently thinking about the various block lengths, bores and head gaskets. Canadian 25" long 218 and 228 engines are 3 ⅜" bore. The difference in the displacement, is the result of a 4 1/16" stroke on the 218 versus the 4 ¼" stroke in the 228. I assume these would share the same head gaskets? The same 25" block is bored to 3 7/16" for the 237, 251 and 265 ci engines. This 25" long block, bored to 3 7/16" is also the same dimensions I believe as 25" USA blocks. Earlier versions of this 3 7/16" bore engines were known as the Spitifire engines. The Spitfire labeling was dropped from the head by the early 52-53 or so .These bigger bore engines were found in the Chrysler and Desoto cars of the USA. The differences being 4 ¼", 4 ½" and 4 ¾" stroke. I assume these engine would all use the same head gasket? Am I on the right line of thinking here? In terms of head gasket commonality? The engineers did a great job of sharing parts and making these cookie cutter 6 cylinder engines, almost all the same. It sure makes it a lot easier for us to cobble something together 70 years later. I suspect one could take a 218 Canadian 25" engine, tear it town. Find a bad crank? Maybe you find a 265 crank & con rods. Bore the block out to 3 7/16 and use the 265 crank & rods. Now that 218 engine is basically a 265. Is this so? What about flywheel weight? Front pulleys? Other bolt on parts from the 218? Did the 265 use a 10 or 11" clutch. The 218 and 228 a 9 1/4" clutch? Very interesting stuff indeed.
-
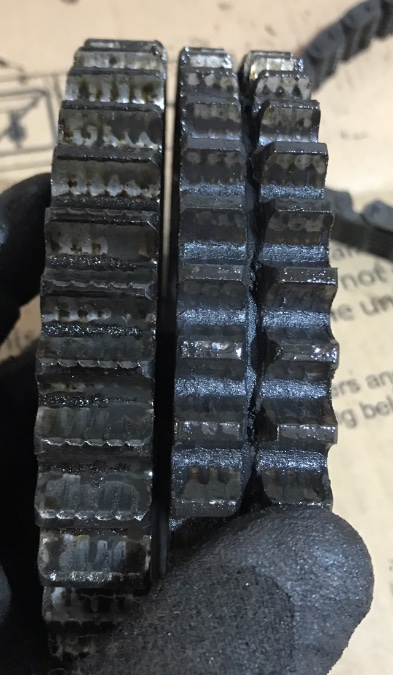
I’m Interested in learning why they may have changed up the cam timing gears width and chain. Left is 1953 Canadian 25” long 228 ci engine. Dodge. Right is 1949 Canadian 25” long 218 ci engine. Dodge. Although the gears are the same OD and pitch, the chains are not interchangeable. The double row gear is slightly wider. Forgot to mic them to compare. Wondering why they changed this up? From wider In 49 to narrower in 53 in my examples.
-
Be aware, even with a decent puller, these drums can be a bear to move. Keep at it. Stay out of the line of fire. Turn the nut around on the axle shaft and twist it back on, leaving a little gap showing for the hub to move. That's all it needs to break free. Then you can stop it from going flying if it pops off hard and fast under great stress.
-
I’ll do my best. Vintage Power Wagon has NOS pistons. I’d read newer updated pistons were beneficial? They offer those too. Cam ground I suspect?
-
Good news to share.: My 25" long block was boiled and got a mag-particle check. No cracks! I dropped by the machine shop. Paid the bill and took my block back home. Now I'll proceed to order all my parts. Also I'll install the new valve guides here at home. Once all the parts arrive, I'll take everything back to the machine shop for boring and a crank grind. It'll probably take about a month for the parts to show up. Looking around at the mass number of blocks and cranks at the machine shop, I figured it was best to take my block back home until the parts arrive. I cannot have them misplace it! Lol. When I measured the mains and rods with plasti-gauge I noticed an uneven wear. A slight taper from end to end. Normal wear for a crank. I estimate its wearing about .0005 to .0015 out of true. I'll get the cranked turned down .010 and order bearings to match.
-
Snow family sitting around the dinner table... Snowboy says to Snowmom..."This soup tastes like boogers." Snow mom replies. " It's carrot soup".


