keithb7
-
Posts
3,470 -
Joined
-
Last visited
-
Days Won
193
Everything posted by keithb7
-
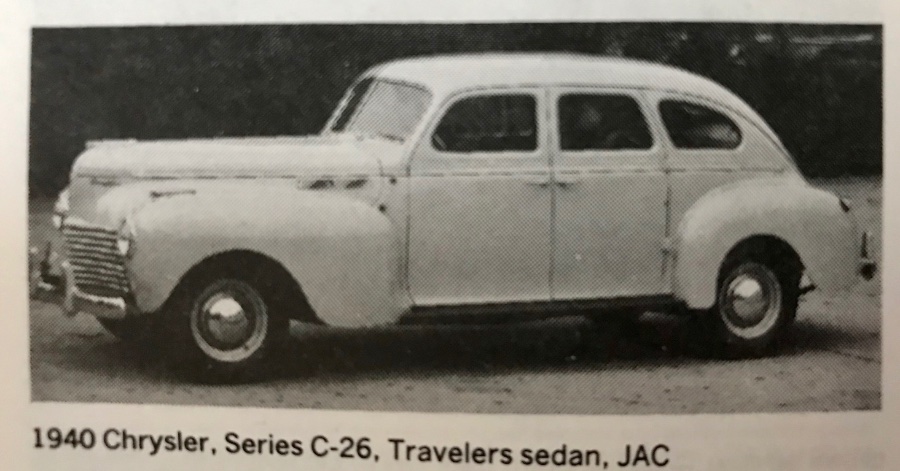
According to a book I have here, the C26 Traveller 8 cylinder shares its 128 ½" wheel base with the New Yorker, New Yorker Highlander, and the Saratoga. The Traveller was the most stripped down base model of the 26 series. Basic interior and available with a manual transmission only. All were available in: 2 dr coupe 3 passenger 711 qty 2 dr coupe 6 passenger 1,117 qty 2 dr Vic. Sedan 6 passenger 275 qty 4 dr sedan 6 passenger 14,603 qty Total production of the 4 different models of the 26 series is documented and shown. The numbers reflect the total production of the C26 series for each body & seating style. For example. 4 dr 6P sedan. The Traveller, the NY'r, and the Saratoga total combined production 14,603. I cannot tell you how many 4 dr 6P sedans were only Travellers.
-
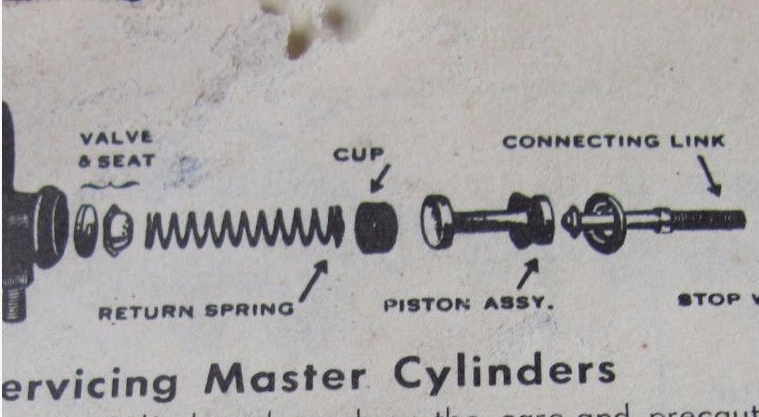
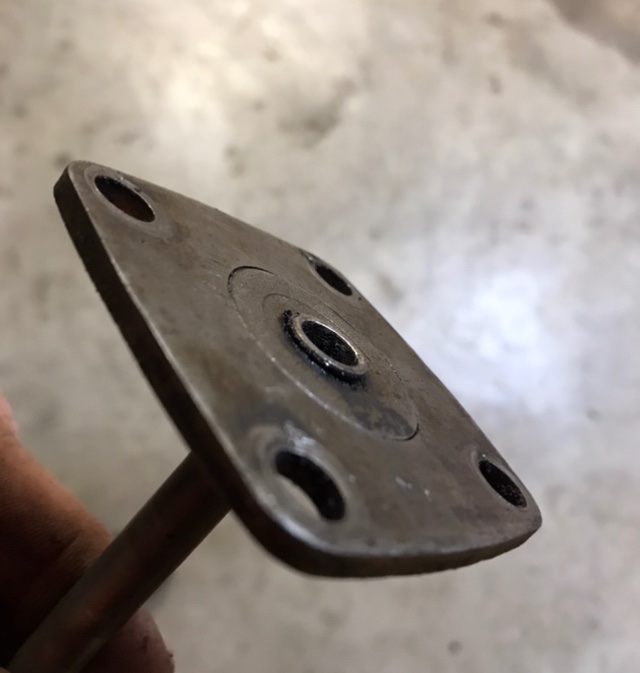
I found this image helpful. A little later year cylinder shown. However similar assembly. Your item D is in the very far left of my image below.
-
The best part about the snow...You really feel rejuvenated when it finally melts. The sun warms up your face again. You hit the tools with renewed energy. A little more spring in your step, as you roll the old Mopar out of the driveway for the first time of the new cruising season. The seasonal changes do bring structure to your life. In some areas, more extreme than others. I am grateful I don't live further north than here. Folks up there got it a lot worse!
-
Happy New Yorker to all P15-D24 members. From all corners of this earth. I know we’ve got some pretty active members from the UK, Scandinavia, Australia, Canada and the USA. Where else? Let us know where you’re viewing from! My first view of 2021. So far so good! (but its early. ?)

-
@61farnham Simon thanks for this info. Very helpful. I think I should source my own Hollander book. I’m questioning if my steering gear box is not what is typically listed in ‘38 Plymouths. According to my Dyke’s book I have a slightly newer version. Mine has an external adjustment screw for the sector gear and shaft. Typically 1938’s used shims on the sector shaft for adjustment. This why I suspect I have the gearboxes typically listed under 41 or so Plymouth listings.
-

Go Fund Me. Fund yourself you lazy so and so.
keithb7 replied to Frank Elder's topic in Off Topic (OT)
This thread stirred up some feelings. The older I get, I am able to look at the changes in the world that have evolved in my lifetime. It seems scary sometimes when I think about what has developed. My Great grandfather I can't say for certain. Probably 1900 I'd guess. My Grandfather born in 1920, my father 1942, myself 1971. Times indeed were hard for those before me. I was given great opportunities to make a living for myself. I was raised in the "school of hard knocks" style. Like many here, I figured out my way. I never took charity. I left home at 19, (surely late, compared to many here) with nothing. Very fortunate to have a good young woman at my side. We carved our way and raised a family. We worked and worked and worked. Still to this very day. Right now, I kid you not, she's sweating copper pipe, installing a new sink. I'm still too cheap to pay anyone for any vehicle maintenance. Been doing it myself since I began learning at 16. My Father drilled into me, independence. Everything. "Figure it out. Cause ain't nobody going to look after you." He was right. I do prefer to see people go and find a way to earn what they need. I think I figured out when I was 8 or 9 that if I collected enough empty beer and pop cans from the ditch I could buy my own comic books. Then it was delivering newspapers. Babysitting. Picking vegetables at a local farm until finally... I was of legal age to work at 14. I got my social insurance number and started working a real, formal job. It took many years of part time wages to keep my old jalopies on road while in high school. Whatever I had left over from buying parts and gas I spent on my girlfriend. A good investment. As mentioned, she'll installing a sink tonight! lol. Sometimes I too think about the salt of the earth people I knew in my youth. Friends and family of my parents. I had the 70's, and the memories are very good. Family was everything. Friends a very close second. Today if people added up what they spend on a cell phone, a home internet package, perhaps a TV subscription bill, Netflix, all the Starbucks coffee each month, it might add up to our parents monthly mortgage payment. Unbelievable, but none of those costs existed 50 years ago. -
Do you have a tachometer you can hook up? Watch RPMs. Pull one spark plug sure. RPM should drop slightly. If no drop in RPM, good chance that cylinder is not firing. If you want to know if you have a dead cylinder due to no compression, a compression gauge would tell you pretty quickly.
-
Love the gantry! Part of me wants one.
-
Maybe one way to make a half decent buck off an old Moapr might be to part it out? Over 2 years ago I made an offer on a '49 straight 8 NY'r. Sunk up to the axles. I figured I'd sell the exhaust manifold and break even. The guy refused my offer. Too low he said. He "had other hot buyers in waiting". It'll be 3 years this summer that the car is still there, sinking deeper. I see it every time I drive by. My offer now would be ½ of what it was a few years ago. Make me make the 35 minute trip 3X will ya? Found a pic of it!

-
Eueka! The light bulb just came on. My Motor's manual tells me that the same Gemmer 305/335 model gearbox that's in my '38 Plymouth is also used in '37-42 Fords. The Motors Manual was published in '42 or so. However they carried on to use these same Gemmers up to '48 in Fords. (several years after my book was printed) There's a billion old Fords guys out there buying parts compared to us Mopar guys. So I found a popular old Ford site. They have all the parts readily available! For cheap by comparison. Seen here: https://www.earlyfordstore.com/index.php/cPath/85_165/sort/3a/page/3 Odd bearings. Gaskets. Shim packs. Rebuild kits. Brass bushings. Worm gears. Looking at the photos, these look correct. $80 for all I need. I'll be placing my order very soon. We’ll see what develops.
-
Thanks @JBNeal. I have been doing lots more research. I thought I would share that my Dyke’s Encyclopedia 20th edition has very thorough Gemmer gearbox setup instructions. It seems that Dyke’s book holds a nicely preserved set of instructions right from Gemmer back in the day. There’s very good descriptions listed about the differences between the various Gemmer models. It appears that I have the 305 or 335 type. I also suspect the 305/335 models do not use a thrust washer or shims on the roller shaft. Due to the external adjustment ability. I did not see any thrust washer or shims on my roller shaft upon removal. Earlier model Gemmers had to be removed from the car completely to set he worm mesh adjustment with shims. My Gemmer has the external set screw adjustment. It claims that a thorough set up can be accomplished with the Gemmer 305/335 remaining installed in the car. My 8th edition Motors Manual lists the 35/335 type as used in 40-42 Plymouths. I suppose anything could have happened in the last 83 years. Parts could have been swapped for some reason or other. I do see repair work on my car, what I think was the result of an accident. Could have needed a steering gear box replaced? It may have had a 40-42 Gemmer installed...Seems believable. My original ‘38 parts manual has been somewhat helpful. It does leave some gaps that I’m still trying to fill. It appears that USA built and Canadian built cars have something different about Gemmer’s used in each. I can’t quite put my finger on the exact reason for the different Gemmer parts listed for each country or origin.
-
If I recall, aren't NC residents allowed to carry side arms? Thieves on your private property are bold! The drug addicts up here lately have been stealing our rural mail compartment boxes. We have to go to a nearby central location to gather our mail and parcels. So far this week two complete units have been stolen on two separate nights. They get everyone's parcels and mail. The red-circles indicate where the two missing compartments were. Gets me thinking, I have been to NC. Flew into Rayleigh. Went to Clayton and Sanford. Drove east out to Nag's Head. Kitty Hawk too. Speaking of snakes I recall seeing hunters in a private treed lot. Bear hunting they said. Claimed the bears there don't hibernate. They had thick leather gators on to prevent snake bites in the swamps. They carried side arms to quickly deal with the snakes. Beautiful area you have there @knuckleharley

-
No thanks! Maybe they'll sponsor my YT channel and send me some free parts! Lol. Not likely.
-
I’ve recently read that these Gemmer worm gears are extremely difficult to machine and reproduce. Only 3 machines were ever built to cut these worm gears. Only 1 machine remains in use today. It’s in Buenos Aires Argentina. I have contacted them for parts that I’d like. The local bearing specialty shop could do nothing with the cone and cup I brought them. These are odd bearings that seem to stump the experts. The seal mentioned above seems right. I’ve considered my options to scan and cut my own gaskets and shims. I know I can do that. However if the specialists in Argentina have everything I need, they might as well throw all I need in one box and ship it to me. I can’t imagine what the price will be...Standing by. By luck, my worm and sector gears seem good. I suspect I caught this impending failure at a good time.

-
I suspect I am at at the apex, or nearing it when it comes to investment and recovery costs at sell time. As I mentioned above, that is not a driving factor for me. I am rebuilding my engine now, it will likely take me over the apex. To the land of diminishing monetary returns. Smiles per mile, the feeling of accomplishment, and experience, charted on a graph, the chart still going up. Steep. I look around and see really nice looking restored '38 Plymouths. Thousands and thousands spent. Countless hours. I could pick up a very nice restored 4 door sedan for $12K USD. It cost plenty more to build! Plenty. How boring would that be for me? Owning a fully restored one, at this point in my life? We'll I'd probably need a second one to keep my busy. Me at 70? Well, I might very well have a different outlook! ? Maybe not, plenty of guys here having fun at 70 and up. Still dropping trannies and pounding off seized rear drums.
-
Hey! There's no drain plug for the differential on my 48 DeSoto!
keithb7 replied to MarcDeSoto's topic in P15-D24 Forum
I also purchased one of these. About $5 US Funds. I needed it or my engine oil gallery plug removal. https://bcfasteners.com/shop/jet-h3700-21-3-8-drive-5-16-square-oil-drain-plug-socket/ -
Hey! There's no drain plug for the differential on my 48 DeSoto!
keithb7 replied to MarcDeSoto's topic in P15-D24 Forum
These work very well. I own one: I have MV7201. Great for pressure feeding or vacuum removal of fluids. https://www.skf.com/mityvac/products/fluid-evacuation-and-dispensing-equipment-and-accessories/fluid-evacuators -
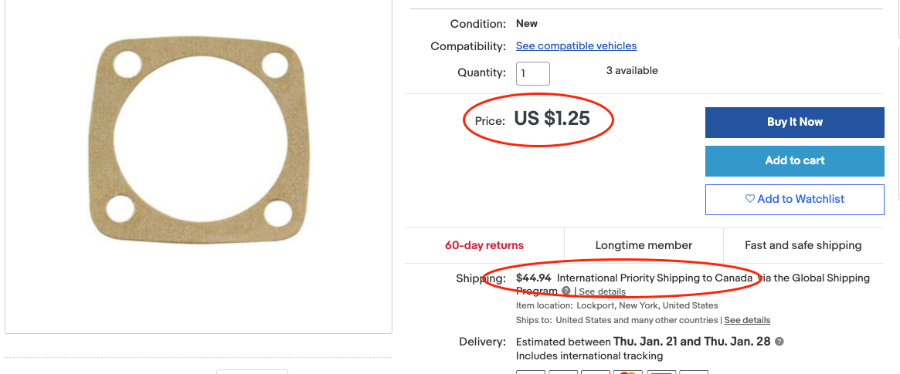
Seeking out parts, I thought I'd share what many of us are up against. This is ridiculous. The part is priced fine. Look at the rate to ship it to Canada. It's a flat gasket that would easily fit in a small envelope. It's frustrating sometimes as we try to keep these old cars on the road, and also manage our costs. ETA over a month. They are not kidding. Likely longer. The Ebay Global shipping program seemingly straps your part to an old wandering dog with only 3 legs. I will try and cut my own gaskets and shims.
-
Thanks @MarcDeSoto. I did forget to go watch the Master Mechanic video. That helped me grasp a lot. I read the 1940 Motors Manual that I have too. Lights started coming on. I think I have found the worn part causing my symptoms. A photo below shows the lower steering shaft/worm gear support bearing. Lots of cage wear. End cover was actually cupped slightly from stress. Bearing cup was milling into the end cover. Allowing the center circular piece to pop out. Been 83 years in the making. Worm and mating roller gear looks good. New bearings, a new seal and some shims, should be all good again. When I took my end cover off there were no shims left. As bearings wear shims are removed to tighten up bearing wear. With all my shims gone, I’d wager they were pulled decades ago, to tighten things up. Now the bearing is totally spent, no make—up room left. This was a fun and interesting project. I learned a ton again. I couldn’t quite accept what was going on. Why the symptoms were occurring. Then I saw the cage wear. I think I’m content to move ahead with the repair now.


-
Have done anything related to the points yet? Sounds as though you are at least partially through a 12V conversion? At what point during the 12V conversation have you noticed the back firing? Valves set? Compression test results acquired yet?
-
Your original coil has the wire from your ignition switch, entering the coil at the end. Hidden in behind the firewall. The other small wire going to the points is on the engine side of the coil. A new 6V coil on Rock auto (Or anywhere else) will have the rear hidden wire moved up to the front of the coil beside all the other wires. You can easily wire up a newer modern coil. An original type with the rear mounted wires ia about $250 US. A new one, what, about $20? You can see my modern coil wired up here. Harder to see the smaller black wire headed to my points in this pic. Yellow wire goes to my ignition switch.
-
The small red wire from the coil goes to a mechanical switch. When the switch closes 6V voltage goes directly to ground. This switch is also known as “the points”.
-
I’m not entirely sure of the path that this thread has taken. I do enjoy the comments. Old Mopars, I don’t care much about their worth. The experience, education and joy they bring me is priceless. If someone miraculously showed up at my door and said “I’ll give you $50K for your 2 cars, all your tools, and spare parts”. The deal was subject to me selling my house so the garage was gone too...I‘d pass. I don’t know what the heck I’d do with myself. My tools allow me to do so much. Not just on my old Mopars. I’d be wrecked. Retirement plans destroyed. I can’t put a price tag on the things that bring me joy in life. A life time of acquiring tools, then all my tools vanished? I can’t accept that. I like to compare my situation to a friend who is an avid golfer. He spends thousands per year on golf fees. Clubs. Gear. Etc. A lifetime of that, adds up to a considerable amount too. Does he care about recovering his investment when he gets out? When he can’t golf any more? Our old cars and tools fare pretty well by comparison. Sell my cars and tools and take up pickle ball? Naw. No interest. When it comes time to sell off an old Mopar I’ll probably start with a higher asking price. After a while of inactivity I’ll drop the price. I’ll keep doing so until I start getting inquiries. Then I’ll know I’m just about in the right price range. Until then I’ll just keep pouring time and some money into my cars. It makes me happy. The whole experience is fun. Part of it Includes coming here. The experience is not for sale.
-
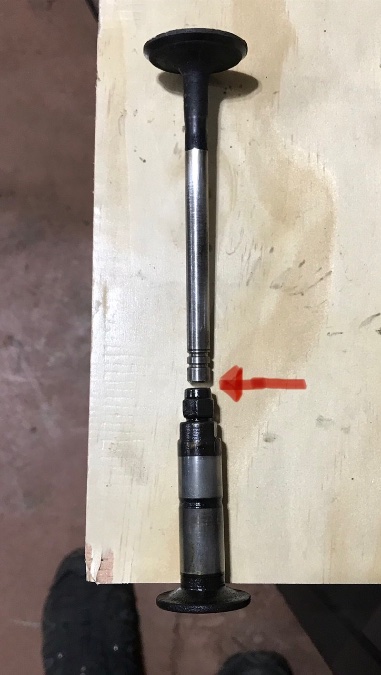
You are to measure the gap between the top of the tappet, and the end of the valve stem. Exaggerated here for clarity. Area indicated by red arrow. By twisting the top tappet hex cap, you are either increasing or decreasing the tappet overall length. Changing the measured gap. What I’ve learned: It may take a few times to get them all set properly. Don’t beat yourself up when one or two valves may be clacking away when you’re done. An automotive stethoscope may help you dial in the exact valves that are still ticking. Use It while the engine is running. Get back in there and re-set the clicking ones again. Why do we need to set valves when hot? 1. Siamese block castings: Each two pairs of cylinders have no coolant flowing between them. This creates uneven cooling within the engine. 2. The water distribution tube: Valves nearer to the waterpump get cooler water than the valves at the rear of the engine. So the valves will operate at different temperatures. Metal expands when it heats up. The hottest valves will create tighter clearances, as those hot valve stems will elongate more. Some folks set the valves when they are hot. Some folks, even set them while the engine is running. Lots of guys will take the published hot tappet clearance spec and add .002”. Then set them all when cold. I’ve done it both ways. Both methods provided good results. Start with Piston number 1 at TDC. Compression stroke. To ensure, grab a tappet at #1 between your fingers. You should be able to wiggle both intake and exhaust tappets a teeny amount. Up and down. This is your valve clearance that you’re feeling. This is usually positive insurance that both valves for #1 are fully closed. Check you valve clearances. Adjust as needed. Turn your fan blade 60 degrees. (Easier to rotate engine when all spark plugs are cracked loose) Go to the next cylinder. (Firing order 1,5,3,6,2,4) Repeat all the steps described and set valve clearances. Repeat until all valves have been set. Something to consider: A valve clearance that is too tight gets tighter when the valve gets hot and elongates. Now this valve will be lifted off it seat sooner. It also takes a little longer time to set down in it’s seat again. This severely limits the valve’s cooling time. Less cooling time means you’re probably gonna burn that valve. It gets so hot chunks can burn away. Then that valve won’t seal and you’ll have a dead cylinder. Have fun! It’s rewarding.
-
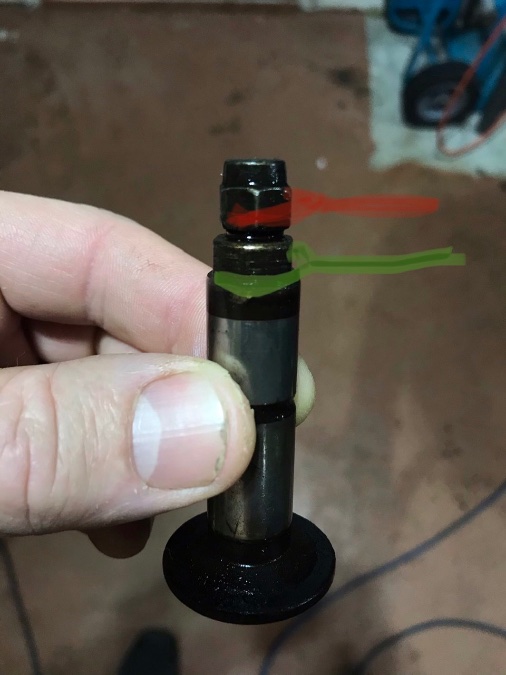
Seen here is a removed tappet. Green lines represent the lower wrench. It holds the tappet firmly in place. Preventing it from twisting. Red upper line represents the tappet adjustment wrench. You twist the top nut to increase or decrease valve to tappet clearance.