Leaderboard
Popular Content
Showing content with the highest reputation on 05/08/2014 in all areas
-
3 points
-
jeeze, I take a few days off and we are a different forum now! it's all cool....with more people and models hopefully we gain more knowledge and friends!2 points
-
We have about 3 acres... 2 is just open grass... no idea why we have it, just sits there and gets mowed every 2 weeks. Had I the money I'd have 2 acres of cars... be worth it simply for the annoyance of the neighbour.2 points
-
2 points
-
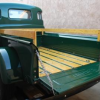
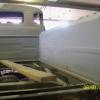
I thought I would post some pictures of my great grandpa's Dodge truck since I pulled it out of the barn. This thing has only been out in the daylight 3 times since it was parked in 1971, the year my grandpa died. Once was when I was a 10 year old kid...I asked my grandma's brother to get his Farmall over to the "Dodge shed" and pull it out so I could wash it. My uncle said "Hey you know there are stakes for the bed of that truck somewhere around here....I'll see if I can find them.." He dug around for a while and came back with all the wood. The farm in the 50's had a sawmill up and running, hence the "fire wood, slab wood, rustic slabs", and also had hundreds of goats too, hence the "Get your goat at Timber Edge Farm". The second time this truck got pulled out was about 10 years ago. The Dodge shed was right next to a massively tall sycamore tree. An impressive tree well over 100 feet high. In a pretty bad storm the top 25 feet of that tree broke off, flew over the dodge shed, and embedded itself like a 12inch diameter spike in the ground on the opposite side of the dodge shed....meaning that thing, in any less wind, would have smashed the truck to pieces. So I cleared a new space for it in the barn, chained it up, and dragged it out of its shed. 2 weeks ago, I finally got the engine unsiezed using the "jack-up-the-rear-tire" method. I didn't have a breaker bar or a lot of room to work, so I read about this method and it worked. Poured WD-40 and liquid wrench into the cylinders and let them soak over the winter (I've got no timeline with this truck), then this spring I jacked up 1 rear tire, put the truck in high gear, and turned it as far as I could to one side. When it stuck, I jerked the tire a few times, then sprayed in liquid wrench and left it a few days. Came back, turned the wheel as far as I could the other way and did the same thing, figuring I was creating some pressure cracks in the rust that the oil could get into. Came back a few days later and could turn the wheel all the way around. This weekend I got it out, changed the oil and hooked to my neighbors tractor, and we pulled it in third gear down the lane and back at my place with the plugs out and a capful of oil in the chambers. The truck went about a mile. When we got back, we put a battery on and it turns over easily with battery power. I also drained the gas tank and added 2.5 gallons of E85 to soak in the tank to work on the varnish and will drain that out before I move the truck again. Anyways, I thought you would enjoy some pictures. The Dodge also got to formally meet "Mr.T." when he drove by. Mr. T.'s flatbed comes in handy as a mobile work station. We were headed down to check on my beehives in the woods. Interesting how modern the dodge looks next to a Ton Truck from 25 years prior.1 point
-
All it takes is the fluid to get low enough for the M/cyl to get a gulp of air and the pedal goes to rubber or nothing. Fill er up quick bleed and brakes like before-BUT ya got a slow leak.1 point
-
Once again I suggest that when these cars were new, it was a common practice to block the brake pedal down with a stick against the seat bottom when leaving the car for long periods of time. The pressure keeps all of the cylinder cups expanded to seal them tight against the cylinder walls. This helps prevent fluid leaks and infiltrating air. Don't forget to take the battery cables off, too.1 point
-
http://p15-d24.com/topic/34880-new-to-forum-1949-plymouth-business-coupe/page-3#entry368121 look at the picture of the back of it. Looks like 2 studs on the left maybe a couple of shared ones with the radio grill and a couple up top.1 point
-
Its one of the Aluminum 3-rows you can buy off ebay. I think it is a Champion radiator...1 point
-
For guys like me that have multi-focal eye glasses (tri-focals for me), the under the dash days are pretty much over, unless I put my glasses on upside down. As far as seeing what's there, digital cameras are one of those new-fangled things that are really helpful. Just stick the camera up behind the dash and keep snapping pictures until one shows what you want to see. Then sometimes you can do it about as easily by feeling, once you know what you need to do, (If I'm working on something I can't see, I can actually do better if I close my eyes. Never knew why, until the last time I was at the eye doctor. He told me that people with my type of sight problems are using a good part of their brain power just to keep both eyes focusing together.)1 point
-
There isn't enough valve spring pressure in our flatheads to warrant zinc. It is really for OHV engines with high spring pressures. I only use oil with zinc in my OHV engines with FT cams. Waste of money in our flatheads.1 point
-
Maybe this will help get the gauges out. https://encrypted-tbn2.gstatic.com/images?q=tbn:ANd9GcTfsMdjhAZ-Efn6z7Szwq5JxakGeGcj1yckH_IR79sXhxTcHydo9g1 point
-
you still have to go under the dash and stand on your head. Take a trouble light and then look up to see the back of the gages. On my 39 Desoto there were two brakets that had 4 nuts inwhich the dial and gages assembly bolted in to. After removing the 4 nuts then the assembly could be pulled out of the dashboard. You are going to have to do some looking on your own to see how they hooked it up but it should be very simple. Rich HArtung1 point
-
After living under the dash once, I had to find a better way. So this time I removed the gauges and switches and put the wires through the appropriate holes. Have the harness loose, uninstalled, inside the engine compartment. Now all the wires are "long" and you can connect them with all that length. Then put the gauge cluster back in the dash and gently push/pull the harness back into the engine compartment. WIth the switches, same thing. Before you push that harness back, connect the switches and install. You can do 90% of the dash this way. I found this MUCH easier and I had every thing correct. Harnesses no longer intimidate me. Good luck.1 point
-
O.K. So what if you don't have a Flathead ? But then what if you don't have a Pilothouse either? I demand an explanation. I'm PMing the administrator immediately and asking for more sub forum titles like W-Series and especially a Rat Rod Truck Forum so we don't have to look at them here. I'm mad as all getout and confused (not really), Hank1 point
-
Don't feel too bad about the O'Reilly job. It's all about the money there. I did the online app for them and got rejected too and I'd been selling parts and new farm equipment, running my own business for years by then. Our local store has been going through help like water through a sieve. They're not paying enough to keep help, good or bad, and don't honor their verbal commitments when hiring. Store managers have changed about 4-5 times in the last3 years. As there regional manager once told an employee they wanted to make an assistant manager without adequate compensation, " any monkey off the street can sell car parts, we don't need to pay you more". Wasn't that hard to understand why that employee left the company. Fastenal didn't want me either in their new store and they've gone through several managers as well. My wife has a state job with WI. She started out running her department when it was a contracted service for the state which they later made a state job, had to interview for the position and then had to wait several months to be confirmed in that position while still managing it and the same department in another facility whose manager had left.1 point
-
That's no guarantee. I have the only house on a island and a 8 acre yard,and damned if I don't butt heads with the zoning idiots every 3 or 4 years. I am 700 feet off the main road,and I've had people who live over 15 miles away file zoning complaints against me for having "too many" cars in my yard. Evidentially they were joyriding one weekend and decided to ride up the road to see what was there,and the woman got her panties all in a wad over "all the ugly old cars". You were right to do your damndest to make sure there was no HOA there,but that's no guarantee the "everybody wear red and march in a straight line" people won't hunt you down.1 point
-
Napa lists both the left and right hand threaded lug bolts: Right hand thread: http://www.ply33.com/Parts/group22#386984 Left hand thread: http://www.ply33.com/Parts/group22#8569811 point
-
Yea well I might drink coffee thru a straw, but you guys do wierd stuff over there... Hank1 point
-
Thanks again for the kind thoughts guys. I take it that you fella's don't call them 'Panel Beaters' in USA - that is the term that we use for those in that occupation here in Oz. Although, I have found that the difference between panel beating and panel restoration here is about $70 per hour!1 point
-
Hi Guys, Got the valves back in and adjusted. Much more easy when the pistons are out and you can turn the crank by hand as you go through the valves. While under the car, I took a photo of a cam lobe. The wear pattern is correct to one side. (http://www.imperialclub.com/Repair/Lit/Master/027/Page12.htm) The big thing to note is that the cam looks just fine after 40 or so thousand miles in city and highway traffic. I have never used any additive in the oil. I do change the oil once in the spring and once in the fall. So much, as I said in a previous post, for the zinc myth. James1 point
-
Boat trailers use that same bolt. I got a set of 20 chrome ones at a boat shop, lefts and rights, for less that Bernbaum asks for a set of 5 OEMs.1 point
-
1 point
-
I love the originality of your car! I probably sound like a broken record but our old Mopar's are coming up in the world. Just in the last year or so I see more of them coming out of the shadows. I especially like all the survivors...and looks like yours is definitely in that category! Great find! Matt1 point
-
Rustoleum will dry and set up good on original undercoating inside and out of the car applications as used back them...Rustoleum will however react with modern day seam sealer. IF coating over modern seam sealer flash coat with a good lacquer based primer sealer first, the Rustoleum does not like to dry when applied directly to 3M seam sealer.....RMP may react a bit to coating that has been solvent cleaned and not totally left exposed to circulating air long enough to properly evap. The tar based coating you have cleaned with kerosene will naturally react as the solvent will soften the mixture..if you are taking off old undercoating with heat and razor blade for metal repairs, final wipe of panel to get it clean I do use kerosene as the solvent. To replicate the original trunk finish and floor pans inside the car I use Henry brand (buy at Lowes) of roofing patch....twin light coats are better and set up quicker than one heavy coat will..the '54 had a sliver finish to the coating and that was matched fairly well by then coating the roof patch with cool seal (roof silver paint) The Henry product is slightly pungent when applied but does lose this odor as it dries...it is the closest thing I know of today that comes close to replicating the interior coating in the trunk and floor pan seams if this is important to you and your cars appearance to others.1 point


