Phil363 Posted September 4, 2014 Report Posted September 4, 2014 (edited) I am really just starting out on my restoration project for a 1952 Dodge B-3-B 108 218ci 3.6L high-side pickup with a three speed manual on the column. The pickup was produced in Detroit on 18 April 1952 according to the Build Card I received from the Chrysler Corp Historical archives. My plan now is to identify the problem areas and take photos of everything from multiple angles. So far I have found the following: (NOTE: updated 17 Dec 2014) Engine does run. I need to repair the fuel tank that has one small puncture hole, with light rust inside and outside the tank, and replace the entire fuel line. The fuel gauge does not work or it is my fuel tank sending unit, which has an unusual locking mechanism, that is not working correctly. REMU guys said the tank is shot and need a new one. Fuel sending unit was shot so that only leaves the fuel guage that works as far as I can tell. The transmission shifts easily from the 1st thru 3rd gear. However, the transmission does not currently shift into reverse. Brakes are currently inoperative. Plan on putting disk brakes on the front. Break lines are rusted through in several areas and a small 5 inch section of the left rear break line is actually broken off. So like many here of course completely new break lines will go in as well. Cab floor is totally rusted out and I have replacement floor pans that will be welded in as well as bolting on new Toe board panel(s) for just above the floor pans. The CAB will be the biggest challenge as far as body work goes. The frame is straight with the exception of the last six inches on both sides of the rear end. Apparently the previous owner backed up and the spare tire carrier under the bed got caught up resulting in damage shown in the frame photo. All wiring is original and needs to be totally replaced. This fall and winter is the break down period and get replacement parts as needed while conducting some minor repairs. Spring and summer of 2015 is where most of the major work will start to be accomplished. Edited December 17, 2014 by Phil363 2 Quote
B1B Keven Posted September 4, 2014 Report Posted September 4, 2014 Welcome! Looks like a great starting point. Quote
Brent B3B Posted September 4, 2014 Report Posted September 4, 2014 looking good, on the picture with the gas tank, is that fuel line just sitting on the tire or is that a second line where the puncture is? Quote
Phil363 Posted September 4, 2014 Author Report Posted September 4, 2014 looking good, on the picture with the gas tank, is that fuel line just sitting on the tire or is that a second line where the puncture is? I just removed the fuel tank from under the cab last night and sat it on the frame by the tire to get a photo. The fuel line you see is a jury-rig I put together to replace what the last owner did to connect the fuel line to the gas tank in the photo. The puncture in the tank was hid under an eight of inch of grim near the top front of the tank. When I was cleaning up the fuel sending unit last night the solvent ran down and dissolved the grim and exposed the small puncture. As for the sending unit .. I could not find this type of fuel sending unit with this locking mechanism on the internet after an hour of searching. 1 Quote
Young Ed Posted September 4, 2014 Report Posted September 4, 2014 If you take 2 screw drivers and form an X you can twist them against each other and push on the tabs that hold the sending unit lock ring in place. 1 Quote
pflaming Posted September 4, 2014 Report Posted September 4, 2014 You have a very nice truck to rebuild. Mine was like that at one time. Much easier to work from age than from fire. So I hope this pic will encourage you with that very nice clean truck. Fire damage is tough work. Keep us informed, we like to see what others are doing. Every build teaches a new lesson to every one. Welcome. 1 Quote
Jeff Balazs Posted September 4, 2014 Report Posted September 4, 2014 Hi Phil; Man that looks a lot better than what I started off with. Enjoy it and have fun with it. You have found your best source of help and moral support. And please don't let the photo that Paul posted scare you off ........ I feel fairly certain the fire was not the trucks fault. Jeff 1 Quote
Phil363 Posted September 5, 2014 Author Report Posted September 5, 2014 (edited) If you take 2 screw drivers and form an X you can twist them against each other and push on the tabs that hold the sending unit lock ring in place. Thanks for the tip .. will try it out tonight. Poured some liquid rust remover on the bezel area of the fuel sending unit last night to help clean it up and hopefully rotate easier. Also, after reading your tip and little more cleaning I now understand the locking mechcanism for the fuel sending unit and figured out where to get a new one should this one be inop. I will have the tank professionally repaired inside and out due to the rust levels. There was a little gas still in the tank after several years of being parked. I took a photo yesterday when I poured some out of the puncture hole in the tank. Phil Edited September 5, 2014 by Phil363 Quote
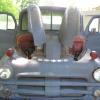
Brent B3B Posted September 5, 2014 Report Posted September 5, 2014 yum, hey don't drink that! just curious, is your motor out of a car? one of my engines looks like yours...... might just be the water pump and radiator inlet throwing me off.... 1 Quote
48Dodger Posted September 5, 2014 Report Posted September 5, 2014 "1950 PH Gas Tank...a look inside" 48D 1 Quote
Phil363 Posted September 5, 2014 Author Report Posted September 5, 2014 "1950 PH Gas Tank...a look inside" 48D I can only hope the inside of my fuel tank does not look like yours did. Well, when I remove the fuel sending unit tonight I will be able to get a peek inside. Will be sure to post here what I find tonight. Quote
Phil363 Posted September 5, 2014 Author Report Posted September 5, 2014 (edited) yum, hey don't drink that! just curious, is your motor out of a car? one of my engines looks like yours...... might just be the water pump and radiator inlet throwing me off.... The current engine is from a Dodge Pickup. The pictures below give a better view of the radiator inlet and water pump and are from the original seller. However, this is not the original 1952 Dodge B-3-B pickup engine that was in the pickup when sold. The last owner said that they replaced it in 1996 with another Dodge truck engine from the 1950's. The orginal Model B-3-B-108 218ci 3.6L engine serial number was T306*93463* according to the build card from the Chrysler historical offices. The current engine serial number T306*102750* indicates that it to could be a 1951-1953 218ci 3.6L B-3-B or B-4-B pickup model engine. The engine block date is 5/23/52. Note: The engine head date is 9/28/53 so it was probably in a 1953 B-4-B. UPDATE: 29 Jun 2016 ... as a side note the carburetor # is D6A2 which belongs on a 1939 Plymouth (P7 or P8) 6 cylinder 201ci engine. Some thing else I will be replacing with a DTE-1 which is listed in my B-3 Shop Manuel as the correct carb for my year engine. Edited June 29, 2016 by Phil363 Quote
48Dodger Posted September 5, 2014 Report Posted September 5, 2014 To quoute the thread: "....the fuel line inside the tank had a pin hole leak in it. I put the air hose to the outside inlet to help blow the crud out. The crud was so stubburned that I tried shooting carb cleaner inside of it, put air to it again, and a fluid stream revealed itself streaming out the side wall, right before the elbow. So its possible the tank never emptied to the bottom, which might explained why the huge amount of tank residue present, over a 1/4 inch thick. The downward tip was completely "submerged" in the residue, and I had to chip it out with a hammer and chissel. " 48D 1 Quote
wallytoo Posted September 6, 2014 Report Posted September 6, 2014 there is nothing unusual about the lock ring on the sending unit. pretty standard for vehicles from the 70s back. you won't even need two screwdrivers to remove it. one is sufficient. gently tap the end of the driver with a hammer and the ring will turn. i replaced my sending unit with one from a mid-70s jeep wagoneer, with pretty easy modifications. the writeup is on a thread here somewhere. cost was around $35, instead of the typical $90 to $150 for the "real" sending unit, and the one i installed has been working flawlessly for a few years now. also, the brake parts are readily available for your truck. when adjusted correctly, they will stop your truck just fine. my truck is a 1.5-ton, and it has 4 wheel drums, just like the smaller trucks. i can lock all six wheels (duals in the back) by getting on the brake pedal. wally 1 Quote
Phil363 Posted September 6, 2014 Author Report Posted September 6, 2014 To quoute the thread: "....the fuel line inside the tank had a pin hole leak in it. I put the air hose to the outside inlet to help blow the crud out. The crud was so stubburned that I tried shooting carb cleaner inside of it, put air to it again, and a fluid stream revealed itself streaming out the side wall, right before the elbow. So its possible the tank never emptied to the bottom, which might explained why the huge amount of tank residue present, over a 1/4 inch thick. The downward tip was completely "submerged" in the residue, and I had to chip it out with a hammer and chissel. " 48D there is nothing unusual about the lock ring on the sending unit. pretty standard for vehicles from the 70s back. you won't even need two screwdrivers to remove it. one is sufficient. gently tap the end of the driver with a hammer and the ring will turn. i replaced my sending unit with one from a mid-70s jeep wagoneer, with pretty easy modifications. the writeup is on a thread here somewhere. cost was around $35, instead of the typical $90 to $150 for the "real" sending unit, and the one i installed has been working flawlessly for a few years now. also, the brake parts are readily available for your truck. when adjusted correctly, they will stop your truck just fine. my truck is a 1.5-ton, and it has 4 wheel drums, just like the smaller trucks. i can lock all six wheels (duals in the back) by getting on the brake pedal. wally 48D looks like our fuel tanks have something in common .. plenty of rust .... but yours had more I think. I love the forum here .. as you solved a running mystery for me on my fuel tank. My original fuel line was cut off and a jury-rigged one was drilled and emplaced in bottom left corner of the fuel tank on the drivers side. I now understand that more than likely like you ... the original fuel line inside the tank may have had holes or became plugged with rust. I managed to let the tank air dry last night and was able to shake out the loose rust today through the fuel sending unit opening and the gas pipe on top. While my original post photos show the locking mechanism they do not show the rust and grim and grit underneath that had it frozen in place. So I did try two screw drivers .. and light tapping with single screw driver to no avail ... it would not budge. So I just soaked the area for another 24 hours with a liquid rust remover and removed the fuel sending unit last night. Now the big question is ... repair or replace the fuel tank. The fuel sending unit is a ..... well see the photo below. 1 Quote
wildwilf Posted September 9, 2014 Report Posted September 9, 2014 Nice truck, Where did you get the floor? 1 Quote
Phil363 Posted September 9, 2014 Author Report Posted September 9, 2014 (edited) Nice truck, Where did you get the floor? I got the floor pans from Dodge Centeral of Michigan. They also provided the lower of the two toe boards (a perfect copy of the original for my 52) that I have attached some photos of. C2fabrications also does some toe boards for 48-52 Dodge 1/2 ton pickup but they may need some minor changes to fit your exact year. I am researching now what shop to go to get my new floor pans welded in and some other metal work in the cab that is beyond my capabilities. Edited September 9, 2014 by Phil363 Quote
Phil363 Posted September 16, 2014 Author Report Posted September 16, 2014 Slowly taking my time to remove parts and document problem areas as well as taking plenty of photos of everything before I touch it with a tool. No real surprises so far ... exposed cotton fabric wiring is all dry rotted and will be replaced in total. I will use the Dodge Truck Shop Manuel for the B-3 series as it has a very good wiring diagram to follow when I build new wiring harnesses next year or so. Only real headache so far is the amount of bolts/nuts that will need to be replaced due to rust. Especially the clip on fasteners with a bolt embedded for the toe panels and inner fender connection points. The U shaped area of the clips just seem to snap in half due to rust eating them partially through on at least half of them so far. I have used plenty of heat on the nuts before I try to remove them as well as deep penetrating oil. Curious to know if anyone knows of where a good place to buy replacement Steel or Stainless Steel bolts / nuts (especially the clip on ones for the fender inner panels and toe boards) that are good replacments for what we have on Dodge trucks now. 1 Quote
Merle Coggins Posted September 16, 2014 Report Posted September 16, 2014 The original toe board fasteners with the "J" clips are Acme thread and are no longer available anywhere I've found. However, you can use an updated J-nut and standard bolt. My local Ace and True Value hardware stores carry a variety of J-nuts that have served me well. Merle 1 Quote
Phil363 Posted September 16, 2014 Author Report Posted September 16, 2014 The original toe board fasteners with the "J" clips are Acme thread and are no longer available anywhere I've found. However, you can use an updated J-nut and standard bolt. My local Ace and True Value hardware stores carry a variety of J-nuts that have served me well. Merle Merle, thanks a lot. Now that I know to search using the term "J-nut" I was able to find them online. I will stop by my local Ace tonight and stock up . Quote
ggdad1951 Posted September 17, 2014 Report Posted September 17, 2014 The original toe board fasteners with the "J" clips are Acme thread and are no longer available anywhere I've found. However, you can use an updated J-nut and standard bolt. My local Ace and True Value hardware stores carry a variety of J-nuts that have served me well. Merle what he said...I basically pick those exact parts when I go picking since they are no longer available. Quote
Phil363 Posted November 18, 2014 Author Report Posted November 18, 2014 (edited) 13 Feb 2015 or Friday the 13th update to previous post. Today was a good day!!! Just a quick update on my breakdown phase which is coming to an end on in the next week or two. At which point I will begin the individual part repair or replace phase. With all of the data and lessons learned in this forum I have not run into anything that I could not understand after I searched for it here. So the engine is next thing to come off and then the frame is off to the shop to make sure it is straight and to have some slight damage repaired to the tail end. I have to say once the water pump came off and I could see inside the Water Distribution Tube (WDT) area I was thinking this is a mess. So I searched the forum on WDT and found several like the one by jsturner "The sword In The Stone". That title was so appropriate to the state of his and many others WDT's. Thankfully, mine was very easy to remove with my pincher nose pliers even though there was rust and brown sludge aplenty. I also purchased a 1950 Dodge 3.54 differential to change out my 4.1 with. It is from a Owen's salvage yard with 1940 and 1950 MOPAR year vehicles in Texas and at first he said he had no 3.73 or 3.54 but that he had a good 3.9. I remembered the thread on gear ratios from 52b3b Joe and that Desotodav found that his were marked with a 39 over 11. So I asked the guy in Texas to recheck the ratio and he did by counting the teeth. He found the ring gear teeth had a count of 39 and the pinion gear teeth had a count of 11 with 10 spline axles. So when I do the math 39 / 11 as far as I can tell this is a 3.54 Ratio. When I start on the rear axle I will install it at that time. Update 13 Feb 2015: After I received it I counted the teeth and found it to be a 3.9-1 .. not to mention it was stamped 3.9-1 on the main gear ring. I am keeping it as a backup .. really in great shape. Anyway, I subscribe to the Old Car Price guide magazine and they mentioned earlier this week a salvage yard in MN called French Lake Auto Parts and that they had Vintage / MOPAR parts from the turn of the century on up. Sent an e-mail looking for either a 3.54 or 3.73 third member that would fit my pilothouse. They checked and found they had one from a 1948 Chrysler Windsor that was a 3.73 and was in working condition. I snapped it up and found it sitting on my doorstep once I got home today. Attached a photo below and the ratio was actually stamped in two places on the pumpkin and once on the main gear. Will now go back over and re-read Young Ed's technique (and other threads) to remove the axles and third members. Of course ... lots of work on rear axle yet .. sand blasting ... etc ... before I tear it down and rebuild it. So today was a good day!!! Edited February 25, 2015 by Phil363 1 Quote
Desotodav Posted November 18, 2014 Report Posted November 18, 2014 I also purchased a 1950 Dodge 3.54 differiential to change out my 4.1 with. It is from a owen's salvage yard with 1940 and 1950 MOPAR year vehicles in Texas and at first he said he had no 3.73 or 3.54 but that he had a good 3.9. I remembered the thread on gear ratios from 52b3b Joe and that Desotodav found that his were marked with a 39 over 11. So I asked the guy in Texas to recheck the ratio and he did by counting the teeth. He found the ring gear teeth had a count of 39 and the pinion gear teeth had a count of 11 with 10 spline axles. So when I do the math 39 / 11 as far as I can tell this is a 3.54 Ratio. When I start on the rear axle I will install it at that time. It is encouraging to see you making good progress Phil. Keep up the good work! Thanks for providing the explanation of the 3.9/11 stamping on the diff. I know that I (and others) will now be keeping an eye out for any other diffs marked 3.9/11 which I/we stumble across in the future. I have both of my 3.54 diffs still at the shop being rebuilt, but expect that they will only be able to make 1 good diff for me out of the two. The 4.1 diff in my 52 truck works fine on the highway, but I really look forward to cruising the highway in my 53 truck with 3.54 ratio diff !! Quote
Phil363 Posted December 17, 2014 Author Report Posted December 17, 2014 (edited) Finally got eveything off of the frame and it will go to the shop here in the next few weeks. Then I will be working my way from the front axle grease cap back up on the rebuild process. To that end I have ordered the Disc Coverison kit from Charlie at rustyhope and am also having him drill out the spindles and steering arms for me at this time as well. Several other threads here have a lot of information on where to acquire the parts from for the disc conversion with parts numbers or search terms to use when searching for the parts on Charlie's list. More than likely I will just follow Charlie's NAPA list myself at this time. I also found a good source at Stengel Bros. Inc in PA for square U-bolts with a 1 13/16 inner measurement which is exactly what the B-3 Parts manuel has for a requirement on my pilothouse. All of the other places I found only had 1 3/4 and then increaments were in 1/8 or 1/4 up or down from that. My Grease Cap up restoration will progress sort of like the answer to the old question of how do you eat an Elephant? Answer ... one bite at a time. Edited December 17, 2014 by Phil363 1 Quote

Recommended Posts
Join the conversation
You can post now and register later. If you have an account, sign in now to post with your account.