-
Posts
4,695 -
Joined
-
Last visited
-
Days Won
35
Content Type
Links Directory
Profiles
Articles
Forums
Downloads
Store
Gallery
Blogs
Events
Everything posted by Los_Control
-
Check your firing order? I know you already did this .... Are you sure it is correct? My first start of my truck that had been parked for many years, I replaced the wires installing #1 at 7 O'clock like the book says.. Turning the engine over I had spark & fuel, but no signs of life. I saw fuel puddling in the manifold. I went through the firing order using the pipe plug over #6 to get #6 on tdc compression stroke. This is where I found out my wires needed to be set 1 rotation to the left .... #1 the book says 7 O'clock ..... mine needed to be 6 O'clock. Setting the wires correctly she fired right up, even with the puddle of fuel in the intake. For something simple like checking firing order, is easy to get #6 TDC compression stroke. That is where the locating plug is. It is important to get #1 @ TDC for many reasons .... checking firing order is not one of them, any cylinder will work if it is at TDC compression. Lay a piece of toilet paper over the pipe plug hole, rotate engine by hand .... when you see the paper move you are coming up on compression stroke. Remove paper & insert wire & continue rotating engine til wire stops traveling upward. Remove distributor cap, the rotor should be pointing @ #6 If not, remove the wires And install them in order starting with #6. I'm only suggesting to wire it starting from 6 because that is where the pipe plug is located .... If it was located over #1 cylinder (where it should be) I would suggest starting from #1. The extra steps of first getting #6 TDC so you can now rotate the engine to get #1 tdc compression like the book suggest .... just leaves wiggle room for mistakes.
-

Installing a Tanks gas tank into a 1949 B1B
Los_Control replied to Los_Control's topic in Mopar Flathead Truck Forum
I thought about doing the same, decided not to. First off, I know the original bracket works .... I never heard of anyone having any issues with the tank falling out. Google says a gallon of gas weighs about 6 pounds, so 16 gallons + 5 pounds for the tank is about 100 pounds .... Less then I was thinking. The original bracket is very well made & very strong. .... They just installed it wrong imho. I would hang the bracket off the top of the cross member .... not bolted underneath it. That way all the weight would be sitting on top of the cross member, the bolts would only hold the bracket in position. The way they have it, all the weight is sitting on the 2 bolts or more precisely the 2 nuts. Then if you extend the bracket 2", is now acting like a lever applying more stress on the 2 nuts. Again I'm no engineer, it has lasted 70+ years with no problem ..... I'm sure I would lose sleep if I were to use it as is ??? Simply drilling 2 more holes & adding bolts so 4 bolts are holding it would help. I would modify the bracket slightly so it would sit on top, then use 4 bolts ... if I were to use it. My bracket when finished, has some faults also. Inside the frame rail is 5.75". So the height of the bracket is only 5.5" There is only room for 2 bolts, it is long acting like a lever with all the weight sitting on the end. Putting all the stress on the 2 bolts. .... Factory used 2 rivets. So I will add 4, 1" welds on the sides just to help the bolts. -
LOL yeah pretty disgusting ... is the pc out in the shop & gets pretty dirty between my dirty hands & the doors always open. Time to go to the goodwill for another key board
-

Installing a Tanks gas tank into a 1949 B1B
Los_Control posted a topic in Mopar Flathead Truck Forum
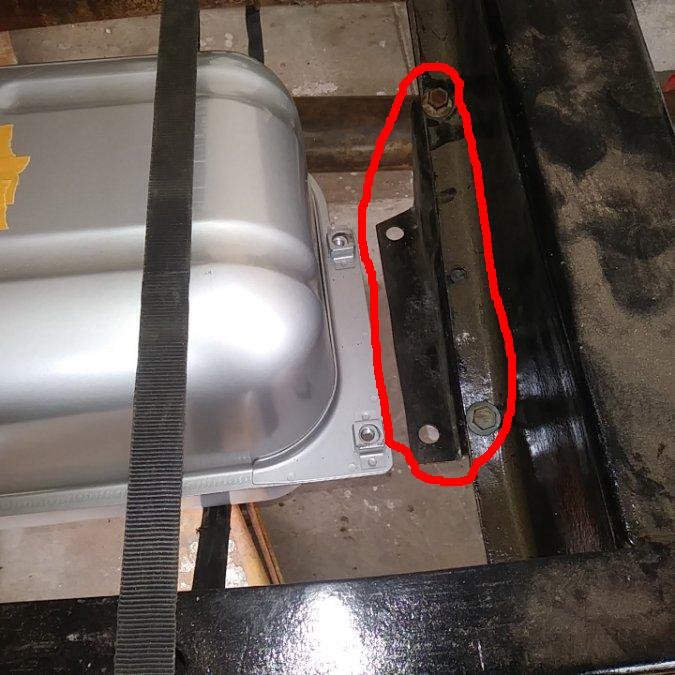
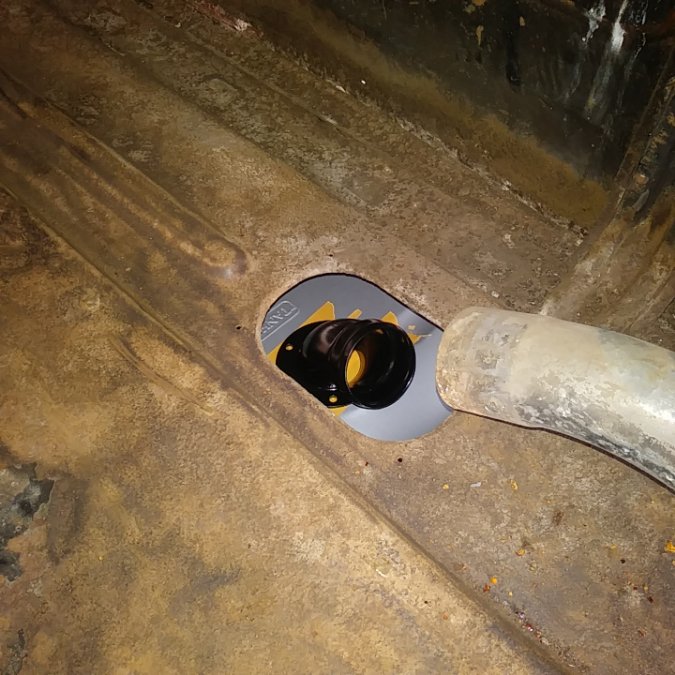
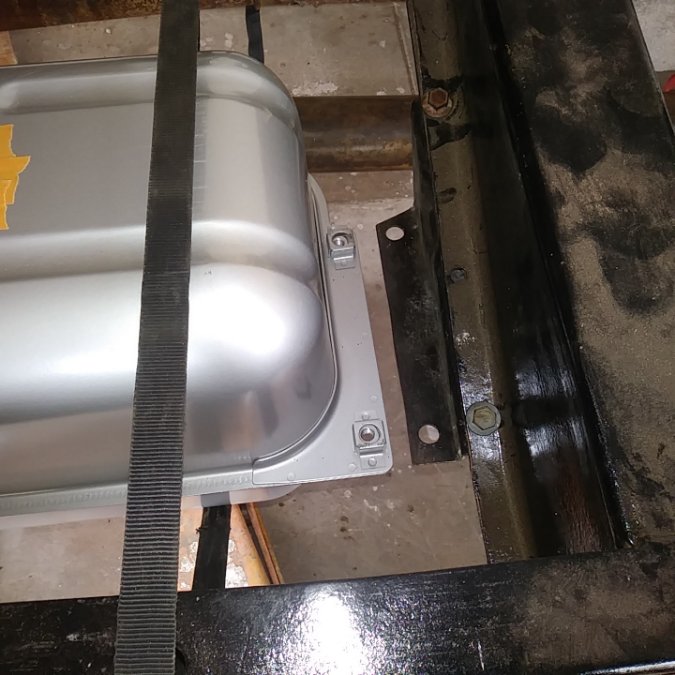
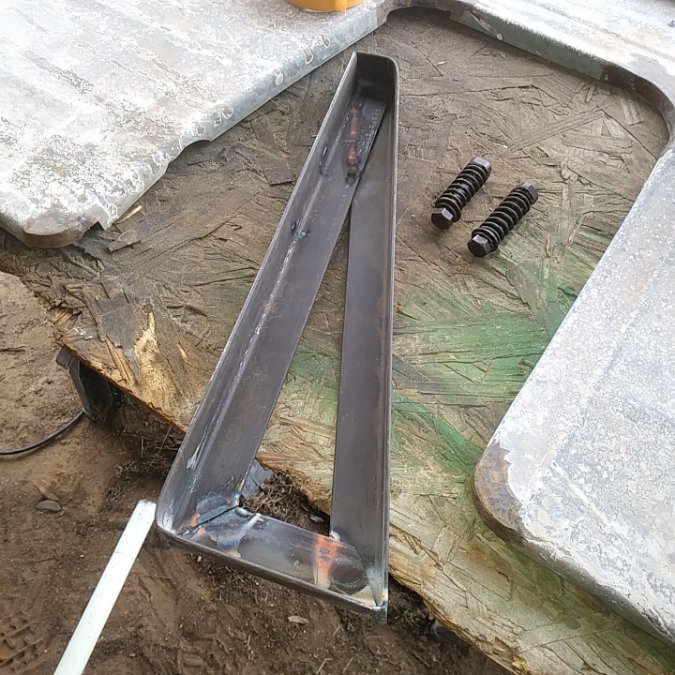
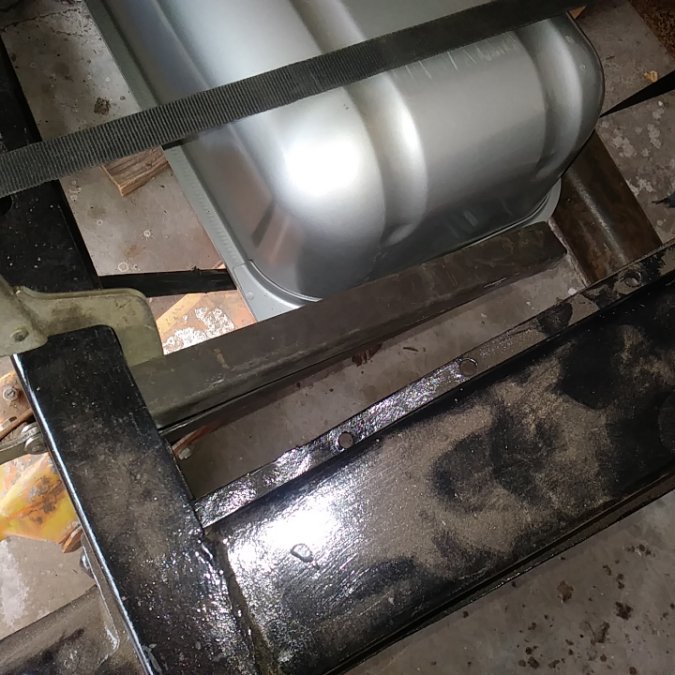
I want to say this tank is bolted to the front cross member as the original tank would be. You can see here the fill tube will connect with no issues The problem is the rear mount. .... The tank is made for a 1937-1947 truck. In 1948 they moved the rear cross member back 1.75" This is a B1B 108" wheel base truck. A B1C 116" wheel base or larger truck would have a factory mount to hold the rear of the tank ... Those cross members are even further away. Here is a quick photo of a mount I am working on, took 20 minute to throw it together ... it still needs final welding & a support brace in the center imho. ... I want it strong. The factory used 2 rivets to mount the bracket to the frame ... I will bolt it along with spot welds. ... Add a little paint. I think it will be just as strong as the factory when finished. Remember the tank full of fuel bouncing over pot holes in the road has a lot of weight .... you want it strong. I'm still wondering if this is strong enough? .... Any thoughts? -
You could add something behind the grill also .... too hide the ugly. My problem using my parking lights .... they are single element ... not sure they would be bright enough. I could drill them out & install a 1157 bulb holder using a dual element same as rear lights. Just torn with this idea because they really are in very good condition .... not sure I want to cut & modify to accept a different bulb holder. Decisions, Decisions.
-
Same with my 1949 .... The trucks did not have the luxury of turn signals. All were added on aftermarket or possibly from the dealer. The cowl lights you have circled would be a poor choice imho, because they sit so far back from the front. They sell a universal turn signal switch for old vehicles. sigstat 900 is what I ordered the other day from ebay. You will not get this one, because it is on it's way to my house There are several available & some new replacements with a plastic chrome housing .... I chose old original. Then you will need a flasher plug & harness. Rear light are easier because the turn signal shares the same circuit as the brake lights you do have. The front is more tricky. Was common to add turn signal lights to the top of the fenders ... Not very cute but very "truck like" .. I have parking lights on the front of my truck .... I think I will use these for the front .... just not sure how yet. The photo you share, the guide lights on top of the headlights have been used for turn signals .... you need to choose what to do for your needs.
-
I have only seen it one time. A friend had a 1967 Dart with a 360 in it. He was a fair mechanic, he tried everything to diagnose his overheating. Finally pulled the waterpump & saw the impeller was toast. Mopar was not safe from the issue either. Fair enough. If I read on the internet, new car warranty wants it changed every 30k miles. Antifreeze manufacturers want it changed every year. Boost the profit margin. I was just surprised reading on another forum where the guys with their $100K Hot Rods with the Chrome Flat Heads & blowers blah blah blah .... Talking about antifreeze was just like talking about engine oils ??? ..... Then the subject of using coolant anode .....How many were using them. I like @Sniper response, cars for many years have been using mixes of aluminum, brass, iron & green prestone worked just fine. I will use the same in my 1949 truck also. Then there needs to be a limit on how long between changes. ..... I checked mine in my daily driver & it is good for -35, is very clean & green, looks new. I only drive 4k-6k miles a year, I change my oil spring & fall every 6 months .... not by miles. This spring the antifreeze will be 5 years old. I think this spring will be a good time to give it a vinegar flush & check the hoses/clamps etc.... Then call it a day.
-
Thats interesting. I would not think the "hogs head would even bolt into the axle housing. Shows you what I know I once had a 1961 dodge truck I bought from BIL. He took out the original 4:10 posi & swapped in some highway gear set. "He thought it was cool" I hated it. BIL gave me the original posi rear end & I swapped it back in, took about 45 minutes. I worked with a guy who had a 1969 Road Runner 383/4spd & he wanted that posi real bad. His original posi was blown up. He offered to swap me his non posi 410 + $$ for my posi .... I was too dumb & did not trade him. I just wanted my truck original. Today I would be more concerned his car be original. These rear ends are easy to swap around the center sections.
-
Thats the way my mother cooked it, in the turkey. I started that way also. I use a electric roasting pan to cook the turkey in, so I have use of the oven. I use a medium sized roasting pan for dressing .... = almost twice the amount you can stuff into a bird .... with less hassle. Also I tend to add meat to the dressing, I like oysters .... this year I used giblets from the turkey. .... I like to cook the dressing separate as I have more control over the cooking times. This year I used the store bought croutons just to use them up & get rid of them .... I prefer making my own. They were fine. My mistake was when I removed the lid for the final 20 minutes to crispen the top layer, I may have got busy and waited 30 min instead. The top 1" was golden brown & crisp, while the next 6" was nice & moist .... Some may like it this way. Me I pour gravy over everything anyways & it just does not matter. Guess I just needed something to complain about
-
Just curious with your new wiring, do you have a fuse panel or circuit relays? Seems each item works ok individually .... except for volt spike on heater motor. When both wipers & heater turned on together you have a issue. So I wonder if they are tied in together & on the same circuit .... do they share a relay or a fuse? Meaning they are both on the same circuit. Relays can act funny, possible a wire is overloaded & overheating .... Just a idea of something to look at. Myself I would keep them separate & on individual circuits. Somehow they seem connected .... one affects the other ..... that does not seem right. Hope it is just a bad motor & fixes it.
-
I cook it in a pan, will have more control over it. This time I was not happy with the dried croutons. They literally were harder then rocks .... I should have just made my own. Sooo, my dressing this time tasted fine, just not perfect.
-
Just the wife & I, we do not bother with gifts ... if we want something we just get it. We do enjoy a nice dinner on Holidays/birthdays .... sadly my dressing came out a little dry this time I do feel really good today. I got tied up with working on the kitchen .... I waited til after Thanksgiving .... It took me right up to Christmas to finish my work. I have all my honey doo's out of the way. The bad weather is out of the way. I have a full tank of gas for the welder ..... I have time to work on my truck
-
Thats a really good idea, too have spare parts if ever needed. Besides the machines controlling the amount of water, I also am leery of the quality of parts today's machines are made of. For whatever reason, I just feel the older machines were better built. They will last as long as you take care of them. Christmas day my wife wanted to wash some clothes, The washer is in the garage. With the cold snap the fill valve was froze, so I used my heat gun & thawed it out & the machine filled up. Then she informed me water was leaking onto the floor & she turned it off. Me being the dummy I am, I did not figure on the drain pump being froze also. Weather is warming up quickly today & no more freezing temps on the radar. Will turn on the propane heater & work in the garage today, I will see just how tough the old machine is.
-
I use to have a real tough time with T-stat gaskets & some others. Honestly I think I was just young & impatient. .... I would scrape the surfaces clean & smooth & usually that was fine. When they did leak & I would have to do the job over, I usually found some leftover gasket material I missed. Seems you can scrape & clean & the surface will be smooth & you think it is acceptable. While there is still some gasket material left. Seems like scraping it will polish it & smooth the left over gasket .... will feel smooth but is actually darker in that area. Anyways as I got older & tired of re-doing my work, I pay special attention to the surfaces, I will use a heavy 36 grit sandpaper by hand & see clean shiny metal on all mating surfaces. I will also use a straight edge & look for light shining through showing if the surface is flat or not .... sand the surface flat if needed. Paper gasket & a gasket sealer is all you need .... I use Indian head shellac made by permatex. Pay careful attention to get the surfaces clean & flat. If the water pump mounting bolts go into water jackets .... Some pipe dope on the threads would be a good idea.
-
In a way I really am thinking about my OT 1991 chebby truck. But think it also fits with all of our cars. When I bought that truck 4.5 years ago, I went through the complete cooling system 4 years ago, April will be 5 years. Flush, new hoses, water pump, T-stat ... I think this spring I will call it, & give it another good flush, inspect everything & fresh coolant. ... I drive it 3k-4k miles a year.
-
You're not alone .... maybe is the season of the year to think of others. I too have been thinking of them. I remember him posting about a bit of a remission & was feeling better, made a few more post afterwards then no post for a long time. At least that is how my mind remembers it. .... I wish them the best wherever they are.
-
The cold weather has me thinking about antifreeze ..... I'm really oldschool & always just use the green prestone for everything. Now I have done a little research, seems we have different versions (colors) of antifreeze because we have different materials in our modern coolant systems. Aluminum radiators, engines, intakes .... plastic components also on modern cars ..... I get it, different antifreeze for different materials. Then I read that some modern vehicles come with a coolant anode. This is a aftermarket one to add to your vehicle. The Flex-a-lite Zinc Anode protects aluminum components in the cooling systems from corrosion and damage that could be caused by electrolysis or coolant additive breakdown. Many here have original cooling systems including radiators ..... guessing the Green is just fine. Many here have aluminum radiators, head, intake ...... Is the green still adequate? How many have added a sacrificial anode to their system? .... is it worth it? How often do you change your antifreeze? Many car manufacturers suggest every 30k miles ..... That could be several years for some of our old vehicles. Must be a age limitation on it? Will a anti freeze tester be adequate .... If I check my 4 year old coolant, is good for -20 temps .... When should I change it? Just curious what others do when it comes to maintaining their cooling systems.
-
Seems the worst of the cold weather is over for West Texas. It did move in fast, even though we knew it was coming. I was watching YT vids yesterday morning watching the weather. It was 35F .... I knew I would need to run the outside hose bib when it got colder to prevent frozen pipes. 45 minutes later it was 16F & the hose bib was already froze. Just saying, even though was expecting it, happened so fast I still had to use the propane torch to thaw it out. 19F this morning, should warm up to 39 later & 54 tomorrow. Hoping I did not make a major boo boo on my truck. It has some straight water in it. Very little I hope. Last spring I installed the original radiator thinking I might be able to use it, filled it with water then. ...... There were so many leaks in it I did nothing with it. So the radiator is empty, I started the truck & moved it around a dozen times over the summer, never adding water. ... I'm betting the block has a little bit of water in it, but not much. I will be checking it over good next week
-
Great looking project, welcome to mopar world. A couple thoughts, you do not list your location, but you say the car is Canadian built. Seems Canadian vehicles had their own rules about engines, most were 25" blocks? If I had a Canadian car, I would want to learn more about which engines were used. I think the 251 would be a very good candidate for a transplant. I would first thing, pull the head on it to see why it is seized. Check the condition of the cylinders. A motor improperly stored can have many issues. If the engine in the car is missing the carburetor or air cleaner ..... can be real tough on the internal parts of the engine. A gasket set is cheap & you will want it around anyways. I am not 100% sure on the transmissions, Late 50's Dodge truck 3spd would be a column shift. Is possible you may be able to use the top from the car transmission and convert the truck transmission to a floor shift. You could with the older transmissions, not sure if that changed in late 50's. Good luck and enjoy the process.
-
Text removed .... Sorry was meant for another thread
-
Curious why you want the measurements .... I get the feeling you are wanting to make your own fenders? ..... Sounds awesome. With my fender set into position lined up with the mounting holes. I get 18" from the very outside edge of the length of bed. 18" Both front & rear of the fender meaning the fender is centered on the bed side. Something else to consider if you are making your own fenders, the rear of the running board bolts to the front of the fender. Basically locking the front of the fender into position if you have running boards ..... Why am curious as to what your plans are so possibly could give better help.
-
Was a common trick the old dirt track racers would use. Create a wire loop or hook on the dash board, when they get in 2nd gear they used it to hold the shift lever in 2nd gear. The short small dirt tracks 2nd gear was the main gear .... wind the piss out of it going down the straight away then back off the throttle going into the corner .... they just stayed in 2nd gear. Was tough on the syncros & always pop out of gear when backing off the throttle.
-
My electronic washing machine experience is limited to the 1 machine we owned for 2 or 3 years. My biggest complaint with it was, it did not clean clothes very good. The computer controlled the water level by the amount of clothes that were in the machine ..... a water saving feature. So when it quit working & it would not fill with water .... I really had no desire to fix it. I did figure out that if I filled it with a garden hose, it would run through the wash cycle, then fill it again & would go through the rinse cycle ..... So I was pretty confident it was the fill valve that was bad .... $25 fix & pretty simple to do. What would go out next? Same time I saw the old school top loader whirlpool on FB market place ..... The house was a rental, tenant moved out and left the machine ... Landlord wanted it gone. Landlord did run it through a cycle to confirm it turned on. I paid $50 for the unknown old washer, compared to $25 to repair the new crappy electronic washer. You wont regret it. Good chance it may be the last wash machine you ever need to buy .... one more item to check off your list. I feel optimistic I "might" be able to keep my old whirlpool running as long as I need it.
-
A cold chisel is a bit crude .... certainly does get the job done though. I used a cold chisel several weeks ago to remove the bed strips that are spot welded to the bed side. I think a better man than me would have drilled out the spot welds .... Horse Pucky!! 15 minutes with the cold chisel & the strips were removed, I spent a little time with a hammer/dolly cleaning the holes up. Then I used the same holes to spot weld the new strip. Then I needed to grind the weld down .... no harm no foul .... cold chisel made quick work removing the bed strips.
-
I'm a sucker for anything old. My refrigerator quit working .... I learned to fix it ..... was the starter that went out. Just saying it took a couple hours to read, trouble shoot .... $15 for a new part. Quicker, easier, faster to fix it then replace it. .... Freezer was stocked full with meat. Now when my washing machine quit working, we bought it used and was a newer electronically controlled unit .... I would not even attempt to work on it. I found a older whirlpool commercial quality super duty washer for $50. Simple to work on, cleans way better then the electronic machine. Just saying, I will work on the older appliances, these newer electronic machines I wont touch.

