


Matt Wilson
-
Posts
641 -
Joined
-
Last visited
-
Days Won
2
Content Type
Links Directory
Profiles
Articles
Forums
Downloads
Store
Gallery
Blogs
Events
Everything posted by Matt Wilson
-
PCV Valve adapter - off center machined - is this normal?
Matt Wilson replied to Bryan's topic in P15-D24 Forum
I just took the measurement off mine, and it's 1.338" - pretty close to 1-21/64" (about 0.010" difference.
-
PCV Valve adapter - off center machined - is this normal?
Matt Wilson replied to Bryan's topic in P15-D24 Forum
I took a look at the part from my '49 Power Wagon, and it is not off-center. Power Wagons were equipped from the factory with PCV systems, and considering that I've had mine for over 30 years, and it sat mostly unused for the prior 20 years, I suspect it's original to the truck. Having said this, it seems that an off-center piece, while not perfect, may work well enough.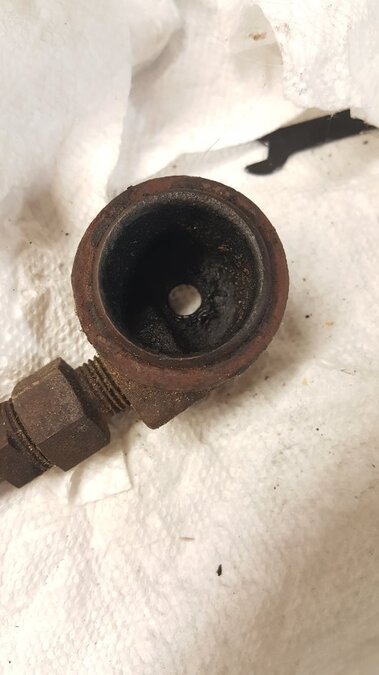
-
Is it possible that you have an adjustment screw the doesn't fit as tightly in the lifter as it should? I read of one guy who had a loose-fitting adjustment screw in one tappet, and that tappet lost its adjustment, resulting in excessive clearance. I Seem to remember it getting bad enough tuat his engine started miss-firing in that cylinder. I think the only solution would be to replace the adjustment screw and/or lifter. Just a thought....
-
Question - 1 Ton - Stepped Bore Wheel Cylinders
Matt Wilson replied to billrigsby's topic in Mopar Flathead Truck Forum
I'm glad someone piped up to set the record straight on the larger bore going to the rear. That's how they are on my '49 Power Wagon and I can't imagine them being any different on other trucks. As for not being needed, I would disagree. I doubt the factory added this expense vs. a non-stepped bore without good reason. As someone mentioned, the reason the larger bore is in the rear is because these brake shoes are hard-pinned, and the rear shoes cannot self-energize the way more modern drum brakes do. The original style 1-ton Power Wagon had this type of brake system through the end of its production run in the late 60's (actually into the 70's for export). -
Nevermind, I just now saw the other topic that you started, where you described the problem.
-
Not to take this thread on too much of a tangent, but do you mind elaborating on what happened to your valve guides to cause so much oil burning?
-
I had the same thing happen - machine shop had not sufficiently flattened the plugs, and one of them popped out and I lost all coolant. Engine overheated big-time, causing a crack in the head and possibly breaking a ring (I found a broken ring when I disassembled the engine, which could have been due to overheating or installer error, meaning my error when I assembled the engine). I went through the entire engine and replaced all the core plugs, including the one on the backside of the block and the one behind the timing chain. I made sure to flatten them well and carefully. There were a few on the LH side of the block that I replaced with the rubber expanding type of plug. Not intended to be a permanent solution, but I did drive it that way for several thousand miles, with no issues. This seems to be a common place for errors, as modern machine shops aren't accustomed to dealing with these types of plugs.
-
I suppose the next question coming to mind has to do with the opposite of air leaking out of the cylinder. That is to say, if the seal at the spark plugs is compromised enough to let air escape, then is it enough to let water into the cylinders whenever water has puddled in the spark plug recesses? Maybe not, as it seems like we would have heard about it being an issue and causing rusty cylinders by now. But it's just a thought....
-
Right, I kinda figured the same thing about not including the lube part when using as a filter. Just interesting that they would use this type of material for a filter, but then I guess a lot of filter elements are made of porous sintered or similarly constructed materials.
-
Yeah, good point about using the correct hardware. I should have mentioned that. The correct hardware is very important. Using the wrong hardware will eventually cause one or both the manifolds to crack (I think it's more an issue with the exhaust manifold).
-
Interesting article. I never thought about using Oilite as a filtering element.
-
Glad to hear that you had success in getting it resurfaced. It sounds like you now plan to separate the intake from the exhaust and replace the gasket, check the heat riser valve and likely replace the four bolts holding the two manifolds together. How do you plan to get those two freshly machined surfaces back in plane with each other when you reconnect the two manifolds? I suppose you'll install them somewhat loosely onto the block, with the four middle bolts (the ones that connect the two manifolds to each other) also being a little loose, and then carefully snug all bolts in small increments? Another option might be to reconnect the two manifolds to each other (those four center bolts), making sure the two manifold surfaces are flat and double-checking on a granite countertop or a machinist's straight edge (or both) before attaching them to the block. The first method may be best, since the manifolds will be mated to the block, with whatever inconsistencies it may have. I just wanted to bring this up, so that you don't just bolt the two manifolds back together and try to install them right to the block, thinking the two machined surfaces are still in plane with each other ("coplanar" is the word I was looking for). You could crack them if you tighten them up against the block when they're no longer coplanar. You've probably thought of this, but I just wanted to be sure.
-
Weren't there some of the flatheads that had oil passages cast into the block, which exited the rear of the block and connected to oil passages that were cast into the front of the transmission, or something like that? I seem to remember someone bringing up something like this. I just want to mention this, in case the original poster has to get this kind of block. Not trying to add confusion to the situation, but just trying to make sure it's not overlooked - if it's even relevant.
-
Welcome back to the forum. I'm sorry to hear of your loss and the difficulties you're having with your insurer. Do you mind elaboratimg on this? When I get my vehicle running again, I am planning to get full coverage insurance from my regular auto insurance company. I had wanted to avoid using classic car insurance due to my perception of how restrictive the policies are. I understand that classic car owners are restricted to pretty low annual mileage limits, and classic truck owners are subject to the same mileage limits and are not allowed to carry cargo. Also, I think we're not allowed to leave our vehicles unattended, except in our own garages. I intend to drive my vehicle (a truck) regularly and use it to haul cargo on occasion, and will leave it in a parking lot from time to time. If my insurer wants an appraisal or two, I'm happy to pay for that kind of thing, and I'll pay premiums commensurate with those appraised values, in order to be sure I have full replacement coverage. Maybe this is a topic for another thread, so that I'm not hijacking your thread, but I just figured I'd ask.
-
Have to you tried disconnecting one spark plug wire at a time and seeing if the noise is still there? If the noise goes away or diminishes when one wire is removed, then that cylinder is the likely culprit. If it's not the bearings, then maybe piston pin wear or piston slap. Also, have you taken off the valve covers to check for excessive valve looseness? I've heard of someone who had a tappet adjuster screw that lost its fit inside the tappet, and it backed off, causing a lot of slack in that part of the valve train.
-
You might also consider buying a dial indicator and using it to see how much runout your crankshaft has. My manuals say the runout at the "center journal" (it seems to me that there are actually two "center" journals - i.e., #2 and #3) is supposed to be no more tyan 0.003". This seems large to me, but it's what the manuals say. This is for new parts, while ised parts have a wear limit of 0.005" runout. Anyway, if the runout is too large, that could be causing your crankshaft to bind in the bearings.
-
Back in the late 80s, I worked at an industrial repair shop. They did all kinds of repairs and installations of manufacturing equipment, along with sheet metal fabrication, and other metal machining/welding/fabrication, etc. I was one of the mechanics who worked on their company service trucks and did that part-time and sometimes full-time throughout the latter part of high school and most of college. Anyway, they had some forklifts (three, I think) and at least a couple of welders that were powered by flathead sixes. In hindsight, they were probably Chrysler sixes. That's also the place where I purchased my old Dodge Power Wagon (with 230 flathead six) for $50. In the early 90s, a friend showed me an airport tug (he was a private pilot) that was powered by a Chrysler flathead six, and the most interesting part was that it had a LONG weld bead running along the side of the engine, the entire length from the front to the rear, just beneath the block deck (i.e., head mating surface) He and I figured it must have been through a freeze without the proper coolant mixture, and it cracked the block. But whatever the reason, it had been welded and put back into service and was in use to that day.
-
You mention the sign being a reproduction...I wonder if any of the ads can be found as reproductions. I'd love to assemble a collection like yours, even if they were all reproductions.
-
Making your own Water Distribution Tube
Matt Wilson replied to maddmaxx1949's topic in P15-D24 Forum
Over on www.dodgepowerwagon.com, I once read a guy's post, which said he stuck a pressure gage on his cooling system and found the system pressure to be about 10 psi with the engine (and water pump) running at an engine speed of around 3000 rpm. At idle, it was 1 or 2 psi. -
Another thing I've been contemplating is how to adjust the valves with a set of headers in place. I plan to use a set of Langdon headers on my engine, which completely block access to most of the tappets. Tom (Langdon) recommends setting the clearances cold and just running the engine that way for good, and not ever coming back to set them when hot. He says others have done it this way with no issues, but the idea of doing this still leaves me a little bit uncomfortable, thinking the valves are not really set white right. I may end up doing that, but I thought I'd see what other folks think. I suppose I could install the stock manifold and adjust the tappets that way, and then install the headers, but that sounds like a pain.
-
Help Me Further Understand Top End Engine Wear
Matt Wilson replied to keithb7's topic in P15-D24 Forum
You can also look at the fracture surfaces of the rings under magnification to see if there are any signs of rust. If there are, then those surfaces were broken long before now; if not, then they are probably fresh breaks. -
I wonder what people do to accurately adjust valves when the tappets have recesses worn into them. When I disassembled the 251 engine I'm rebuilding now (converting to 265), the tappet adjusting screws had recesses that perfectly mated with the tips of the valve stems. The recesses were probably 0.005 - 0.010" deep. A feeler gage will obviously no longer work to give accurate clearance readings at that point. If the owner or mechanic doing the adjustment realizes this situation, I suppose the old, worn adjusters could be removed and replaced with new ones, but I doubt that could be done without removing either the valves or the camshaft and lifters.
-
Help Me Further Understand Top End Engine Wear
Matt Wilson replied to keithb7's topic in P15-D24 Forum
I'm just now coming in on this thread. It's been some great reading, and I wish you the best of luck with it all. One thing I'd like mention is you should exercise extreme caution when using a ridge reamer. I used a ridge reamer on both flathead sixes that I've rebuilt, and both machine shops (different shops, 15 years apart) told me, after I had already done it, that they advise their customers not to use them. They don't even use them themselves. They recommend just pounding the pistons out the top of the block. Of course, that breaks the rings and ring lands, making it much harder to ascertain the condition of the engine up to that point. Apparently, it's very common for the reamer to cut too deeply (radially into the cylinder wall) and too far down the length into the cylinder, which makes it impossible to reuse the cylinder without boring oversize, and it often makes it impossible to bore to the next oversize, instead requiring it to be bored one or two sizes beyond that. I guess I got lucky with my first rebuild, because the machinist was able to take it from the 0.040" oversize that I discovered to 0.060". During my second rebuild, I thought I took great care, but the machinist said I had removed too much material to go from the standard bore size (my engine had never been rebuilt) to 0.020", instead having to up to 0.030". My only point with this is that if you still have any desire to just re-ring your engine and not bore it oversize, you need to be extremely careful when using a ridge reamer. Speaking of re-ringing, as you mentioned already, I think there is some risk that the existing ridges might not play well with new rings, not quite conforming to each other, and possibly causing impact of the rings against the ridges and breakage of rings and piston ring lands. So this is a nudge in the direction of boring oversize. And if you follow through with a 1/16" overbore, as you've discussed, then digging too deep with the ridge reamer is less of a concern, although I'm sure someone could cause enough damage to risk ruining the possibility of using even that large an overbore, if they really got carried away. Anyway, good luck! Matt -
As one data point, you can go to the Best Gasket website and they will tell you the compressed thickness of head gaskets for our engines. I think the thickness value is 0.042" for my 25" block. Of course, that is for their brand of gasket. Other brands may vary somewhat, but at least this gives you an idea.
-
Also, based on what I've read, an increase in compression ratio only results in a power increase of a few percent. For example, I think I read that a change from 8:1 to 9:1 only increases the power by around 5% for an overhead valve V-8. I suspect it would be similar for a flathead six. Such a small power increase is probably not noticeable to most of us.
