


Matt Wilson
-
Posts
641 -
Joined
-
Last visited
-
Days Won
2
Content Type
Links Directory
Profiles
Articles
Forums
Downloads
Store
Gallery
Blogs
Events
Everything posted by Matt Wilson
-
I'm sorry that you're having such issues, Paul, but it sounds like there is a little flicker of improvement, which sounds encouraging. I'm 52 years old, and I have some days in the garage when I only get in three hours before I'm tired. The crucial threshold is whether you make progress at all, even if it's not more than three hours a day, or not even everyday. I wish the best for you, and I look forward to seeing your upcoming posts.
-
Full Flow Oil Filter Part Number and Applications
Matt Wilson replied to Matt Wilson's topic in P15-D24 Forum
Ok, good to hear you went ahead and pulled the trigger on that. Let us know when you try to fit it, along with the filter. It'll be good to hear if it does actually fit properly. I ended up lucking out (one of the few times on this truck project, it seems), by purchasing an MCH6103 starter that was rebuilt by a guy who has been rebuilding starters for 60 years. He goes by pammiesuesguy on ebay. Seems like a really nice guy, answered all my questions patiently. I was the only bidder, so it means I got it for the starting bid that he had placed on the starter. I actually bid higher than that, as a way of showing my appreciation for his patience in answering my questions, but apparently eBay defaults to the starting bid if you win the auction as the only bidder. The starter arrived and looks basically new. I haven't tried to fit it to the truck yet, since the engine is on a stand for rebuilding, but based on the measurements and some careful eyeballing, I'm sure it will fit. Plus, it's one of the numbers recommended by Dodgeb4ya. I will probably have to swap the input lever from my old starter to this rebuilt one, or perhaps slightly modify the lever on this rebuilt one, but that should be simple, I think (I hope). -
Found my camshaft! - Pulling motor on 1948 Dodge.
Matt Wilson replied to Bryan's topic in P15-D24 Forum
Just FYI - when I've tried using Evaporust on cast iron, including my engine block, it has left the metal black, and I had a very hard time getting it off, and in fact, haven't been able to get it all off. I've decided that for the most part, I'm not going to use it on cast iron. Hopefully your experience will be different, but I just thought I'd mention it. -
Remembering forum members who have passed on
Matt Wilson replied to Don Coatney's topic in Recognitions and Remembrances
Resurrecting this old thread. I was doing some searches for info on this site and found something of interest posted by James Curl, so I sent him a PM. Didn't hear anything for a few days, so I looked at his profile to see when the last time was that he had gotten on the forum, and it was some time in 2016. So then I did a Google obituary search and I found an obit for someone by that name, shortly after the last time he logged onto this site, and it was a Texas obit, and in one or two of his posts, he had said he lived in Texas. So I'm pretty sure that was him. Another sad loss.... Just figured it was appropriate to recognize him and to let you all know, if you didn't already know. -
Found my camshaft! - Pulling motor on 1948 Dodge.
Matt Wilson replied to Bryan's topic in P15-D24 Forum
If you're finding remnants of the brass bristles, you might consider buying a brush kit made specifically for engine cleaning. I bought one made by Moroso (I think) and bought it off Amazon (I think). I seem to recall it was about $40, and it had quite a variety of brush diameters and lengths and they are all very stiff, scratchy brushes made for scraping off crud. I haven't cleaned my block yet, but I've cleaned quite a few other parts and haven't noticed any bristles coming off. As for solvents to use, I bought a couple of gallons of mineral spirits, which I will use to clean my block, and I also have used a LOT of brake parts cleaner on a variety of engine parts and other parts. I like the CRC Brakleen, as it is not flammable and doesn't evaporate as quickly as others, which means I don't have to continually spray it onto/into whatever I'm cleaning to make up for what's evaporating, and it makes it less prone to chilling the parts and producing condensation, which can cause flash rust. I believe they even sell the stuff in large buckets that are more economical and keep you from having to buy it as often. -
The ones I've seen and used were pre-molded into an L shape, but you might be able to buy a length of heater hose or flexible house and get it to make the bend without causing it to kink.
-
Thanks, yes, I've already installed a Speedi-Sleeve. It was definitely needed. With my old 230, I thought I had centered the timing cover over the hub pretty well, but I must not have, as that thing leaked like a sieve. I hope this one goes better.
-
Thanks. The seal I removed from the engine was rubber or maybe nitrile or neoprene, rather than leather, and it had the cut lip and spring and all. The engine was from an early 60s Power Wagon, and either they were using somewhat modern materials by then or the seal had been replaced. But yes, the seal pictured in the manual may very well have been leather. Good point about calling Best Gasket.
-
Cause And Effect - Lugging The Flat Head Engine
Matt Wilson replied to keithb7's topic in P15-D24 Forum
Lugging can indeed damage the crankshaft bearings. They become fatigued and the surface material starts flaking off. Exactly why this happens, I don't know, but the comment mentioned earlier about knocking (pinging or detonation, I believe was meant) may be correct. With detonation, the loads go up and I suspect they can cause damage to the bearings, amongst other things. -
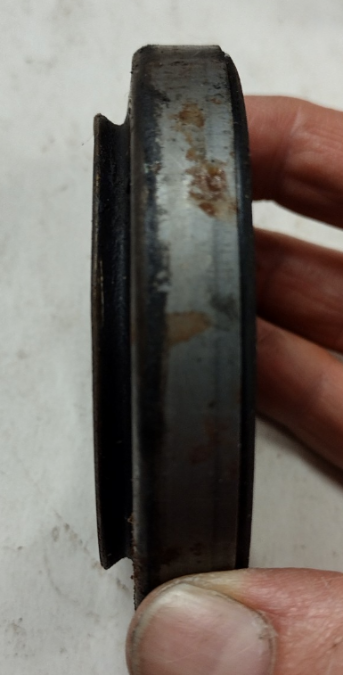
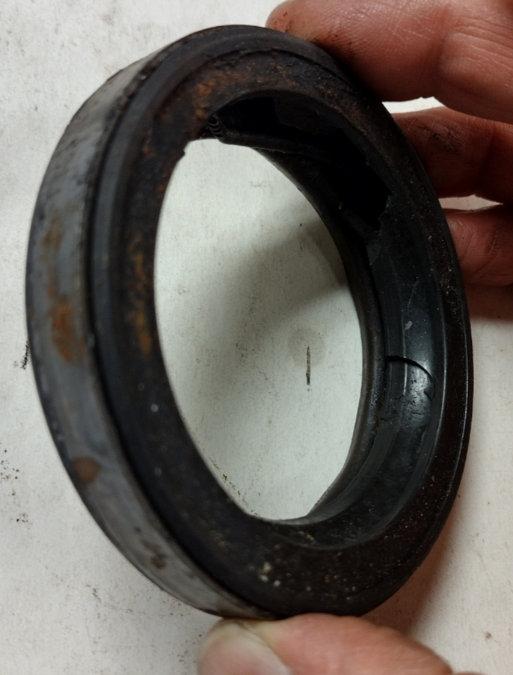
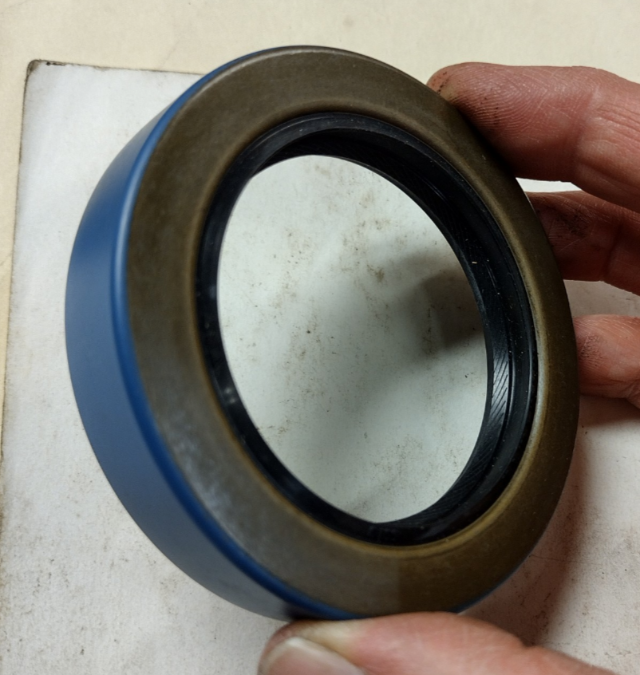
I'm looking at the front main seal that will go into my 25" engine. It's from a Best Gasket kit. It doesn't look like the original or like the image shown in a couple of my repair manuals. The first image below is from one of my manuals and it shows not only the seal, but also an oil seal gasket. When I took apart my engine, I'm fairly certain it didn't have this gasket, and my new gasket/seal kit from Best does not have this gasket, as far as I can tell. Also, the new seal doesn't look like the old one, nor does it look like the one in the manual. It's the correct size (inner and outer diameters and thickness), but looks a lot simpler than the one in the manual. You can see the differences between the original seal and the new seal in the next few photos. So do I just smear a little sealant on the O.D. of the new seal, and maybe even the front face, and then press it into place in the timing cover housing? Or do I need to find (or make) the seal gasket shown? Also, is it an issue that the new seal looks so much simpler than the one in the manual? Thanks.


-
Glad you found it. I have one somewhere around here. I hope I can find it when the time comes to assemble everything. If not, then now I know where I can find one, thanks to you. Be aware that tapping that hole was a bit of a challenge for me. Not that bad, mind you, but I remember having to work the tap back and forth (clockwise & counterclockwise) over and over, advancing little by little till I reached the end of each hole. I guess the cast iron was resistant, but I eventually prevailed. Good luck!
-
Internal Bypass block - External Bypass head Help?
Matt Wilson replied to Bryan's topic in P15-D24 Forum
I just posted a response to your other thread. -
My understanding is that people in this situation tap the holes in the block so that a plug can be screwed in there, with some sealant on the threads, of course. This prevents coolant from going through the internal bypass passages. They then install the external bypass water outlet (thermostat housing) on the head, with the small bypass hose that accompanies such a setup. I believe one of George Ashe's sons told me that's what George does in these situations, and that's what I'm planning to do with the 251 that I'm coverting to a 265. I plan to use the external bypass pieces from my old 230 engine. In the photo below, you can see that I tapped both the vertical hole and the horizontal hole. I expect to use the plug in only one of those holes, but I tapped then both to give myself flexibility. I used a 1/2-13 tpi tap. I may have had to drill the hole to the correct size first, so it would tap more easily, but I don't recall for sure.

-
You might still be able to take the custom piston approach, but not purchase custom rods. You could use rods from a 237, which I believe are 1/4" longer than rods from a 265, but make your custom pistons so that their compression height is 1/4" less than stock. That way, the piston tops will still come up flush with the block deck, like the original parts would. Given the stock compression height (nearly 2"), there should be plenty of room to reduce the compression height without issue. You could even buy a modern ring set that will last a lot longer than the OEM and will preserve the cylinder bores for much longer as well. I'm having custom pistons made for my 265 build, although I'm sticking with the factory rods and bolts. The pistons are a little under $800 including tax from JE Pistons. Someone else on this forum steered me away from them a little, based on their experience with JE getting too many of his orders incorrect, but I went with them after calling every custom piston manufacturer I could find, because they offered more flexibility compared to the other manufacturers, along with the alloy that I wanted, and their price was significantly better too. You could also talk to Egge Machine, who makes custom pistons - just not forged. They might be able to make a set of pistons with a different compression height. When I talked to them about making pistons, it was going to be about $330 plus tax, but I wanted forged (just my preference). Either of the above approaches would be substantially cheaper than buying a custom set of rods and pistons. Having said all this, I would strongly caution you to check your internal engine clearances with the 237 rods prior to ordering custom pistons. The 265 rods and bolts were made the way they were made because they needed the added clearance inside the engine. The stroke of that engine is so long that a standard rod configuration, like the one in the 237, runs the risk of impacting other objects, such as the camshaft, the oil pan rails and maybe other things. If you have access to some 237 rods, you could mock them up with the 265 crankshaft and your old pistons in your block and see if they will clear everything, plus some extra clearance in all directions to account for flexing of the parts under load. The same approach could be taken with 251 engine rods.
-
I agree that a leakdown test is a good idea.
-
Chevy Head Bolts in a Dodge Engine
Matt Wilson replied to RodFru2u's topic in Mopar Flathead Truck Forum
I'd make sure your valves will clear the head before taking any material of the head. You can lay the head directly on the block, unbolted and with no head gasket in place, then rotate the engine by hand and see if the valves lift the head off the block. If not, then you're good, but if so, then you could try it with something a little thinner than the head gasket in place (maybe some washers or cardboard or something) between the block and head and then see if the valves lift up the head. You could also try stuffing some modelling clay, purchased at your local hobby store (or Amazon), into each combustion chamber and then rotate the engine. You can then take the head off and stick a scale or the skinny, protruding back end of your calipers into various locations in each valve head impression in the clay, and that will give you a more accurate idea of the valve clearance. If you rely on this method, you should do this in every combustion chamber, as the chamber depth can vary from one chamber to the next. At least that seemed to be the case when I measured mine. I'd suggest 0.030 - 0.040" clearance, but other folks may have other suggestions. Having said all this, I removed about 0.060 from the head in my '49 Power Wagon when it had a 230, and I never could tell any difference in power, so I don't usually recommend it to others. It seems like it mostly just eats into the future machinability of the head. At least that was my impression. I was disappointed. -
Ah, ok, I didn't realize that. Thanks, Sniper. The reason I asked is because ARP's head nuts are 0.504" tall, but I was fairly sure the factory DPCD nuts are not that tall. As you might have figured, this is related to the head stud/head nut questions I've been asking in my other post. I figured I'd ask this particular question of someone who I know has (or at least had) factory head nuts, hence the reason for coming to this thread.
-
Super! Thanks so much!
-
Here's a pic that shows the oil pan gaskets for my engine, which started life as an early 60's 251 out of a Power Wagon, and which I'm coverting to a 265. For either size engine, it uses the same block, oil pan, etc., so the gaskets would be the same and I think they would be the same for your engine too. The front and rear pieces are made of cork that is between 0.240 - 0.245" thick. They are both about 0.845 - 0.855" wide and 10-13/16" long when laying flat. The side pieces don't appear to be cork, but rather some type of mostly fibrous yet somewhat rubbery stuff, and they range in thickness from 0.090 - 0.095". These are gaskets made by Best Gasket, which I purchased through Vintage Power Wagons almost 5 years ago. Hopefully this helps.

-
Jim, I wonder if you would mind measuring the height (thickness) of one of the head nuts on your engine? Not sure if those are OEM nuts or if you replaced them. Thanks!
-
Hmmm, good info, thanks.
-
Well, that's certainly a data point in favor of not doing that. Probably good enough reason for me to avoid it.
-
If I decide to do like you guys have suggested and mount the brackets under the head nuts instead of on top of them, there are some brackets I know I want in place from the start (horn, throttle linkage). But if I decide later, after running the engine for some time (maybe a few thousand miles), that I want to add some more bracketry under some of the other nuts, will it be a significant risk to remove just those nuts and reinstall and re-torque them? Or should I completely remove the head and replace the gasket at that time, as part of the process of installing the new new brackets? I've heard of people removing and reinstalling just the head nuts or head bolts of interest, but it sounds like it could be a little risky.
-
The studs I have actually are the longer ones. I even called VPW to double-check their long stud length vs. mine, just to be sure they shipped me the right ones and that checked out. I also asked them if they happen to have any longer ones, but they don't. I agree that the pre-planned approach looks cleaner, and I may still have to go that route, but it would offer a lot more flexibility to do what I'm thinking of doing.
-
Ah, that's good to know, thanks! I didn't think to look on their website to verify what the rep told me. I just figured he was giving me ARP's position on this. ARP offers studs in 1/8" increments. It's not so much an issue with the overall length, but rather the length of the upper threaded section. That section is only 1" long and it's difficult to fit (in order from bottom to top) a flat washer, a head stud, a bracket to hold an accessory, a lock washer and another nut in that 1" length. I may be able to do it, though, if I choose washers and nuts carefully. Looking through McMaster-Carr's offerings, there may be a combination of these things that will let me do this, but it will be tight. Too long a stud and the head nut will bottom out ("shank out") on the shank of the stud. I can compensate for this by adding a washer under the nut, but then I run the risk of the upper nut (that holds the accessory bracket) extending beyond the top of the stud and not getting adequate thread engagement. I think it can probably be done, but it'll be tight.

