


Matt Wilson
-
Posts
641 -
Joined
-
Last visited
-
Days Won
2
Content Type
Links Directory
Profiles
Articles
Forums
Downloads
Store
Gallery
Blogs
Events
Everything posted by Matt Wilson
-
Well, I'm sorry if it came across as a criticism. That was not my intent; it was not intended as a slam. I was only pointing out that in something so critical as brakes, I'd be hesitant to change that particular feature, as I figure the engineers probably had good reason for it. Also, it's indisputable that having a larger rear bore will produce more braking force at that shoe than having the same bore size as the front shoe, even if it's not perceptible to the driver. If it has worked well for you, then that's great; more power to you. And yes, I agree that some of these manuals are poorly written. Like you, I also tend to augment my understanding with multiple manuals, for that reason. Some are written much better than the original shop manual, but it seems that none are complete or as well-written as they could be. I've also seen a few specs that changed over the years, across the various factory manuals, so I like to corroborate the info sometimes using two, three or occasionally even four manuals. I sometimes end up referring to other automotive repair books, or even automotive course textbooks to gain further understanding, when my multiple Dodge, Chrysler or Army manuals don't do the trick.
-
No, not because I just choose to "believe" it's a misprint. As I said before, the axle shaft nut that you describe is only used on lighter truck models - i.e., 1/2 and 3/4-ton models - and passenger cars (which are not covered in my manual). So it struck me as odd that eight models would list a spec like that, when only two of them actually use such a configuration. Additionally, that nut description just happens to be the same size and thread pitch as the lug nuts on my Power Wagon. On the other hand, the only axle shaft nuts on my Power Wagon are 3/8" (six of them) that hold the axle shaft flange to the hub, and they obviously would not stand up to 142 ft-lbs of torque. Other heavy models, 1-ton and up, have similarly small axle shaft nuts. I've assumed for a great many years, probably incorrectly, that this spec was referring to the lug nuts. I should note that a poster on the Power Wagon forum has said that the Dodge M37 manual (M37 uses the same 3/4 - 16 TPI and 1-1/5" wrench size lug nuts), calls for 200 - 225 ft-lbs of torque. Manuals are not always consistent. One last note is that it's worth considering whether to tighten the nuts to something less than 450 ft-lbs, in case one finds oneself some distance from help or power tools and having a flat tire, as it will be difficult to use hand tools to loosen nuts tightened so snugly. Sorry if proposing a possible misprint has stepped on someone's toes.
-
I took a closer look at the valves tonight, under greater magnification, held up next to my Starrett 6" scale as I rotated the valve to see the entire circumference. Most of them look like they still have a little meat left - maybe enough to allow a cleanup by grinding. So now I'm leaning toward taking them to the machinist to see if he can take off just a slight amount to clean them up.
-
I think it may be a misprint, calling it the axle shaft nut. The manual covers lighter trucks and heavier trucks (and no cars). The lighter trucks have the nut you speak of, bwcause they have semi-floating axles, but the heavier trucks, including the Power Wagon, don't have that nut because they have full-floating axles. Most of the trucks on the list are the heavier trucks. I'm pretty certain this spec is for the lug nut. It's even the correct size.
-
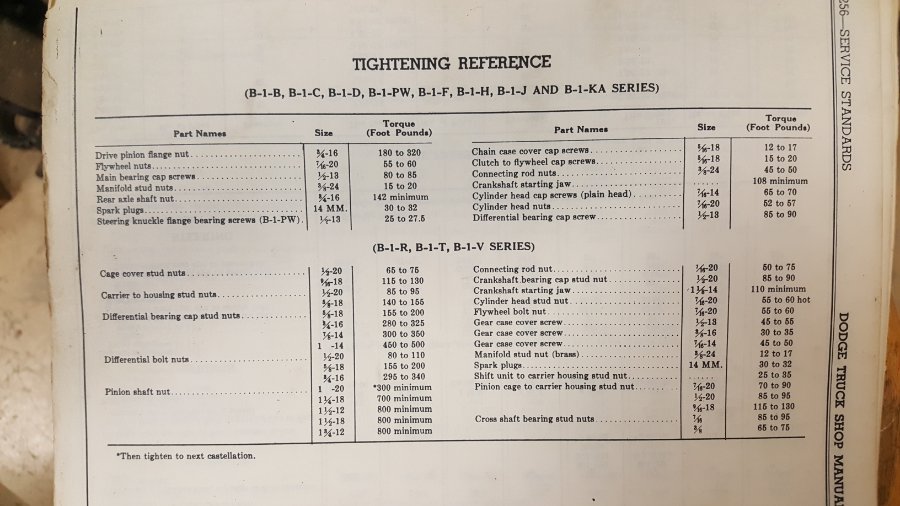
Here's a photo taken from my 1948 - 49 B-1 series shop manual. It lists the "rear axle shaft nut" as requiring a minimum of 142 ft-lbs of torque. It gives no maximum. I'm certain they are talking about the lug nuts because they list the size as 3/4", which is the size of wheel stud on my Power Wagon. Nut size (which I just now measured to confirm) is 1-1/2". This same torque spec seems to cover several models. I'm sure one of them is the 2-ton truck, and I don't think it matters that this is for 1949 - 49, while yours is a '47 model. The torque values will almost certainly be the same. Last time I tightened them, I think I went to 225 ft-lbs and used anti-seize.
-
Thanks, John. I figure it won't hurt to try the Evaporust, but I suspect I'll still have pits. Maybe I can get a shop to just kiss the faces and not go below the minimum edge margin.
-
Actually these were new valves, made of 21-4N alloy, which is supposed to be very good stuff. They are what Vintage Power Wagons sells. I had them ground because it is not uncommon for the faces of new valves to run non-concentric with the valve stem, or to be slightly out of round. Two machine shops have advised me to have new valves lightly ground to correct this. I'm leaning toward trying the lapping and I'll check for proper sealing by filling the ports with solvent and seeing if the solvent leaks past the closed valves (under spring pressure). If no leaks for several minutes or an hour, then they should be good, I think. I may change my mind, though, and buy new ones. Still thinking about it. Gotta do some research on valve lapping to see if it seems risky or if it requires a particular level of skill or practice.
-
I don't think there's any room to grind without violating the minimum edge margin. I'm hoping lapping will be enough on most, but I suspect I'll end up replacing the pitted one.
-
I happen to have some Evaporust, so I'll try that on the one rusted valve. Some of the valves have nicks in the region where they contact the seat, so those will need attention. Actually, after looking closer at the valves this morning, I see that nearly all of them have tiny nicks and dings on the faces (usually just two or three) and I think most of those are in the region where they contact the faces, but I'll check more closely to verify. If it turns out to be too many, then that will be more than I want to spend to replace them and have them ground true when these are otherwise new, so I'll probably try a light lapping to get rid of the nicks. If any pits remain after soaking the one valve in Evaporust, then I'll try a light lap of that valve. If any valves don't clean up adequately after lapping, then I'll break down and buy new ones to replace only those that don't clean up, and I'll have those ground true. I've never lapped valves so it'll be another learning experience.
-
The main reason I am hesitant to lap is because, when my machinist was first doing the valve and seat work (more than four years ago), I mentioned something about lapping to him, and he said that's really not the preferred way to do things anymore. He said modern equipment and techniques achieve significantly better results than lapping. He's an old timer, but he has kept up with changes in technology. Having said that, lapping has served many people very well for many years, so it's probably fine. I suppose another reason is that I'm concerned about lapping is that the seat comtact widths for all the valves are pefect right now, and if I lap enough to remove the pitting on this valve (and nicks and dents on the other valves), I'm concerned about accidentally lapping too much of the seat material away so that I exceed the allowable contact width specified in my manual. In any case, I don't see anyone saying that this pitting and the nicks and dents are ok to leave (I doubt they are).
-
Getting closer to assembling my 251-turned-265 and I was cleaning the valves this evening in preparation for bagging them to keep dust off till I install them. I noticed one had a rust patch on the valve face. The photo is after I polished on it with some scotchbrite. If you zoom in, you can see It well, but it looks a little worse in the pic than in real life, I think. I worked on it for a few minutes and this was the best I could do without going to something more abrasive, which I'm hesitant to do. I think I know the answer, but I feel like I should ask....is this anything to worry about? It looks like it's right where the valve will contact the seat. My first thought was to take it to a machine shop to have them grind it a bit, but the edge thickness of the valve head (the margin) is already right at the minimum allowed per one of my manuals, so any grinding will no doubt violate the minimum. I suppose I could chuck it up in my lathe and do some hand polishing with some 400-grit or 600-grit sandpaper, but not sure how well that will work. A few of the other valves have tiny dings on their faces (they were all in the same plastic bag for years and no doubt bumped into each other as they got moved from one spot in my garage to another). All those valves are right at the minimum for edge margin too. I wonder if lapping would clean them up. I don't really care for the idea of lapping, but I'd consider it to avoid buying new valves and getting them ground to true them up. Thoughts?

-
As far as I have been able to tell, the bolt patterns at the back of all the flathead sixes from around 1933 or 1934 through the end of production, some 35 - 40+ years later (for export during the last years) are the same. As mentioned, the temp gage hole size did change at some point. Also, some smaller engines used a flywheel with 4 bolts to connect to the crankshaft, but I couldn't tell you exactly which ones. Someone else may chime in here. I seem to recall reading about some engines that rotated in the opposite direction compared to most engines (most crankshafts rotate clockwise when viewed from the front - i.e., facing rearward to view the front of the engine), but I think these were pretty uncommon and weren't used in cars or trucks. And of course, there is the length difference of about 2" (23" vs. 25"), which you already know about. There were also manifold differences for updraft carburetors and exhaust manifold differences, and thermostat bypass differences, but these are relatively minor and can be accounted for without too much trouble. Otherwise, I believe they are all pretty interchangeable.
-
Right, I spoke to George Asche a couple of years ago,and he said he puts a light coating of engine oil on the bolt threads and torques the rod bolts to 45 ft-lbs. Presumably the same would be done for the main cap bolts.
-
I talked with a hot rod engine builder a couple of years ago, and he said he likes to do soda blasting. I think it's baking soda that's wetted and run through a sand blast nozzle or gun. He says it does a good job of getting rid of rust but the soda dissolves in water so that it doesn't leave any solid chunks like you'd get with sand blasting, bead basting, etc. He said he's seen examples of people who cleaned parts with those solid blast media, and in some parts, like oil pans with baffles, you'll never get all the grit out, and that's a real risk for causing damage to the engine. I might feel similarly concerned over intake manifolds too.
-
That is great info! Thanks so much! Looks like that confirms my findings in both engines. In talking with one of the machine shops I used for the 251 work (actually, I'm turning the 251 into a 265 with the appropriate crankshaft and rods), it seems that nearly all engines of any make for at least the last 50+ years have not used lock washers, or any type of washers, on the rods. Presumably that's the same as for the main caps too, although we didn't get into that discussion. The 265 rods had recesses for lock washers, but I had those machined down to eliminate the need for washers. This was at the recommendation of Vintage Power Wagons, who said something about a Chrysler Technical Bulletin that indicated it was better to go without the washers, but they didn't have a copy they could send me. I'm sure it would have been fine if I had left the washers in place, as most folks have done, but I decided to remove the need for them, especially since those washers are difficult to come by in unused condition, which is what I would have strongly preferred. By the way, the 265 and 251 rods are nearly identical in every respect except for length, bolt head configuration (and rod features related to the bolt heads), and possibly the thickness of the beam section. I measured and compared these two types of rods in every detail I could possibly cover, and they seem to be identical except for what I mentioned. In fact, the beam thickness may be the same as well, but I just can't quite recall. Based on this, I felt comfortable in removing the lock washer recesses from the 265 rods, since the caps would then be identical to those of the 251 rods. The nuts and threaded portions of the bolts for those two rod configurations also appeared to be identical to each other.
-
That would be great, thanks.
-
Yeah, that '63 251 didn't have any washers at all on the main or rod caps.
-
Good info. The 251 came out of a 1963 Power Wagon, and perhaps they didn't use lock washers on the main cap bolts by that time. The rod cap bolts also did not use lock washers, unlike the 230, which came out of an earlier Power Wagon. And the rod nuts were not lock nuts either, contrary to what someone posted on another website forum.
-
Thanks for the info. I guess the 230 was correct with its washers and the 251 was correct without washers.
-
Yeah, I thought that might be the case, but I guess I just mainly didn't expect the bolts from the 251 to look like hardware store Grade 8 bolts. I suppose they're fine, though.
-
Some of the guys on the Power Wagon forums have used this stuff in head bolt applications on the flathead sixes for many thousands or tens of thousands of miles with good success.
-
As mentioned, cleaning the threads in the block and on the bolts with a thread chaser is a good idea, and be sure to use thread sealant on any bolts that go into the water jacket (which might be all of them, but not sure). You might want to go ahead and use sealant on all the bolts, even the ones that don't go into the water jacket, just so you get uniform preload across all bolts. Just don't use too much sealant or it can pool up in the bottom of the hole and crack the block when the end of the bolt gets forced down into that same space in the hole when torquing.
-
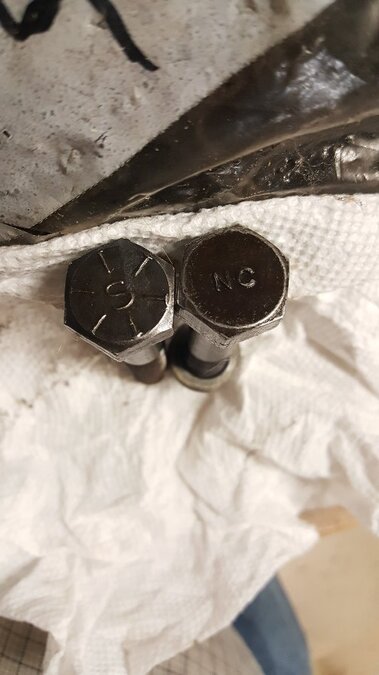
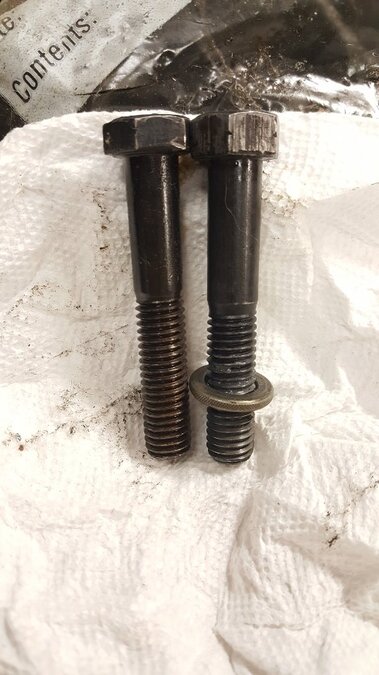
I noticed the main bearing cap bolts on my 251 are not the same as those on my 230. See the attached images. The view of the tops of the bolt heads shows the 251 bolts marked with an "S" and they also have the lines you expect to see on Grade 8 bolts from the hardware store, while the 230 bolts have no lines, but they all say "NC." From the side, it can be seen that the 251 bolt heads are a little thinner and the threaded portion is a little longer than on the 230 bolts. Does either of these bolts look correct? The 251 came out of a '63 Power Wagon and I'm certain it was never rebuilt. The 230 was rebuilt (by me) nearly 20 years ago, and at least one time before, back in the 50s, according to a tag that was on the engine. As a side question, do you all use lock washers on your main caps? The 251 had no washers. I can't recall if the 230 had washers when I disassembled it, but it sure did afterward, as you can see in the photo. Those look like hardware store Grade 8 washers, and I imagine I they were my doing (whether I was replacing existing washers or not, I do not recall).
-
I've read that even though Dot 5 will not absorb moisture, the moisture still gets into the system (because of the vent hole in the master cylinder lid and any that the maintainer lets in by removing the lid to top off the fluid) and this moisture will settle to the bottom (lowest points) of the system. Seems like that has potential to still cause problems. I suppose if the lowest point is a cylinder (wheel or master), then those cylinders will still corrode. If the lowest point is a brake line, then that line will eventually corrode, unless it's the nickel-copper variety. I've also heard that if the vehicle is stored in a place where it can get cold enough, then any moisture that has collected in the system can freeze, and if there is enough of it, then it can block the line where it sits. Does any of this sound correct? Maybe these things are possible, but are they very realistic possibilities? I've toyed with idea of changing from Dot 3 to Dot 5 in my '49 Power Wagon, and now would be the time to do it, as I'm doing significant brake work on it. Thanks.
-
Great-looking truck. One of my favorite body styles. Welcome to the forum!

