Merle Coggins
-
Posts
9,390 -
Joined
-
Last visited
-
Days Won
87
Everything posted by Merle Coggins
-
Wasn’t a D25 an import version of the Plymouth P15 in Dodge trim? If so it’s likely the 25” version of the 230 CID engine. It may have come out of a Fargo, but it would have originally been in a Dodge car.
-

Installing inner front fenders.
Merle Coggins replied to Los_Control's topic in Mopar Flathead Truck Forum
That video is me. I didn’t have a YouTube channel at the time, so Tim posted it on his and shared it on the forum. Yes, the inner fenders come out, and in, through the top. It’s a tight fit, and you will need to wiggle it around to find the right angles. Be careful though. I ended up scratching the paint on the firewall a little bit. -
Good one Brent… Flights and hotels are booked. See y’all there…
-
Nice... That's what we call a "DuPont Overhaul".
-
I want to say 1 inch, but I'm not 100% sure on that.
-
I wouldn't try that on our ice right now. It's been so mild lately that the ice is pretty soft, and disappearing fast. Our big sturgeon spearing season kicks this weekend on Lake Winnebago (largest inland lake in Wisconsin), and other upstream lakes on the Fox River chain. There is much concern about the ice conditions with everyone that will be out there.
-
Photbucket files to be deleted soon
Merle Coggins replied to ggdad1951's topic in Mopar Flathead Truck Forum
I got that from them a couple years ago and I downloaded everything I had there and saved it to an external storage. I then canceled my account with Photobucket. I didn't see enough benefit with their service to warrant paying for it. -
Good to know. All of the ones I've dealt with had conditioner.
-
Those coolant filters used on diesel engines have a conditioning agent in them to replace depleted chemicals in the coolant to extend it's life and keep internal corrosion at bay. They may also do some filtering of debris, but their primary purpose is to recondition the coolant.
-
Jeep XJ master cylinder pushrod?
Merle Coggins replied to gtech636p's topic in Mopar Flathead Truck Forum
Today's physics lesson... Basic Hydraulics... PSI = Pounds per Square Inch, or Pounds/Sq. In. I'll use a 1 inch bore and a 3/4 inch bore as examples. So first we have to find the square inch surface area of the piston using the pie are square (π × r2 ) formula. 1" bore = 0.5" radius. 0.5 X 0.5 = 0.25 X 3.14 = 0.785 square inches of surface area. 3/4" bore = 0.375" radius. 0.375 X 0.375 = 0.14 X 3.14 = 0.44 square inches of surface area. If I were to exert 50 pounds of force on the master cylinder piston with my foot how much pressure will be generated? 50 lbs. / 0.785 sq. in. = 63.7 PSI with the 1 inch bore. (metric conversion; 22.7 kilos = 4.4 Bar) 50 lbs. / 0.44 sq. in. = 113.6 PSI with the 3/4 inch bore. (metric conversion; 22.7 kilos = 7.8 Bar) So, as you can see, the smaller bore will create more braking pressure with the same pedal force. Or, you could say it will take less leg force to generate the same braking force. However, as alluded to, the smaller bore will move less fluid so it will take a longer pedal stroke to apply the brakes. So it comes down to will a smaller bore master cylinder displace enough brake fluid before bottoming out to apply your brakes safely, yet apply more pressure at the same leg effort? Or do you need a larger bore to get the fluid displacement required, and need a little more leg effort to achieve the braking force needed. -
How Many Pilot House Trucks Have Survived?
Merle Coggins replied to Bradley S.'s topic in Mopar Flathead Truck Forum
Looks like someone may have cut off the back half to make a trailer. -
Hey Ed, you want to borrow my bucket seat for a test drive? ?
-
It should be stamped into the frame, just ahead of the left front tire. You may have to do some gentle cleaning/sanding to find it. It should be an 8 digit number, likely starting with an 8
-
Kind of like that around here too. The big show fall we had, just before the polar vortex, is melting away fast. We had mid 40’s here yesterday.
-
I don’t believe there is an o-ring at the pick-up screen connection. As for that other o-ring instruction, that is correct. The rear main cap has a groove on either side that needs to be filled with pieces of that o-ring to seal the seam between the cap and the block. This is part of the rear main seal system as the cap is flush with the back of the block. You don’t want oil seeping out through that seam, which isn’t captured by the rear main seal.
-
If you had to modify the points spring to make it fit, you probably don't have it installed correctly. One time I didn't get the points spring anchored properly and the copper strap was the only thing making tension for the points. It would start and idle just fine, but when I tried to drive it, it would sputter and loose power at higher RPM. I went back and retraced my steps and discovered my mistake on the points spring. After correcting that it ran great again. Without a properly installed spring the points will bounce at higher RPM and greatly effect the dwell, and ignition timing.
-
Observations upon reaching an advanced age
Merle Coggins replied to DonaldSmith's topic in Off Topic (OT)
That polar vortex is due to hit us next week. This week we're having a fair amount of snow events. Next week they forecast negative temps, but no more snow, which is good for my wife as I'll be out of town and she won't have to shovel. I don't mind the cold either, as I can dress for it. However, I'm glad I don't have to work out in it full time as I did when I was younger. -
Observations upon reaching an advanced age
Merle Coggins replied to DonaldSmith's topic in Off Topic (OT)
Around here you could say we have only 2 seasons... shovelin' and swattin' -
Observations upon reaching an advanced age
Merle Coggins replied to DonaldSmith's topic in Off Topic (OT)
Me too... Oddly enough, I even like the snow. -
Observations upon reaching an advanced age
Merle Coggins replied to DonaldSmith's topic in Off Topic (OT)
It's been pretty minimal up by me, so far. It looks like it snowing much more down your way. It looks like you guys are getting mostly rain out of this storm, at least for now. -
You should be able to get 55+ out of your truck with the 4.10 gears, although the engine will be close to max. RPM's. Replacement gear sets for these axles are non-existent. You can find a differential assembly from a Plymouth, Dodge, DeSoto, or Chrysler car from the same era, that has a suitable gear ratio. There was a change in spline count for the axle shafts and side gears some time in the early 50's, but otherwise they're a direct swap. I have a 3.73 diff from a '50 Plymouth in my truck. Or you'll have to go with a more modern axle from a Jeep Cherokee, or similar. I have no experience with this type of swap but I've seen many here that have done it. The Cherokee seems to be the favored one.
-
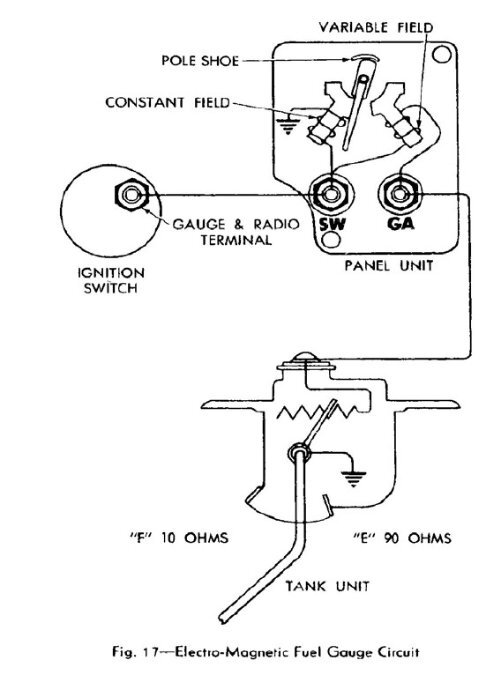
Understanding how the gauge operates helps to troubleshoot it. As you can see in this image, the gauge has 2 electro-magnetic coils inside. Both receive voltage from the Ignition Switch. The Constant Field coil is grounded, through the gauge mount, to the dash. This coil magnet is trying to pull the needle towards the 'E' position. The Variable Field coil is grounded though the sender in the tank. The sender is a variable resistor. The higher the fuel level the lower the resistance will be through the sender, which will create a higher amperage through the Variable Field coil. This will make this coil magnet stronger and will pull the needle towards the 'F' position. As the fuel level drops the resistance gets higher in the sender, the amperage is reduced in the Variable Field coil, and it looses strength. The Constant Field coil will then start to pull the needle back towards the 'E' position. If you have good voltage supply to the gauge, the next checks are to check the continuity of the wire going to the sender. Check resistance between the wire terminal, at the gauge, to a good chassis ground. You should get a reading between 10 and 90 Ohms, depending on fuel level. If you have an Open Circuit to ground on this wire you then need to be sure that the wire is in tact and connected to the sender. Also, a check to be sure that the sender body has continuity to ground is warranted. If you temporarily ground the GA terminal to chassis ground the needle should peg to the 'F' position. This indicates the gauge is working properly and the problem lies in the fuel sender, or the wire to it. Another failure I've seen is the gauge not properly grounding through it's mount. This will cause the gauge to be pegged to 'F' all of the time. Some of the gauge mounting screws have insulating washers. You don't want that on at least 1 of the fuel gauge screws so that it can properly ground to the gauge housing, and ultimately the cab. The insulating cup washers are usually installed near the 'hot' terminal to help prevent an inadvertent short circuit to the adjacent wire terminals.
-
251 Broken Crankshaft / Noise on Rebuild
Merle Coggins replied to Herding Goats's topic in Mopar Flathead Truck Forum
Are you depressing the clutch pedal to start the engine, out of habit, (no knock) then releasing it just after it starts (knock starts)? If the noise came from the clutch replacement that’s where I’d be looking first. -
Mopar Deluxe Model 36 Heater Ducting Routing
Merle Coggins replied to jwolf's topic in Mopar Flathead Truck Forum
Defrost ducts look like this. Sorry, nothing to show scale. I never pulled them out of the cab for stand-alone pics.
-
As Ken said, the sockets are easy to replace. I picked up a couple of replacement sockets from my local big box auto parts store. A little heat on the old socket melts the solder and they'll just about fall out. Clean it up and solder the new ones in place. My next challenge was finding amber bulbs in 6 volt. They are non-existent. You need amber because the lenses are clear. I ended up finding LED bulbs in amber and they've been working great for many years.