Merle Coggins
-
Posts
9,369 -
Joined
-
Last visited
-
Days Won
86
Content Type
Links Directory
Profiles
Articles
Forums
Downloads
Store
Gallery
Blogs
Events
Everything posted by Merle Coggins
-
I saw that floating around on Facebook. Not sure how I feel about it...
-
Yup, that’s it. Hood ornament;

-
Nope… Not Fiat
-
just for you, Tim. ?

-
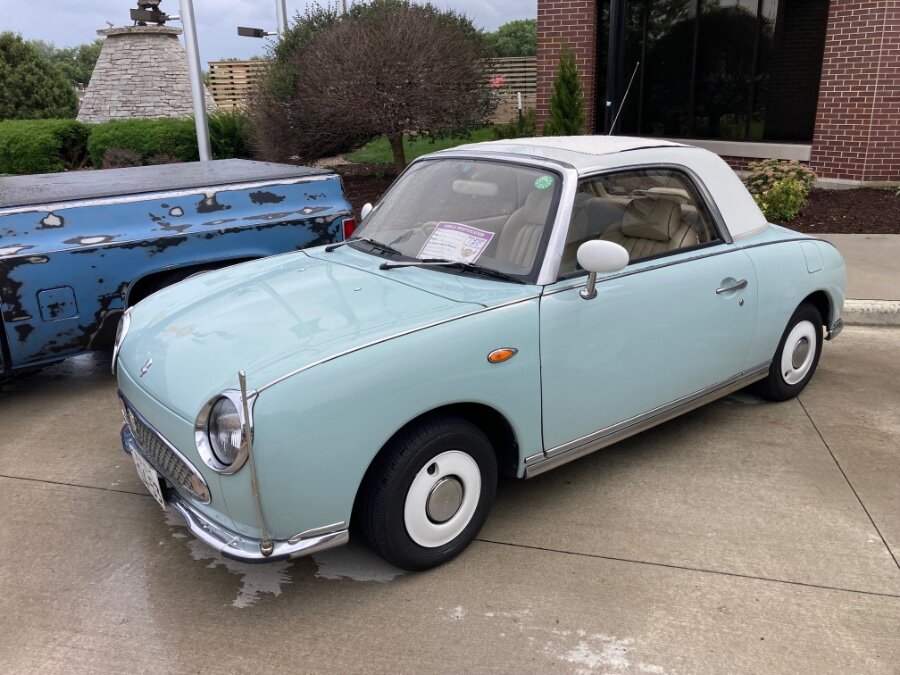
Saw this roll into a car show I’m attending today. Had to go check it out. I certainly didn’t know what it was. Who here can identify it with out help from Google?
-

47 dodge not shifting in to the higher gear.
Merle Coggins replied to Sal M.'s topic in P15-D24 Forum
When you get to 45 MPH does it just loose power and quit pulling, or so you just feel it’s revving too high at that speed? If it is loosing power at that speed I suggest you go back to your recent tune-up and reinspect things. As Don mentioned earlier, a few of us have experienced a failure to properly connect the points spring and have experienced points bounce at higher RPM’s. When this happened for me the truck wouldn’t get over 40 and would start to bog down and run terrible. Once I discovered my error, and corrected it, I got all of my power and speed back. -
Newbie question - fuel tank drain plug, and engine compression
Merle Coggins replied to Vespanation's topic in P15-D24 Forum
What you're seeing on the drain plug is actually a double square with 8 points. As stated you can use a 1/2" drive ratchet. -
Must have been a Wisconsin or Minnesota car.
-
My truck has the 23" block 218 CID engine. Pretty much the same engine that Plymouth used. I don't know exactly how many miles are on it since the rebuild, but I estimate it to be close to 7000.
-
Maybe your oil pressure gauge line sprung a leak and it wasn't the engine's fault at all.
-
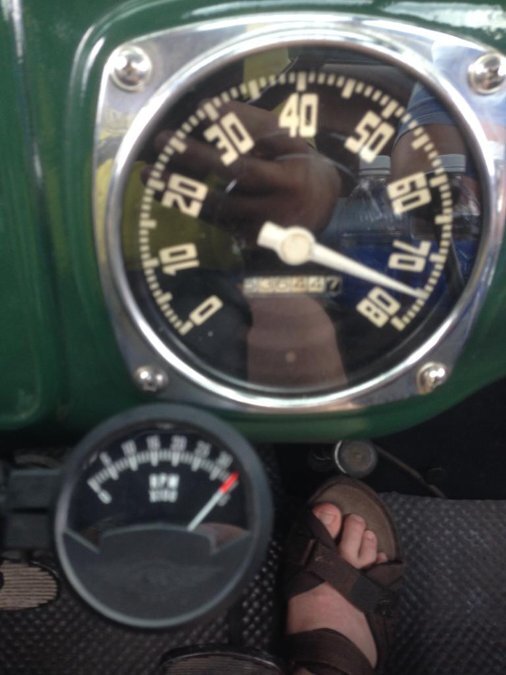
I've done a few longer road trips in my truck with sustained RPM's between 3000 and 3500 with no ill effects. I also know the condition of my engine as I built it when I restored the truck. Having a tachometer helps understand the true RPM without the fan noise leading to you believe it's spinning faster than it is. Not the greatest picture, but this was on a road trip to Detroit for a WPC meet, traveling down I-94.
-
Maybe you need to rewire your radio to be key dependent.
-
If you have the transmission in gear and your foot is off the clutch pedal but the car doesn't want to move when revving up the engine, then either the FD has completely failed (unlikely) or your clutch is not engaging properly (slipping)
-
When I first got promoted from the shop into a service truck I was issued a 1985 GMC 3500 with a 454 that ran on gas or propane. It had a 70 gallon propane tank in the bed along with the stock gas tank. It didn't have as much power when running on propane, but it ran very smooth. You could really lug it down without it chugging and bucking. The downside was cold starts in the winter. If I knew it would be below freezing in the mornings I'd switch it back to gas before parking it so it would start easy in the morning. If it was too cold the propane wouldn't flow through the regulator to supply the engine with enough fuel. There were coolant hoses routed through the regulator to warm it up, so once the engine was warm you could switch it back over. Switching back and forth was a process... From gas to propane you'd switch off the fuel pump and let it run the carb dry, then activate the valve for the propane. From propane back to gas was a similar process. This one would take more time for the engine to 'catch' as the float bowl would have to refill with gas. This worked best when driving down the road so that you could use your momentum to keep the engine spinning until it had enough gas to relight the engine. Ahhh... memories...
-
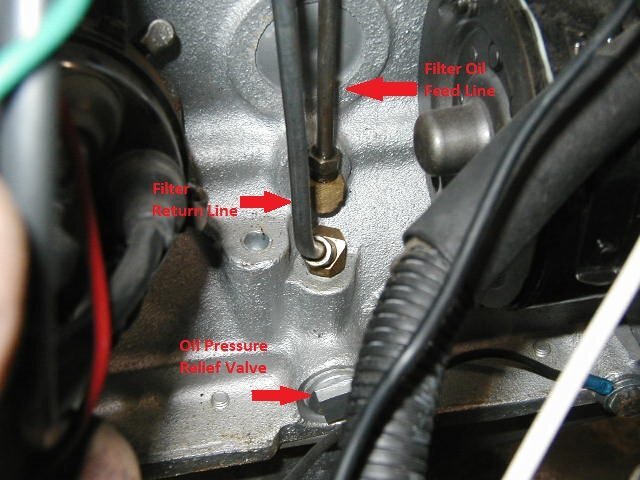
I believe you are looking at the Fluid Drive fill plug. That is a special oil that is no longer available, but it seems the closest alternative is an ISO 32 / AW 32 hydraulic oil. You should be able to find some at a local place that had tractor supplies. However, I would think it would have to be extremely low to give you the symptoms you describe. It's also possible that the clutch is slipping badly. If the FD is seriously low you probably have a bad bellows seal and the oil may have gotten into the clutch disc.
-
ggdad1951 truck project montage: FEF!
Merle Coggins replied to ggdad1951's topic in Mopar Flathead Truck Forum
Nice! -
Have you done work on the ignition system recently? Bogging down at a certain RPM regardless of load sounds like an issue a few of us have experienced with points bounce from not having the spring attached properly.
-
That’s pretty much what I used. It chipped a little bit of the plastic off of the hub, but it isn’t noticeable after I cleaned and painted the wheel. Be sure to leave the nut on, but loose. Best to thread it off until it is flush with the end of the steering shaft/tube. You’ll also want to have something solid on top of the tube to press against so as not to damage the top of the steering shaft/tube.

-
The Gilmore is an awesome place. The WPC Club meet had their car show there one year. I think I enjoyed the museum more than the car show, and the car show was good too.
-
Yes, vehicle refinement has come a long way in 70+ years, but I still enjoy driving mine around. It has it's own charms. Nice lookin' truck.
-
There should not be any continuity between the coil output lead (high tension terminal) and the + or - terminals. You should get a little over 1 Ohm between the + and -. To check the secondary winding check from the output terminal to the coil case.
-
You may have a coil that is failing when it heats up.
-
Yup… What Jerry said… ☝️
-
It could have been part of an aftermarket water injection system. I've never seen one, but I've heard that they were often used 'back in the day'. The theory is that the water mist that was introduced into the intake air/fuel charge helped to cool the combustion temps to reduce detonation.
-