


Merle Coggins
-
Posts
9,387 -
Joined
-
Last visited
-
Days Won
86
Content Type
Links Directory
Profiles
Articles
Forums
Downloads
Store
Gallery
Blogs
Events
Everything posted by Merle Coggins
-
Plymouth trucks also returned in the '80's with the Trailblazer, based on the Ramcharger, and a Plymouth (Arrow) version of the D50. Also, don't forget the Horizon TC3 based pickup truck. For reference I found this article. https://www.autos.ca/classic-cars/motoring-memories-plymouth-trucks-1937-1941-and-1974-1983/
-
 If you just want to run the engine in-chassis before everything else goes on, you just need a jumper wire from the Neg battery post to the (-) terminal on the coil. Something that can be removed easy to shut off the engine. The (+) side of the coil connects to the distributor as usual. Get an inexpensive gauge set and connect them up to monitor oil pressure and coolant temp. Hotwire the starter and "Let 'er Rip".
 -
I've done the valves on my truck with the engine running and warmed up. It's actually fairly easy. You'll need long tappet wrenches to keep your knuckles away from the exhaust manifold. And even then you'll need some good gloves to protect your hands from the heat.
-
I've crossed over to the Dark Side
Merle Coggins replied to 1949 Wraith's topic in Mopar Flathead Truck Forum
SWEET!! Looks pretty solid. -
Yup... it's a pretty common failure these days. Mine happened at a busy intersection during afternoon rush hour. Another motorist had a tow strap and offered to tow me out of traffic and into a parking lot. I happened to have rebuilt my 'old' pump with a kit from Antique Auto Parts Cellar and had it stashed under the seat. A few moments later I had the pump swapped out and was on my way. That rebuilt pump has been in service ever since without issue. The 'failed' pump also got a rebuild kit from the same source and now resided under the seat... just in case... The rebuild kits come with a pin with retainer clips instead of relying on a press fit. I've heard of several people staking the pin on new pumps to prevent this common failure.
-
OEM Cranking Amps 6v Flathead Six 1942?
Merle Coggins replied to Warchild16's topic in Mopar Flathead Truck Forum
You can't have too many cranking amps available from the battery. The starter will only draw the amperage it needs to run. The most common issue for good cranking function is poor, or too small, battery cables. Larger is better. Make sure all connections are clean and tight and the cables aren't corroded. Also, be sure your battery cables are 0 gauge at minimum. If the cables are too small, or there is a lot of corrosion within the cable and/or connections, then the cables will consume some of the available amperage which will cause a voltage drop at the starter motor. This voltage drop and poor current flow will be more detrimental to the starter than to much battery.- 1 reply
-
- 3
-

-

-
Yuck!! Interesting thought though... 6 months from now on a typical day in northern Wisconsin that needle could be at that same angle, but at 180° from it's current position. And it'll be too cold to be out tinkering in my unheated garage. We all suffer with weather in different ways.
-
New guy on the forum, having troubles finding parts
Merle Coggins replied to Slikk's topic in Mopar Flathead Truck Forum
If you are looking for used parts you'd have to scour any local salvage yards. Otherwise you'll need to shop the Old Mopar Home Shopping Network, a.k.a. eBay. -
I agree with what Tod said. I did that same thing once. I didn’t get the points spring locked in correctly. The set I used had a copper strap to make the electrical connection for the points and another spring steel strap that locks in along side to assist in closing the points. I didn’t get the spring locked in correctly so that the only spring tension to close the points came from the copper strap. At RPM’s above around 2000 the points would bounce/float causing the engine to misfire badly. I could barely get the truck above 35 MPH. It took me a little while to figure out my mistake, but once I did, and corrected it, the Ol’ Dodge ran like a top again.
-
It's unlikely that a loose caliper would cause a wheel misalignment. But it could be the source of your 'clunk'. Since the hub is exposed, have you checked for excessive movement in the wheel bearings? Loose wheel bearings could cause an alignment issue as well as strange noises.
-
I thought the curved metal piece resembled a plow moldboard, but all the wood was throwing me off as to what it could be. I wouldn't believe they'd make a snow plow with wood.
-
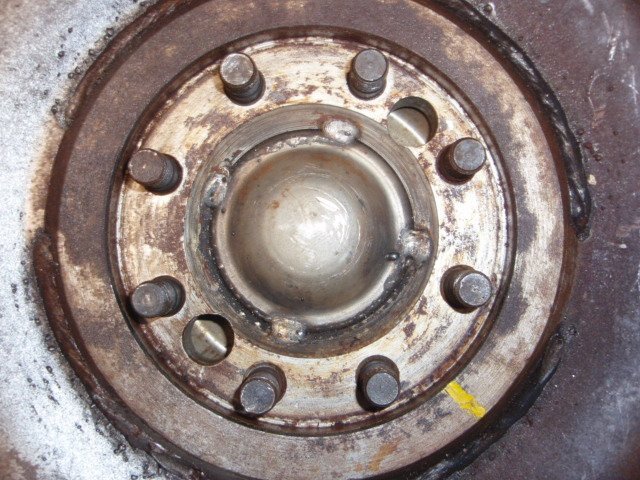
Yup, that's normal. I believe it's just a cap for the end of the pilot bushing area. Here's mine. Also, in case you aren't aware... the 8 studs aren't symetric. There are 2 that are closer together than the rest. (bottom set in my photo) The crank flanges are drilled to match so that the FD coupling can only be installed in one position. When I removed mine, before taking this picture, I remembered to mark it's location relative to the crank flange (yellow mark). Unfortunately before going back together I wiped everything down, which removed my paint stick mark. ? But if you study both sides enough you'll figure out how to match up the studs to the holes and it should slide right on. If not, turn it to the next hole and try again.
-
Two batteries in Series = Add up the voltages - Amperage doesn't multiply Two batteries in Parallel = Add up the Amperage - Voltage doesn't multiply
-
Tom, I don't own that car. It's just something I saw at the car show. The story is from the current car owner.
-
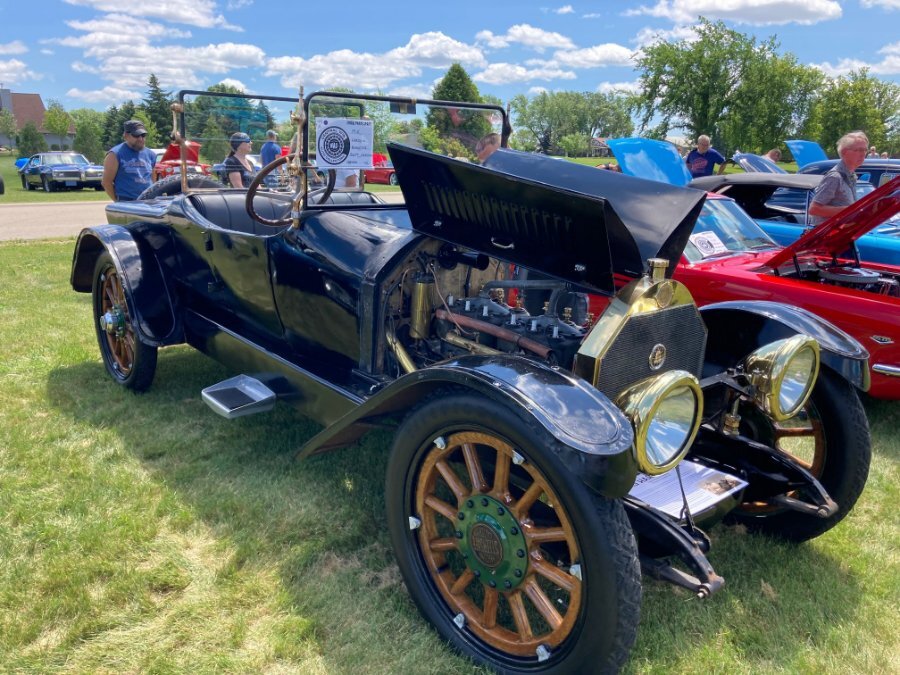
How ‘bout that… I just made it in the picture. The club that hosted the car show posted this picture on their Facebook page. I just barely made it in. (Lower left corner) The afore mentioned ‘40 Dodge truck is front row to the right of center. And the Harding car shown above is in the 3rd row behind the ‘40 Dodge truck. There were more vehicles down to the left but I guess their fish-eye lens wouldn’t go that wide.

-
First Foray - Just Purchased 1953 Dodge B3B
Merle Coggins replied to Oliver's topic in Mopar Flathead Truck Forum
Yes, I believe the SEM paint is what Quiet Ride Solutions recommended. But I recall that I used a Krylon paint for plastics and it has held up well. -
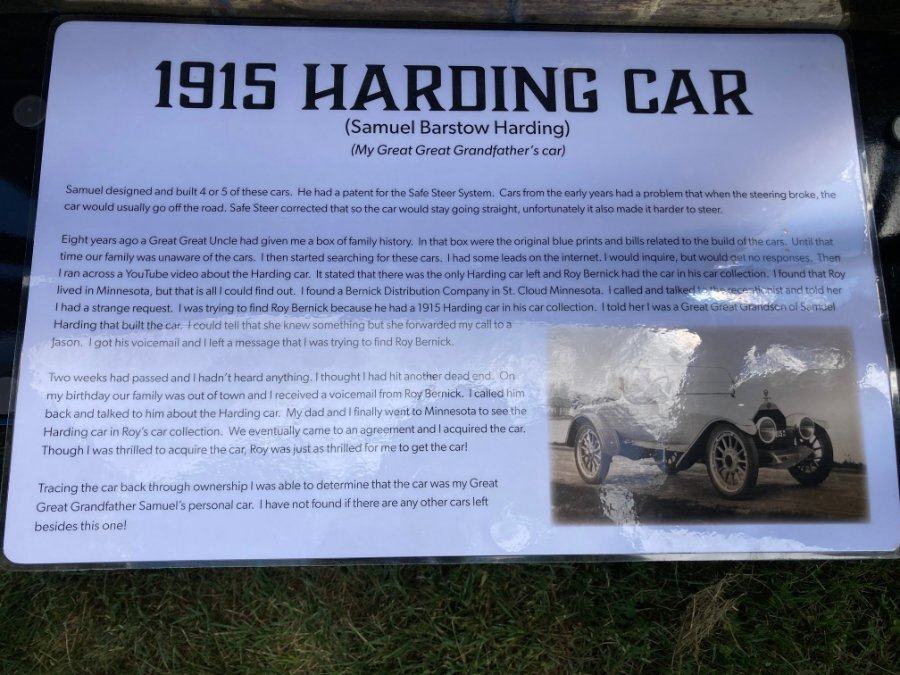
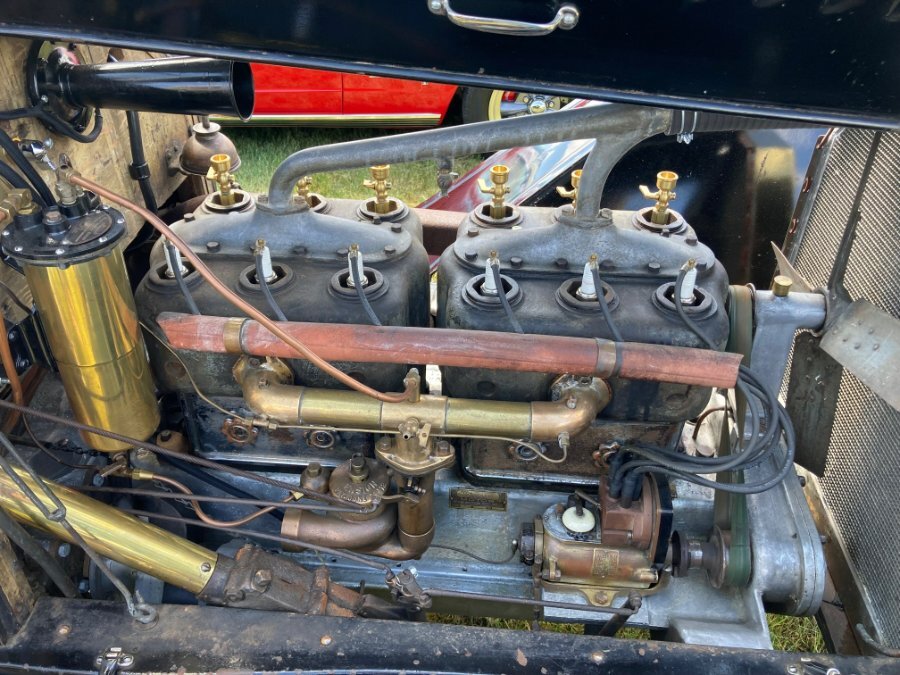
Yesterday I attended a local car show. It was a beautiful day with a couple hundred vehicles present. I had one of 2 classic Dodge trucks. The other was a very nice 1940 (didn't get a picture) Anyway, one of the most interesting vehicles there (to me anyway) was a 1915 Harding. I had never heard of it, but it had an interesting story that I thought I'd share. I took a photo of the story board but it was hard to get a good pic without sun glare. I'll transpose it here for easier reading; 1915 Harding Car (Samuel Barstow Harding) (My Great Great Grandfather's car) Samuel designed and built 4 or 5 of these cars. He had a patent for the Safe Steer System. Cars from the early years had a problem that when the steering broke, the car would usually go off the road. Safe Steer corrected that so the car would stay going straight, unfortunately it also made it harder to steer. Eight years ago a Great Great Uncle had given me a box of family history. In that box were the original blue prints and bills related to the build of the cars. Until that time our family was unaware of the cars. I then started searching for these cars. I had some leads on the internet. I would inquire, but would get no responses. Then I ran across a YouTube video about the Harding car. I found a Bernick Distribution Company in St. Cloud Minnesota. I called and talked to the receptionists and told her I had a strange request. I was trying to find Roy Bernick because he had a 1915 Harding car in his car collection. I told her I was the Great Great Grandson of Samuel Harding that built the car. I could tell that she knew something but she forwarded my call to a Jason. I got his voicemail and left a message that I was trying to find Roy Bernick. Two weeks had passed and I hadn't heard anything. I thought I had hit another dead end. On my birthday our family was out of town and I received a voicemail from Roy Bernick. I called him back and talked to him about the Harding car. My dad and I finally went to Minnesota to see the Harding car in Roy's car collection. We eventually came to an agreement and I acquired the car. Though I was thrilled to acquire the car, Roy was as thrilled for me to get the car! Tracing the car back through ownership I was able to determine that the car was my Great Great Grandfather Samuel's personal car. I have not found if there are any other cars left besides this one.
-
As 9 foot box said, the cable routes down the inside of the firewall and exits through a notch in the toe boards, then down alongside the trans to the speedo drive at the tail.
-
I believe it's 1/2" double square. A 1/2" drive ratchet should get the job done.
-
I saw a PIlot-House with a slant 6 several years ago. There was a guy on this forum for a short time back then. He was in northern IL, about an hour and a half drive from me, so I drove down and met him and checked out his truck. I don’t remember the details of it, but it fit. I believe the last time I talked to him he had sold the truck.
-
How to connect fuel pump to carburetor on 48 DeSoto?
Merle Coggins replied to MarcDeSoto's topic in P15-D24 Forum
A tubing cutter will give you a cleaner, straighter, cut without debris. -
Camshaft Bearing clearances? More than manual?
Merle Coggins replied to Bryan's topic in P15-D24 Forum
How did you measure the clearance? If you measured the journals with a mic, and the same with the insides if the bearings, keep in mind that the bearings will compress slightly once installed. It would be more accurate to mic the bearings after installation, then calculate your clearance. -
The compression in the cylinders is what gives you engine breaking when you lift off the throttle pedal. You also get some engine breaking with a FD unit. It’s all spinning at relatively the same speed when you are motoring down the road. When you let off the throttle, to coast, the momentum from the car now drives the clutch through the transmission. This now makes the turbine impeller force oil against the input impeller which tries to spin the engine. So you still get similar engine breaking as you would in a conventional clutch/trans. vehicle. At lower speeds, and engine RPM, this effect is much lower. Another factor that comes in to play with FD equipped vehicles is that the FD unit itself makes for a much heavier flywheel on the engine than a conventional flywheel/clutch setup. This makes the engine RPM’s drop more slowly when you let off the throttle.
-
If you have a hose connected between the heater connection at the back of the head and the return connection at the water pump then you have created a radiator bypass as well. Coolant can now circulate from the head back into the water pump to circulate through the engine again without being cooled by the radiator. This can cause your engine to run hotter than it should. It’s best to block off the connections of not using a heater.
-
As they showed above, and as you already surmised, the Fluid Drive attaches to the crankshaft and rotates with the engine. Inside there are a pair of impellers. One is connected to the FD housing and spins with the crankshaft. The other, the turbine, is connected to the output, which is the clutch plate. This acts like a flywheel on a conventional engine and the clutch attaches to it. As the rotating speed increases the input impeller drives more oil against the turbine impeller to increase the output torque to the clutch plate. The clutch will then drive the input shaft of the transmission which will in turn supply the power through the selected set of gears to the transmission output shaft to drive the driveshaft, supplying power to the differential.