


Greg W 41 Dodge WC
-
Posts
33 -
Joined
-
Last visited
-
Drag link rebuild 41 WC
Greg W 41 Dodge WC replied to Greg W 41 Dodge WC's topic in Mopar Flathead Truck Forum
Thanks for the support guys. Per usual, when I took my time, consulted the manual, listened to the advice of experts, disassembled and degreased everything, the job was fairly straightforward. I met my goal of removing most of the slop from my steering wheel (one of the drag link springs was broken). My installation tool is not available on eBay or Amazon however ?.
-
Drag link rebuild 41 WC
Greg W 41 Dodge WC replied to Greg W 41 Dodge WC's topic in Mopar Flathead Truck Forum
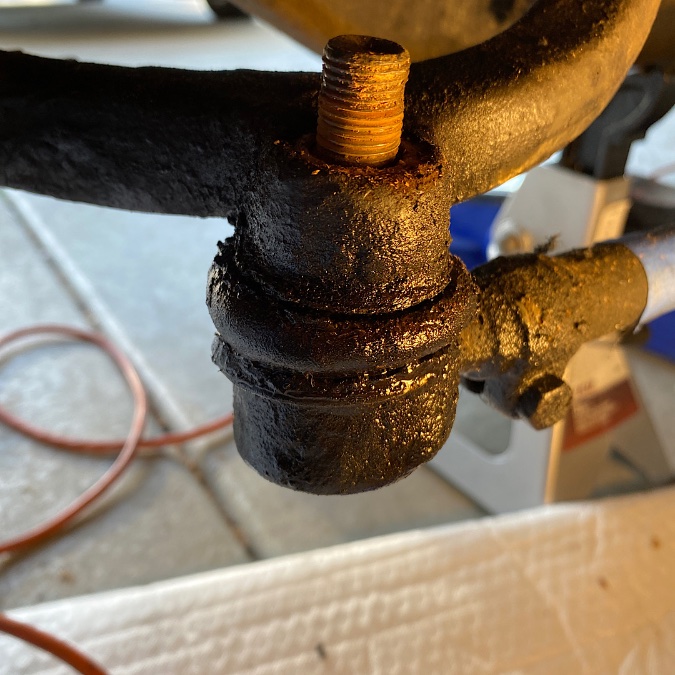
Thanks guys. I thought that this would be a quick and easy fix to take some of the slop out of my steering, but alas we live in a world of old trucks and things are rarely quick and easy ?. When I took the drag link apart, I noted that the previous owner had only installed parts 1,2,3 & 1/2 of 4 from the diagram above. When I tried to install the new kit, with spring, etc., it doesn’t all fit no matter how much the spring is compressed. That is probably why they assembled it as they did. So, back to the drawing board. I’m going to see if I can find a correct old drag link somewhere that I can rebuild properly. Alternatively, I might try to shorten the spring. -
I’m about to rebuild my drag link with a kit I purchased from DMC a while back. I have never done this before and was hoping that someone who has might have some useful tips. Thx, Greg
-
4 speed Transmission ID
Greg W 41 Dodge WC replied to Greg W 41 Dodge WC's topic in Mopar Flathead Truck Forum
Unfortunately not. It is long gone. Happy hunting. -
Hubcap spring clips
Greg W 41 Dodge WC replied to Greg W 41 Dodge WC's topic in Mopar Flathead Truck Forum
You are correct JB. At the top of this string you can see how I modified them to use spring clips. -
Tie rod ends 41 WC
Greg W 41 Dodge WC replied to Greg W 41 Dodge WC's topic in Mopar Flathead Truck Forum
Thanks guys, I used the German “goodentight” standard with an extra umph to line up the cotter pin. Everything is back together and running well. -
Tie rod ends 41 WC
Greg W 41 Dodge WC replied to Greg W 41 Dodge WC's topic in Mopar Flathead Truck Forum
The $15.00 puller worked ?. I have the tie rod assembly reinstalled at the correct length, but cannot find anything in my service manual that references the proper torque for the tie rod end castle nuts. Does anyone know this spec? -
Tie rod ends 41 WC
Greg W 41 Dodge WC replied to Greg W 41 Dodge WC's topic in Mopar Flathead Truck Forum
Thanks very much for your suggestions guys. I was able to free up the drivers side with a couple of sledge hammer blows but no such luck on the passenger side. I’m going to invest in a tool to try to press it out. -
Changing tie rod ends for the first time in my 62 years (hey you gotta learn sometime). Once I have the castle nuts off, how do I remove the old tie rod ends? I’ve tried a few hard raps on the top of the bolt via a wooden block and sledge, but she ain’t budging. What am I missing? Thanks, as always, for your help. - Greg
-
I’m trying to remove the front, passenger side, lower, shock mount from my 41 WC. I snapped the stud on one side and cut the frozen nut from the other. I then used a combination of heat, penetrating oil, and a big sledge with a drive pin, but it’s not budging. Any suggestions before I start drilling? Thx
-
I have an original 4-speed transmission (shifts well, but no synchro), an original rear axle (cleaned with new bearings and races about 1,000 miles ago), drive shaft, single chamber master cylinder, and front brake drums available from recent projects. Please note that although the hand brake band is almost new, I reused the pull mechanism on the new transmission. I also got lazy and cut the shifter arm ~2" from the hub and reused it on the new transmission. I don't have the time to facilitate shipping, but if you are near Raleigh, NC and could use any of these items, they are yours free of charge.


-
Hubcap spring clips
Greg W 41 Dodge WC replied to Greg W 41 Dodge WC's topic in Mopar Flathead Truck Forum
Part# 14-6612334: 16” x 6”, 5 x 4.50/4.75” bolt circle, 3.75” backspace. They come with hubcap “bumps.” These should be ground flat to get the best fit when using spring clips. -
Disk Brake Conversion
Greg W 41 Dodge WC replied to Greg W 41 Dodge WC's topic in Mopar Flathead Truck Forum
No. I’ll need to leave the master as is until I get the 5 psi regulators for the rear drums. In three weeks I’m putting in a Jeep 8.25” / 3.55 (replaced with 3.83) along with a S-10/T5 NWC. I’ll probably just not drive the truck until that time and include the dual MC and front back regulation as part of that big project. -
Disk Brake Conversion
Greg W 41 Dodge WC replied to Greg W 41 Dodge WC's topic in Mopar Flathead Truck Forum
Thanks for the support guys. I agree that installing a dual master cylinder is the right play and will get to that as soon as possible. In the short term I just received two 2 lb proportioning valves. I'll install those in-line to the front disks tomorrow and add a set of 5's to the rear drums later in the week. -
Disk Brake Conversion
Greg W 41 Dodge WC replied to Greg W 41 Dodge WC's topic in Mopar Flathead Truck Forum
Thanks. The caliper is completely locked. The front end is still on jackstands and after bleeding I cannot turn the rotors by hand. I have a couple of in-line 2 lb. residual valves arriving tomorrow (got to love Amazon) and will see if that relieves the back pressure on the caliper.
