-
Posts
4,695 -
Joined
-
Last visited
-
Days Won
35
Content Type
Links Directory
Profiles
Articles
Forums
Downloads
Store
Gallery
Blogs
Events
Everything posted by Los_Control
-

Size of battery cables 1946 WC Dodge Pickup
Los_Control replied to Mark G's topic in Mopar Flathead Truck Forum
Yes the .00 or .01 is recommended. My project truck I have .02 for + ground, then a small 12 volt cable for power. This works fine for 2 years starting it up & moving it around. When I re-wire it I will install correct cables .... going 12 volt so does not matter. -

Optima battery suddenly too weak to crank on 48 DeSoto!
Los_Control replied to MarcDeSoto's topic in P15-D24 Forum
Do you have the gas pedal hooked up? These carburetors are at full throttle at rest. you need the throttle spring to pull it to idle. Totally backwards from a modern carburetor & dangerous when a throttle spring breaks .... just the way our Grandparents rolled back in the day. -

Replacing clutch pedal bushing.
Los_Control replied to Los_Control's topic in Mopar Flathead Truck Forum
Got mine from https://dcmclassics.com/suspension-parts/304-br-563-brake-clutch-pedal-bushing.html?search_query=clutch+pedal+bushing&results=1 The title "replacing clutch pedal bushing" is wrong though. Is common for the pedal to wear on the shaft & wobble then squeak as it rubs on the toe boards. I thought the fix is to replace the bushing .... now that I'm in there, the factory did not have a bushing installed. You need to create & install a bushing. Mine was just a bit loose on the shaft. I took a very thin cutting wheel for a dremel & took a cut out of the length of bushing so it would be smaller/tighter on shaft. Then I reamed out the pedal very slowly until I could tap the bushing into place. .... Then I cut the length of the bushing flush with the width of pedal. Was pretty simple, not sure if it is the correct way to do the job. I will need to lightly tap the pedal back onto the shaft ... when I slide it into position, I suspect the shaft will have wear & be a little loose. But 100 times better then it was. Waiting for paint to dry before reassemble it. -
What helps is to use the " in your search... such as "fuel gauge wiring" Wont fix all your issues but may help. I recently searched replacing the bushing for my clutch pedal. Been discussed 1 thousand times but nothing to really help me. You may want to concentrate on "fuel gauge"
-
I want to follow along here @dgrinnan ... I am curious because I know all horns have relays from the factory? Here in Texas you need a working horn to pass safety inspection. I helped a friend awhile back to get his horn working on a chebby silvarado truck for inspection. I bought a $3 plastic horn, a $3 push button to mount to the dash. I asked Charlie at my parts store ... "Do I need a relay?" ... Nah will be fine he said. 4 years later the horn still works fine with no relay. ..... How often & how long do you use a horn? Is the relay a 6 volt thing? I know modern 12 volt also uses a relay .... is it really needed? Last time I used the horn on my chebby truck was to pass safety inspection ... a short 1 second blast to show it works. 1 year ago. I do need to go in for my annual safety inspection this January "now" Give my horn the usual 1 second blast .... At what point does a horn relay become required? Normal use on a 12 volt vehicle they work fine. ..... I'm thinking if you actually need a relay to cover the horn circuit .... you may also need good combat training if you plan to lay on the horn long enough to burn it out?
-

Replacing clutch pedal bushing.
Los_Control replied to Los_Control's topic in Mopar Flathead Truck Forum
That little booger was tough. I did heat it up with map gas .... not sure how much that helped. I took a round flat punch & drove down the right side of the key forcing the left side up. Then drove down the left side forcing the right side up. .... Rinse & repeat a few times & got it moving kinda good ... still could not pull it out with vise grips. Then I cut myself & got some blood dripping onto it .... came right out. I started mowing lawns when I was 12 years old, I bent a lot of keys & replaced them over the years .... This was the toughest one in my 60 years on earth. -
Just do not pull a Fred when cleaning the threads. I had a 218 engine given to me, was rebuilt & stored with the head removed for many years. I cleaned up the light surface rust on the cylinders, then ran a tap through the threads to clean them up. Then later I read that the thread pitch on head bolts is not course or fine ... they have a specific pitch. Is this true? I read it on the internet. Only suggesting to check the thread pitch before running a tap to clean them up. I think this is what Ken is saying also
-
I know it could be converted to use a dual filament bulb. Just not sure that is what I want though. I do like the idea of mounting lights on the frame horn .... just depends on what style you are looking for. For a custom or street rod, even a simple upgrade to original ... they look fine. Just small & maybe hard to see. Since I'm going for the larger mirrors, cab lights, mud flaps, cb antenna, 4 tail lights .... I want more cow bell for front turn signals
-

Replacing clutch pedal bushing.
Los_Control replied to Los_Control's topic in Mopar Flathead Truck Forum
Is a awkward spot to get to with a chisel. I have a angled pry bar with a chisel end. I keep it sharp and makes a good gasket scraper. It was starting to cut the key. I would think It would have come free at this point .... So I decided to walk away & think about it. Glad I asked .... I have map gas I can use to heat it with. -

Replacing clutch pedal bushing.
Los_Control replied to Los_Control's topic in Mopar Flathead Truck Forum
Thanks Merle, it sure does show it as a separate piece .... I just pulled out my book again and it does not show it. I will continue working on the key then. Using the chisel I started to cut into the softer metal & it still did not budge. Maybe if I soak it in oil then apply some heat ..... I have to drive to town to get a bottle of argon gas, will spray it before I leave. -
Trying to replace the bushing & a bit unsure of the procedure. I have 2 books that show a exploded view of the pedal assembly .... no instructions to replace bushing. When I remove the end piece which is the clutch pedal adjustment, appears to be a half moon key in the shaft. I tried to remove the key with no luck .... I do not see a corresponding slot on the clutch pedal to slide over the key. Now I'm thinking I need to remove the pedal assembly from the transmission & remove the pedals from that end? Not trying to over think it, I tried with a chisel to remove the key & will not budge .... I do not want to damage the shaft if it is not a removable key. Probably easier to clean & paint if whole assembly was removed anyways . Any hints on proper way to replace bushing?
-

Optima battery suddenly too weak to crank on 48 DeSoto!
Los_Control replied to MarcDeSoto's topic in P15-D24 Forum
Not saying it is the best way, I just got on Rockauto and ordered individual plug & coil wires at a length that would work. So they were all ready made. I did not need to crimp them myself. They were really cheap, but seem to work fine. My thoughts were to just get the engine to run ... then later I would want to get high quality wires & crimps to make a custom set .... I wanted to use the cloth covered wire With quality ends. Like in the photo but different colored wire. The end you show in your picture you can mess with it & get it to work .... for $5 you can just buy a good wire from local parts store. -
I will be honest & never owned a ultra sonic cleaner or used one. I watch a youtube video every Sunday for a few years. The mechanic is pretty knowledgeable & works on anything from Diesel back hoes to lawn mowers .... 1930 Dodge, Lots of variety. They use a ultra sonic cleaner & started out with the suggested cleaners, simple green, pinesol, vinegar .... After a year he uses Berrymans carburetor cleaner in the new large ultra sonic cleaner. For car parts. The original small cleaner he bought, he uses a simple household cleaner in it for things like jewelry or chrome pieces ... Makes sense to me. A different product for different jobs.
-
The staring fluid to air up the tires is a real deal. It causes no damage to a tire .... such a quick & short blast. I have only seen it done on tubeless semi truck tires ... works just as well on passenger tires though. When I was retreading truck tires we naturally had a service department to change tires. .... We got paid piece work for what we did, not by the hour. This was in Seattle, We were called Puget Sound Tire. I remember talking to the owner one day about something, Up in the 2nd floor office, & he was talking to a customer on the phone ... So I'm being quiet & wait my turn. Downstairs Tony has a order for 48 tires & wheels .... He is using starter fluid to air them up .... POW! POW! POW! .... I felt so sorry for my employer as he was doing a face palm trying to talk to a customer .... Tony was doing no wrong, this is a working shop & he was earning more money in one day then others make in 2 days.
-
Just thinking I may give the pinesol mix a try. I have a master cylinder that has been soaking in Berrymans carb cleaner for 3 days .... I pulled it out today, did a very quick 30 second hone on the bore & it looks like it will be fine. The reservoir has some crud in it yet, the old paint is flaking off .... Thinking the pinesol as a final rinse while I clean it ... see how it does. Naturally after cleaned & painted would use Dot 3 brake fluid to rinse the bores before assembly. I have never used the ultra sonic cleaner, They seem to do a pretty decent job though .... I have one on my personal want list. Even they will not remove wasp from passages though
-
-
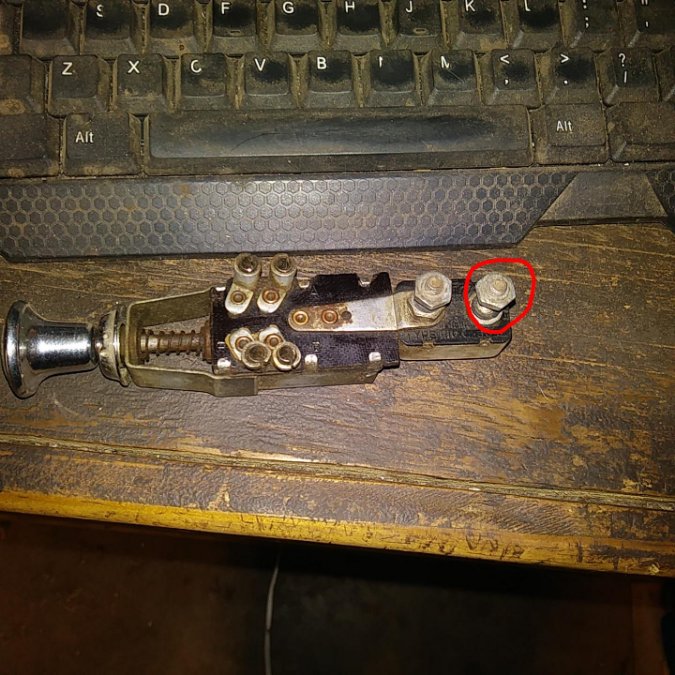
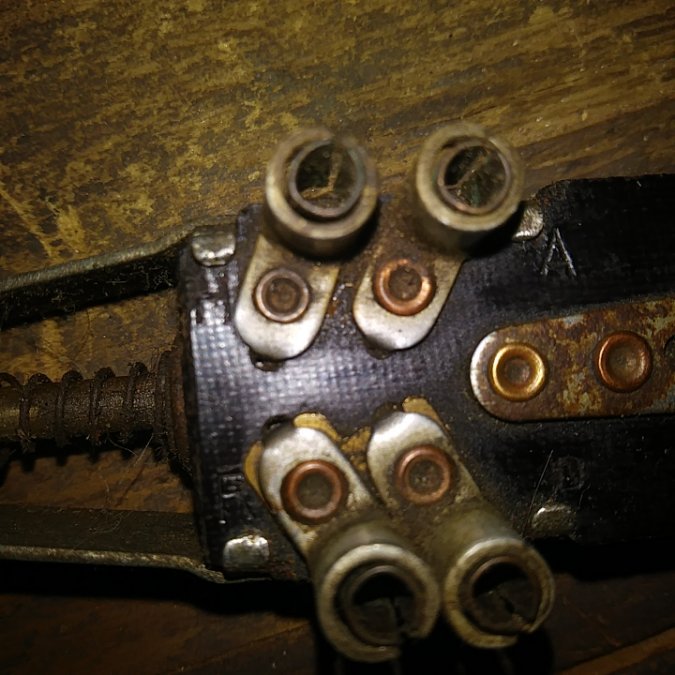
Mine is technically a 1950 model .... not sure if the switches are absolutely the same. I have H, A,R, D .... See if they show up in the photo.
-
Have to admit it does a better job then I would expect.
-
"I would use a bit of caution when you delve into your cowl vent. With that air conditioning unit under the dash (where the cowl vent handle was), whoever installed it may have permanently closed the vent. I don't remember if the handle is necessary to lock down the vent, and I'm currently too lazy to go out and check. " I think what @Dan Hiebertis saying, many people did permanently weld these vents closed in some fashion or another. They often leak in the rain & cause rusty floors .... in this case the vent would leak water into the AC? Love them or hate them, cowl vents were often closed when customizing a 20 year old car ..... now a 70 year old car we like them to function.
-
Oh my I thought this thread was going to be fun .... is starting out good @Eneto-55 trust me is not worth it .... leave them wild cats alone. Either shoot em or provide a exit & time .... do not try to corner a wild cat. .... Lets not ask me how I know, being a dog catcher at age 18 brings back many memories.
-
I use it very rarely. I like it for a diagnostic tool. Can quickly determine a no start issue ... if it is spark or fuel related. I did use some yesterday to start my truck ... I should be horse whipped, but I did. My truck had not been started for 6-10 weeks .... I did pour gas down the carb & I smiled how quickly it started. I use a temp gas can mounted on bumper. I pulled it forward to the driveway to wash the truck .... removed the gas can so no water would get in it while washing it .... this drains the fuel line. So I used a short whiff of starter fluid to light er up again. ..... Better then grinding on the starter trying to pull fuel back into the line.
-
I can think of several reasons why I would want to have a extra push button around for different future projects. I personally do not think picking one up is a bad idea. My riding mower starts with a push button. It is possible that is part of your problem, for the engine to start with the keys in your pocket tells me the wiring is wrong. May be possible the incorrect wiring burned up your push button? I would go back through the ignition switch wiring & correct it before installing your new push button. Maybe someone with more knowledge on the ignition wiring can explain which wires to look at .... sounds like your switch is bypassed.
-
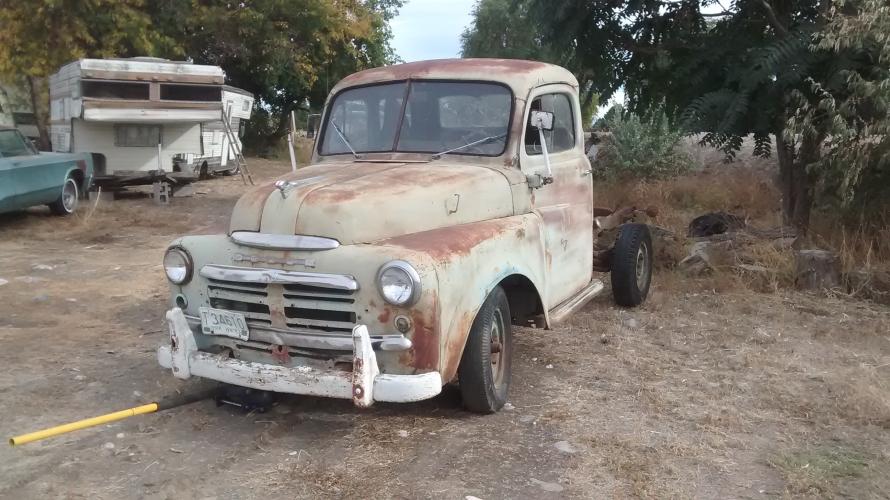
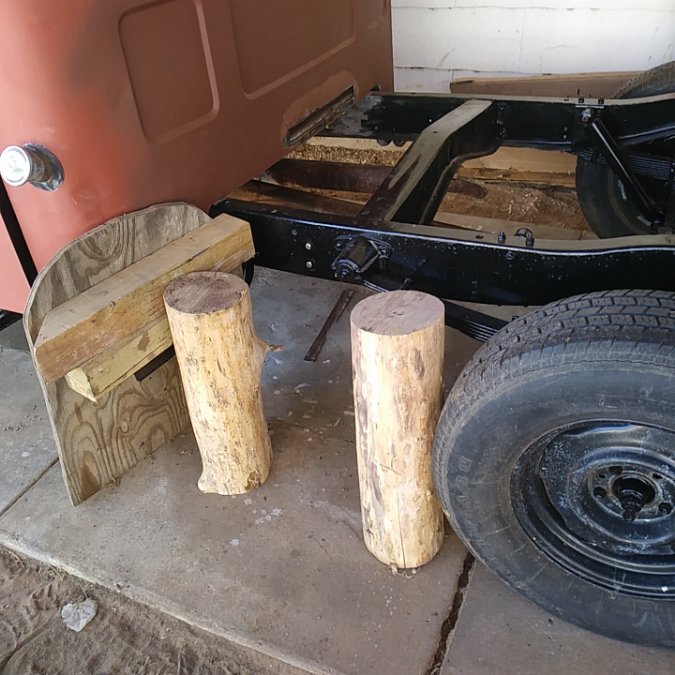
Yes it is going to be a issue for sure. As it sits, I tried hitting it with a 3 pound sledge hammer. Just too much flex in that cab corner. When I hit it with a hammer, all the energy is wasted with the metal moving. I HAVE A PLAN!!! I have 3/4" plywood to go against the cab, 4"x4" blocks to sit on the running board bracket .... A tall log to sit against that mess. ..... Just saying a whole bunch of shims & I can lock that corner in place ... when I hit it with a hammer I may get results. Just a idea what side of the walnut tree I dropped out of ??? Just saying with a jack in-between .... it may be a swing & a miss, or get me to first base. What I did do today was get it off the jack stands, start it up & give it a long needed bath. I did get the rusted area cut out for my patch panel .... I would love to do a cut & butt here but just not possible. Honestly it was a nice day out ... I washed my truck .... Doing some thinking in the process. I sure did smile when it started up faster then my daily driver sbc.
-
I would say 18 gauge at minimum, depends how large of patches you are making. If they are large patches & you do not have access to a bead roller, you may want to use a heavier 16 gauge. The 18 gauge will be fine, there are ways to hammer form beads into them .... the beads make the panels stiff & rigid. ..... More work. The 16 is pretty rigid as it is, heavier & cost more, not as easy to bend or form if needed. I have a store bought floor pan for my truck. They make them out of 20 gauge, is easy to work with ... looks nice with all the fancy bead rolling. It is so thin & flimsy, is easy to burn through when welding .... pretty sure I will need to add extra bracing under it to keep it from oil canning when you step on it. I will make it work, 18 gauge would be my first choice.
-
I have 63.75" from mounting surface to mounting surface. Is that what you need?


