


westaus29
-
Posts
152 -
Joined
-
Last visited
Everything posted by westaus29
-
I have just been on "Flathead 6 engines" on Facebook trying to help with engine mounts that dont fit the 38. I tried a search on this site but could not find anything so am putting this out wanting feedback. I recently had to seriously modify the upper and lower rear engine mounts that I purchased several years ago from Roberts. When I checked I found they were labelled 39-54 when I ordered them, part nos T88A and T88B, so I cant blame Roberts. The upper mounts were larger and had steel inserts, the lower were just larger. I had to hacksaw 1/4" off big end of uppers to remove the insert, then ground all down to correct thickness on a belt sander, using old mounts as pattern, because otherwise the bolts were too short. End result was good. The guy I was helping bought his from Mopar Direct/Bernbaum recently and had the same problem. When he phoned Bernbaum they said the 38 was no longer available so he hopes to get a refund, meanwhile is modifying them to fit. I also got a quote from Bernbaum when I was ordering mine in 2013 and kept the printouts. They listed (and still list) 38 rears separately from 39-54, with 38 being much dearer, part numbers L-344 and L-345. I asked for 38 but now I see the quote price was same as 39-54, but no part numbers on quote so I am guessing the 38 rears were not available then either. Talk about poor communication! I have found Bernbaum pretty reliable but communication is not their strong point, especially when trying to deal with them from Oz. I started asking them about a 38 drag link end back in March, package finally arrived 3 days ago after 5 months, numerous emails and several phone calls. To cut a long story short, does anyone know whether and where to get 38 rear mounts (not that I will need them)
-
Great! Even us old timers get it wrong sometimes. I once put plug wires on in reverse order on my Landy after drying it out after a creek crossing. Started but didnt have enough power to pull the skin off a rice pudding, took a while to figure why.
-
I would have to say go for it and sort out the details later. A great car, very advanced for it's time and once in a lifetime opportunity for most people - I dream of finding an Airflow. Keep the 38 (yes I am biased) and sell the 53 which was out of date when it was first sold.
-
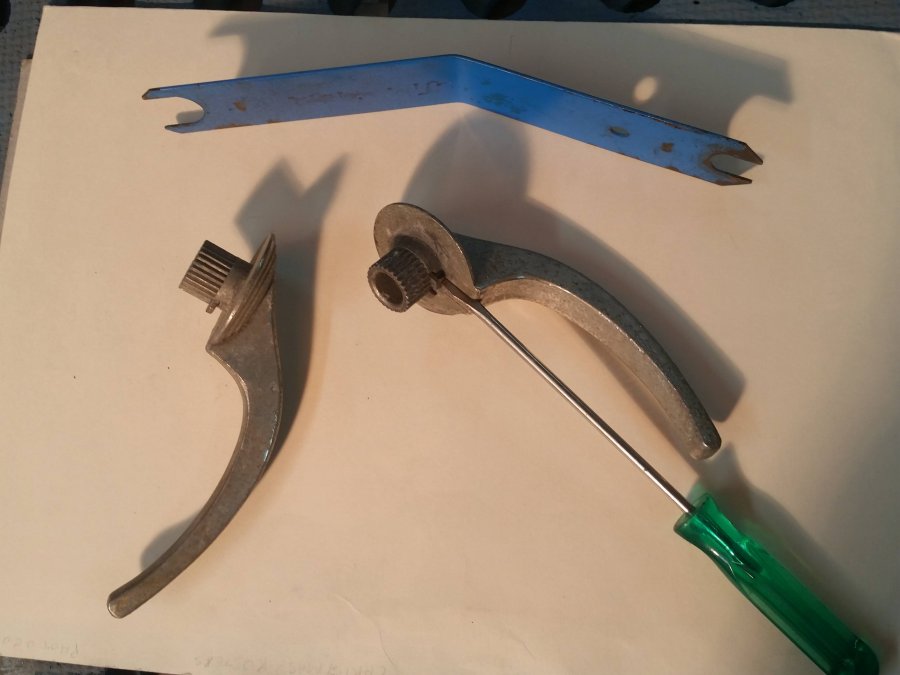
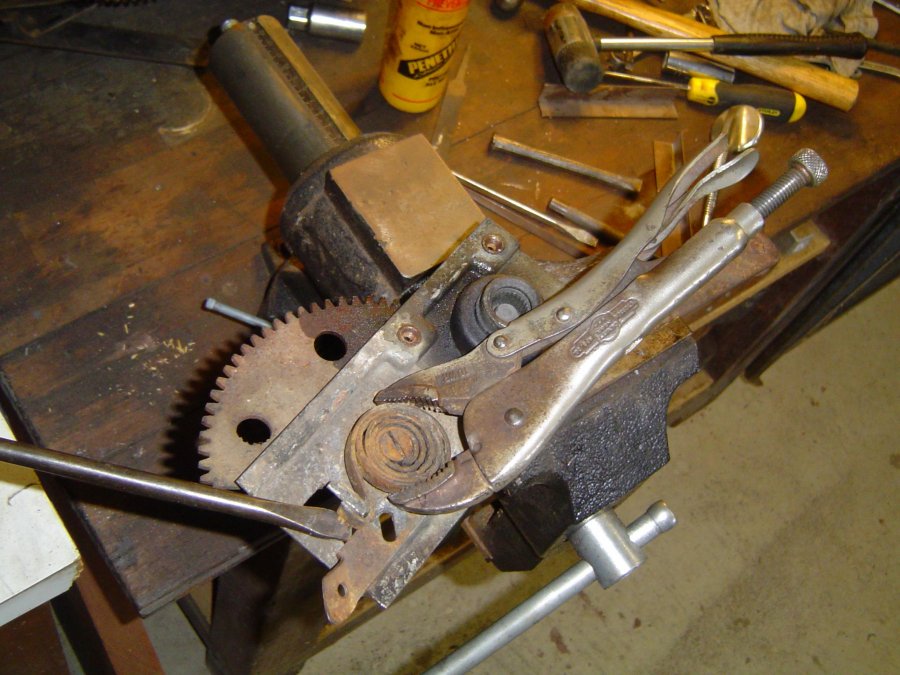
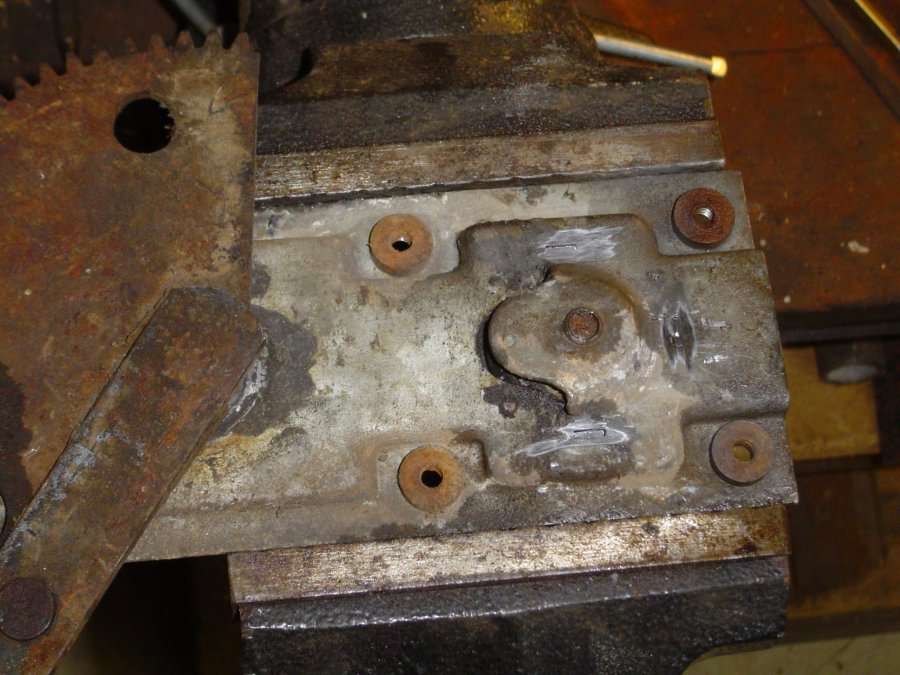
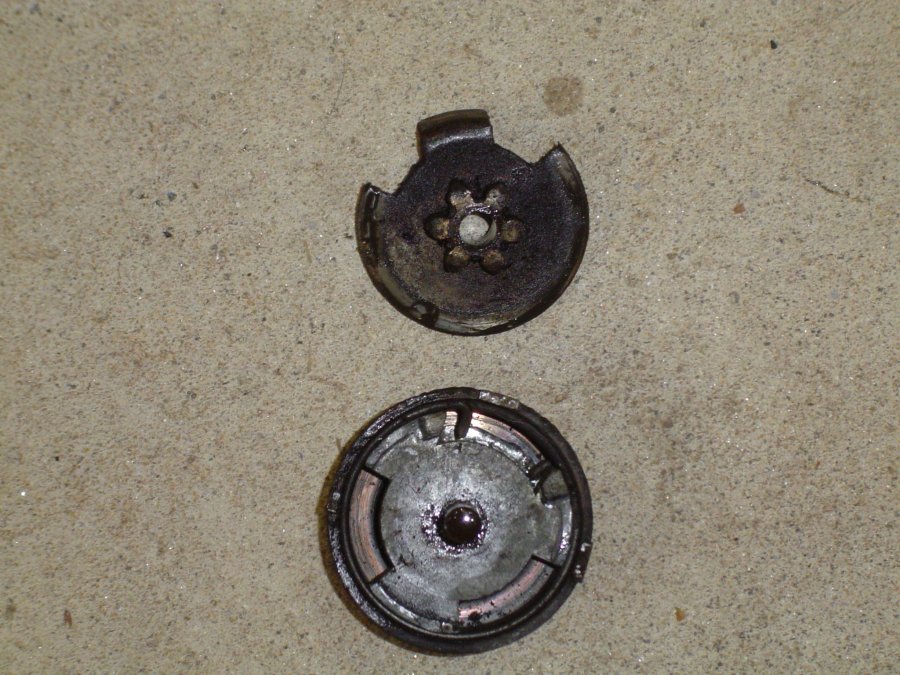
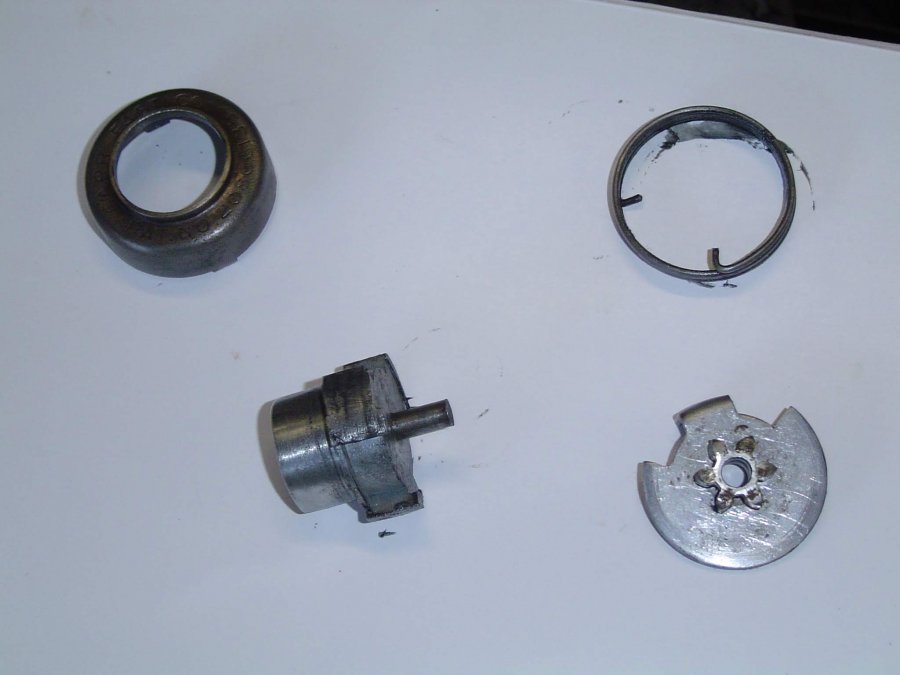
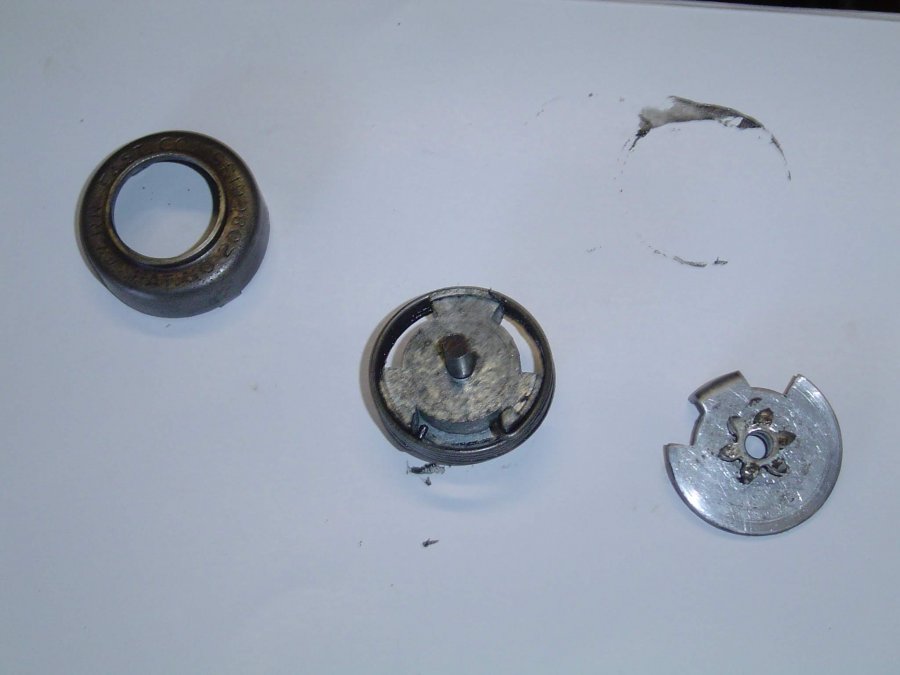
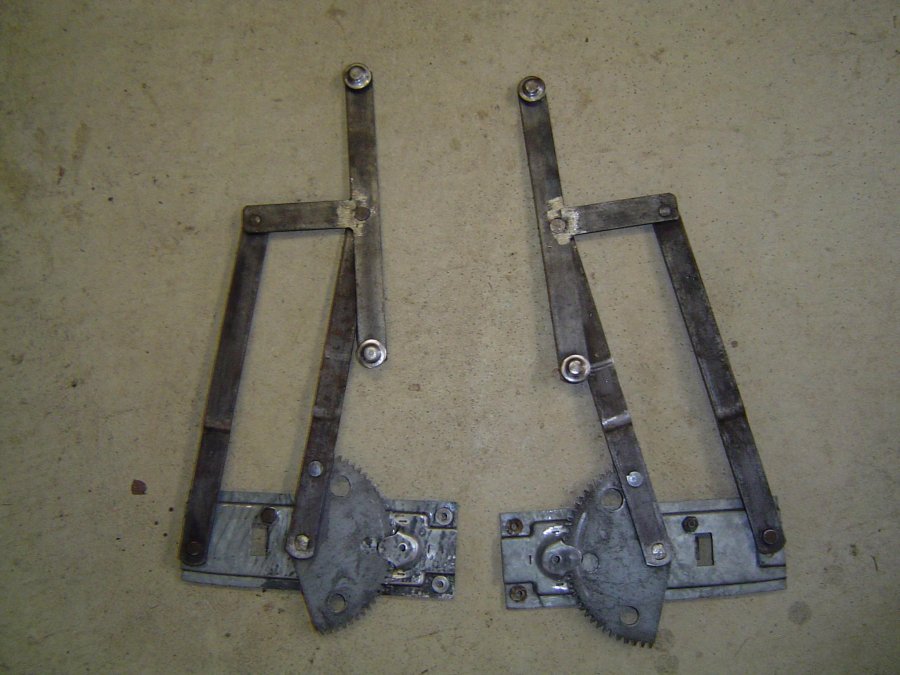
In March I posted brief details on fixing the window and door handle mechanisms. I am rewinding a bit here to add some detail about how to fix an Aussie rear window winder, which is quite different from the US ones, tho much of the process is the same. The Aussie window handles have a brake mechanism with a pot metal boss that expands with age and seizes up. To remove the door panel, first remove the handles. With the Aussie splined handle you insert a thin blade screwdriver under the handle and push the clip in, then wiggle the handle off the spline. Next remove the window trim then prise the panel off the door frame using a flat scraper or even better the proper tool which is readily available, see pic1 for detail. The panel is held on by clips pressed into holes in the frame. The design of clip will depend on who did the retrim. Undo the 4 window winder bolts and slide the mechanism down and out, much easier than later models, and disengage from the glass channel. To disassemble winder, hold flat in vice, use vice-grips to take tension off spring, and prise end of spring off post with heavy screwdriver, see pic2. Note adjustment bolt position then remove bolts to clean and lubricate the gears To fix seized boss, turn over mechanism and grind three lugs off boss, see pic 3. If you have a friend with a lathe, you can mount the boss assembly and take a thin skim off the pot metal boss, which then enables you to get it all apart. I didn't at the time so put it in the drill and used a file to skim it, see pic 4. Take a picture of the helical spring position from the back before you pull it apart as otherwise you will have difficulty putting it back together and it won't function properly, see pic 5, 6 and 7 for details. I can guarantee you will still have fun getting it together right! Lubricate sparingly with grease then reassemble and tack weld the boss back into the mechanism. The final pic is of the 7 passenger rear winder mechanism, quite different to the 4 door sedan.

-

Recommendation for Vent Window Rubber Seals
westaus29 replied to Stargrinder's topic in P15-D24 Forum
Unfortunately cheap shipping usually means no tracking, no insurance and no comeback for buyer or seller. I imagine sellers can get burnt by this too. Like Andydodge I am in Oz and my experience in shipping is you get what you pay for, even tho it hurts. I recently paid $US 75 shipping for a $US 75 detroit style uni joint repair kit in a small box, $225 in real $A, and it was poorly made rubbish. I eventually got back the item cost but no apology, no shipping refund and still no uni joint. All that from a seller I have used several times for big purchases with 100% success. Needless to say I wont order anything from them again. My preferred solution for poorly fitting rubber is ordinary black roofing silicone to fill the gaps. It is cheap and with a bit of care you cant detect where it was done, and it outlasts the rubber. I used it on my 38 Plymouth in 1980's when I was donated a roll of Chev rubber that almost fit. It and the rubber were still A1 when I removed the windshield in 2012 for total rebuild, and I will do the same again. -
Sounds like a good compromise, should give you many miles of service. Just dont push it so hard!!
-
As stated above, there is rust and then there is rust. If its minor, your approach may work. A badly rusted bore will never free up with penetrating oils. When rust forms it expands and seizes things up. I would be wary about using a chemical such as mollasses, not sure what it would do to aluminum pistons or bore, it does attack metal also. If you wanted to try something like this, try an acid based radiator cleaner suitable for alloy blocks. They have inhibitors to minimise metal attack. Like Keithb7 above I found an engine for my 38 Plymouth sitting in the bush with head off, originally a T series out of a Dodge truck but same block. My old school mechanic stripped head and crank, then poured about 1/2" of gasoline on top of each piston and lit it, outdoors of course, surprising how quietly it burns. Did that about three times then took a block of hardwood and a small sledge. All except one came out easy, the last one took a lot of hammering. Put the hone thru, sent block to get one bore resleeved and rest taken out to suitable oversize, put it back together and it still runs ok (no longer in car but ran it 10 mins before starting teardown. It wont be going back in because I have a couple of P6 blocks and want to go original.
-
You might try posting on facebook group "1930-1950 Dodge/Plymouth in Australia (Early "Mopar Only). Reasonably active group and some know-how.
-
I am in the same club as many of you. Most of the tuning gear has been in the cupboard for years, only ever use the timing light. Maybe I should pull out the dwell meter seeing as my hearing is no longer A1, at least that's what my chief assistant tells me.
-
My 55-56 Mopar parts list has a table of exchange brake shoe/lining sets which lists both 10" and 11" brakes for 1949-1954 Dodge, 11" only for 55-56, so your brakes could well be original 10" and you should get them exchanged. Nothing is certain on a car this old. My 55 V8 wagon is supposed to have 11" rear brakes and 3.54 diff but someone has changed out the complete assembly for an earlier with 10" brakes and 3.9 diff ratio, most unfortunately. Initial adjustment of these brakes is very important. Ideally the linings should be matched to the drums. You then need to set them up with an adjusting tool. There is good info on this site on overhauling brakes, see the Technical section. There has also been a post by Sam Buchanan on how to make an adjusting tool, and I recall there is a member who sells one.
-
Have posted rocker pics on forwardlook forum http://www.forwardlook.net/forums/forums/thread-view.asp?tid=54746&posts=15#M598799
-
My 55 rockers are similar but taper slightly towards rear. I cut the outer skin about 5mm inside the sill step, and fabricated a replacement for the bottom 2/3, 4 sections and 3 bends, plug welded with mig on the horizontal face of the sill, minimal grinding and a touch of body filler on inner sill step. Also had to cut out 50mm of rusty inner sill plate and plug welded the replacement, again with joggled joint. Left the centre pillar base alone as it was good, cut rocker face about 25mm below pillar base. Have pics but of 55 so probably not suited to this forum? I could post them on the forwardlook forum if you want, as was planning to add them. The hard part is reproducing the rocker ends.
-
For the rocker panels you could maybe try your local small trailer fabrication business to fabricate the parts. I have a Detroit bodied 55 Plymouth and while parts are available from US by the time you factor in exchange rate and transport they would cost a mint. I worked out what parts to replace, made careful measurements as they taper a bit, sketched it up and took them to the local trailer place. They made them from 1.2mm sheet which is thicker than normal, and worked out very quick, excellent and very cheap at $22 each.. I didnt try and replace the whole assembly, just the lower rusted part, and used joggled lap joints with spot welds. That way it wasnt off road too long.
-
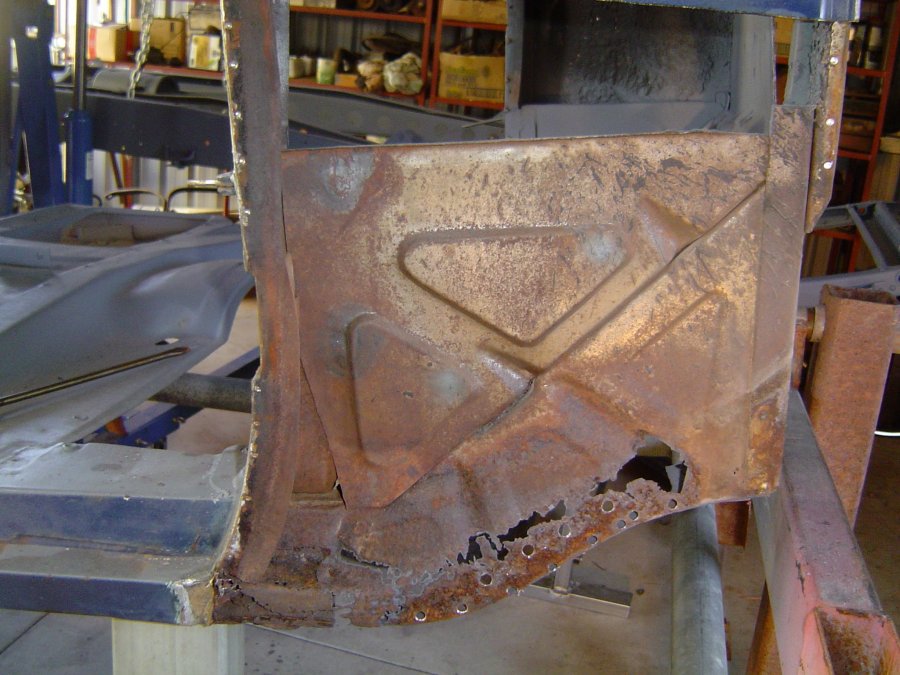
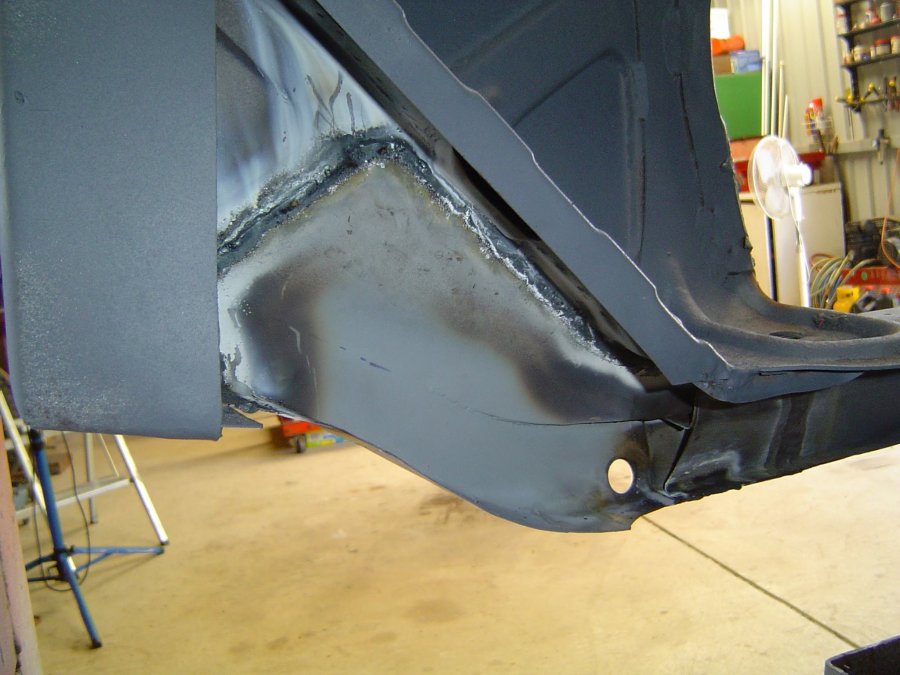
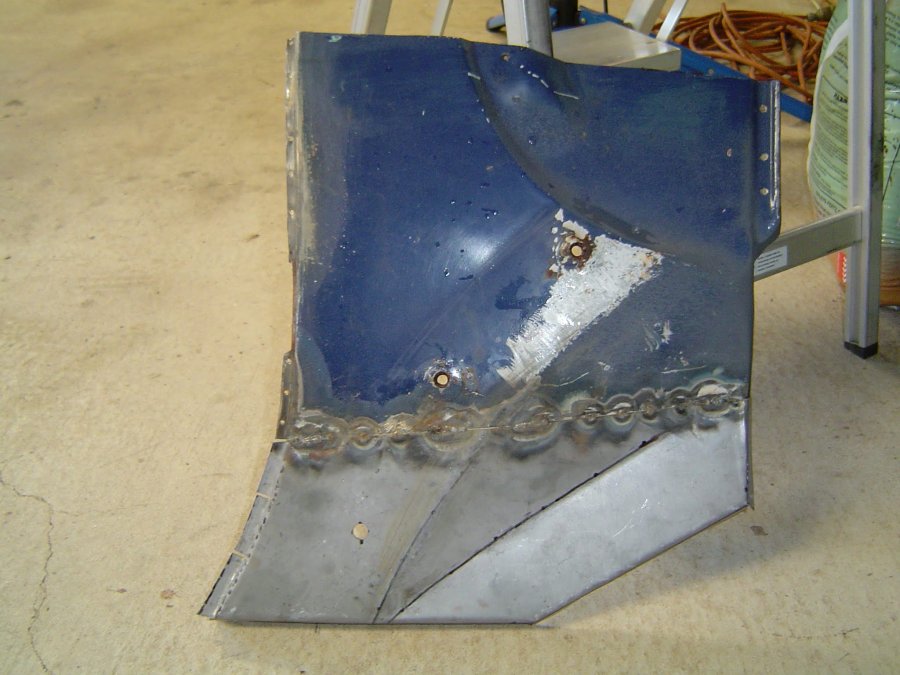
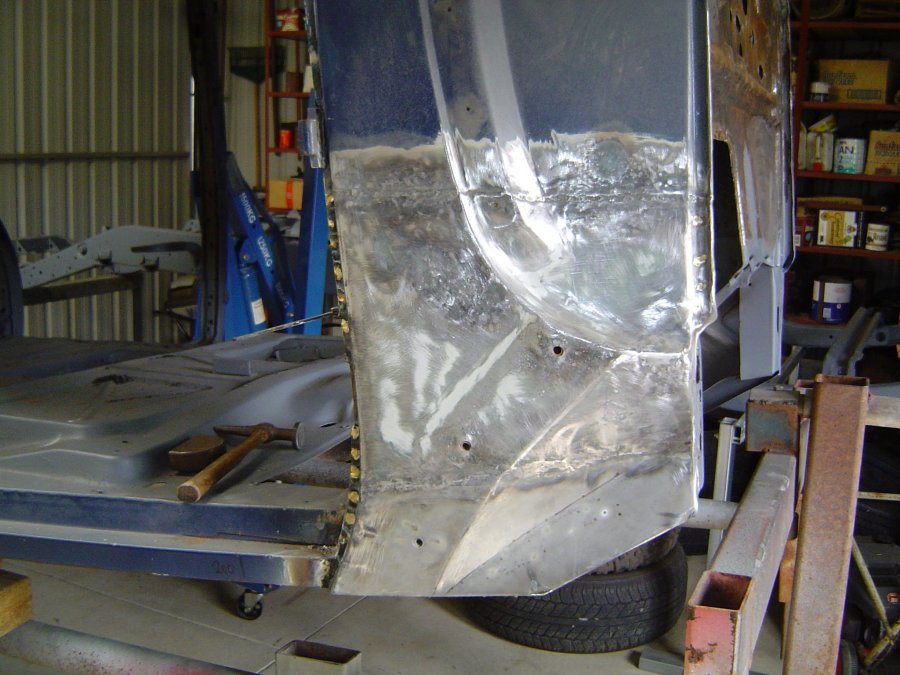
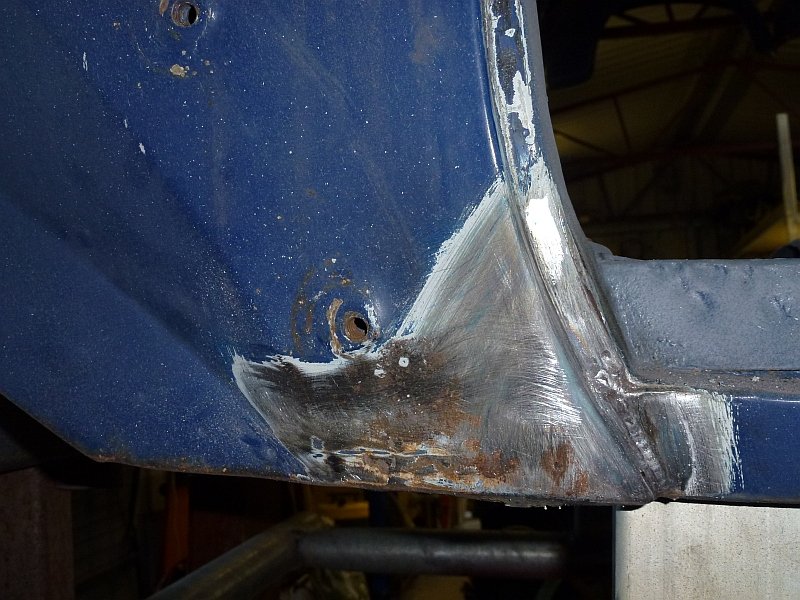
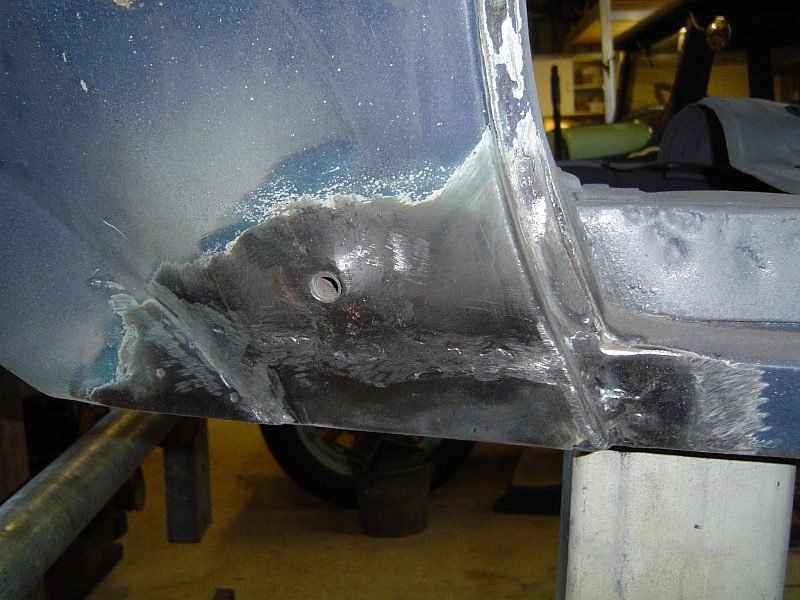
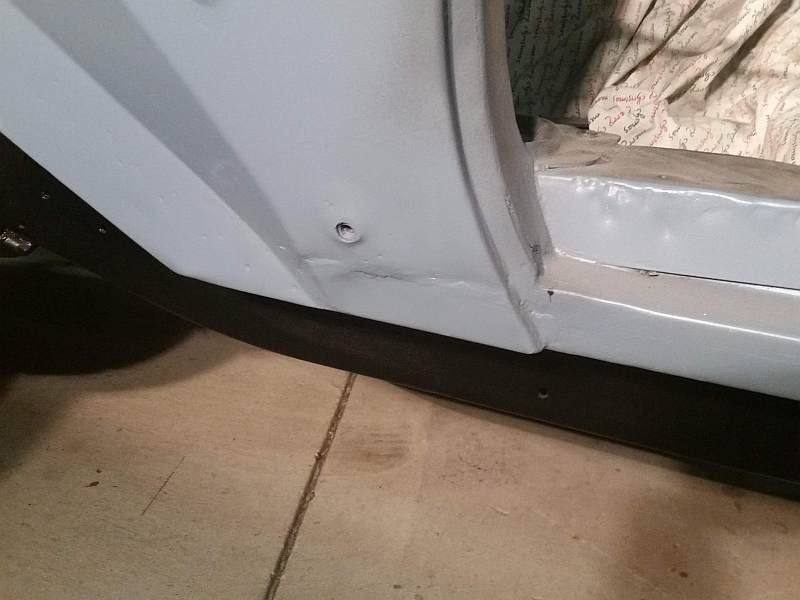
I tackled the drivers side lower cowl (right side) next, again oxy welding. I had seen an article on how a NZ restorer did it so followed his example, cut the outer skin up high where I could control the weld better, drilled out the spot welds around edges, and pulled it off to expose the rusty inner layer and sill end. Again there were three layers to remake patches for. Fixed the sill and inner layer (without the ribs as they are hidden), patched the outer skin and welded it back on, using brazing around the edges and to hold the inner and outer skins together at the bottom. Reasonable happy with the result.
-
The bell housing locates with two pegs and should not be any alignment issues. I have done several 201 flathead engine/bell housing swaps, from the original P6, to the T series engine that I ran for many years, to the replacement P6 I am putting in now.
-
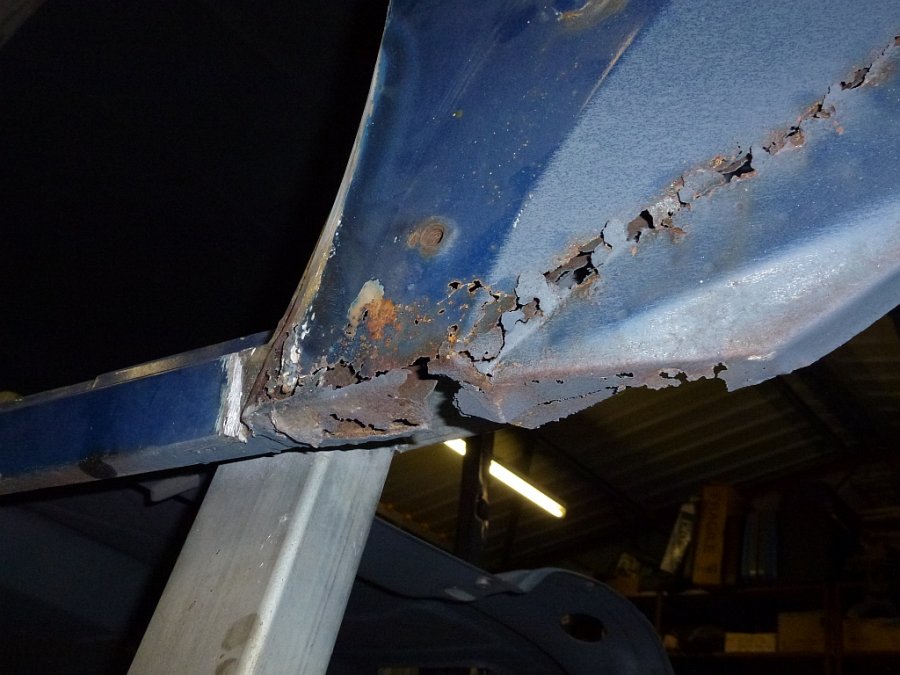
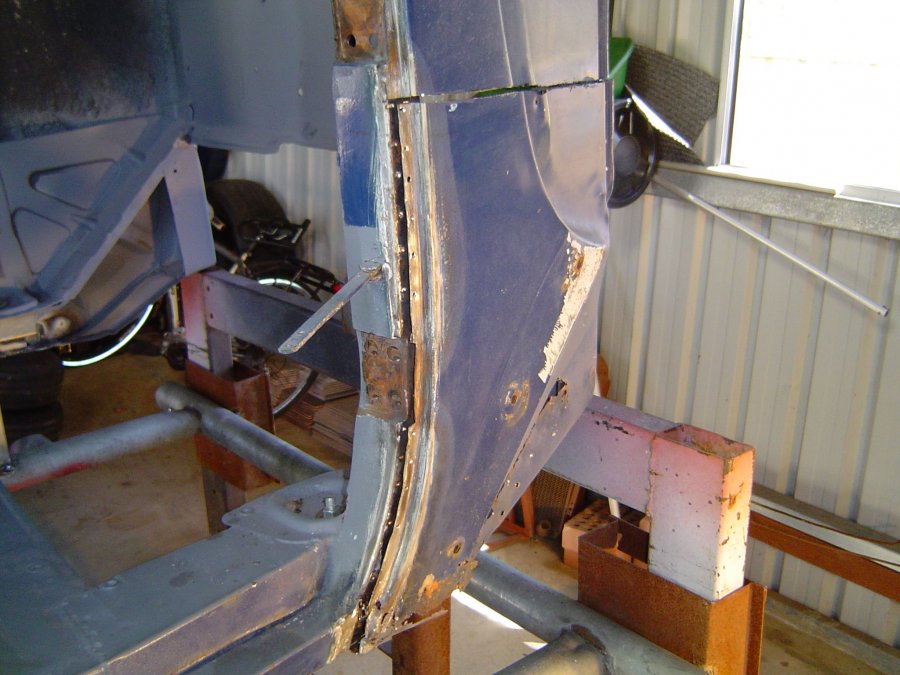
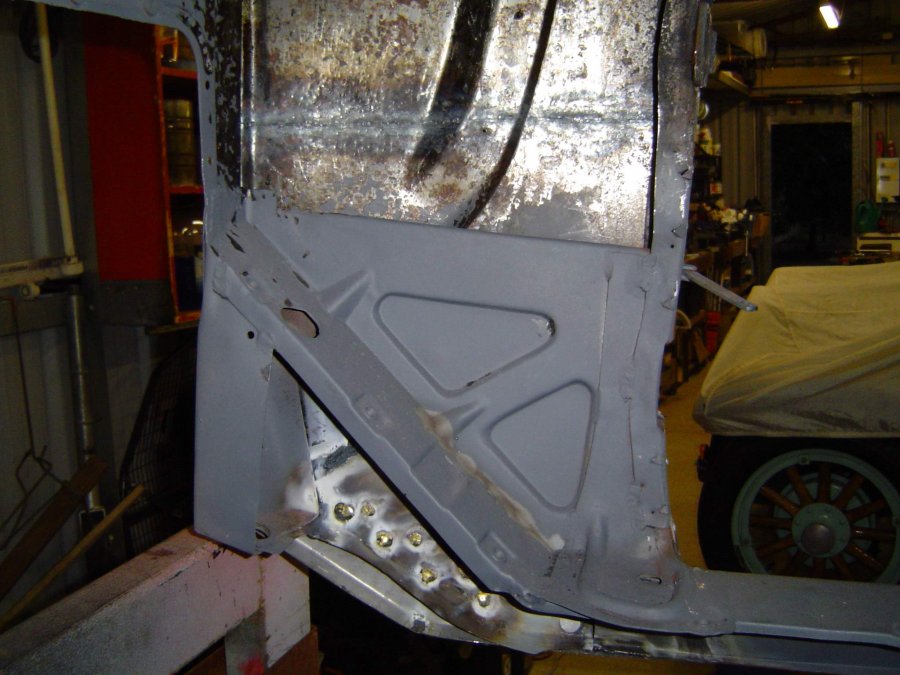
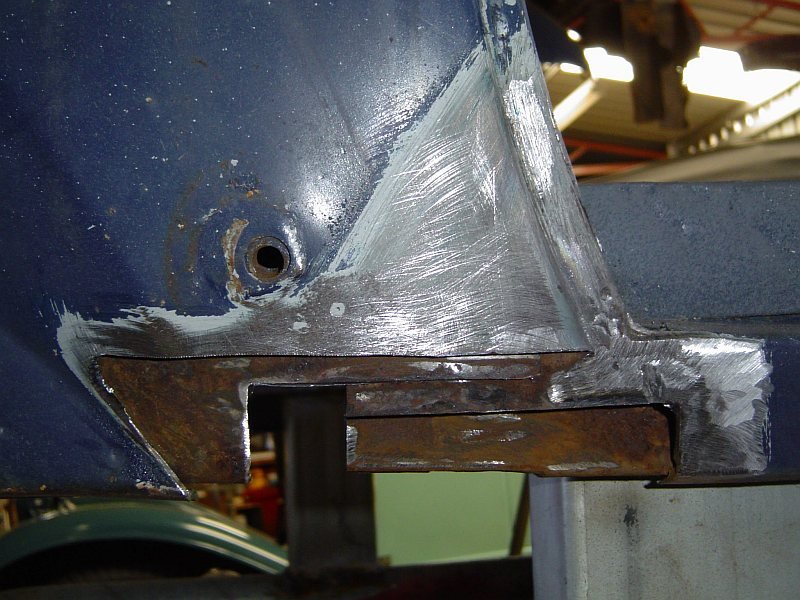
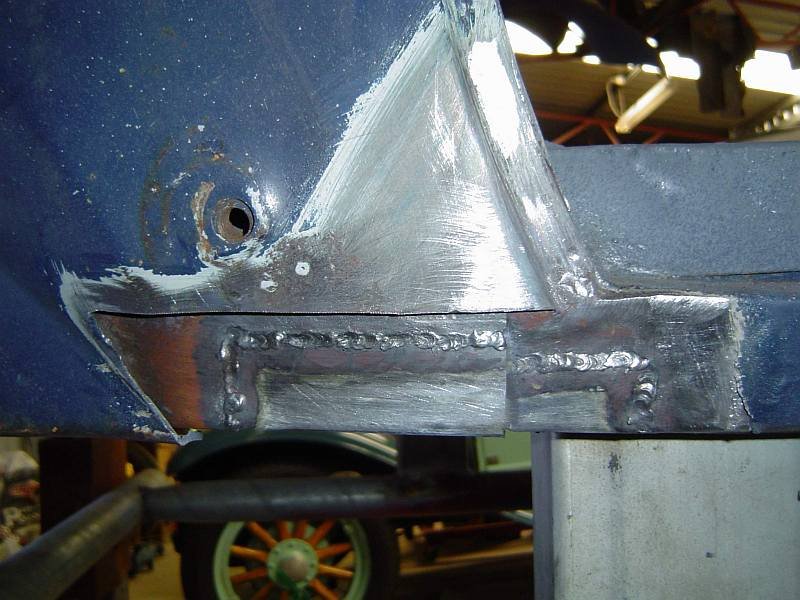
Time to move on to rust repairs. As I mentioned at the start of this post, the Aussie 7 passenger roof is constructed by cutting the sedan in half and inserting 20 inches in the middle. The profiles didn’t match so they filled the whole area with up to ½ inch of lead, bog 1930’s style. Over the years the lead cracked, moisture got in and the edges of the roof rusted away. Water and dirt also found its way into the lower parts of the body, in particular the centre pillars which had no drain holes. I completed those repairs but when I stripped the hood lining to get ready for the upholsterer in the 1980’s I discovered severe rust under the lead over front and back doors which had to be cut out and replaced. That killed my date with the upholsterer. The car was used for a while but eventually died and my interest switched to my 29 Tourer. In the intervening years, rust took hold again in the lower body as we then lived only 2 streets from the Indian Ocean and its southwesterly winter gales. So starting in 2012 I resolved to restore the old lady before my joints seized up. Things like house reno, garden and purchase of a 55 Plymouth wagon have diverted us some, but we are plugging on. Rust repairs on the 29 were done using old school oxy acetylene welding. The body was a simple metal skin over a wooden frame. I started out on the 38 using the same, but the 38 body has layer upon layer of metal which is way more complex and very hard to manage heat distortion due to lack of access to hammer things back straight. First to tackle was left front lower cowl, only a small amount of rust but three layers of metal to remove and replace, ie rocker, cowl inner and cowl outer, and lots of lead filler on the rocker that had to be removed first. All went ok until I replaced the outer skin, as old metal was a bit thin and no access to hammer straight. Should have cut higher. But I coated all visible rusty surfaces with Fertan, injected fish oil into the rocker, and put a drain hole in the inner skin so next time it wont rust! It will need a bit of bog (no worse than the original lead) but have sealed it for now with undercoat and scrap top coat to prevent rust.
-
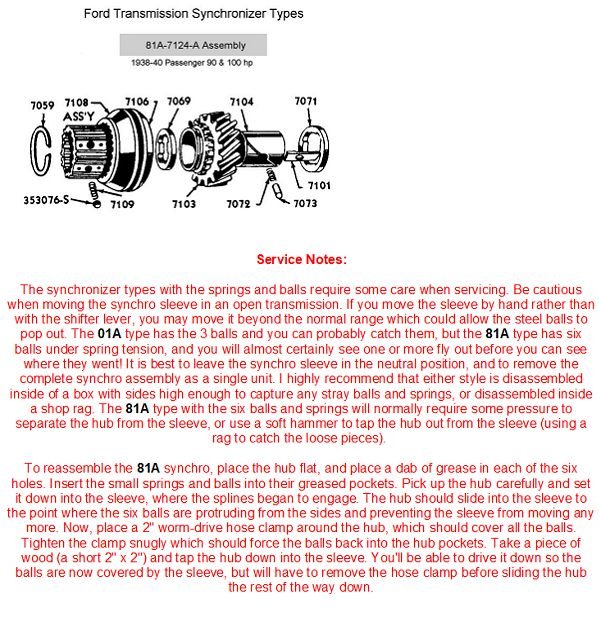
If you decide to disassemble the synchro to clean and lube it, the notes below are available on Vanpeltsales website. They specialise in Ford and I have wondered whether the parts are interchangeable as they look identical. The process is simple but needs care to avoid losing bits.
-
Great job! Good to hear even the expert struggles a bit with welding patches into 70 yr old metal. Even when it looks clean it sometimes behaves very contrary. Just when I think I have my settings right and all is going well, all of a sudden it turns to chookshit (from Aussie chickens)
-
When cleaning the underside of mine, a friend suggested I buy an electric paint scraper to save wear and tear on my wrists, best idea I have heard for a long time. Cost under $40, came with a range of blades, 2 yr warranty, hoped it would last the distance. Still going strong ten years later. Really good at removing underbody sealer.
-
Hi Keith, great to see you out and about in the 38, makes me jealous as we are in lockdown and the 38 is in pieces. Must get back to posting more on the rebuild. I enjoyed your note about the fuel pump problems. Cant imagine why you would get vapour lock, considering your location and the time of year (I spent 7 years in Northern Ontario so know a bit about cold weather!). My 55 Plymouth was always hard to start after not using it for a week or so. Would need to turn it over for at least 30 sec before it would fire. Replaced fuel pump with a brand new one, no different. Installed an electric pump on the chassis under the left rear door with push button on dash.Now I just push to prime and she fires up first time, no worries, similar setup to yours. Once running, the mechanical pump is fine. Have just topped up the battery on the 55(and the 29), and may take it for a spin in next week, as restrictions are starting to be lifted here. We have been very fortunate in WA, at last there is an advantage in living 3000 km from civilisation as the Eastern Staters call it.
-
Sharps40 is right. My 38 manual says fill cup with grease and turn one complete turn every 1000 miles! Add 2-3 drops of SAE 10 oil to wick in centre of cam every 6000 miles. (old SAE 10 did not have detergent like modern oils). My 29 manual says similar and care should be taken to keep grease off contact points and weights
-
I have done up quite a few distributors over the years: - a few drops of sewing machine oil on top felt pad, points plate bearings and weights. Engine oil attracts moisture and may lead to rust. - wheel bearing grease in grease cup on side (every one I have stripped had grease in the cup) - smear of vaseline on cam ( some points kits come with a small capsule). Havent ever seen a felt pad on the points arm? This last time instead of oil I sprayed weights and points plate sparingly with marine grade Lanox, will see how it goes. The only failure was my son's 1967 Datsun 1000. For some reason it kept losing spark. I found another that worked ok and still have the original, which I plan some day to try in my 1929 Plymouth. Believe it or not it is a simple mod to fit.
-
Hey Keith you asked a question about shocks on my 38 7 pass Plymouth. I just posted dimensions on Andydodge's post about shocks. The front and rear shocks are identical dimensions, the only difference is the rear shocks have stone deflection plates above the lower mounting
-
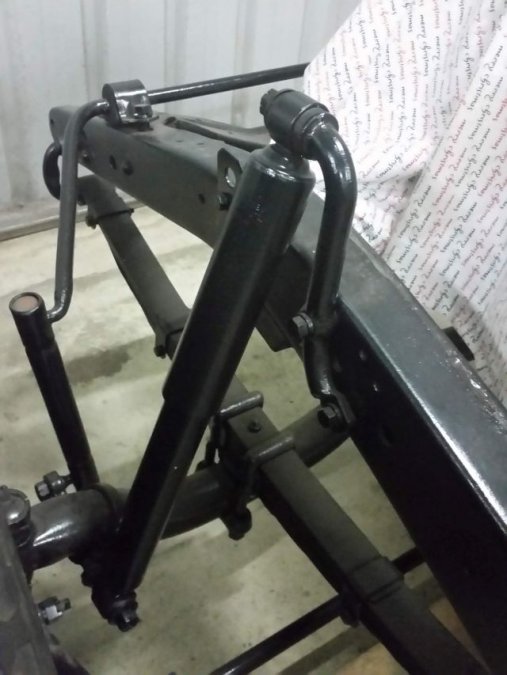
Back to your original question. You may already know, but the 38 Plymouth for one has telescopic shocks on front with an upper mount that bolts on with captive nuts inside the chassis rail and extends several inches above the rail. My shocks are Munroe made in Oz by Wylie, too old for numbers to mean anything, about 1-1/2 inch bore, 13 inch compressed and 21-3/8 inch extended. The originals are Healing made in Oz, same bore, 12-5/8 inch compressed and 20-1/2 extended.I imagine you could work out what lengths you need and pick a shock from the catalogue. I looked at a current Monroe catalogue online and Holden wagon shocks could fit the bill for me. Oh for the days when everything possible was made in Oz. We are just starting to realise the folly of reliance on China for everything. Sneak preview below.
-
I had the same problem with that "answered" status setting, after I saw someone actually complaining that someone else hadnt set post to "answered". I even posted a query to support and got no answer. Finally noticed that for posts I own, there is a column on left with tick marks, and if I CLICK ON A TICK the status goes to"answered". An undocumented feature!


