-
Posts
507 -
Joined
-
Last visited
-
Days Won
2
Content Type
Links Directory
Profiles
Articles
Forums
Downloads
Store
Gallery
Blogs
Events
Everything posted by Veemoney
-

Getting my 46 WD15 repaired and back on the road
Veemoney replied to lostviking's topic in Mopar Flathead Truck Forum
Good to plan ahead. If you don't have one get a mixing cup to measure and mix the paint components accurately. The cups are cheap and many places include them also with the paint purchase. Thanks for the reminder, I have a 78 FXE that I need to paint and put back together. -
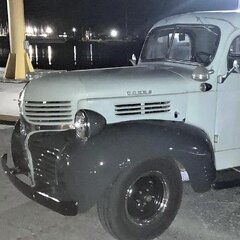
If that is the same car looks like someone has taken good care of it from just that picture.
-
I found they are usually marked in one or both of these spots with this style number stamp. First pic is the top and second is looking from the bottom.
-
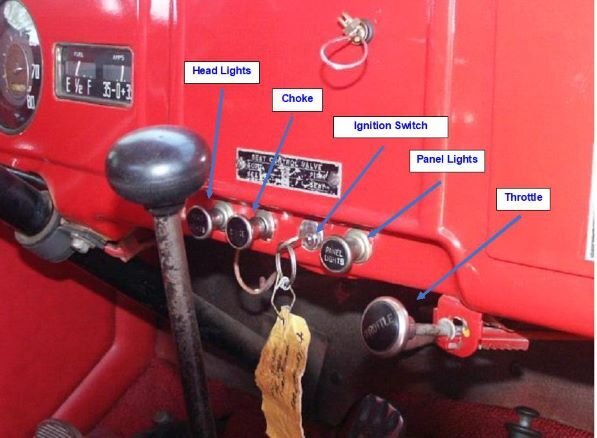
Back in the day of these trucks maybe cruise was a usable option but not so much now, be nice to find an old owners or sales brochure that calls out the intention. I thought it could be useful also if using the hand crank to start or adjusting RPM of the PTO as others mentioned. My farthest left of the 5 locations is a switch controlling an under the hood courtesy light that is mounted to the firewall. Not sure if it was original equipment.
-
Ed mine has 5 as well with key in the middle. Just looks like they didn't drill for the 5th location but the room is there and that would give it 5 with the key in the middle. I just pulled the picture from a manual an suspect now it may be military model based on the panel light knob and extra throttle cable. My truck has the extra throttle located as 1 of the 5 locations right of the key that is centered.
-
Found this pic in a manual I picked up. Shows the lower section off to the right of the main gauge panel. This is close to how my truck is set-up in that area.
-

Getting my 46 WD15 repaired and back on the road
Veemoney replied to lostviking's topic in Mopar Flathead Truck Forum
Just one comment. When testing make sure you mix the paint with any reducer & activator as applicable for the paint you are using. If not, you can't be sure you won't have a bad reaction without those solvents and hardeners. If your first-time shooting take advantage of the test panel by giving a sand prime and shoot to get your settings on the gun and increase your comfort zone. -
When I disassemble a new master or wheel cylinder I wipe down all components, inspect them and coat the bores, seals and pistons with the Sil-Glyde before assembling each assembly. The intent is that the silicone grease be a barrier between the parts and the oil/water from direct contact and forming rust. Metal is porous so even small amounts of the silicone grease filling those pores should in theory slow the process of rust starting there.
-
I assumed some rails would be in the plans to contain the load. Was thinking along the lines of a lawn chair cushion or foam at the bottom of the basket area to help absorb the bumps. Could even have plywood cut for the top of the foam if a firm surface is preferred. Another option would be a suspension system from the rails. Those baby trailers I've seen used suspended seats from the rail systems so the children are floating rather than sitting on the solid surface connected to the axle. That helps soften the ride. Think carrying an apple bouncing around in a bucket verses carrying the apple in a suspended sack.
-
Ulu, That trailer needs some suspension I think to help the eggs over the bumps but looks like a great start. I made some good buys using CL, FB and Ebaa so I vote used as well. Plenty of folks buy them and after once or twice then they sit in a corner kind of like a treadmill. T120, That is a sweet ride you found. Does it have a generator or battery for the lights?
-
Both good looking trailers. Sounds like the price was right
-
Your socks don't match?
-

Getting my 46 WD15 repaired and back on the road
Veemoney replied to lostviking's topic in Mopar Flathead Truck Forum
Your friend with the body shop can steer you on the best methods for the repairs so bounce your plans off him to help get the best results. Good to have someone you know that does this for a living. When testing paint with thinner pick a spot like on the old running boards in case it reacts badly since you won't be using those or a spot you won't see. For that area on the cab above the fender I would usually pull the tape line used during priming and wet sand to remove the hard edge there and move my tape up higher. That leaves some space on the old paint where I sanded lightly to allow the new paint to fog in that area and lightly overlap to the old paint. Once dry I can then wet sand with super fine paper in that area if needed to blend the old and new paint so any difference in color is not so apparent. Again though your friend may have some better way to manage that area and improve the final job. -

Getting my 46 WD15 repaired and back on the road
Veemoney replied to lostviking's topic in Mopar Flathead Truck Forum
I had one of those Craftsman red compressors. When it came on it was full blast screaming. If you were close and it caught you off guard it would get the heart pumping. Did the job till I found a pre-war old 2 stage Champion to rebuild and mellow the work area some. Did you get a chance to check if the paint you ordered is a close match? -
I pull new brake components apart, give them a check and coat the parts with a brake grease ( Sil-Glyde) before reassembling. I like to confirm the seals and bores look good and it is a quick easy check to do. The grease is sticky and I believe it helps protect from the early start of rust in the bores.
-

Getting my 46 WD15 repaired and back on the road
Veemoney replied to lostviking's topic in Mopar Flathead Truck Forum
To test your existing paint: Take a clean white cloth, wet it with lacquer thinner and rub a spot of paint to test the reaction. If the color comes off immediately or the spot starts wrinkling, it shows that the type of paint is enamel. But if the color wipes off onto the white cloth only after vigorous rubbing, it is a sign of lacquer paint. If nothing wipes off onto the cloth, the paint is probably urethane based. How to determine if your car is coated with clear coat: To find out if the finish on your vehicle includes coats of clear paint over its base color, simply sand a hidden spot using 600-grit or finer sandpaper. A white sanding residue shows that there exists a clear coat finish. A color residue shows that only a color material was used to paint the body with -
Be nice if it shows up and fits as it should, especially at the cheaper price. Not sure if this is the one your thinking about for the Cuda. I purchased the motive 1105 to use on the 34 I have set-up with a dual master cylinder under the floor. Made these brackets to help it tighten down straight and it worked great, no leaks first time set-up & using it. I plan to use it on the Charger to do the fluid change next. Good Luck
-
Sorry Sniper I seen the thread on the motive unit was 1-3/16 and you mentioned yours was 1-1/4 so I figured you would be making a cap adapter from a bolt or cap. Thats what I did for the truck. If you do go the pressure bleed route I recommend picking up a shut-off valve for inline too.
-
I recommend the pressure bleed through the master process and especially if you don't have a helper. If you have a leak you will see it sooner rather than later. With a vacuum process you have a chance to draw air into the system undetected. Last year I purchased this pressure bleeder off the Bay for less than I could find a Motive unit. Works well and came with the fluid bleed off bottle, Pressure bleed-off on tank and quick disconnect coupling. 3L Capacity Manual Brake Clutch Fluid Bleeder Bleeding Tool with E20 Adapter | eBay The Motive unit did not come with these items. Used it on my 47WC last year and just finished up last night using it on the 34 Plymouth. I bleed the master on the vehicle during the process on both.
-
Thumb shifters for me these days. I always enjoyed using the upper more relaxed position when riding the dropped bar bikes. The Schwinn Continental mounted the shifters on the neck making for an easy reach to them.
-
Interesting thread and some cool bikes. I like the bars on this one. Never got used to the shifter mount on the lower tube so most times I would just power through without shifting when possible.
-
Looking forward to seeing your progress on this one
-
I'm speechless on this one
-

Increasingly Difficult To Find Manual 6V Battery Chargers
Veemoney replied to keithb7's topic in P15-D24 Forum
My old "Die Hard" 6/12v charger gave up and you know that usually happens when you need it. HF is not far but they only had smart charger models and I picked up this one after reading some good reviews on it. It is a "high freq" model with settings for wet, AGM and Gel batteries. It was on sale cheap and got me going. As Young Ed mentioned Facebook marketplace is easy enough to use just click the local button so I can pick-up and see it before I buy. I found an old school not so smart model on Facebook Marketplace for $12 locally, 10amp and no shut-off so It has to be monitored closely during use. I check volts with a fluke meter when charging. -
Forget unloading the groceries just use Uber Eats.


