

desoto1939
-
Posts
5,103 -
Joined
-
Last visited
-
Days Won
59
Everything posted by desoto1939
-
AS per Don Smith, yes these modern cars with all of their electronics are a drain on the battery when sitting in your driveway or garage. I have a 2009 Vovlo V70 the battery went in the car about 1 year ago. My Volvo specialist told me that we need to drive the car at least once a week for at least 10-20 minutes so that the alternator kicks in an then charges the battery. Taking a short 1-5 mile run to the store or post office is not enough to put a charge back to the battery. So if you have an older 2nd car that doesnot get great gas milage you still need to start and drive it to keep the battery fully charged. Rich hartung desoto1939@aol.com
-
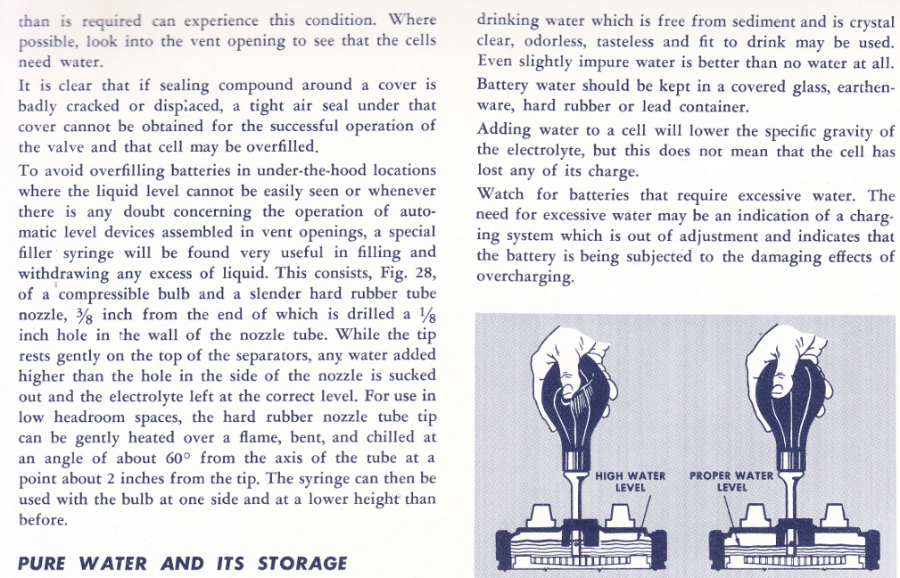
I basically change my oil and filter ever two years. Also I base this on the amt of driving that I have done. I have a 1939 Desoto that also has the bypass filter. The older oil can style stated that you could go 8k on an oil filter because it was a bypass filter and not a full flow filter like we have in our modern cars. I also replace my oil bath filter element with a NAPA paper element that fits perfectly in my air cleaner housing. I feel that since inmy area we do not have dirt roads and the old tar/chip roads the amt of dust and other air quality junk has lessened so I change the filter when it needs to be done and also blow out the filter every year. I also use the new Castrol GTX Classic that has a very high amt of ZDDP and it is a W20/50. This oil can NOT be used in a modern car becasue the modern cars have catalytic converters and this oil will destroy the converter. I know a couple of posters on the forum do not like the Castrol oil products but the oils of today even the Walmart brand is totally better than what was being used back in the 30-50's. I think the biggest issue is that you check the oil and the mileage and then make your our personal decision when to change oil and filter. I feel that both should be done together. The real big culprit if only starting your engine and not letting it get upto full operating temp and then radiator temp thermostat is not fully open the you get water and other acids building up in the oil pan which is not good for the car. So in the winter time if you start you are in your garage let the car fully warm up and get the temp to be above where the thermostat opens. At lot of people change the oil before putting the cars away for winter storage becasue the water and acid issues. some prefer to start the year with fresh oil every year, again a personal choice. Also at the end of the year is the perfect time to check all the fluid levels and to test the antifreeze quaity. In out older cars you should be usin ghte OLD GREEN AF that is labeled as INT inorganic and not the modern AF like the extended fomulas. You will have to look for the old green AF but the auto stores still carry this product. If you AF is still good and not showing any signs of turning brown and is still green I also dump in a bottle of Water Pump Lubricant and Anti-rusting agents. AF breaks down as it gets older and you start to loose the antirusting agents so that is why it turns brown. The protection of frezzing is still there but th einternal rusting chemicals have been depleated. Also make sure that you also have the correct style radiator cap. Some of the early cars used a non-pressure cap and then they started to go to pressure caps. If you over fill the radiator some of the systems will purge the extra fluid in the radiator. In my 39 Desoto which is non-pressure system the water level is approx 1 inch down from the top of the tank. Let you car determine what is best for your cooling system. Also time to check the battery fluid level and also take a reading of the electrolites in each cell. Most caps can still be removed, but do not overfill ech cell. The original rubber bulb filler has a small hole approx 1/4 inch above the end of the filler tube. This was there so that when tested the fluid it would suck out the extra fluid if it was overfilled. The new bulb do not have this over fill hole. I have a older document on batteries that describes this information. refer to the attachment. This info was taken from my Autolite Battery Manual Rich Hartung Desoto1939@aol.com
-
 Thanks for the pictures of the headlight and the housing showing the tab to mount it in the correct manner. If you get to hershey next year I will be in the same location. have been going for 35 years. I was up in Scranton over the weekend for a wedding. My wife went to Marywood College Rich Hartung
 -
I have sen on ebay where they made a sleeve that inserted on the u joint housing where the end buttons slide into the housing this was to take up any wear that had occured over the years. I would not shorten the pin or anything else. I would first check that the pin is completely center between the end ball of the driveshaft. I think I might have the metal housing for the 46 Dodge. If I remember correctly the housing on the 46 Dodge is different then the other cars. Let me look in my NS parts. Rich Hartung Desoto1939@aol.com
-
Hershey AACA Eastern Swap Meet and car show Oct 7-11 site OAD 7&8
desoto1939 replied to desoto1939's topic in P15-D24 Forum
As of today 9/16/24 the great Hershey swap meet and car show is only 21 days away. This will my 34th year of attending this great event. The hobby is changing but when Hershey is in the air everything stops so we can attend. If you plan on coming my site is in the Orange field Roa OAW site 7&8. I will be there on Monday and waling the field looking for all of those elusive 39 Desoto parts. I will officially open on Tuesday 10/8/24. Stop by and say hello and talk MoPar. Rich hartung Desoto1939@aol.com C; 484-431-8157 -
That is the correct Autolite Bullseye bulb for your 1949. This is the first year that they started using the Bullseye Bulbs. i just sold one that had a 1953 date stamped on the back of the bulb. Not sure they stamped all of the bulbs with a build date. If you do take yours off and there isa date stamp can you photo that and also the number that is on the top front of the bulb. I am trying to see if there isa any coorolation on the three numbers that were part of the glass lens. Where in PA are you located. I am located in Valley forge, PA. Also if you are close to Hershey in October stop by my vendor site in the Orange field Row OAD site 7&8. Rich hartung Desoto1939@aol.com
-
Greg G: i have read your posting. But the POC club is very strict in their judging and have more information than even the AACA. So their deduction of 5 points for having the Bullseye headlight on a car prior to even when they were first produced makes sense. I think the AACA deducts 10 points. Rich hartung desoto1939@aol.com
-
We as well all know that the weather is changing this only means that MECCA or as we all know it that the Great Eastern AACA swap meet and car is basically just a few weeks away. This years dates are Oct 7-11. Monday the 10/7/24 is pack-in day for all of the venders. Set up time and sometimes you can find those early parts that you are looking for. Tuesday - Thursday 10/8 to 10/10 is the official parts swap meet. Friday 10/11/24 is the AACA car show. Most of the venders have left becasue everyone is basically going to view the cars which will be on display just be hide the new AACA Headquarter Building. I will have two Sites over in the Orange field parking lot that is near the Giant Indoor Arena. My site number is ROW OAD site 7&8. I have been at this location for the past 5 years. I will be listed in the Program Directory under my last name and also under DeSoto Parts. I am very close the new AACA Headquarters and Library so walk over the AACA building will visiting. If you plan to attend please stop by and say hello and take a rest. You can also leave some heavy items and then pick them up at the end of each day. I do not stay on the field at night time but go to my daughters house and return each morning. So if you are planning on going let me know. Rich Hartung Desoto1939@aol.com 😄 Cell 484-431-8157
-
Loren: are you talking about the little plug on the axle near the backing plate on the axle? According to my 1939 Service Manual they state to not use a zerk fitting because when using a grease gun the user has a tendency to put to much grease into this location and this then forces grease out the end of the axle shaft. The instruction state to remove the small bolt then put some grease on your thumb and then press the grease into the hole so as to not over fill the area. Rich hartung Desoto1939@aol.com
-
Ivan-B: The period correct headlights would be the 4030 bulbs dual filament. If you are having your car AACA judged on judged at a Plymouth, chrylser, dodge or Desoto car show then these are what should be installed in the car. If you are not doing a full restoration and you are trying to have a drivers car then the 6006 sealed beam with the tits or nibs will also fit into your headlight buckets. The 6006 or 4030 are basically the same light. Also yes the 6006 bulbs can be found at a Tractor supply and if you have a local car show and swap meet you can also find them there. Try to get a matched pair made by the same company so there have the same prisms lines in the glass, but different manufacturers and can be sued will not be of any major concern on driving at night. Rich Hartung Desoto1939@aol.com
-
The 1940 -48 Headlight bulbs did not have the aiming tits. The correct bulb number was 4030 for MoPar's Then in 1949-55 they all used the Autolight Bullseye bulbs still 6v with no aiming tits. Then in 1956 the headlight manufacturers starting making the 6006 dual filament 6v bulbs with the aiming tits. Pre 1956 mopar should be either using the Autolite Bulls eye bulbs or the 4030 bulbs. and occasionally you see the Corcoran Brown bulb on cars between 1940-48. I currently have one of the Corcoran-Brown bulbs if anyone needs a spare. Then the 12 volt headlight bulb were then produced and some cars either had dual headlight or 4 headlights depends on where the car was registered. Rich hartung Desoto1939@aol.com
-
did you ever check the throttle saft idel dog? This is used on my 39 desoto and would also be used on your carb. On the bottom of the carb where the linkage connects to the throttle there is a stud and on this is mounted the throttle iddle stop dog. This control the sisson chock and also the trottle speed. there is a set screw to adjust the throttle rpms and this screw then makes contact with this dog. On mine which was the original carb had worn a hole in the throttle shaft dog and was causing the rpm's to stay high and make the throttle sick. Refer to my earlier posting of the pictures of the throttled dog. There are couple of these throttle shaft dogs listed on ebay. I replaced mine and this also help with my issue of a sticking throttle and not being able to get the rpms down lower. 1939 40 41 42-52 Plymouth DeSoto Chrysler Dodge MoPar Carb LINK Fast Idle DOG AMS Obsolete-Formerly Mitchell's (80397) 99.7% positive Seller's other itemsSeller's other items Contact seller Rich Hartung desoto1939@aol.com
-
Around the area here in Valley Forge Pa which is the suburbs of Philly the regular car mechanics are getting upto 170-190 per hour. So even if you can find a good old school mechanic you need some deep pockets for their work and diagnostic skills. If you do not have a lift then you will have to pay their going fees. And as you also stated that you are getting older so crawling under a car is harder. Every couple of years I take the car back to him for a total look over to keep the car running and as a safety inspection. In the state of Pa there is no state inspection on antique cars, you as the owner have to make sure the car is safe to operate. So why risk any possible issues spend the money to insure you and your family are safe in your antique car, mine is 85 years old so compare that to our aging bodies and the cost of just keeping us in good health. I just had the king pins, lower outer two control bushing, alignment, brake hoses, rebuild front wheel cylinders with NOS one, new install emergency brake cable, total inspection of the entire car flushed the entire brake system. the cost was not cheap he had the car in his garage almost the entire month of Feb and granted he did not work on the car everyday but when he was done the car was perfect. I did not have the lift to do the work and also the experience to do the work. The money spent was worth it to me and now the car tracks straight with my hands off the steering wheel and the front end is much tighter. Rich Hartung Desoto1939@aol.com
-
great find rich
-
if the glass in the frame is original then they probably used setting which is more like a rubber tape. You can try to heat up the tape along the edges with a heat gun or maybe a hair dryer to get the tape soft. Clamp a piece of wood t the open end of the glass and then use a set of vise grips and when the tape is soft the try to pull the glass out. Remember this glass is also most 75 years old so be careful. If you are going to replace the glass then just break it up and then remove the old glass. Also any glass shop can cut new flat glass for the frame. Setting tape is old style when we did my glass they used the black silicone glass setting caulking in a tube. This will allow you to position the glass in the frame and to make sure it is square on the outer edge of the frame.
-
Looking for some insight on my old Plymouth
desoto1939 replied to Mikec4193's topic in P15-D24 Forum
In your pictures of the cowel vent and the hood, the homemade hood hinge end flat sticks over the front lip of the cowel vent. So the cowel vent can not even be opened. I would just put a gasket in the indent to seal off the lid of the vent or you could just put some gasket sealer around the edges of the vent. Just my 25 cents of input. Rich Hartung desoto1939@aol.com -
Dot 5 will not cause rubber to deteriorate. Dot 5 is silcone brake fluid and does not draw water into the brake system and line, also dot 5 will not eat your paint like the Dot3,4 and 5.1 fluids. Yes the rubber boot on the MC may have dried out because of non use or heat and just because of age. If you have left the car i storage from 1980 then I would suggest that you go over the car and check the braking system, antifreese properties, carburation and the entire car. So basically your car has not been driven for over 40+ years. The gas tank may be clogged, the brakes might even be stuck, all kinds of potential issues. The hoses would need to be replaced so you are basically starting a new restoration on the car. Rich Hartung desoto1939@aol.com
-
If you go to DOT 5 then you will need to flush the entire braking system,Master Cylinder and each wheel cylinder with Denatured Alcohol. You will then need to replace all of the rubber brake hoses with new hoses that can use DOT 5, also the inner wheel cylinder cups and the outer boots. The entire system MUST be Clear of the old brake fluid, again it must be clean of all existing brake fluid. I have used DOT 5 for over 35 years in my 1939 desoto, some owners do like it other do not. Also if you go to Dot 5 brake fluid there is a new brake fluid labeled as Dot 5.1. Dot 5 and DOT 5.1 can not be mixed together. Keep us up to date on what you find and also call the prior owner to see if they know what brake fluid they used. Rich hartung desoto1939@aol.com
-
What type of brake fluid are you using, Dot3,4 or dot 5. Dot 3/4 can draw water moisture inthe to the brake lines and master cylinder and wheel cylinders. Since the car was restored five years ago and might not have been driven it could be a contaminated wheel cylinder. I would pull the front drum remove the shoes. Do not adjust the lower eccentrics, Remove the cups and pistons and check to see if any crap in the wheel cylinder. Remember that you have step cylinders. Do a lite hone on the cylinder and clen each piston. Reassemble the brakes and bleed the wheel cylinders check to see if the shoe retrack and move in and out. Might just get a spare rubber brake hose and could also change at the same time when doing the brake repair. Either which way you have to take the system apart. Brakes are so important and you can not afford to have any issues. Rich Hartung with a 1939 Desoto desoto1939@aol.com
-
the fuse in the older cars was not an add on fuse but was contained in a metal fuse holder that was part of the switch assembly and the fuse was in a metal cylinder that twisted into the switch. could use a dummy fuse as suggested. Rich hartung
-
A friend of mine went to a local car show and found an original 1957 DeSoto salesman Award. I have posted the certificate for your information. Rich hartung Desoto1939@aol.com

-
Miker: This is rich Hartung and I have a 1939 Desoto 4 door sedan. Contact me and we can talk about the 39 Desoto. i will send you a private message . Rich Hartung desoto1939@aol.com
-
Look for a 6 volt single headlight relay you do not need a dual 6volt relay since you will only be supplying current to single bulb light and not a high and low beam situation. So look for a single relay 6 volt on ebay or at a swap meet Most of these being solfd usually have an instruction sheet. One wire will come from your switch or toggle switch to turn on the fog lights from inside the car. One wire will come from a connection from the battery to supply current to the relay use a 10 gage wire. One wire also 12 gage will then run out to the foglights might want to run this power wire to a new seperate junction box light what youhave for your regular headlights This wire then is attached to the stud and the two wires from the foglights are also attached to this same stud. Turn on the ignition switch and then turn on the switch to the foglight and they should work turn off the foglight switch and they go off and then turn off the ignition the foglight switch if turned back on should not even supply electric to the lights. I have this same setup on my 39 Desoto . Rich hartung Desoto1939@aol.com
-
Distributor Help for my Barn Find 1950 Fastback
desoto1939 replied to Theturtle's topic in P15-D24 Forum
Los Control: If you follow the entire posting this owner verified that the correct distributor is current installed in his engine block. I had attached a page from my Autolite Manual with the year specific models and this matches his car. So according to what the owner replied back to me he has the correct dizzy and has also ordered the correct breaker plate for the dizzy and his car also has the Vaccuum Advance module. Each owner can do what ever they please to do with their car/truck. All I was trying to do is help the owner verify the installed equiptment so he could continue on with getting the engine running. Maybe this gentleman wants to have the period correct parts and not switch out to other parts. We all know that the original parts will perform in his car. Rich hartung desoto1939@aol.com -
Distributor Help for my Barn Find 1950 Fastback
desoto1939 replied to Theturtle's topic in P15-D24 Forum
I have the old style breaker plate with the small ball bearings in between the two halves. The car has been running on this style for over 85 years on my 39 Desoto. Yes on the NOS Breaker plate for my car I clean out the old grease that was used to lubricate the ball bearings. Just like anything on an older car you have to maintain certain things to keep them free and moving. I also still have the distributor that came with the car from the factory. And rotate the grease cap to keep the inner bushings lubricated. I do that every two months. So the older parts are fine and work just fine. Rich Hartung Desoto1939@aol.com

