-
Posts
5,099 -
Joined
-
Last visited
-
Days Won
59
Content Type
Links Directory
Profiles
Articles
Forums
Downloads
Store
Gallery
Blogs
Events
Everything posted by desoto1939
-

Rear axle vent fitting. Here's a real head scratcher !
desoto1939 replied to Noonan's topic in P15-D24 Forum
Check with andy Bernbaum for the axle vent tube. Also if you are using the zerk fitting to grease the inner rear wheel bearings this can become an issue by over greasing the bearings. According to my 1939 Desoto service manual it states that you should not use a zerk fitting because it will force to much grease into the bearing and then over grease the bearings and then force grease out the other end of the drive shaft and grease can then get onto the brake linings. The proper way it to remove the small nut then put wheel bearing grease on you thumb and push that into the opening. You will have to do that process several times. Refer to your service manual in the lubrication section for your car. Rich Hartung desoto1939@aol.com -

Coolant leaking out of the clutch housing?
desoto1939 replied to temecularevev's topic in P15-D24 Forum
If and when you replace the welsh plug get the ones in BRASS especially for this location on the back of the block. Most welsh plugs are galvanized plugs but the brass will not rust out. Also if the engine gets pulled then change all of these plugs over to brass, done once and should not have to worry about them for a very long time. Also get the flat style and not the cup style. Rich Hartung desoto1939@aol.com -
Update on the Rebuild process: Yesterday a good friend of mine and also a mechanic we disassembled my Autolite IGS 4102-c distributor. It is a very easy process, the only real issue that we had was grinding down the lower pin that hold the collar onto the shaft and then having to press it out of the unit. We drove out the drive shaft with the use of a rawhide mallet so as to not damage the end of the shaft. Used the factory miller tool to drive out the upper and lower bushings. Cleaned the shaft and left the sprigs and weights still attached to the shaft. Yes the factory bushing did have the lubrication holes drilled in the bushing. We remove the outer grease cup and cleaned that and the opening of any left over grease. We decided that we would install both the upper and lower bushing with the tool. Then drilled out the holes and use the opening in the body of the grease cup to locate the holes. Used a 7/32 for the top hole and a 1/8 for the lower oil hole. Cleaned the drive shaft looing for any wear marks and found none. Insert the drive shaft town to check for any binding. we did find that there was some tightness when trying to go through the lower bushing. Also note we did rebuild two distributor and had the same issue with tightness on both. We then had to ream the bushing with a 1/2 reamer coated with ATF fluid. Make one pass and this removed the tightness and there was no slop felt or even seen. Installed the lower cup and used a 1/8 by 3/4 in long pin to the secure the cup to the drive shaft. Installed the breaker plate assembly and then used my Snap Gap tool to set the points to .020. Checked each lobe and now each high point on the cam opened the oints to the proper opening of .020. Still have to install the distributor but it is cold in my garage. Hope to finish this weekend. It took us approx 1-2 hours to complete both distributors. Another great learning process for me. I am writing up an document on what we did and will try to attach it to this update. It is still a work in progress. If any one has questions feel free to contact me. Rich hartung desoto1939@aol.com Rebuild Autolite Distributor.docx
-

Borg & Beck pressure plate Number 1368 Type 10A7 what does it fit
desoto1939 replied to desoto1939's topic in P15-D24 Forum
Russ: thank for the lisiting I will keep that with my other information and will look in my Borg & Beck catalog. Tks, Rich Hartung -

Borg & Beck pressure plate Number 1368 Type 10A7 what does it fit
desoto1939 replied to desoto1939's topic in P15-D24 Forum
I contacted Fort wayne Clutch and they told me it is for a 51-53 Mercury. Thanks for the update I will recheck my Borg Warner Clutch catalog. Rich -
you could also contact this person via the web search: regulatorroy. Lives in Mulica Hill NJ. He has an extensive amount of these window regulators. I have visited his shop several years ago and he had regulators for my 39 Desoto. contact him he might beable to help you. Rich Hartung desoto1939@aol.com Regulator Roy, Mullica Hill, NJ Regulator Roy 2 Folwell Lane, Mullica Hill, NJ 08062 (609) 828-8537 regulatorroy.net
-
So on my 39 Desoto the volt reg has the original autolite tag and it is rated at 28 AMPS. So if I installed the base alternator positive ground that is rated at 60 amps would I have any issues since it is rate at 30+ amps more that the original regulator? Everyone is having their points of interest and input. ALso they make a fuse that can be directly attached to the battery tab on the volt regulator so that you do not blow out the VR. I have several that I have in stock and they are rated at around 22 amps. So could this also be used on the VR at the battery terminal tab with the 6 volt positive grnd alternator? I still have the original 6v generator. Rich Hartung desoto1939@aol.com
-

Brake Master Cylinder Rebuild on a 1948 Chrysler Royal Question
desoto1939 replied to Tom Skinner's topic in P15-D24 Forum
Tom: wih the 1948 Chrysler you have the Lockheed brake system that utilizes the eccentric pins to move the shoes inward and down and outward. If you have anyone that might have the Factory Miller MT19 Brake setup gage tool then try to borrow that tool since it can set the shoes up to factory specification or even borrow the Ammco 1750 brake gage or even purchase from Keith the tool that he made to adjust the individual shoes on each axle. Since you will have the two wheel cylinder setup you will also start your bleeding at the bottom cylinder and then bleed the top wheel cylinder. If your eccentric pins have the arrows stamped into the ends then rotate the pins so that the arrows point towards each other. You will have to loosen then castle nut on the back of the backing plate first. On each pin there should be a flat spot to accept an open end wrench might be 9/16 or 1/2 I do not remember. You will also need a set of feller gages to help gap the shoes at the toe and heel. After getting each shoe adjusted properly then hold the eccentric pin on the outside with your open end wrench. Use a torque wrench and torque the rear castle nut to around 75 foot lbs. Hold the pin from rotating via the use of the open end wrench. Install the drum and make any fine adjustments with the top half moon adjuster. read and reread the factory service manual on the brakes for your car and fully understand the process. It takes some time on the first drum but you will get quicker as you do each drum. On my 39 Desoto I only have a single wheel cylinder and on my brakes the rear shoes on both the front and rears have the short lining shoe installed on the rear and the long lining on the front for each brake. This was the factory setup since we used steped wheel cylinder pistons. Hope this might help. Rich Hartung desoto1939@aol.com -

Brake Master Cylinder Rebuild on a 1948 Chrysler Royal Question
desoto1939 replied to Tom Skinner's topic in P15-D24 Forum
Tom: You state that you have owned the car for over 50 years and have not done any maintenance or rebuilt the MC. Yes it is not the type of repair work that we do every year like an oil change or other maintenance. I do assume that you do check the fluid level in the MC and that you might bleed the entire brake system every few years. But you have never had the MC apart or inspected during its useful life since you have owned the car. I would suggest that you at least get a NOS unit to have as a spare and or a repair kit. Yes pushing the pin out might be a pain in the butt, but if you learn how to do the job then you will know the internal condition of your MC. If you do not feel confident in doing the work then suggest that you find a mechanic that can do the work for you and would try to get it done now during the winter months. I am a shade tree mechanic not a certified mechanic but curretly rebuilding a distributor for my 39 Desoto. Yes it is scary doing something that you do not have alot of experience with but if you ask alot of questions and do some research you will be surprise at what you can accomplish. remember that these antique cars are a hobby and that they do not need to be fixed in one day. It might take several days to complete the project and that is the beauty of the project. When you get stumped you can ask for help and diagnosis the issue. Rich Hartung desoto1939@aol.com -
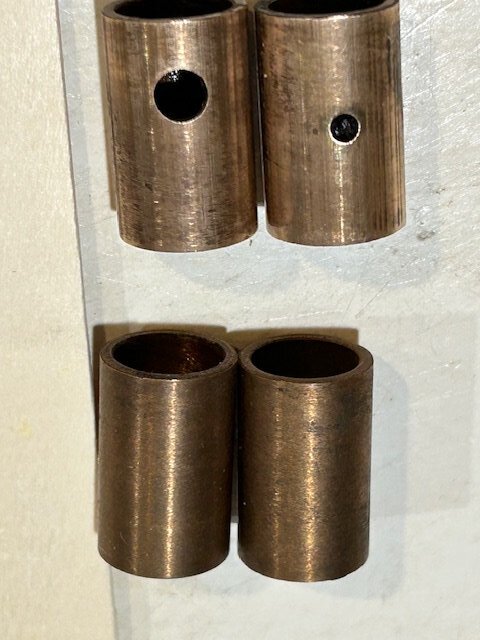
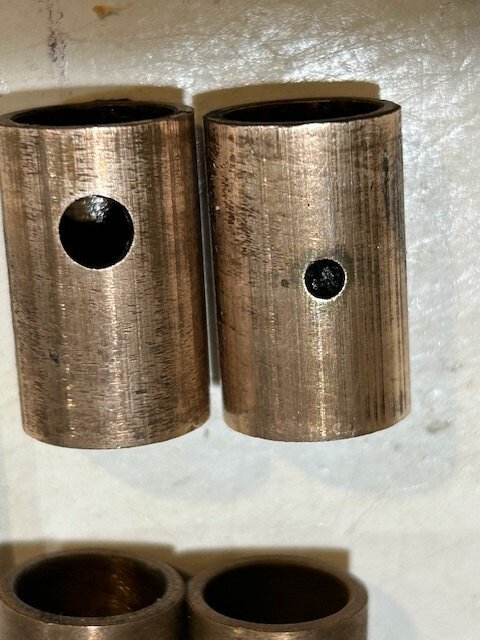
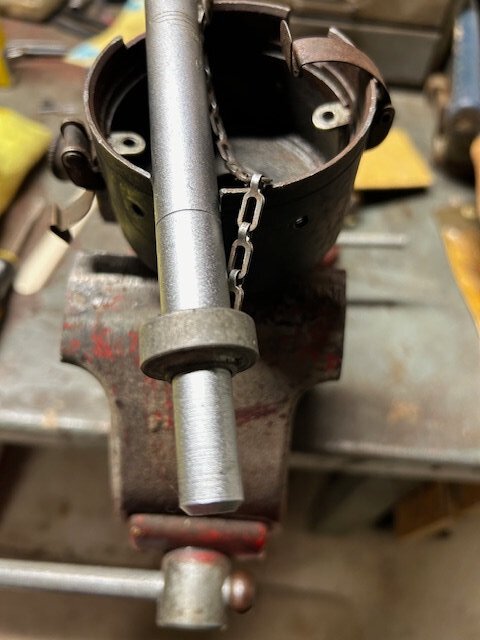
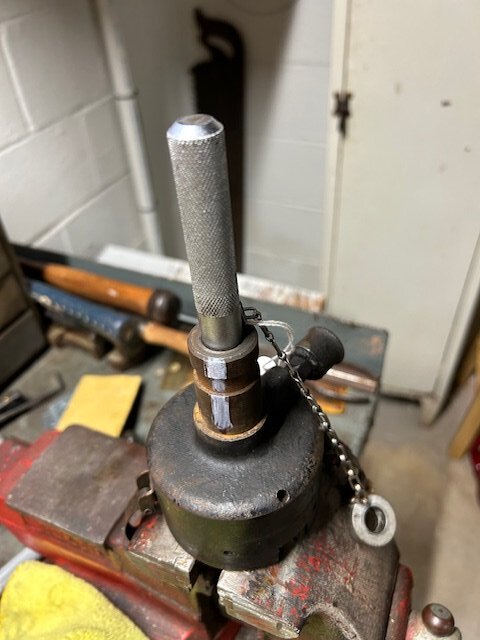
I am rebuilding an extra Autolite distributor for my 1939 Desoto. I have the factory miller tool that is used to push out the two bushings and also install the two bushings. When i pushed out the two original factory Autolite driveshaft bushings I discovered that these original bushing had factory holes on the side that would matchup with the top grease cap and permitted grease to be forced onto the shaft. at the base of the main body is another hole that you allow oil to enter at the base of the body to also oil the shaft. I have 5 replacement bushings and they are the correct replacement numbers but neither of the bushings have the appropriate holes in them. Should I be concerned that these holes are not in the replacement bushing or should I have them tapped and drilled out to the appropriate sizes. I figure that the original bushing lasted 85 years I guess the replacement bushing will still work and be good after I dies. What is everyone thoughts on this issue. Attached are picture of the old and new bushing and the factory Miller Tool that the dealership mechanics used to rebuild at distributor. Note that there ae two different sized holes. In the second picture the bushing on the left is used on the top and the one on the right is used in the base of the main body. The factory miller tool in the 5th picture has a collar that is used to drive the bushing into the top of the base and the collar is used to make sure the bushing just sits below the hole in the base to insure that the shaft does not bind and there is a washer that sits on top of the bushing. On the bottom there is a collar that has a pin that goes through the shaft and into the collor. This also has to be driven out to remove the shaft. I use a 1/8 in steel rod to drive out the pin. The pin might be 9/64 in diameter and then needs to be staked so that it does not work its self out of the assembly. Was thinking of using a split slotted pich pin to make it a tight fit. Any recommendation if this will work? Rich Hartung Desoto1939@aol.com
-
Could also be a grounding issue on the right bucket. ALso the wires that you are showing are not in great shape, bare wires and insulation is missing. Are you sure the bulb is not burned out on the right. Rich Hartung Desoto1939@aol.com
-
I know in the states there are venders that specialize in hood hinge repair and rebuilding. Not sure if there are any in Australia. I would suggest that you try to do a search on automotive Hood Hinge Repair and Restoration. It might be costly but then you will at least know that the hood will stay upright and not be of any issue. If you want to have an antique car then sometimes you have to pay an expert to do the work when you do not have the proper tools and work experience or even and proper way to work on the car safely. Just my $1.00 worth of input. Rich Hartung desoto1939@aol.com
-

41 Plymouth - any tips for removing side trim clips?
desoto1939 replied to 41 Plymouth Coupe's topic in P15-D24 Forum
Suggestion: Go to a good quality automotive paint supply store. Ask to see if they have a supply of plastic molding clips. Also take along one of your stainless steel moldings and then try to find one of the clips that will fit into the back of the molding. I did this with my 1939 Desoto. Reasons: 1. The old steel clips will rust and then the water when it runs down behind the trim will eventually leave rust markings on the paint. 2. Since the new clips are plastic they will not rust. 3. When pushing the clips and the molding back into the hole it will not chip the paint and or even send crack marks in the paint. 4. If you have to remove the molding at a later time the plastic clips will just comeout very nice and clean and its easier to remove the moldings. 5. No one even sees the clips so go with the modern clips. 6. Go to the web site for Restoration Supply in Windber PA. they have a great selection of plastic clips and they are a great company to work with for supplies. It might take an hour or two of your time to find the correct size plastic clips but it will make you reinstall much simpler. Rich Hartung Desoto1939@aol.com -
Basically all oil that is being sold in todays market, AutoZone, Walmart and other oil products sold on the web are detergent oil UNLESS the label states NON-DETERGENT. If you read your owners manual for your older car most stated to use 20 weight oil in winter and 30 weight oil in Summer. These oil were dinosour oils. Todays products are better in design because of the better refining and the additives. I currently use the Castrol Classic 20/50 weight oil in my rebuilt engine and is has one of the highest amt of ZDDP, Phosphorus and Boron in the mixture according to my discussion with the Castrol representative. THe blue bottler Walmart store brand is produced and bottled at several processing plants in hte USA and this same company bottles and produces the various major other brands. So if your car has a filter, By-pass or other you are good to go. If not then I would install one on your car and start running the car with a filter. By-Pass is better then none at all. The weight of the oil also depends on the age of the engine, condition od of the engine and where you are located and currently live in the USA. As suggested aboe go to the webpage and read the article on oil and you will learn alot about the oils and how they have changed. Rich Hartung Desoto1939@aol.com
-
One very important point regarding the oil pressure guage. Mopar used a very special nut with a compression fitting and the threads are 27 pitch. Yes this is correct. When you take out the metal line from the back of the oil guage DO NOT again DO NOT lose this metal line. It is needed to fit inside the oil gage and make a complete seal. These are very hard to find. The rubber flexible rubber hose threads into the end of the metal tube. Just want to give you this FYI. Most people try to replace the special connector and they throw the metal line and the special nut in the trash. Rich hartung Desoto1939@aol.com
-
in 1934 Desoto only made the airflow model. They did not have the airstream model which was a return back to the old style square bodied cars. The Coupe is also very rare. Few of these cars are known to exist. Rich Hartung Desoto1939@aol.com
-
on my unit there is a spring clip that hold the vacuum advance arm in place but it might not be necessay to have one in place. I looked in my 39 desoto parts book and there is no listing for a spring clip to hold the lever onto the stud. Rich Hartung desoto1939@aol.com
-
in Don smiths picture for all of the people that are installing a headliner you can see the metal brackets above each door that hoods the headliner tucked up under the doorframes. Some will have some very small teeth to grasp the headliner. Use a spackle blade maybe plastic so you do not discolor the headliner. I help the painter do mine on my 39 Desoto. Rich hartung desoto1939@aol.com
-
It all depends on if he is making the headliner from scratch, if he has a pattern to use, the material type and his labor. i got my headliner from Restoration supply in Windber Pa and it was perfect fit for my 1939 Desoto. Prices have gone up so you will have to ask around to several upholstery guys to get the price. Rich hartung Desoto1939@aol.com
-

Plymouth Passenger Car Parts List Model Series P15
desoto1939 replied to David T's topic in P15-D24 Forum
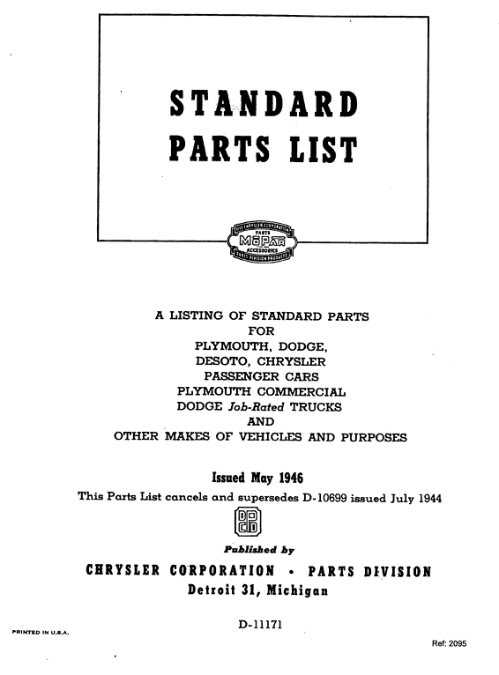
Here is the front page of the standard Mopa Parts reference catalog. I currently have this entire catalog scanned into my computer. Rich Hartung desto1939@aol.com -

Plymouth Passenger Car Parts List Model Series P15
desoto1939 replied to David T's topic in P15-D24 Forum
I also have the same standard parts book. I have a scanner and I also scan all of my catalogs when time permits. This way i have better access to the manual and it also saves wear and tear on my catalogs. Since I have scanned my catalogs it then provides me with the opportunity to cut out any single page and print it when someone needs that specific info or when I am looking for that part I can take it along with me to a swap meet. Rich Hartung desoto1939@aol.com -

Need help on how to use Miller Brake Gauge MT-19 tool kit.
desoto1939 replied to MarcDeSoto's topic in P15-D24 Forum
sam: Thank you for the full explanation of how you get the full diameter of the drum. I am not putting down the tool that was designed by Keith. If it works for you and everyone else that is great. Yes the tool price is a great purchase for the average day home mechanic. I originall purchased my Ammco brake tool that cam in the metal box for around $75 and then was able to get the Miller MT19 full set with the 7 sleeves for around $125 and then purchased the other brae tool the tru-brake shoe lining cutter for around $125. So I got all of the tools for a little over $300 as compared to $40-$600 at todays prices just for the Ammco tool. I do see guys on Ebay selling the AMMCO tool for $600-700. The person is buying up all of these tools when cheap and then jacking up the price and trying to make a killing on everyone he sells. As we can all see these high priced tools are still for sale by this seller. You can price yourself right out of the market. Since I do not need the new tool I was not knowledgeable of how the tool was designed to work and that is why I have asked the questions. Others might have the same question but no one ever stated how the tool was correctly used or even put and instruction sheet out into the technical section on the Forum. I have placed a long time ago how the Ammco and the Miller tools are used to let members know about the tool. Is anyone going to put out some information on how to use the newer tool? Thanks, Rich hartung desoto1939@aol.com -

Need help on how to use Miller Brake Gauge MT-19 tool kit.
desoto1939 replied to MarcDeSoto's topic in P15-D24 Forum
The correct way to use the Ammco tool is that yes you use the tool end with the dial and the other end with the rod and the flat spot fit on the inside lip of the drum. You then loosen the set screw on the dial end and rotate the dial until it does not move, Yes you have to be directly across the middle. Also remember that you now divide the reading on the dial, and lets say it is 40 which is 40 over. You then divide that in half and then set the dial at the 20 mark becasue you are only doing one shoe at a time. You then put the tool on the spindle or axle shaft shaft and then either use the half moon adjuster on the backing plate to move the top of the shoe out and according to your specs for your car the distance at the top to the rod is either 6 or 12 thousands, then do the same for the eccentric, You must know the correct spacing for the toe and heel for your car. You use a flat feeler gage to make the spacing. So again how did you determine the inside diameter of ther drum when the drum is off ther car. and to know when the shoes are set up properly. Please answer the question. I know a person that was using the tool you use and then found the Ammco tool and discovered that your tool was way off the mark and the Ammco tool gave him a proper set the first time. Rich hartung desoto1939@aol.com -

Need help on how to use Miller Brake Gauge MT-19 tool kit.
desoto1939 replied to MarcDeSoto's topic in P15-D24 Forum
Bacelaw: I have a question for you since you use the modern brake tool. i have both the Ammco Brake gage and he Miller MT19 brake gage and also the Miller Truebrake tool that uses the sleeves and then you can cut down the linings to fit the arc of the drums. My question that the Ammco and the Miller mT 19 both measure the diameter of the drum so that you can get the shoes properly set and so that you have the proper spacing at the toe and heel of each shoe. With the newer tool the drum is removed from the spindle and or the rear axle. So how do you measure the drum with your new and improved tool? I am still trying to fingure this out by looking at the tool. Can you explain how this tool is better than the Ammco or the factory Miller tool? Rich Hartung Desoto1939@aol.com -
go to the MOnroe shock webpage and do some searching on their site. I do know do a search around the 1946 years. All of the shocks that they say fit were good from approx 1939 up to in the 50's. Since you have put on 17 inch tires do sure if this will affect the length of travel that you will need on the shocks. Also you can get these shocks at good prices if you know the Monroe shock number. There is someone selling rear shocks a pair for over $300 on ebay that is highwasy robbery. I got fonts for the 39 Desoto and they were MOnroes froma Napa store for arounf $37-40 each. So I spent $75 and save $200 plus dollars and also shipping. So do your homework. Also how much play to you have in the steeringbox? This might also need to be rebuilt. Also rebuilding the upper and lower control arm bushing will also improve the handeling along with the alignment. Rich hartung Desoto1939@aol.com


