

desoto1939
-
Posts
5,103 -
Joined
-
Last visited
-
Days Won
59
Content Type
Links Directory
Profiles
Articles
Forums
Downloads
Store
Gallery
Blogs
Events
Everything posted by desoto1939
-
The information goes into the mid 1930 -around 1948 according to some of the dated sheets in the catalog.
-
I was just able to purchase off of Ebay in a leather bound binder the Chrysler Motor Standard Parts manual. This manual was published for the engineers and for also parts suppliers that has the spec's, such as bolt head diameter length of the shaft on the bolt the thread pitch and number of threads. I found a section on the welch plugs and it specs out the various sizes The overall diameter, thickness and radius. It even lists that these were steel, aluminum and brass plugs. I compared this info that my info in my 1929-1939 Desoto master parts manual and the part numbers also match up Another section I did a quick lookup was on Hose clamps and it shows in great detail the two styles of hose clamps that were used, split flat band and the two wire style and also details on each style and size. I purchased the book with shipping for $27. This is just a great example of the detail that all of the auto engineers used to get their parts manufacturer. I will post some screen shot of some of these pages. I am going to try to scan this manual and have it available if anyone wants copies. The first page is from the engineers manual and pages 2/3 are from the 1929-39 Desoto master parts manual. The first page provides more detail about each size plug. This is a great reference manual for me to use to inform other users of the correct smalls parts information. The binder has a serail number stamped into the binder 1582 and states that this manual is the property and is to be returned to the Chrysler Corp Engineering Department upon request. Rich hartung Desoto1939@aol.com Welsh Plugs.pdf
-
doug: I had to rebuild my original dizzy for my 39 Desoto over the winter. After taking it out of the car and putting in on a bench i discovered that I could move the came by pulling on it and then the points would open to the correct gap of 20. I had to install new bushings. check for any movement in the bushing and the side to side movement of the dizzy shaft. Just a thought. Rich Hartung
-
that will definitely affect the position of how the dizzy is installed in the block. Let us know after you have re-indexed the oil pump. Rich Hartung
-
greg: thanks for the information. I did a lookup on this topic. would having riveted lining also cause this issue? I would think to a lesser degree since the linings are not bonded to the metal shoe area. Also hard to believe that for almost 50 years we had drum brakes and then in the era around the 70's we started to go to disk brakes and it took that long to solve the issues. Rich Hartung
-
Bigbe60: I sent you a PM about the tools. Rich Hartung
-
doug: are you using the NICad tubing? Suggestion is when you are at the point of making a bend install some large grass triming cutting string usually plastic where the bend will be located and leave enough so you can pull the line out when done. This will keep the line from getting pinched and help make a smoother bend. Rich Hartung Desoto1939@aol.com
-
check for any scoring. Recommend that you just replace this wheel bearing assembly and also the races. Also check the other wheel bearings. These are cheap as compared to having a wheel lock up while driving and having a major accident and getting hurt or even killed because the car could not be controlled. Rich hartung
-

1952 cranbrook convertible top stopped working suddenly
desoto1939 replied to terry G's topic in P15-D24 Forum
since you state that the top need to be push or nudged to get the top to go down. The first thing I would check is to see is there is any loose connection in the arms and or any bent washers or anything else that might be causing the binding. Could also put some white lithium grease, lubriplate, at the points of on the metal frame. Start with this to determine where you are getting the binding it might just be something simple. Look for loose wire connections a the motor. Maybe disconnect the wires and clean the ends to make sure you have clean contacts and no crud on the connector. I own a hardtop so this is just some suggestions. Rich Hartung -
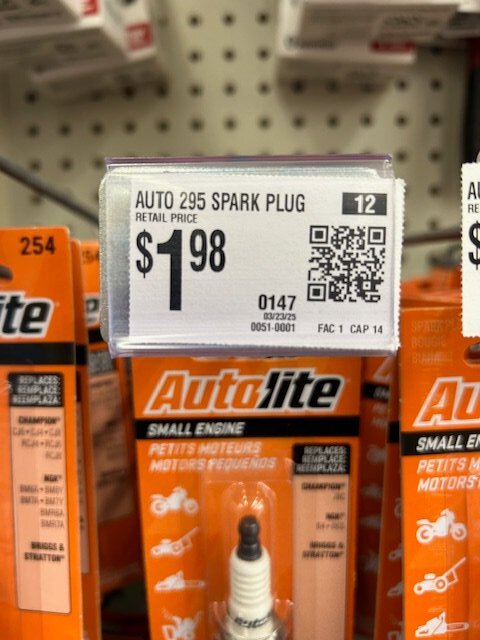
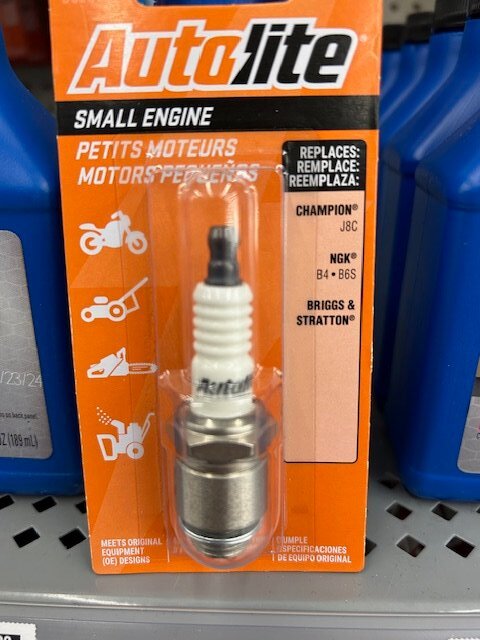
I know alot ow owners ask what plug to purchase for their old MoPar flathead engines. A friend of mine who also owns a 1939 Desoto which is a driver car and not an AACA show car let me know about these plugs. He also uses these in his engine without an issues. Walmart back in the auto section has a rack of various small engine plugs. They only charge $1.98 per plug versus these same plugs that are listed on Ebay and they are selling these same plugs for $8-12 each. You also save on shipping if you purchase at your local walmart. When looking at the package you will also note that they are a replacement plug for Champion J8 plugs that were also used in our MoPars. From some of my early cars catalogs the original Champion plug that was used is the J8C, but the J8 replaced the J8C at some point in time. These Autolite 295 Plugs do not have the black body and do not have the original hash markings, but the body is not chrome plated and give you the BLING look But when you can purchase 6 plugs for a little less than $12 plus tax these are a great buy. I keep six in my tool box in the trunk of my 39 Desoto as spares. Also of note that the older Autolite A9 plugs are getting harder to find, but when at a swap meet look at the end label on the autolite box and look for this number: A00-12405-A these are the A9 14m 3/8 reach. Just passing along information to the members. Refer to the attached pictures. Rich hartung desoto1939@aol.com
-
Borg and Beck / clutch release lever adjustment
desoto1939 replied to bellemecanique.ch's topic in P15-D24 Forum
Here is some information from my 1939 Desoto Clutch section from my service manual. I do have the Miller Pressure plate rebuilding tool with the various sleeves for setting up and rebuilding the PP. Looks like .005 inch clearance between. This is the best I can do and this is for a Borg&Beck PP. Rich Hartung desoto1939@aol.com USA all the way.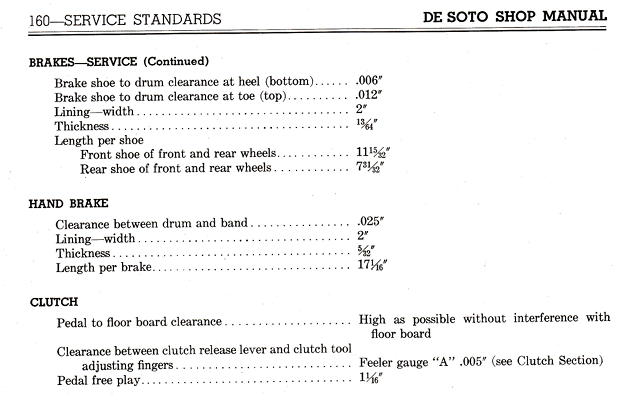
-
purchased two GE 4030 Sealed Beam 6volt headlight bulbs
desoto1939 replied to desoto1939's topic in P15-D24 Forum
So true even with todays owners of these modern cars. If we all went to the dealeship for every replacement item we would be paying so much extra for the parts. In todays word we go to the parts store, NAPA, Autozone and get a replacement part or a remanufactured part to keep the cost down to a reasonable cost, such as headlight replacement bulbs, oil for the engine and oil and air filters and even brake pads. Rich hartung -
purchased two GE 4030 Sealed Beam 6volt headlight bulbs
desoto1939 replied to desoto1939's topic in P15-D24 Forum
I have an old Atlas automotive supply catalog that lots of gas stations had in their station so that they could make repairs and order replacement parts. This catalog goes from around 1937 to mid 1950's. For the various cars it documents that starting in 1940 -1955 the replacement sealed beam headlights were the 4030 model that I have documented in the above posting. The only thing is that the MoPar car and trucks changed over to the Autolite Bullseye bulb in 1948-55 and these bulbs also did not have the aiming tips. So back then if you just had a car and the light burned out and you took it to a gas statio they would order a 4030 bulb and or if they had these instock they installed one and you were back on the road in about a 30 minute wait period. Most car owners were not picky about nor being an Autolite bulb but us collectors are when getting judge to be an authentic car. Rich Hartung desoto1939@aol.com -
purchased two GE 4030 Sealed Beam 6volt headlight bulbs
desoto1939 replied to desoto1939's topic in P15-D24 Forum
But here is the big issue. AACA permits the cars that are being judged for Junior 1st, 2nd and 3rd place trophies and also Senior 1st along with Grand National cars that should not have the lens with the nubs that they can pass the judges with these nubs. AACA standards are that are car is to be represented as if it just came off the showroom or dealers lot or backlot. I have brought this to the attention or the CEO Mr maskowitz about this issue. He could care less and stated that they do not know every car. Two years ago at the Hershey fall car show there was a 1951 Chrysler Royal 6 that had a recent Senior Grand National badge attached to the front of the car, BUT this car also had the incorrect headlight lens with the three nubs. Next to this same car was a 1950 Desoto that had the correct Autolite Bullseye bulbs and then down the row was a 1953 DeSoto that also had the correct bulbs. I pointed this out to Mr Maskowtiz. My point is that if the car is a Senior Grand National winner to me that tells me that the car has been judged by the most experience judged and have gone over the car with a fine tooth comb. Also since it is a senior Grand National the car owner then can increase the selling price. But a poor guy that does purchase the car would be paying top dollar for the car and would have incorrect parts on the car. The AACA judging standards have gone down hill so do not always thig that a judged car is correct and also far from being perfect. I also offered to come to the Hershey AACA headquarters and do a presentation on Headlights and also told this to Mr Moskwotz but he and the AACA have never answered my opportunity to educate them and to update their judging manual. But there profess to be the experts on judging of restored cars. Just posting the facts that I know and have first hand knowledge of seeing AACA judged vehicles. Rich hartung Desoto1939@aol.com -
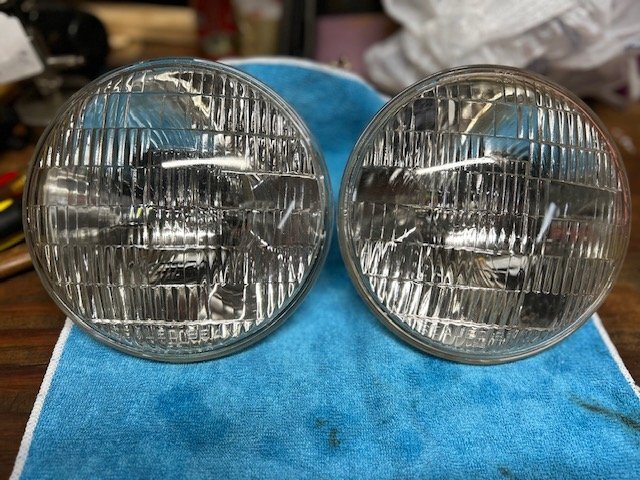
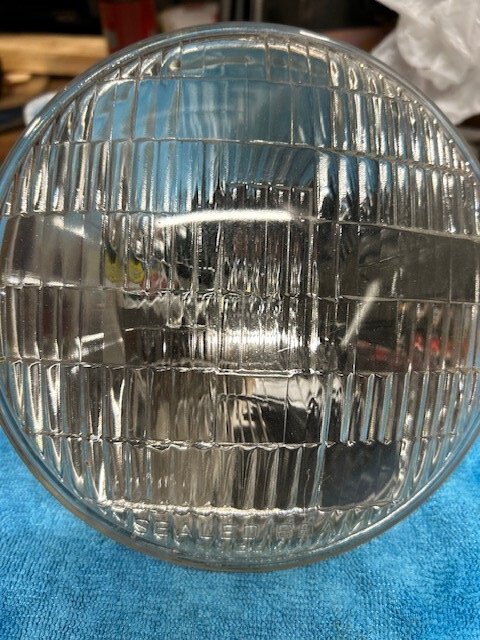
I went to a local swap meet held by the South Jersey AACA club on Sunday. There were a lot of venders. I was able to purchase two GE 6volt 4030 sealed beam headlight bulbs. Refer to the attached pictures. When looking at the front of the bulbs you will notice that there are NO alignment TIT molded into the front glass part of the bulb. Starting in 1940 the sealed beam bulbs did not have the aiming tips. The aiming tips started with the 6006 6v bulbs that were starting to be manufactured around 1955/56. Mopar used the 4030 bulb from 1940-1948 as standard equipment and then in 1949 -55 they used the Autolite Bullseye bulb. I came home and cleaned up the bulbs and tested them on my 6 battery tester and both low and high beams worked. So I am ready, if I ever want to convert my 39 Desoto over to sealed beams, but the conversion trim is totally different than the original rectangular trim. But at least i have the correct period correct bulbs and I also have the correct adapter and conversion sealed beam internal components for the car. Oh, and I only paid $5 for the two bulbs. Not to rub it in or not. Just wanted to provide some education if you have a mopar car/truck from 1940-48 so tha you can have the correct period headlight bulbs installed if you are going for points judging. I did a presentation at the National Desoto convention on headlight so this is how I can document what is and is not period correct. see the pictures below. Rich hartung Desoto1939@aol.com
-
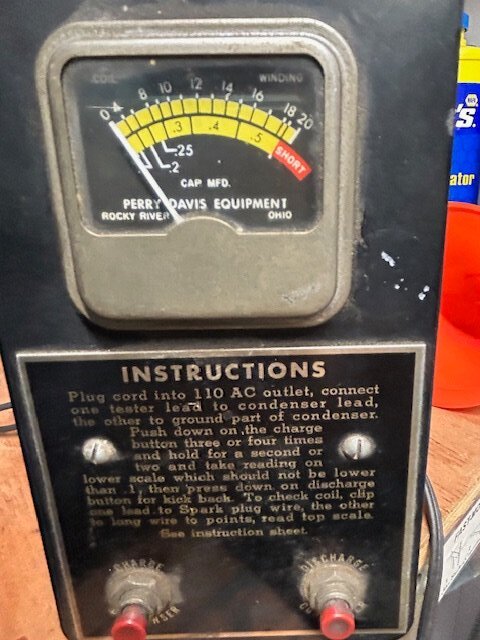
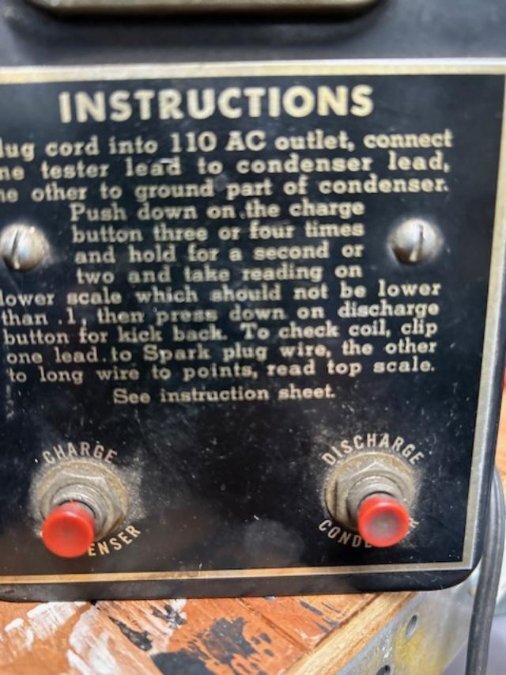
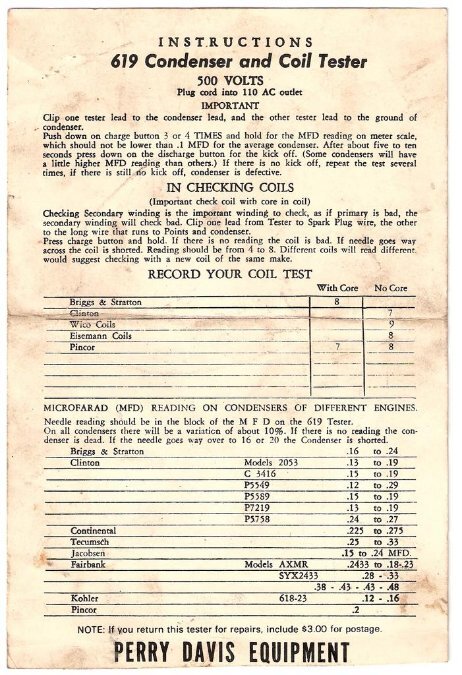
I went to a local swap meet held by the South Jersey AACA club on Sunday. There were a lot of venders. I was able to come home with three great purchases. 1st found a Perry Davis Coil and Condenser testing. I know how to work the condenser testing part. But, i can read the instructions on the front of the tester. I have a question regarding the testing of the coil You plug the tester into an electrical outlet. Connect one lead to a spark plug and the other lead to the wire coming from the coil which would be my postive wire going to the distributor. Then i assume you should get a reading on the upper scale on the tool. When testing a condenser you have to press the charge button on the left get the reading for the MF, Micro Ferrets reading then discharge the condenser. But when testing the coil do I have to do the same process or not and also does the ignition switch need to be turned on so that the current is now completing the circuit from the coil through the distributor to the spark plugs. I want to make sure I have this setup correctly and then do not want to destroy any of the electrical parts and the original coil that is in the firewall. I have never done this test so trying to figure out how to properly perform the test safely. I purchased the tool for $10. Not a lot of money for a diagnostic tool. refer to the attached pictures of the tool and the instructions on the tool. Any help is appreciated. After getting the tool to work I will post pictures of the readings that I get on my 39 Desoto. Did a search and found an instruction sheet on the coil tester. Hook up the two leads and then depress the charge button to get your reading on the scale. But nothing stating to turn on ignition and or to depress the discharge button. What is everyones opinion.

- 1 reply
-
- 1
-

-
Doug: Glad you figured out the issue. So what fuel pump number solved the issue? Hey are you planning to be coming to Hershey this fall, if you do please stop by our vendor spot at OAD 7&8. Looking forward to seeing you again. Rich Hartung desoto1939@aol.com
-
in your car if the car was made in the US it will have the 23 inch block and head. So are you wanting to go to the bigger 25 inch block and engine that were used in the Chrylser/Desoto cars? If you go this route then you might have a very tight fitment issue. Rich Hartung Desoto1939@aol.com
-
Sonny: Have you removed the top of the carb to verify that gas is getting into the bowel and that there is no sediment or dirt in the bowel of the carb. If the move the throttle linkage does gas squirt down the body of the carb. Coulb also be a stuck needle valve that operates the float. Also check the float to make sure it does not have any holes. Would the car also need a ballast resister since now going to 12 volt? Rich Hartung desoto1939@aol.com
-
If looking at the post above this one and refer to number 13 you will notice that the vibration dampener and the pully can come as a complete unit. refer to number 47 on the grid below. The numbers on my grid are also factory number and come from a Mopar vender Tristate catalog that the Mopar supliers used and is the same as the michell catalog number. When I replace the vibration Dampener and pully is was a single unit that already had the hub on the unit. Rich hartung Desoto1939@aol.com

-
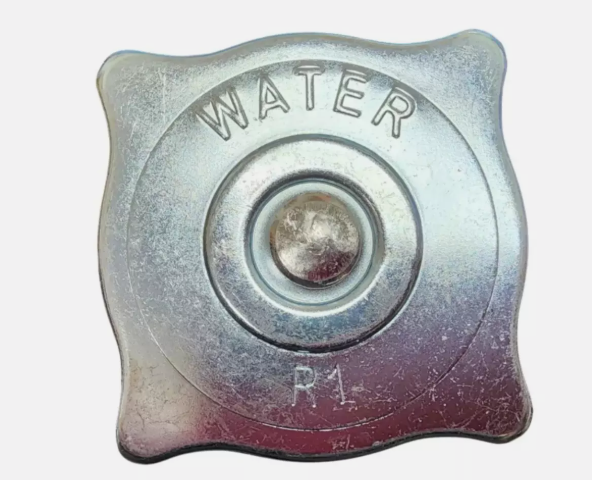
You will use an r-1 radiator cap if you still have the original radiator. here is a picture of the cap. Rich hartung desoto1939@aol.com
-
You are correct that you DO NOT use a pressure cap on the radiator. The radiator should have an overflow tube and these older systems are self leveling. Fill the rad with water and then run the car until it gets up to temperature. The rad will burb out the excess water and it seeks its own level which willbe approx 1 inch down from the top, just keep it maintained at that level, sorry, we are not metric here in the states, and we drive on the right and not left side of the road, just kidding
-
Here is a page from my tristate mopar venders catalog on the vibration dampener. Hope this helps you. Rich hartung desoto1939@aol.com
-
I sent you a PM and I have the kits and housings for the 40 Plymouth. Rich Hartung
-
I am looking at maybe purchasing a 1956 Dodge Coronet Coupe with the V8 engine. The car is yellow and white combination. Interior is very good. overall body condition is very good no cancer from the pictures. Chrome looks great and would make a great diver car and also being 12 volts. What are some of the areas that i should be concerned about, Trans, rear, engine, etc. Looking for input prior to making an offer or even considering the car. Thanks for any input. Rich hartung desoto1939@aol.com
