

desoto1939
-
Posts
5,104 -
Joined
-
Last visited
-
Days Won
59
Everything posted by desoto1939
-

Plymouth Passenger Car Parts List Model Series P15
desoto1939 replied to David T's topic in P15-D24 Forum
I also have the same standard parts book. I have a scanner and I also scan all of my catalogs when time permits. This way i have better access to the manual and it also saves wear and tear on my catalogs. Since I have scanned my catalogs it then provides me with the opportunity to cut out any single page and print it when someone needs that specific info or when I am looking for that part I can take it along with me to a swap meet. Rich Hartung desoto1939@aol.com -
Need help on how to use Miller Brake Gauge MT-19 tool kit.
desoto1939 replied to MarcDeSoto's topic in P15-D24 Forum
sam: Thank you for the full explanation of how you get the full diameter of the drum. I am not putting down the tool that was designed by Keith. If it works for you and everyone else that is great. Yes the tool price is a great purchase for the average day home mechanic. I originall purchased my Ammco brake tool that cam in the metal box for around $75 and then was able to get the Miller MT19 full set with the 7 sleeves for around $125 and then purchased the other brae tool the tru-brake shoe lining cutter for around $125. So I got all of the tools for a little over $300 as compared to $40-$600 at todays prices just for the Ammco tool. I do see guys on Ebay selling the AMMCO tool for $600-700. The person is buying up all of these tools when cheap and then jacking up the price and trying to make a killing on everyone he sells. As we can all see these high priced tools are still for sale by this seller. You can price yourself right out of the market. Since I do not need the new tool I was not knowledgeable of how the tool was designed to work and that is why I have asked the questions. Others might have the same question but no one ever stated how the tool was correctly used or even put and instruction sheet out into the technical section on the Forum. I have placed a long time ago how the Ammco and the Miller tools are used to let members know about the tool. Is anyone going to put out some information on how to use the newer tool? Thanks, Rich hartung desoto1939@aol.com -
Need help on how to use Miller Brake Gauge MT-19 tool kit.
desoto1939 replied to MarcDeSoto's topic in P15-D24 Forum
The correct way to use the Ammco tool is that yes you use the tool end with the dial and the other end with the rod and the flat spot fit on the inside lip of the drum. You then loosen the set screw on the dial end and rotate the dial until it does not move, Yes you have to be directly across the middle. Also remember that you now divide the reading on the dial, and lets say it is 40 which is 40 over. You then divide that in half and then set the dial at the 20 mark becasue you are only doing one shoe at a time. You then put the tool on the spindle or axle shaft shaft and then either use the half moon adjuster on the backing plate to move the top of the shoe out and according to your specs for your car the distance at the top to the rod is either 6 or 12 thousands, then do the same for the eccentric, You must know the correct spacing for the toe and heel for your car. You use a flat feeler gage to make the spacing. So again how did you determine the inside diameter of ther drum when the drum is off ther car. and to know when the shoes are set up properly. Please answer the question. I know a person that was using the tool you use and then found the Ammco tool and discovered that your tool was way off the mark and the Ammco tool gave him a proper set the first time. Rich hartung desoto1939@aol.com -
Need help on how to use Miller Brake Gauge MT-19 tool kit.
desoto1939 replied to MarcDeSoto's topic in P15-D24 Forum
Bacelaw: I have a question for you since you use the modern brake tool. i have both the Ammco Brake gage and he Miller MT19 brake gage and also the Miller Truebrake tool that uses the sleeves and then you can cut down the linings to fit the arc of the drums. My question that the Ammco and the Miller mT 19 both measure the diameter of the drum so that you can get the shoes properly set and so that you have the proper spacing at the toe and heel of each shoe. With the newer tool the drum is removed from the spindle and or the rear axle. So how do you measure the drum with your new and improved tool? I am still trying to fingure this out by looking at the tool. Can you explain how this tool is better than the Ammco or the factory Miller tool? Rich Hartung Desoto1939@aol.com -
go to the MOnroe shock webpage and do some searching on their site. I do know do a search around the 1946 years. All of the shocks that they say fit were good from approx 1939 up to in the 50's. Since you have put on 17 inch tires do sure if this will affect the length of travel that you will need on the shocks. Also you can get these shocks at good prices if you know the Monroe shock number. There is someone selling rear shocks a pair for over $300 on ebay that is highwasy robbery. I got fonts for the 39 Desoto and they were MOnroes froma Napa store for arounf $37-40 each. So I spent $75 and save $200 plus dollars and also shipping. So do your homework. Also how much play to you have in the steeringbox? This might also need to be rebuilt. Also rebuilding the upper and lower control arm bushing will also improve the handeling along with the alignment. Rich hartung Desoto1939@aol.com
-
when you do the next waxing of the car. Get some clay bar and then clean off all of the road containments. Use a micro fiber towel. I use a detailers spray as th eliquid to make the claybar remove the material. Then when applying the was do not go in circuar motions apply the was ina linear fashion like would do when sanding a board. go with the the grain or how you would look at the hood from sitting in the car. So front to back of the hood. Also take off the wax in the same manner. Do this same thing with all body parts of the car. Also remove the tag on the micro fiber cloth. Never use a dish detergent to clean the car, it removes the grease and or wax. Rich Hartung Desoto1939@aol.com
-
Loren: I had an issue where I could not get my carb and my 39 desoto to idle properly. I took my original carb and a couple of replacements and a NOS replacement carb to a Carb rebuilder. Put the old carb on his engine and it imediatle flooded his engine. Then put on the NOS one and it ran perfectly with a little adjustment. When I had the old carb off the maniflod i had noticed that there was raw fuel in the intake maniflod of approc 1/8-1/4 inch of fuel. This was an idication that the carb was flooding and after running the car in the summer it was alwasy so hard to restart a hot engine. Thought it was the ethanol gas issue. When I toke the old carb apart and rebuilding it I picked up the float and shook it and noticed a clunking feeling in the float. There was gas in the float. So this was making the level in the bowel seem to be alwasys wanting more gas and was flooding the carb and this did not permit the fuel to vaporize to get the car started whn hot. Problem has been solved for my 39 Desoto. Rich hartung desoto1939@aol.com
-
with the coil in the firewall and the armored cable that connects to the back of the coil it sort of was an early theft prevention setup since would would have to cut the armored cable to jump the ignition wires. They did find that this made it harder to start because of the extra length of wiring going to the dizzy. They then did move the coil down onto the bracket mounted on the side of the head. Rich Hartung desoto1939@aol.com
-
Here is a page from my 34-41 Miller tool catalog; I does show that they did have drive in style zerk fitting both for straight and angled fitting. tool number d-437 Rich Hartung desoto1939@aol.com

-
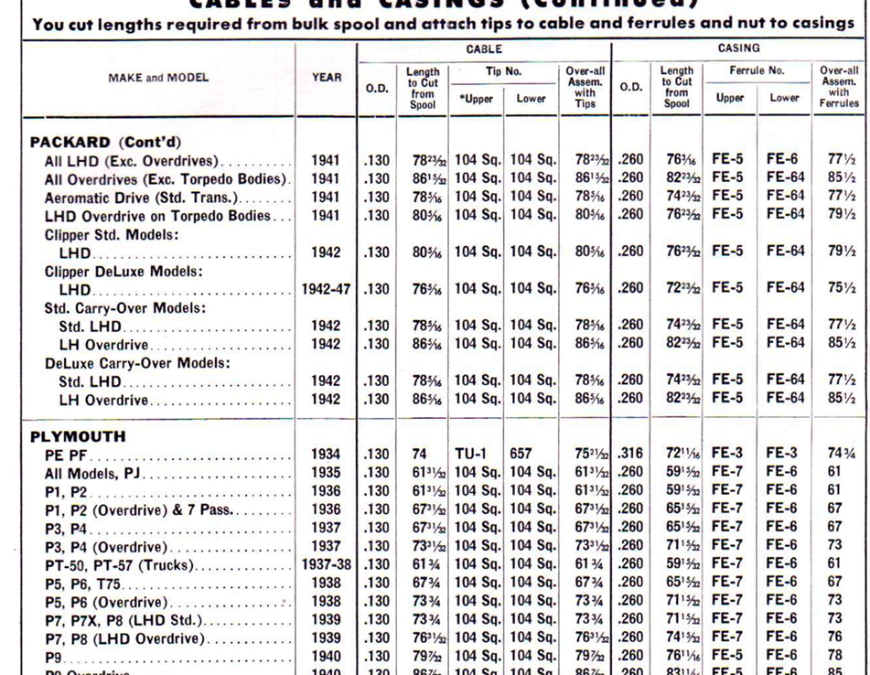
Here is some info taken from my speedometer cable catalog. This was taken from my AC speedometer catalog. Hope it helps. Rich Hartung desoto1939@aol.com

-
when you register for the Hershey event they remind you that everyone should have a PA sales tax number and that you should write your PA sale Tax id number on the registration form. I have know that the PA revenue has been at Hershey but I think over the years they go after the real big venders that make their living off of selling parts such as Cocker tires and other big venders. If you do not have a visible license they then can shut you down or ask that you file a report on what you sold. I know most small time venders do not charge PA 6% sales tax. Rich Hartung
-
I agree. But how many people here have yard sales and only do cash sales. So in the same vein this should also be counted as income. I can say that most home owners have done a yard sale or a community yard sale. Rich Hartung
-
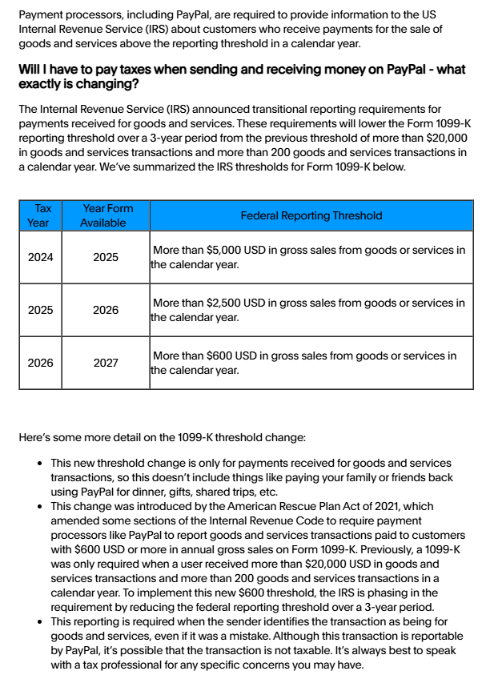
I know this is not a regulat topic but will also affect every member of the club and anyone that sells items via a webpage provider. Please go to the article and read the information that I posted. I am not a tax preparer but jus posting the information. Please do not take this posting down it is for informational purposes for the members. Thanks, Rich Hartung desoto1939@aol.com
-
I have attached an information sheet that I received from Pay Pal regarding the dollar amount of sales that will be reported to the IRS for 2025, 2026 and 2027. So of the biggest sellers might get hit with a 1099-k form. SO make sure you track your sales, the cost of each item that initially it cost you, travel cost and any other expenses to purchase the item along with postage to ship the item food and also lodging cost. Like traveling to Hershey, the cost of a vendor site, etc. The Fed Gov't needs money so they are going after every $$$$$$$$ than they can get their hands on. So starting in 2025 I would suggest that you only deal in cash, money orders or personal check or a bank check. Do you own research on this information Rich hartung.
-
I agree with Tom, Since you do not know when you are going to use the engine, and maybe never, Definately use penetrating oil in the engine. If it was me I would try to get the engine into your heated basement to also help eliminate any moisture and also the heated area of the basement will help with preventing any rust. Then every several months then go down and had turn over the engine to keep the cylinder walls lubricated. Maybe put in some used sparkplugs or plugs the holes. If the holes are pluged then remove the plugs before you try to turnover the engine while in storage. Could also put in a use head gasket without any gasket sealer and thne tighen the head but to to full spec's just to seal the head and also lessen any rust issues. If the head is tight you can always remove the head to check on the wals of the cylinders every so often. But good plans or mice and men go astray. Also I would not wrap the engine in plastic because that kind of traps moisture, maybe a breathable cover like a blanket. Rich Desoto1939@aol.com
-
If have an Autolite IGS4102-c original dist in my 39 Desoto. I pull the dist and replaced the breaker plate with a NOS unit. Set up the points to a 20 gap with a snap gap tool. Then when testing the gap at each point on the dist cam I am noticing that on some points on the cam the points are not opening or are smaller than the 20 gap. Has anyone else had an issue like this. The dist shaft is nice and tight no slop, no slop in the breaker plate. Could i have a worn spot on the cam. Since most 6 cylinder Mopar car/trucks used the Autolite dist would anybody know if another cam from a later autolite dist would work as a replacement cam? My Autolite catalogs do not list this part so i can not do any cross checking. Any and all help appreciated. I have put out swome fellers to several of the major Mopar parts venders. Thanks, Rich Hartung desoto1939@aol.com
-
Solly: Remember that you will not get a real hard pedal like to now have on your modern cars. There is always some travel distance when applying the brake pedal and how the pushrod moves. Before making any adjustment on the pushrod please refer to your factory service manual in the brake section. It will tell you the distance of the free play for your car. Also remember that you are dealing with a braking system that was designed in the early 1930's. You have to have a mindset of this when driving your car now in the modern times and the reaction of brake fade in these old cars is a known factor. I have a 39 Desoto with the 11 inch brakes. Yes, I can stop my car but I always anticipate a potential stop when approaching an intersection that is controlled by traffic light. When approaching a light and it is green and I see a bunch of cars coming towards me in a group then I assume? that the light has recently turned green for my oncoming traffic. If there is a lot of space between the cars or only a single car in a row then I assume, Again, that the light will be turning to yellow and then to red. You always have to have your mind and driving skills in tune with the od antique car and how it reacts to your driving and to the appropriate driving situation. Rich Hartung desoto1939@aol.com
-
since we assume that the car either has been repainted or not the original color black that is on the car currently has faded over the years because if was probably as single stage paint and they did not use any clear coat. People think that black is black, but this is not correct. When they mix paint colors to get to a specific color there is a mix ratio. A rattle can of black might work but suggest that you try this on something then compare the color. Also you should strip the old wax off the metal that you are going to respray, if not then the new paint might not be smooth because of the oil and wax on the metal. Talk to a body shop guy to get their opinion on how to match the color. Rich Hartung Desoto1939@aol.com
-
I had a very small leak at one of my bleeder screws on my right rear brake. I found out that the taper on the end of the bleder screw was not the correct taper and that the fluid would then work its way out via the threads of the bleeder screw. I was able to find the correct bleeder screw and this solved my problem. saw a wet spot on the backer plate and had to look hard to find the issue but i found it. Take a look around the brake hose and also bleeder screw. Rich Hartung desoto1939@aol.com
-
Sounds like brake shoes out of adjustment and the shoes and not close enough to the drum. Do you have access to an Ammco 1750 Brake gage to get them set up correctly? This tool is not cheap but if you plan to keepthe car this one of the tools that you will need to purchase or even borrow if you can to get the shoes adjusted properly. Also go the technical section and do a search on the Ammco brake gage tool. i have done several seminars about this tool. Rich Hartung desoto1939@aol.com
-
Bad brake master cylinder lead to brake switch not working?
desoto1939 replied to dsapern's topic in P15-D24 Forum
Also when replacing the brake light switch, mechanical one not electric. I also block up and support the brake pedal arm so that the pedal can not get pushed down and then release brake fluid and then let air enter the brake lines. My brake switch on my 39 desoto screws into a brake line and brake light brass connector that is mounted on the frame in the engine compartment area. Some of the older master cylinder had the brake switch mounted on the end of the master cylinder. Not sure of where yours is mounted. Like stated above if you touch the two wires that go in to the switch and your brake lights light up then you have a complete circuit. If not, then there is an eclectic power issue. So the Master cylinder could also be low on fluid and not enough fluid is being pushed through the line to push the internal contact to activate the connection to make the brake light come on. Very simple switch when you think about how it works. Rich hartung Rich Hartung -
Farmer John: yes you are correct with your statement. I missed adding in the 0 for the example. so in my example the correct measurement is 11.010 or then thousandths over. If I do go through with this idea I would create a form and instruction sheet along with an area for the mechanic to write in the appropriate information. Rich Hartung
-
It would be the responsibility of the owner of the car to get each drum micro metered to know the exact diameter f the, Example 11.10 11 inchs and 10 thousandths over. Then send me the respective shoes for each drum indicating where they are located on the car. Example Right Rear 11.20 then label the right rear shoes with this information then do the same for the left rear according to the measurement of the left drum. The owner ships the brake shoes to me at their cost. I cut the linings according to the supplied information. I then send the shoes back to them at their cost, maybe in a USPO if it fits it ships. Then I charge them for the service $20 for all four shoes or $10 for one side. There are not many places that even have the tool to cam-grind the shoes and very few people that even know how to do this work. Rich Hartung
-
OK: I have a question for the members. I have an opportunity to purchase an AMMCO Safe Arc cam brake shoe grinder, that I have seen and know the motor works and is complete along with the Ammco Brake 1750 brake gage tool. The owner is local to me and has offered the tools at $500 for both as a set. I currently have a 1750 ammco brake tool and also the factory Miller brake setting tool MT-19 and the miller Tru-brake tool that uses the adapters parts so that you can also arc the shoes when the shoes are on each axle. I also have the Ammco Micrometer 16 inch tool to take an exact measurement on the inside diameter of each drum and also the metal bar that is used to setup the tool so that the gage is set to tell you the correct diameter of a drum. SO I know I can sell the extra ammco brake gage tool and this will lower my total cost. I also have the instruction manual of the Ammco safe Arc tool. Figure that i could also let owners with drum brakes know that i Have the arcing tool and then make some cash to help payoff the tool. What would everyone think would be a fait price to charge for a complete axle set of four shoes? Also have to consider that the owner would have to pay shipping both ways to send/receive back the four shoes. I was figuring around $20 for a complete axle set??????? Need input on this entire idea. It not like I have to have the tools but these tools are hard to find and I can get the tools locally and not have to deal with any shipping fees especailly on the safe arc tool which is very heavy. All input and replies are welcome. Rich hartung desoto1939@aol.com
-
they used a Gland Nut to thread into the side of the head. It is a brass nut and then the tube from the end of the mechanical temp gage threads into the gland nut. Also notice the welsh plug directly above the gland nut. If you have to remove the bulb from the gland nut they ususualy get stuck in the glad nut. By twisting the tube you might break the bulb and then it is a pain to replace the entire temp gage and also costly. SO, Drain the engine then pull out the welsh or otherwise known as freeze plug. You will then see the end of the tube inthe opening. Spay lot of PB Blaster in the area and let is soak over night. Then take a soft mallet and then try to tap out the bulb from the inside of the hole take you time, might have to respray more PB Blaster to loosen up the tube or you might get lucky and it will pop out. Clean around the opening put in some sealing material and then put in a Brass Welsh plug. Open the attachment with pictures and this will make it easier to understand the process. The little nut next to number 6 sparkplug is used to time the engine. Rich Hartung How to safely remove the temp gage end from the side of the engine head.docx

