


Sniper
-
Posts
6,303 -
Joined
-
Last visited
-
Days Won
141
Everything posted by Sniper
-
I think my problem is I can't see paying $70 for the kit when I could buy the equivalent of 4 kits for that money going with the Dorman stuff. Thanks to the help here and some research on my own I have numbers for the studs, washers and brass nuts except the conical stuff. If I find a source I will share it. I still have the conical nuts and washers on my current manifold. So I could recycle those, but like the boneyard donors they'd be ugly looking when all the other hardware is new. I suppose I could sand blast them, but I need a sand blaster. Then I would also need a compressor big enough to feed the sandblaster. Of course I'd need a new electrical line run to supply the compressor at which the inspector will want, at the very least, the feed to my house brought up to current code and knowing my luck the breaker panel and house wiring too. At that point I may as well just spend the $70 for the kit. It's a vicious cycle. All my Plymouth money is currently earmarked for other things and I don't have an endowment, lol. Now if only Ed McMahon would deliver my check I'd be set.
-
Thank you very much. Did you manage to find a source for the conical washers and nuts? I was looking at McMaster Carr the other day and wasn't finding what I needed there. Thanks again
-
supposed to be another batch in "late January". One Ebay, user name eastcheam842 I have a set of his finned sidecovers enroute as we speak.
-
In line for a Thickstun dual 1bbl intake. It looks like it's a better design that the Offy stuff. Thanks for the info. Any idea on the long studs?
-
These guys sell the lenses, maybe they have a gasket or a source https://www.moparmall.com/1951-1952-Plymouth-Parking-Light-lamp-Lens-1345479-p/822-542(x2).htm
-
dielectric grease is an insulator so make sure you get a good mechanical connection.
-
I am going to go to a set of Landon's manifolds as well, do you recall the specifications of the studs you used? I'd like to have them on hand before I start.
-
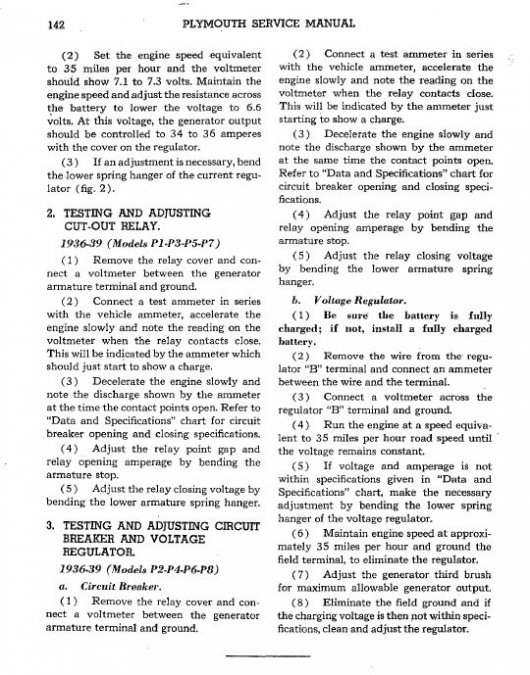
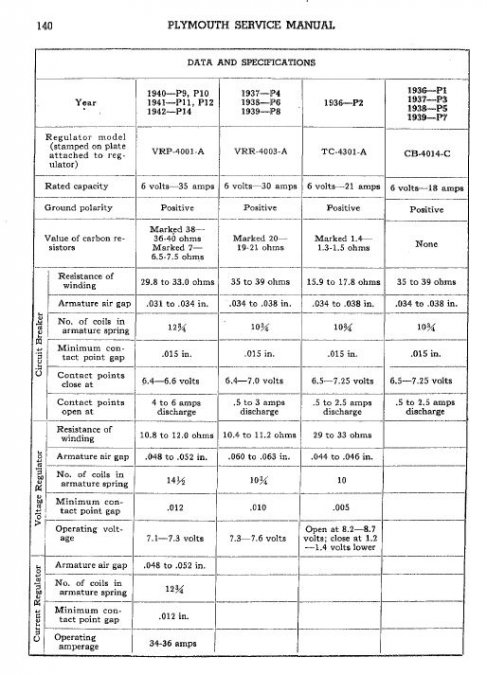
At idle is when a generator is at it's least capable. You realize the cut out relay and all of the relays are adjustable? Not sure I like the diode setup, no idea what they were trying to do with it. Thinking on it and seeing what it replaced, it looks like those diode are just telling the generator to always charge since they replaced the voltage regulator relay. Attached are the adjustment procedures out of my 37 Plymouth service manual.

-
Make sure you double check the plug wire connections on each end. Sometime they like to pop off if you don't "burp" them during installation. You essentially squeeze/pinch the boot to release any trapped air as you are installing he wires.
-
Unless you trim the bump stops the housing will hit those before the shock bottoms out. No different that filling up car with enough weight to drop the rear 2". It'll hit the stops first. So stock shocks ought to be fine.
-
You need to measure the voltage at the battery with the engine running. Also, observe the ammeter needle when you first start it, it should swing towards the + side. I also suggest getting a service manual, it won't have everything but with that and the folks here you should be covered. https://www.rockauto.com/en/catalog/plymouth,1952,cranbrook,3.6l+218cid+l6,1349872,literature,repair+manual,10335
-
The snout of that hub looks like it has one gnarly crack in it?
-
I am thinking on pulling the engine out of my 51 for a reseal as well. The service manual is surprisingly empty on how to do that. I do plan to clean the engine compartment while I have it out. It's not bad, but still.
-
He has a ton of other videos, some of them on how to make 3D panels.
-
3/16 works out to a #10. https://www.boltdepot.com/fastener-information/machine-screws/machine-screw-diameter.aspx Either 10-32 or 10-24 as the two most common ones.
-
True, I don't run the non-ethanol fuel. I just run Shell regular unleaded with "up to 10% ethanol". I wonder if stepping down a level on the thermostat rating would help?
-
Did you mean to say you need 5/16" not 3/16"?
-
I can get unleaded without ethanol around here too. I don't run it though, is that what you are running? I think my thermostat is a 160 one as my car never gets much above that. What's your thermostat?
-
I just watched some videos on this, it was very interesting. Here's the link
-
nice
-

I'm ready to buy disc brakes and master cylinder.
Sniper replied to 48ply1stcar's topic in P15-D24 Forum
In this case track refers to the distance between the tires, not how it goes down the road. -
Doesn't work like that at all. Go read up on thermodynamics and heat transfer. But to sum up, Newton's law of cooling states that the rate of heat loss of a body is directly proportional to the difference in the temperatures between the body and its surroundings. Time is immaterial, faster water flow promotes more turbulence that allows the coolant to be as fully exposed to the heat source (engine) and the heat exchanger (radiator) as is reasonable within the constraints of the system.
-
Only time I ever tried to solder a radiator is was a leaky seam, between the top tank and the core, I ended up chasing solder around the seam trying to seal it. Ended up closing the gap with some epoxy. It was a brass radiator, if yours is brass it can be soldered, clean it well first. Solder doesn't stick to gunk and have flux handy.
-
I just retorqued my head, pretty sure the spec was 70 ft/lbs.
-
You'll pinch the hose and damage it. Not something you want to do in a system that can generate 1000+psi. Unless you are already planning on a new hose.
