-
Posts
507 -
Joined
-
Last visited
-
Days Won
2
Content Type
Links Directory
Profiles
Articles
Forums
Downloads
Store
Gallery
Blogs
Events
Everything posted by Veemoney
-
What you say when you see a bunch of lawyers and politicians up to their chins in cement. We need more cement! I heard this the other day on the show I was watching.
-
I think those lights with the LEDs pointing down rather than some down and some at angles out would work nicely. My walls are 10ft which is my ceiling height. I started with 4ft LED bulbs and used my old fluorescent fixture with the transformers removed. The bulbs I originally purchased were the clear unfiltered LEDs, I put up a few and they had me seeing spots because 10ft ceiling wasn't tall enough for them. I exchanged them for ones with a frosted diffuser and that worked out nicely for my set-up. Had the same issue with one of the corncob style LED bulbs I used in an outside streetlight style fixture up about 14ft up. A portion of that bulb stuck out past the bottom of the fixture and did me the same way so went with a smaller version of that style bulb that did not protrude past the plastic diffuser. I wouldn't look directly at the bulbs, but they were in my periphery, I guess.
-

Is 1940 powerwagon windshield frame same as Fargo?
Veemoney replied to harmony's topic in Mopar Flathead Truck Forum
Here is a replacement unit to give you an idea of what it looks like when not under the dash. New Replacement Closed-Cab Power Wagon Windshield Regulator - CC797133 – Vintage Power Wagons -
I hate when that happens. I started my fall/winter rearrangement as well. Sold some items on FB Marketplace and was doing good then bought some other items. I used to put the 2-wheeled items side by side like you have in the picture. Then tried end to end along the walls. Finally purchased some pallet racketing that I modified for my space to allow stacking those items higher. I also put in a full floor at the ceiling of the shop for additional storage above with big access doors. Bottom line is every time I made some space I filled it. It's in my blood.
-

Well gentleman I did it and she's home 1934 Plymouth PE business coupe
Veemoney replied to Solly's topic in P15-D24 Forum
Very clean and nicely done. Perfect time of the year in AZ to do some test drives and work out any issues. I worked out west of Goodyear and would take my motorcycle on I-10 to Tempe and man that pavement stays hot all night long in the summer. -
Interesting project.
-
Nice progress. Do the front wheels have enough clearance, so they won't rub when cornering? Car is looking good.
-
Congrats on the new purchase and future mancave. Shops fill up fast and never seam big enough, good planning and organization now during the build will help make the most of any size shop.
-
Now that is cool.
-

A833 transmission for my flathead
Veemoney replied to Tony_Urwin's topic in Mopar Flathead Truck Forum
I put a 3.54 gear in my truck that has the stock 4-speed. I take off in 2nd now all the time and start in 3rd on occasion. Before with a 4.10 rear gear I started off in 3rd all the time. Tires are 225x70x16. For my set-up I feel a 3.23 would be ideal but want to keep my stock housing so I am content for now. Drove it for years with the 4.10 gear though. -
It looks very well cared for and from your discussion details, the person you are acquiring it from sounds like a very conscience's person. Nice find
-
On my 2010 Ram 1500 I had problems with the front brakes dragging. Things must of been good for short trips around town but a few miles more and I could smell the smell of the hot pads and that is when I noticed the problem. Replaced the pads, spring buffers and fluid, cycled the calipers to confirm they were moving freely, and the problem appeared again. I found out about the inconsistencies with the remanufactured calipers from threads on the internet. The problem with the calipers if your hard parts are in good shape is to replace the single O-ring in these calipers. They are just a few bucks for the kit and easily installed and comes with the new boot. The O-ring is round but it's profile is square. It is the square edges that grasp the piston as it is pushed out and pulls it back. As the corners of the square O-ring wear and round they no long grasp the piston as well. I like the Sil-glide product as well.
-
I was afraid of that as well. Now by trying to fix one problem you will be creating another. Meaning to clean up the scratches and lines in the cylinder your opening up the bore size to a point your piston has to much clearance all around and you will then have some piston slap and poor ring seal. Best check your bore size and piston size before moving forward to see what cylinder wall clearance you have at this point.
-
Tragedy, just hope he had insurance to cover some of that loss. Well worth saving. They make plenty of parts for restoring that body style. I had a large ash tree the emerald ash borers took over in the far corner of my property. No danger to the house or anything other than me when I mow the grass. I was able to get the electric company to take it down and haul it away since some power lines were nearby. I still get to look at the big stump though.
-
Mertz, I sent you the PM. Hope it helps
-
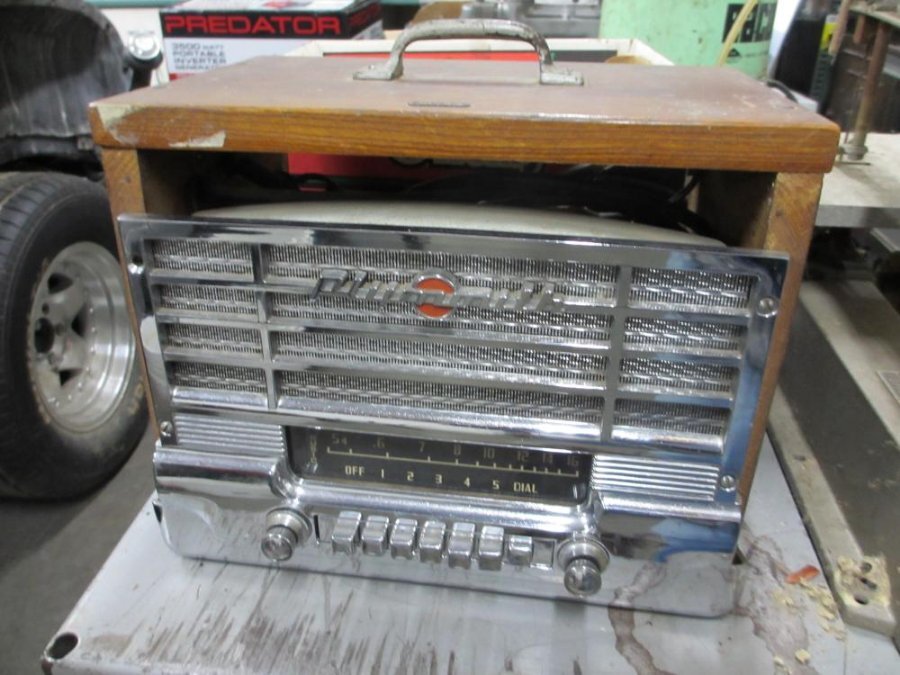
looks similar to this unit been sitting on the shelf for about 18years. never gave it a try. Someone took the time to install it in a wood box with carry handle. I picked it up at a swap. Glad to see folks still getting these up and running.
-
-
Devil is in the details. You haven't provided any details on what you're calling a gouge. A picture and measuring the length width and depth would help since you provided mic readings for the bores but nothing for the gouge to determine if this is more of a scratch than a gouge. Based on the wet compression numbers coming up to match the other cylinders I assumed it to be not so bad and could be used as is. If you decide to hone it measuring the depth will help determine how much you would need to hone to clean up (figure twice the depth of the gouge if it works out evenly during honing), The hone finds the best center for what is left there. Once the head is milled it could be swapped to the other motor if down the road you decide to rebuild that one. Also the cam profile is likely better to in the motor your running.
-
The sides of the cylinder wall are thrust surfaces as the piston goes up and down and also the way the piston is made it will show on the piston skirt in the same locations. Probably not far off from stock with the exception of number 4 for that motor. Do you drive the car pretty regular or is it possibly cylinder 3,4,5 have some rings sticking issues that may benefit from some seafoam soak or marvelous mystery oil. Since you planned on doing the valves and the head is off proceed as planned and also get the head shaved .050-.060". With your compression numbers the head is likely never been cut and that will bump the compression up across all the cylinders. Where on the cylinder is the gouge? If it lines up with the wrist pin then I would be concerned otherwise carry on.
-
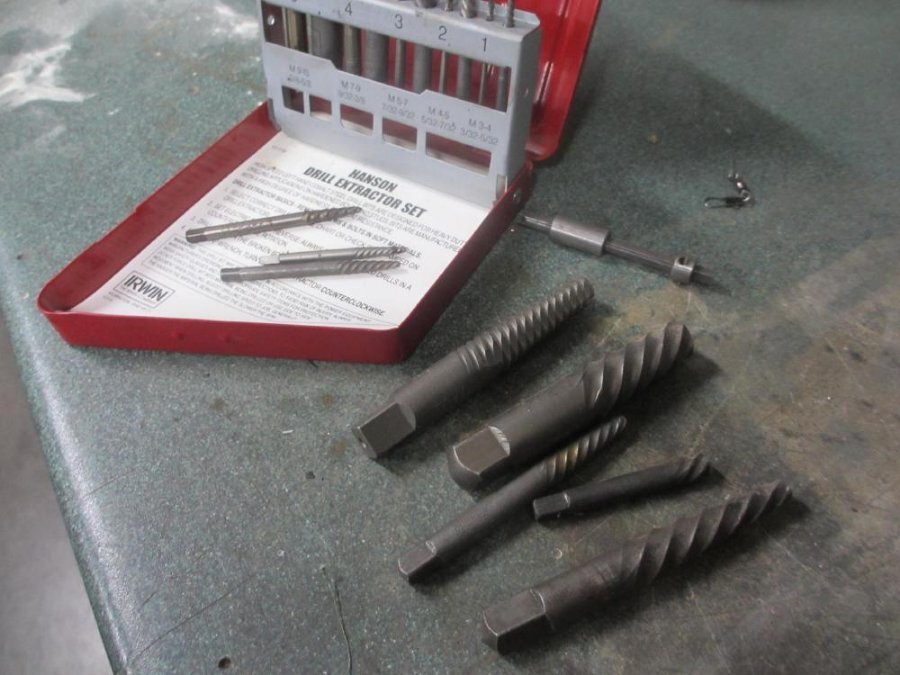
First step now is to get the easy-out removed. A close-up picture of the hole and remnant currently would help as these repairs are not a one size fits all. Head bolts are tough steel, easy-outs are hardened steel, and carbide bits would be the next step up in hardness then diamond coated. They sell carbide drills and burr bits that are small shanked to run in air grinders or electric Dremel type tools. Without seeing it I would suggest a round head carbide burr bit which you could probably pick up at Harbor Freight. I know they also carry diamond coated as well but that is a slow cutting process and water would help if you go that route to help flush and cool the cutting. It helps to pick up a couple burr configurations like a pencil tip which can help if you have room to grind a flat area on the side of the easy-out and try to turn it out if it has the long spiral flute as opposed to you the tight spiral flutes and a magnet or air to pull chips. long spiral and tight spiral taps, cut off tap where it will bottom out if need be Steel 1/4" shank carbide burr bits in many configurations. Most common for your needs shown on the lid edge Pencil grinder with 1/8 carbide pencil tip burr, Dremal grinder has 1/8 round tip burr configuration but they come in many more.
-
Congratulations, looks like you will have a tank full. 300-500 fry in a few days, time to find some new homes
-
I second the seals appear to be installed correctly. Have you confirmed the breather for the axle is not plugged up and also check the diameter of the axle wear surface for size that mates correctly to size of seal or pitting/grooves. I have also seen springs pop out of the seal during installation for those so equipped.
-
Are there any electric receptacles on the backside to indicate it had another component. It looks similar in size and style to the cabinet my Quik-way valve machine sits on. Not sure what if anything under the wood top would give us a hint as to it's origin.
-
In addition to what was mentioned so far I would add the following: You will likely be pulling the coolant bulb for water temperature if it is still intact from the head. Small tubing so be careful not to kink it and also removal of the bulb from the head may require some patience and rust dissolver. If it is the stock device it contains ether which is flammable. I would plan on having a machine shop mill the head mating surface to up the compression if it has not been done yet. If you had any overheating issues it would be a good time to look at water pump and distribution tube.
-
If you should decide you want to put the hole in another option would be using the hole saw with these modifications: The pilot drill on most pulls out to allow sharpening or shortening. In this case I would shorten it so it protrudes past the cutting teeth of the hole saw half the diameter of the pilot drill. For a 1/4 inch pilot go 1/8th inch past the saw teeth. Using duct tape wrap it around the outside diameter of the whole saw 6 or 7 times creating a stop that should prevent you from diving through. Create the stop so only 1/8th inch of the teeth are exposed. Take your time and don't get it to hot where your tape can slide up. If you can manage a piece of thin sheet metal, plywood or duct work up in-between the sender and the floor from under the cab that should provide a safety barrier. You would also need the location for the hole and if so someone here should have it or I could pull my seat and provide.


