


kencombs
-
Posts
3,077 -
Joined
-
Last visited
-
Days Won
27
Content Type
Links Directory
Profiles
Articles
Forums
Downloads
Store
Gallery
Blogs
Events
Everything posted by kencombs
-
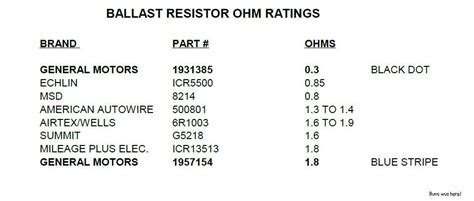
In general aftermarket coils and such are approximate fit to literally hundreds of makes/models/years. But may not be specific for a singe fitment. Close enough to work for most if not all. Ballast resistors are fairly wide ranging in value. I copied this chart off the net. Typically the coil and resistor combo is selected to limit current across the points to 4 amps or less. That's real real goal. the way I do a static test of the workings is to turn on the ignition, turn the engine so the points are open, hold the end of the coil wire near a ground on the engine. Closing the points by bridging the gap with a screwdriver and then removing should create a spark to jump the gap. And it should happen with or without the condenser IF the condenser shorted internally. Just create a path for current to flow and break it. Should spark when broken.
-
Probably due to a mismatch between the generic 12v, that requires a resistor coil, and the value of the resistor chosen. They must be matched in order to arrive at the design voltage.
-
I always use a Ford starter relay (solenoid) in cases like this. They have an ignition post specifically to send full voltage to the coil when powering the starter. Not applicable if using the stomp starter, but I always change to a bendix style. GM used ceramic resistors on some models but a lot of them had a resistor wire from the ign terminal of the switch to the coil. And then a terminal on the starter solenoid to feed the coil while cranking.
-
Are you measuring the 12v at the coil with the points open or closed? Big difference as the resistor only does its thing when current is flowing.
-
-
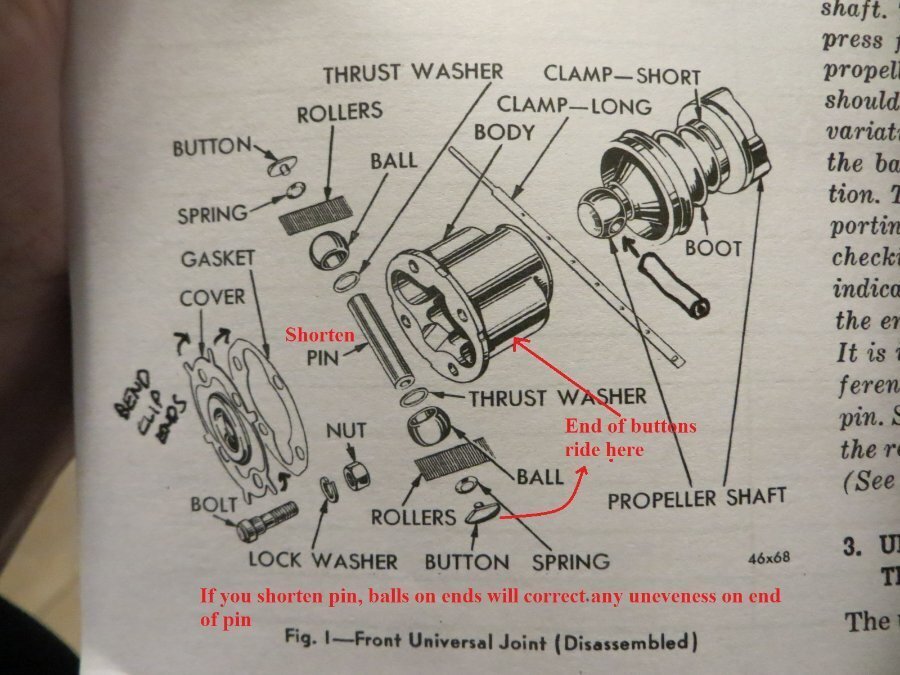
I just reread your first post, and see no mention of the buttons or springs. Where they present, where they in your kit? Those are the only items that center the pin in the housing, assuming the pin is properly located.
-
It's been years since I had a ball and trunnion apart but the symptoms sure sound like the assembly is not centered. Assuming the pin wasn't moved due to wear the only way that could happen is if the end buttons, springs and thrust washers aren't exactly the same side to side. Are all of those new and the same or a mix of used and new? reference pic: linked from somewhere on this site
-
High Quality H4 Headlights for 12v Cars (Cheap!!)
kencombs replied to Sam Buchanan's topic in P15-D24 Forum
I am so glad that OK dropped the vehicle inspection law years ago. It served very little purpose as it only proved that one day per year a car/truck met the rules. And, the mandated inspection process was almost never followed due to the requirement to remove brake parts to determine wear and other similar steps. . No shop could afford to do that for the specified charge, so if it was done it often led to unwarranted repairs in order for the shop to make a decent wage. And failing for no good cause, like a gravel chip in the upper right corner was a technical fail. Overlooking that could cause the inspector to lose his inspection license. Many did and it led to haphazard enforcement and general disregard for the whole law. My Dad had a salvage for 30 years. Thousands of wrecked cars passed through there and I helped part them out. Not one wreck we saw could be blamed on a defective vehicle. Defective people, yes, machine, no. Ops, got on my soap box and forgot the reason for the post. The state inspection never included any check of headlights except both work, brights and dims. Now, no inspections but a trooper spotting a lighting failure will get you a ticket. As it should. -
Bolts for mounting Flat 6 to Harbor Freight engine stand
kencombs replied to Cooper40's topic in P15-D24 Forum
That link shows the correct mounting info, at least one of the ways, may depend on your stand. All the tapped holes are 3/8x16, if my memory is still good. Any grade 5 hardware of the correct length will suffice. I made a different set of arms for mine as I don't like using the crank centerline as the rotation axis. Make it way to top heavy and hard to rotate. So mine got moved down some, still not a perfect alignment for easiest rotation, but better. Sorry no pics, done with that for now. -
Just a comment about strange readings with even quality tools. I have an Fluke, expensive volt ohm meter that is fully automatic. No selector, dial or any thing, Just turn it on and touch the leads to the conductors and it will sense either voltage or ohms selection and ACvsDC. Except, I was using it to check out some trailer wiring. Hooked it up with alligator clips, went to the vehicle and turned the turn signal on. Meter read 6v, on a 12v system. It saw the pulsing DC as and AC application and averaged the voltage, on/off times.
-
They are available from some sources, but they will be rubber, not leather and a royal pain to install.
-
I suspect the 250 will be harder to fit in the engine compartment than the 350 due to the length. The 218/230 are one of the shortest 6s made. Even adding 2 inches with a 251/265 requires mods to either the pan or crossmember. And I think the 250 may be longer than the long flathead. Cleaning up the v8 install may be faster and cheaper than a six. But maybe not as satisfying. I've been able to source used trailer hitches at auctions and garage sales. Looking for one now to modify for my 56 pickup. Of course, now that I'm looking they are scarce.
-
It's needed. It is all that separates the grease-lubed working parts from dust, dirt, water an other stuff that may be picked up on the road. Dirty/dusty grease makes a fine lapping compound, removes lots of metal quickly.
-
The fact that the vacuum gauge reading is in synch with the tick indicates something is amiss, not just an exhaust leak. Probably #2, but I'd recommend a leakdown test to see where the lost compression is going. Noises that happen once per revolution can be a lot of things. Bearing, not likely at idle. Something on top of a piston? Any chance a screw/nut or something was dropped into the intake? Something blocking the valve from closing could hold the valve open slightly or if on the piston could cause a tick. I've seen lots of pistons with witness marks on them from carb butterfly screws and other FOD. And the pieces often get broken in two so could concieveably cause both symtoms. A leakdown may help and and a cheap camera attachment for a smart phone could pinpoint.
-
Sure sounds to me as if the oil pressure relief valve has a malfunction. Closed when cranking but when a large volume of oil flow is present it opens and dumps all the flow into the pan. I've never worked on a factory full flow flathead, but is it possible that the valve has been exchanged with another, for a bypass system?
-
Tell us a little more about the full flow oil system. Is it a factory system with the block mounted filter or an add on. Maybe some pics of the plumbing if it isn't factory.
-
More on additives, short story fuel additives good, oil additives bad
kencombs replied to greg g's topic in P15-D24 Forum
Anyone else have flashbacks of the 55MPH national speed limit days! It works for sure, but I chal!lenge anyone to drive from El Paso to Dallas without speeding -
There is some interchange of early poly and hemi V8s flywheels with the flat sixes. But details are important. Flywheel bolt count and clutch drilling pattern to start, as well as the target and source engine year.
-
Castrol GTX Classic 20-50 Motor oil with High ZDDP levels
kencombs replied to desoto1939's topic in Technical Archives
Just a comment about the history of zinc compounds in oil . During the early years of our flatheads, no oil contained that. Only after the advent of overhead valves, with the added valve train weight and higher spring pressures was is added to oil formulas. While it won't hurt anything (unless you have a newer engine and it's catalytic converter), IMHO there is no benefit either. As Los mentioned, the older oils with high paraffin content really left a lot of deposits, everywhere in the engine. I've seen Y-block Fords with so much deposited inside the valve covers that the rocker arms were leaving impressions in the waxy stuff. And, over an inch layered in the bottom of the oil pan. But, OTOH, I've never seen an engine with a bearing failure due to that stuff. Lubes good, for all it faults. -
Maybe here:
-
Take a close look at the ignition points, especially the closing spring install.
-
I read some of the reviews. this one stood out. "Works just fine. Ignore the 1-star reviews. It is difficult to keep centered and one has to have the skill necessary to use it which is no different from any ridge reamer. Those who complained about it should seek professional help with their engine work." Most of the negatives are due to fact that this type of reamer is somewhat dependent on operator skill. Controlled leverage while turning it etc. You have to hold it down while turning or it may catch and tip. Some mentioned tapered cuts that could damage rings. that is impossible IF one stops cutting with the ridge is gone. It may taper (slightly) the area above the ring travel. that said, the lathe type is better, if one wants to spend the extra money. Edit: that old Snap-On is a good tool but usually used ridge reamers have a badly worn cutter which needs replacement before use. Not always, but often.
-
Probably been done a billion times. At least several 1000s by me. Same with the center of the front axle on PUs.
-
Don't know about your particular vehicle, but lots of early headlight switches has a 30a glass fuse mounted on them. but I really don't understand this: There is a holder that slips over the one attached to the headlight switch.. one what? can you provide a pic?
-
Lisle makes a couple of good styles. The best is an older one that cuts sorta like a lathe, cut depth adjustable and cuts from the bottom of the ridge upward. I don't think they are available new, but used ones can be found online. The new ones really just scrape off the ridge, not cut like the better ones. Those are the kind that are most likely to cause damage as Sniper mentioned. Cheaper though, and available new.

