


kencombs
-
Posts
2,927 -
Joined
-
Last visited
-
Days Won
23
Content Type
Links Directory
Profiles
Articles
Forums
Downloads
Store
Gallery
Blogs
Events
Classifieds
Everything posted by kencombs
-
Rebuilding the Mopar 3 speed: synchro choices Resolved!
kencombs replied to FarmerJon's topic in P15-D24 Forum
Not normally, but circumstances can cause damage. Damage the low/reverse slider from trying to spin the wheels, actually spinning on slick surfaces then hitting dry spot or 'speed-shifting' where common with all the low powered cars of the 50s. The first was my mistake. And a lot of other teenagers. Not so much the HP but the result of high (for a flathead) RPM and the inertia of that heavy crank/rod/pistons/flywheel when the clutch is engaged too quickly. Mopars weren't as bad as Ford flatheads. Dad made a lot of money supplying rebuilt 3spds to the local teen crowd back in the day. -
Yet another new tire thread. or .... A fool and his money!
kencombs replied to Los_Control's topic in Off Topic (OT)
I've defaulted to specifying USA location only on searches. If I don't find it there and really need one whatever, I'll include other countries. But, I've had pretty good luck with sources in Asia for the most part. -
Rebuilding the Mopar 3 speed: synchro choices Resolved!
kencombs replied to FarmerJon's topic in P15-D24 Forum
Been working on these cars way before they were 'old' cars. And never had to repair a strut type, except for broken gears, not the fault of the synchronizer, rather the loose nut behind the wheel. Me. No experience with the third option but don't like it's looks. -
And the smells are distinct also. Hard to describe but if if coolant(steam) and it has antifreeze, it will smell sweet. Fuel just smells bad, sort of sharp and makes eyes water, oil not so much.
-
Before I decided to use a 2bbl, my plan was the little Holleys with glass bowls. 'cause the look cool and use readily available Holley jets for the inevitable tuning needs. One can find those in really small sizes from early falcons so even a 3 carb setup wouldn't overpower a 230,
-
ANSWERED My 1947 Dodge built
kencombs replied to roughirongarage's topic in Mopar Flathead Truck Forum
Lead was used in a lot of old paints, including vehicles. As long as you don't ingest it there is no risk in normal working on it. But, be aware that sanding dust in the nose, eyes or mouth is ingesting. Easy solution is wet sand. Or use a good mask and filter system when power sanding. But those precautions should be used no matter the presence of lead. Anything you breathe besides the normal 80/20 N and O mix is not good for you. I use my paint mask but with particle filters instead of organic vapor cartridges when sanding. -
Yep, I bought a new unused one off eBay a few years back, 200 bucks delivered, changed my mind and sold it several months later for 250 plus shipping. Should of kept it I guess.
-
My advice to anyone pulling a head is to use an impact wrench. Set on lower power and forward first, the reverse. The rat-a-tat is much less likely to break a bolt that a straight pull with hand tools. Most, if not all, air impacts have no way to lower reverse power, only forward. The reason the fwd/rev is to assist in breaking the adhesion of threads to block without subjecting the bolt to full power. I have a couple of composite impacts (3/8 & 1/2) that I really like, Ingersoll-Rand. Light weight, both with titanium hammer cases, and LOTS of power.
-
I was going to mention that earlier and forgot to include it with my post. IF, and a big if, I were blast any white metal it would be with walnut shell and start with lower air pressure, raising a little at a time until it just started to cut the paint. Finer grades of glass or slag can be used, but it will leave a satin or coarser finish, depending on the metal and media.
-
I use Kirker epoxy, primer, base, clear or single stage paints. Not quite the coverage of the big boys but w a y cheaper. Looks good enough for me. That's current use, but I've done different in the past when we had a local 'wholesale paint' store. Now that they're gone, only the parts houses have paint stuff locally so mine is all purchased online. the only time I really worry about staying with the same brand is base and clear. Otherwise I've seen no issues with changing brands after the primer.
-
Several on ebay. This one is best price and seller ships internationally.https://www.ebay.com/itm/335179001237?hash=item4e0a39ad95:g:XukAAOSwzihlhzrb&amdata=enc%3AAQAIAAAA4MbUv%2FNXMCYV0dtXug07a3e%2FLrB3olSAiB70ps23sEb5DRX8U1sngPIaa0gJ59%2Fl2%2F3AXqwRLaZXcdOwOOKuYjWTrc7AkSFHWn9y9yDhImQFqqdNKNpIgtxCyh59856dMREt9Y7rYDO6ekOfPc0%2FGQzcdMwhHPC8v0OtyR28qmTAzHvdEZEtJvrf6WDJbj2KLETh%2BTYSDXotP4yEL5ZhNYTW%2Bhp4jzZ55tyU1lZgeQoJX3UEJcwDD1UJHkP4BSd9I6rGqWsgdh2E7uRS9f2GUzJC9c5pVG8CWLWhlWV%2FX1Yb|tkp%3ABk9SR-L0zaSfYw
-
Agree with Los on what it probably was . Fix for either worn arm or cam. But the part is a split bolt normally used for larger gauge wiring splices. The covered with lots for electrical tape.
-
Personally I would discount the vacuum advance as a source of these symptoms. My reasoning is this: If it is leaking air the idle speed and idle mixture screws could be adjusted to compensate. Once done it's done as it would be a fixed leak, not variable. And that is a tiny orifice and cannot admit much air as the port for it is above the throttle blades. There is no, or very little, vacuum applied to it at idle. But, plugging the port at the carb is a great way to eliminate that as a cause. But the mechanical advance could very well be drifting if badly worn or springs broken. Have you checked the points spring? Loose, broken or misplaced spring there can also cause issues. But putting the timing light on it and watching the flash and pointer movement would be my first move.
-
I don't think accelerator either. Surging at a constant throttle position with no load sounds like ignition to me. Vacuum advance not likely to be the cause of acceleration lag as it isn't even involved at that point. Did it do this before the new condenser was installed? I doubt every new one until proven good. Loose mechanical advance can cause weird things. How does it look with a timing light on it? actual timing setting is not important, just watch for intermittent flash and/or the mark moving.
-
Points spring? Condenser? Accelerator pump? First things that come to mind. Since it isn't being driven, maybe sticky valves, especially if it was started with old gas in it.
-
If you apply enough of the the epoxy primer no further primer will be needed. It will need a long cure time to sand well though. However if you have some places that need smoothing further some 2k urethane is the best available today.
-
Just to echo the above, the center sections swap for many years better ratios are available. especially true for 54 an up as they were starting to set the cars up for the better roads. Swapping axle gears to match splines is easy to do. And swapping just the center section complete is so much easier/faster than setting up a ring and pinion, at least for me.
-
3 speed transmission to bellhousing bolt pattern
kencombs replied to lostviking's topic in Mopar Flathead Truck Forum
The 60 is much different than earlier models but the change may have occurred in 58 or 9. It uses different mounts, hyd clutch on the passenger side, rear mounting face has 3 different bolt patterns to fit the transmissions offered and the pilot hole for the front bearing retainer is much bigger than the early models. That last is important to me, as it is a perfect fit for the A833OD and centers it to allow me to drill ant tap in the right place to attach it. But in a one or two places the old holes overlapped where. the new ones needed to go. So, the old ones got plugged with a cut off bolt with red loctite then the new one was drilled partially in the plug and partially in the cast housing. Since it used different mounts I adapted the 60 crossmember also. One of the reasons for all this is to allow for a V8 swap later if needed and I wanted suspended clutch and brake pedals, thus the hydraulic part. I have those parts from the 60 cab installed also. Original clutch slave cylinder, later disk/drum master for a Dodge pickup. Edit to add a pic. This the Tran sitting on the unmodified housing. You can see where I had to and weld for new holes I have more pics but working on resizing. 2 more during rework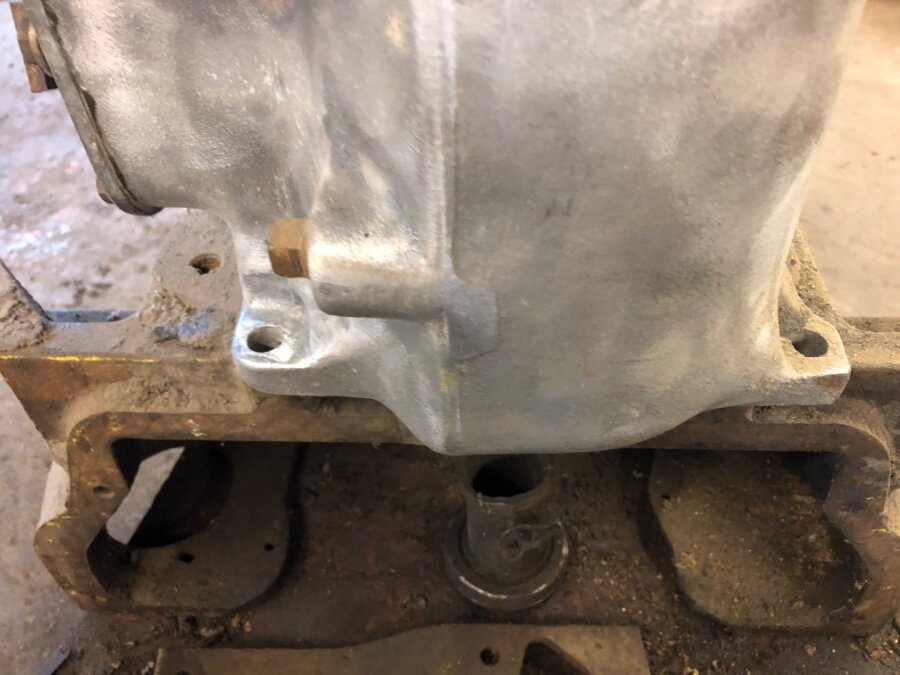

-
It looks like a perfect place for paint remover to me. Strip it bare then scuff with red scotch pads. I'm a big believer in epoxy under everything. It sticks to everything and everything sticks to it. One caution though, be careful in your choice of stripper or 'etch' materials as some are not good on white metals, aluminum, zinc etc. Like lye, one of my favorite strippers will eat that up. A strong solvent may remove the paint, try a little xylol or plain laquer thinner.
-
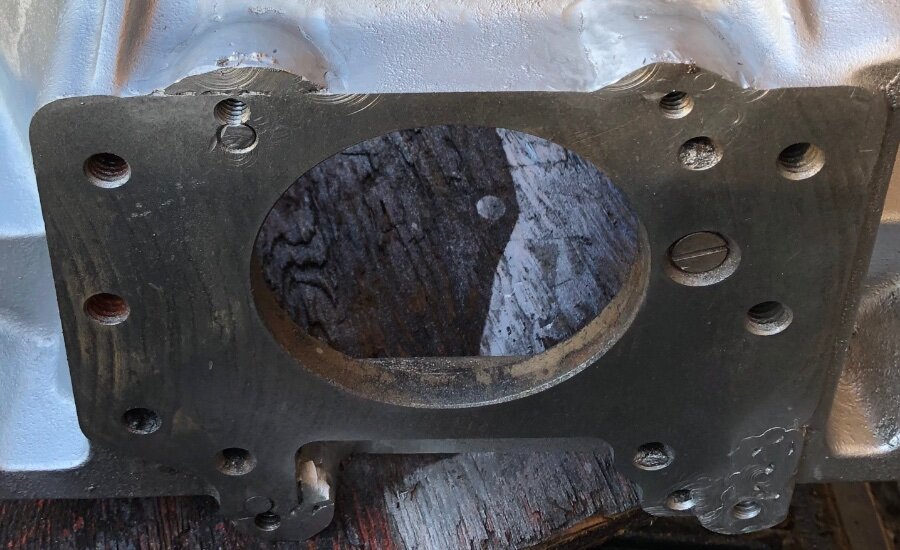
3 speed transmission to bellhousing bolt pattern
kencombs replied to lostviking's topic in Mopar Flathead Truck Forum
I'm also using an A833OD in my 56. But, with a 60 truck clutch housing. The machined face of that is almost big enough to drill and tap with no adapter. Just some welding over the top 2 as they were too close to the edge for my liking. The plug some holes, weld up a small area that was too low and redrill for the others. The center hole is a perfect match to the A833OD so hole location was easy. I just set the trans on the housing, made up a center punch that is a snug fit in the trans holes and marked them. Drilled and tapped on my drill press. It also has the frame crossmember and mounts for a 60. It's all bolted together, sitting and waiting for me to paint the firewall and start putting it back together. I did it that way because that housing also fits early hemis and polys. A V8 upgrade, if desired, will be easy. -
I'd be really careful on the valve stem clearance. Too tight and they will stick when hot. That .3435 reamed size is .001 less that the as-shipped size for an exhaust guide. At least the ones I've seen and ordered. Intakes are .03425 as shipped. I haven't looked recently but I think the exhaust spec is a .002 clearance. A couple of years ago I had 4 heads on hand no two of them seemed to be the same thickness when measured at the same places. I had mine cut .060, we'll se how it goes. do know valve to head clearance if fine at that. As to 'is it worth it?" Look at the factory HP ratings over the years. Steady, but slow increase and nothing changed, except compression ratio. I started with a 56 Plymouth head, cut it .060, did a little chamber cleanup around the intake opening and cced the head. By my calculation I'll be around 8.8-8.9 compression up from a claimed 8 stock. My hope is to realize the 135 that was advertised back then. I assume the 'hump' in your block is the head mounting surface, not main bore? If so, odds are that the head is a mirror image.
-
Just above the oil gallery, and directly behind the oil fill tube? I don't recall a core plug in that location. Clean it up well and inspect, but I suspect a repaired freeze crack. The cleanup will go much easier with that fill tube out of the way. My technique is to use a wooden plug in the end so it can be gripped with vise grips without collapsing them twist, pull, tap and apply appropriate words 'til it comes out.
-
251 Broken Crankshaft / Noise on Rebuild
kencombs replied to Herding Goats's topic in Mopar Flathead Truck Forum
I've had, and driven others, that would not start in cold weather in neutral and clutch out. To much heavy weight oil resistance for the starter to overcome. Main drive gear, cluster gear and 2/3rd slider all turning cold 90w! One, an old Chevy with synchro 4spd, had to be warmed up good to even let the clutch out in neutral after running. Could have been the 140w in there to slow down seal leaks! and these were all way before synthetics so it was all dino stuff. -
I looked this thing up in my old Hollander. It says that there are a LOT of Mopar starters that can be used IF one uses the starter and solenoid pair. 46-48 Ply(NZ4133), 49-51 Dodge and ply(MCH6201)-52-54Dodge and Ply(MCH6205), 55Ply/dodge, 46-55 dodge/ply (MCH6305. So unless you're determined to keep it original, you'd be better served by locating a replacement with a more available source.
-
251 Broken Crankshaft / Noise on Rebuild
kencombs replied to Herding Goats's topic in Mopar Flathead Truck Forum
That reminds me, the oil supply line, pump to main gallery, not the pickup, will fit swapped end to end. But, it will not avoid the crankshaft when installed backward. But, that should not be affected by the oil pressure rising. That part is really odd as knocks are almost always evident before the oil pressure comes up.

