DJ194950
-
Posts
3,789 -
Joined
-
Last visited
-
Days Won
3
Content Type
Links Directory
Profiles
Articles
Forums
Downloads
Store
Gallery
Blogs
Events
Everything posted by DJ194950
-
I was thinking the same way as Plymouthy, which is why I said if you are not experienced/ do not have a oxy-acetylene set up and comfortable using it. If I was trying it myself I would use a small tip and heat the extractor cherry red and let it cool and repeat to take the temper out of the extractor and try drilling it out with a hardened drill bit, use lubricant and drill slowly. If that did not work out I would again heat the extractor to cherry red and slowly open the oxy. valve more and more until I had a mini cutting torch and blow out the extractor as slag. Let cool blow out the hole and drill the bolt with a larger bit all the way thru the bolt piece (as large as possible without touching the block threads. Use a pick to remove leftover bolt. The perfect starting hole as mentioned before is paramount to bolt removal. If drilling was done off-center it can still be done this way but harder . Experience can be key/lots of good luck can certainly help the inexperienced. Machine shop recommendation was for the inexperienced/ no oxy/ace. setup/not comfortable to do this. Experienced friends to help can be very valuable! Best, DJ
-
 Where any of these the New style that reads the lobes of the distributor where the points rode rather than the type with the ring with the magnets that fit over the lobes in the distributor?? I have only used the Old?? type with the magnets in a ring with great luck. Thanks, DJ
 -
At this point if you are not experienced this problem before I believe that I would visit a few local machine shops and discuss your problem. If you find one who tells you how he would deal with it and is willing to do the extraction of the broken screw extractor and bolt-( reasonably-Not cheap) - I think I would have it towed to him and repaired. When he is done either have it towed home or take your New bolts or studs etc.parts, water/antifreeze, etc. to be done at his place and complete the repair there if he is OK with that and drive home. My 1 cents worth. DJ
-
Hey grandpa, can I borrow one of the old cars of yours?? A few friends and one-- uh, girl I met like old cars--- so please --I promise etc. etc.! Also can you Not tell mom and dad?? I do remember those days. DJ
-
Here is s your IAY dist. listed in pertronix catalog on left side of their page, 9th. one down listed. just for for info. DJ
.png.2b9bab583029a916eff9e6b76ed1595a.png)
-
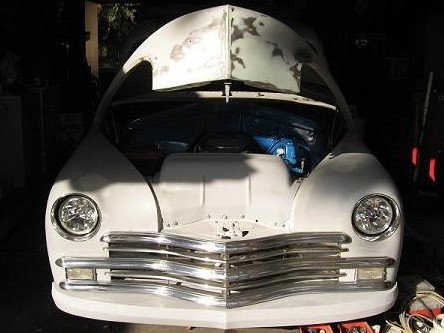
That is quite the paint job! DJ
-
That temp sender requires another special fitting in the head first that has a tapered seat for temperature bulb. DJ
-
P28 rear main seal leaking after rebuid
DJ194950 replied to blazin6969's topic in Mopar Flathead Truck Forum
Want to sell the 34 2 dr.?? Maybe I can get a third loan on my house to buy it.? Love the 33-34 Plymouths! Best, DJ -
Horn going off on 1947 Plymouth special deluxe.
DJ194950 replied to DJ194950's topic in P15-D24 Forum
After further checking-p-15 spec. deluxe steer wheel horn button, The wire through the steer shaft is new, not grounded when separated from the contact plate. turn wheel both ways no grounding, Further research on p-15 horn at steer wheel on google came up with some older p-15-d24 posts on this. Appears that the cup/nut/spring/plate are all in ground contact through the steer box. the wire also get a ground when pushed down into the Plate per parts book Repair manual about horn repairs says 0000 about this condition at steer wheel. The horn ring is Supposed to push the spring down to beak the contact between the spring/cup and the plate/wire when the horn ring installed to push inward to break the contact per old p-15 posts. Appears to me to be correct! This appears to be done by downward pressure on the horn ring by the horn retainer when tightened down. It is NOT doing this somehow. They remain in contact, no seperation of plate and spring. Those that have this problem before may have some ideas as I'm pretty lost as looking at parts book and parts all seem to right and testing. Lost post but trying to be thorough. Thoughts you p-15 gurus!??? DJ -
That truck is to nice for working! Don't you own a beater chev. or ford for the dirty work? Suppose you just wanted to get home without a tow truck! DJ
-
Hey I like gauges and knobs, just not that into the cassette player! DJ
-
Recently took off the steer wheel horn parts today to see how the ground contact make contact. The horn started to honk every time new owner turned the steer wheel, not to good in town!! Called Marty (previous owner) about this and he he said that a minor change in the screw tightening or loosening of the horn screws that hold down the horn ring (p-15 special deluxe with the ring style), once solved this problem for years but I think there may be a better repair as it is doing this again. Seems to me that the screws should be able to be tightened down totally and keep the needed space between ring and the contacts under it. My thoughts have lead me to think that the length of the hold down screws could be critical? Can someone measure their original screws? Any others with this experience and solutions? Thanks, DJ
-
Valve Work - 1953 L6 264.5 CI C60 Windsor Deluxe
DJ194950 replied to keithb7's topic in P15-D24 Forum
So it does Not leak exhaust then if left as is or does it? Thanks,i am still trying to learn from the masters! DJ -
I had one bellhousing- flathead Mopar (forget exactly what it was) - that had a nut up inside the bell on the passenger side that was on a stud off the back on the motor that came inside the bell. Very hard to see! Worth a quick look. DJ
-
Thanks for the reply Marty! Also, sorry I mistyped your name! DJ
-
Valve Work - 1953 L6 264.5 CI C60 Windsor Deluxe
DJ194950 replied to keithb7's topic in P15-D24 Forum
In your pictures with the intake/exhaust still on motor- question what is that hex side screw in fitting hanging down on the underside in front of the #4/5 valve cover area that looks like a air/hose fitting? On the exhaust manifold to exhaust flange it appears that the flange face in Not at all flat. If so with a straight edge to check flatness it requires filing until it is flat to stop and exhaust leak. Very nice car! Enjoy! DJ -
P28 rear main seal leaking after rebuid
DJ194950 replied to blazin6969's topic in Mopar Flathead Truck Forum
Thought that it was totally one OR the the other. Rope style or neoprene style in the main cap grooves as designed with the side seal rubbers. Not mix and much as you feel like?? Actually remember a third type. Neoprene main bearing cap seal and metal with rubber edge seals bolted on at the real side of block? Did rope seal also use a main bearing rubber seal at the sides? Never done a Mopar rope seal. The kit I got for my neoprene main seal had two styles of the rubber main caps seals So? Thought maybe the rope type also had those(but the other type?) . Might be confused? It happens--too often. DJ -
Far from finished- the dash of my 50 Ply. suburban. Built from fiberglass close to original but extended towards driver about 1 1/2" for A/C clearance. Will someday have wood grained center section. Have a 4x8' roll of wood grained wall or other use for gluing here and also may use instead some sheets of burbinga wood book matched sheets for lamination (gluing) in the area. Now that I have seen ways to do at home hydro-dipping wood finishes in also any style I'm sure that is by far the easiest way to do a very nice wood grain center portion of the dash. Got to-GOT to finish this car!!!! Love the other examples posted! Something to strive for in the future. DJ

-
Well Mary, now that your old, beautiful car is currently in my garage, I should find out from you if these Indexing plug washers are reusable as the new owner(not me but a friend who is not a mechanic) will ask me or I need to tell him about this. Oh ya, are these torqued? How much? Also are they available locally or need to be ordered? DJ
-
Great I guess if it never moves from that spot! Is this what I have read about is layin" frame? I like rakes to the front but---- DJ
-
maybe add one of these? http://www.batterymart.com/p-battery-mat-black.html I have never used one myself as I prefer sealed batteries and have read if you get these wet they hold moisture if your underhood battery mount setup gets wet? Maybe build a tray with a drain to underside of truck and have the box sprayed with rattle can undercoating sealer? Some thoughts, DJ
-
Jumper wire Bat. to coil Pos. or Neg. depending on your car. Jumper on starter solenoild Bat. to Start and remove. drive home! Good luck! DJ
-
Cool tunes from stock AM radio with no antenna!
DJ194950 replied to Bob Riding's topic in P15-D24 Forum
Who??? Didn't they tour with the who? DJ -
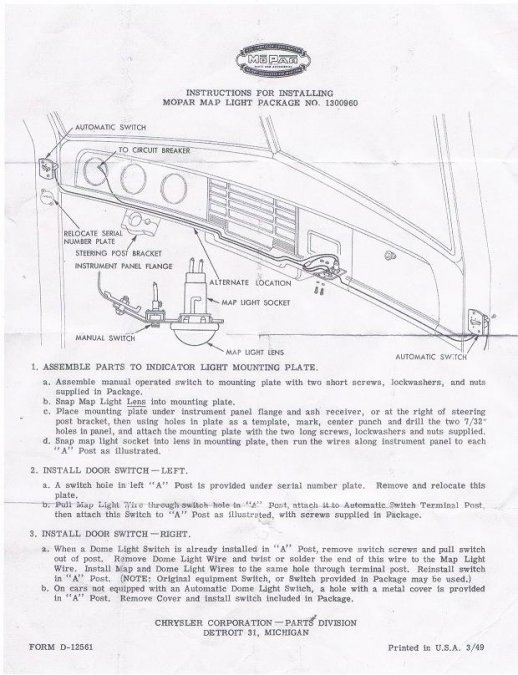
Well that is the factory accessory add-on and factory instructions. ID plates were screwed on and not a riveted type. Each to their own. Make a copy of the posted page and keep in the glove box? DJ
-
Really not to hard to clean the switch contacts as stated. I will add a factory map light schematic with a second switch on the drivers side. Give you some ideas to just add the switch and tap into the ground wire that turns on the interior switch? Maybe both! Has been several avail. on ebay fairly reasonable recently. DJ