


FarmerJon
-
Posts
470 -
Joined
-
Last visited
-
Days Won
1
Content Type
Links Directory
Profiles
Articles
Forums
Downloads
Store
Gallery
Blogs
Events
Everything posted by FarmerJon
-
Tomorrow I will try to take some pictures from a couple original manuals I have. Hopefully you can better make out what is going on.
-

Rebuilding the Mopar 3 speed: synchro choices Resolved!
FarmerJon replied to FarmerJon's topic in P15-D24 Forum
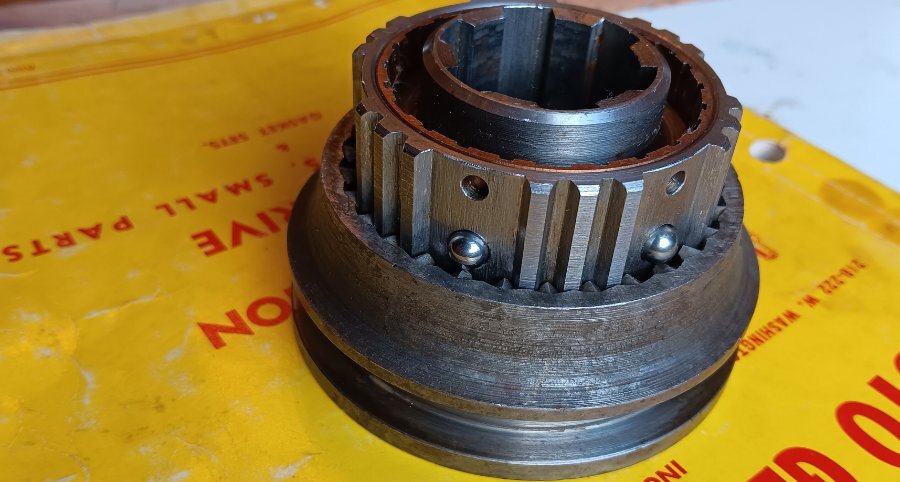
I could see that. I didn't know this thing had spring loaded ball bearings inside it when i first cleaned it and popped it apart. You can imagine what sorts of words were uttered when i suddenly had small springs and balls all over the workbench. -
Rebuilding the Mopar 3 speed: synchro choices Resolved!
FarmerJon replied to FarmerJon's topic in P15-D24 Forum
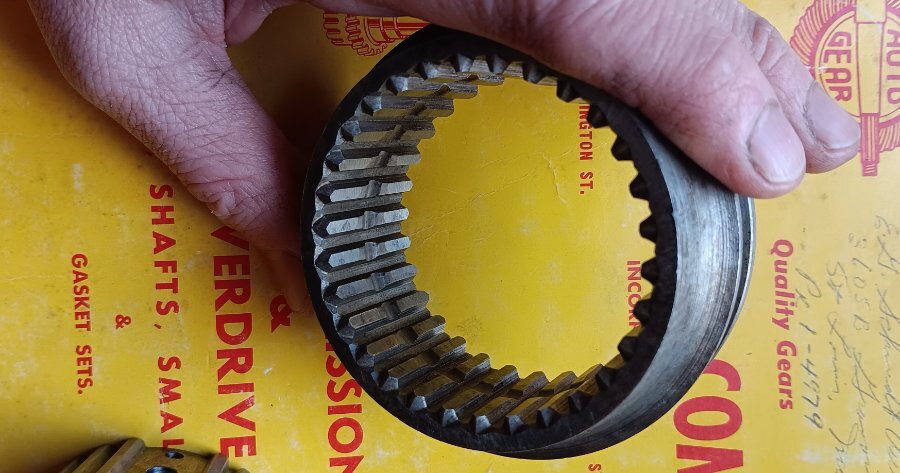
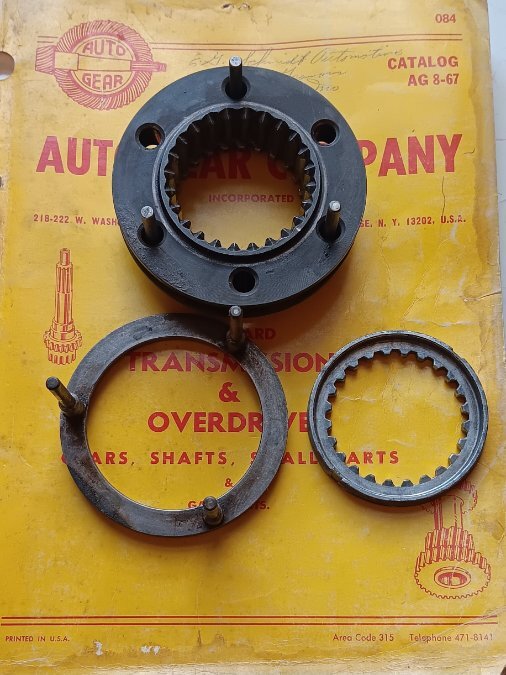
I got a Mopar NOS strut synchro 2nd gear today and was able to compare it to the Option 3 synchro. The cone is a match, but the dogs of the '35-39 synchro are about .020" too small to slide onto the dogs of the gear. I could open it up on the lathe, but unless I am gaining something, I won't bother and will just sell it and buy a Mopar NOS strut synchro. Any of y'all have any experience or opinions on post-processing treatments, like Cryo or micro shot peening? Thinking of just having a few select things done, like first gear and the synchro parts. -
Rebuilding the Mopar 3 speed: synchro choices Resolved!
FarmerJon replied to FarmerJon's topic in P15-D24 Forum
Do the flathead 6s make enough power to put any particular gear in danger? -
Rebuilding the Mopar 3 speed: synchro choices Resolved!
FarmerJon replied to FarmerJon's topic in P15-D24 Forum
Well it is helpful to validify my distrust in the pin synchros. I am sure they are fine for Pastor Fred and Gramma Nan. Here is the Tech article I found that discribes the different kinds of synchro http://rspublication.com/ijst/aug 13/43.pdf -
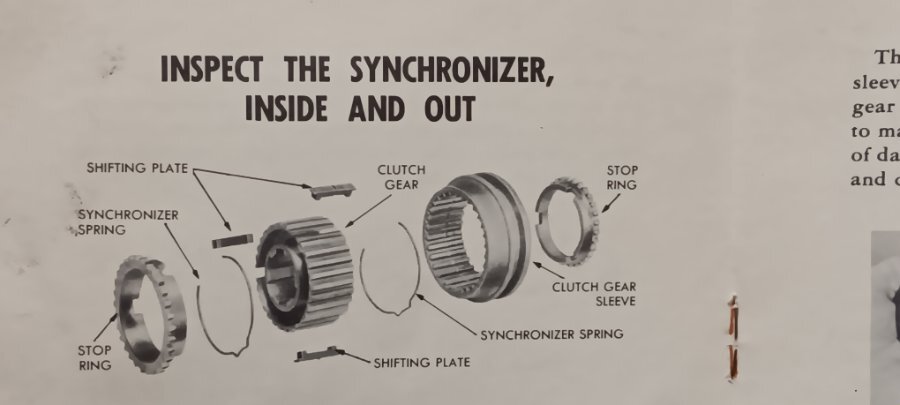
Guys, I need some knowledge: I am building my first transmission, a Mopar 3 speed overdrive. I have built engines and a rear differential before and work in manufacturing, so I feel up for the task, but I have some options for Synchro type, and don't have the experience to know what will suit me best. Car has a lightly hopped up flathead, so not much power, but I do enjoy beating on it, and jamming the shifter like a maniac. My options are: Option 1 Pin type- what came in all R10g1 transmissions. The one I have is in good shape, but I will need to replace the aluminum blockers. However, a search here has numerous posts from guys who have had pins fall out/break off. Also some accounts of the Ramchargers mention problems they had with bending pins on hard shifts. This is what got me looking at what my options are. Option 2 Strut type- what is supposed to be in my current '48 transmission, stock for '40-53. Basically a conventional synchro like in any of the popular 4 speeds of the 60s. My original plan was to swap this style in, despite needing to change out a number of other parts. However, when I bought a NOS assembly, I received Option 3-Constant Force type. This type doesn't use blocker rings, just copper cones/wipers integral rings in the clutch hub, and spring loaded ball bearings keeping it centered in the slider ring. It turns out this is from 35-39 Mopar 3 speeds, but at a glance and a couple measurements (although more needed) it looks like it would be compatible with the strut type input shaft, second gear and shifter fork. I cant find much info on this type, other than one mention that the ball detents can be easily overcome, allowing the gear teeth to grind. It seems to me that it may be a good candidate to modify as a "slick shift" synchro, since it would keep it's original amount of syncronization. With no blockers, I would think shifts would be shorter. However, I don't know how wise it for me to be WOT slick shifting a BW overdrive transmission. So, what do you guys think?
-
Paging @Semmerling On the later transmissions the gears can be changed, for the '40-56 transmissions they run around $50. Maybe you can determine if they interchange?
-
If you are thinking of pulling the head for a valve job, I would spray all the bolt heads with a quality penetrating oil several times, over a few weeks. Add it cold, and when engine is hot. You can also start by tightening the head bolts to the recommended torque spec. This usually helps break them loose from whatever corrosion has built up, but is much less likely to break them off.
-
Engine is looking good! Intake and exhaust all depend on your goals. It looks like the intake is fairly low profile at the carb flange. I belive that the late '40s early '50s passenger car intakes are fairly tall, for better power in the rpm they are expected to see. I would use the tallest intake you have, and might look at making a carb riser. You could add a vacuum port to the riser. It may also pay to compare the plennum and runner diameter, with larger being preferred. For the exhaust, you could add a second outlet, or split it entirely. Carb is a carter BBS, used from the early '50s thru the '70s. I dont see a tag on that one, so it may be hard to match it to a rebuild kit. Also watch for throttle shaft wear causing vacuum leaks, and on some, the throttle shaft can come loose from the throttle lever. I have one from a '55 230, I plan on trying on my '48, I suspect it will perform slightly better, since its throttle plate and venturi are larger than my stock Ball and Ball. I belive that there are electric and manual conversions for the choke. ETA: Carter Ball and Ball D6G1 has 1.245" venturi, 1.562 throttle plate. Carter BBS 2062s has 1.347" Venturi, 1.688" throttle. So right around 8% larger, plus whatever flow was gained by the minor changes made to the internal layout. Passenger car intake I have laying around, off a '53 217, is part number 1120002-24. See how much taller it is, and how the runners are straighter.

-
Steve- Do the diagnostic procedures laid out by Keith and others. As far as additives- no 'mechanic in a bottle' is going to fix worn or broken parts. BUT! They can alleviate carbon and grime build up on the valves, piston crowns and rings. This can be a big help to old engines like these. If you are only seeing small amounts of smoke, and tests indicate that there is no major problems, additives, used correctly, might be just what you need. Like Dan, I am not familiar with how the "No Smoke" products work, but I have used seafoam, marvel mystery oil, and a spray bottle of plain water to rejuvenate good but dirty engines. Both MMO and Seafoam detail how to use them to "soak" or fog the cylinders. I will usually start with this, as well as the recommended amount in oil and gas. I usually alternate between the two products in my fuel, for several tanks of regular driving, as well as a few spirited WOT blasts, for the sake of forcing rings and valves to break free of the old gunk and reseat.
-
All that, but also *you can mix and use DOT 5.1 woth DOT 3 &4 But dont mix Dot 5 with Dot 5.1 Who made this system !?
-
Is there a trick to posting a Wanted advert in the Classifieds?
FarmerJon replied to andyd's topic in P15-D24 Forum
I can barely FIND the classified section consistently, let alone use it. I have bought and sold on various forum classifieds for 10+ years, and this is the first I have found that is unusable. It is quite unfortunate as I would would love to be able to find what I need here. -
Dual carbs and dual exhaust was available as an option on the 25" engines in some trucks, but not on the 23" passenger cars. Yours is a aftermarket setup for sure.
-
I would think that it may also prevent rattling of the tin. I would buy some appropriate thickness felt from McMaster Carr, and cut a new one if nothing ready made is available
-
Very nice! It looks like a '50s Edmunds Custom 2x2 intake with holley/ford 94 carbs. Exhaust is a pair of Fenton cast iron headers or a reproduction "Langdon" version. Lpg is an interesting configuration, I wonder how the 94s meter it.... Lpg has som advantages for the old engines- no carbon build up, no fuel washing the cylinder walls and mixing with oil, better fuel distribution on these longer engines. It seems like one big complaint is when people try to use gasoline carbs to make a dual fuel set up. It leads to a big loss of power. Dedicated propane mixers are able to flow enough air to compensate for this. Those helly 94 carbs have good parts availability, so you should be able to convert them back to gas pretty easily. Shoot me a PM if you need help getting parts mailed. Good luck and keep us updated!
-
That chop looks great! Can we see a close up of the engine? What Transmission is that?
-
This may be an unfortunate slowdown, but dont get too fustrated. These things happen, and in the end are just minor bumps in the road. Worst case, you pay to have it lightly honed again. Bummer, but not the end of the project. I would be wary of vinegar, or CLR type products, as they can be difficult to neutralize and will cause much more corrosion after a few days. I personally would lothe to use scotchbrite in a honed cylinder, as it might take the tooth off it, making the rings hard to seat. If you didnt have the engine bored, and you still have an old ring or two, I might, carefully, put a ring in the cylinder, square it up, and push it down the cylinder. The ring's natural tension should scrape off anything too proud of the surface. A new ring would also do. Remember, these old engines will run with all sorts of poor internal conditions. If remember correctly, the first year or so of SBC v8s had chrome rings that often didnt seat well. The factory warranty solution was to pour baking soda down the carb and rev the piss out of it till it stopped smoking. Makes me think...Maybe baking soda on a toothbrush might scrub it off. As far as using water on machined iron parts: SOP at many machine shops is to use HOT water, usually after the hot tank to get the corrosive cleaner out of all the nooks and crannys. This is followed by being thoroughly dried off by compressed air. WD40 is better than nothing, but just barely. I rub fresh cylinders down with motor oil. Dont worlly about lint and dog hair, you will clean the bores again before you assemble. The big take away is: plastic bags are bad. Bagging a block may seem like you are being diligent to keep dust off your freshly cleaned engine, but it really is trapping any moisture in. I cover things I am working on with a Tshirt rag. Once OHV heads are on, i may use masking tape to close up the ports. Good luck!
-
I drive my p15 a fair bit, and change the oil spring and fall, that still works out to less than 3000 mi per change, maybe closer to 2k. The extra cost of synthetic isnt worth it for me. That said, i have noticed that most of the aforementioned cheapest Walmart and parts store oil is "semi synthetic" or "Synthetic blend" so it may get to the point before long where "good ol' dino oil" is the more expensive option.
-
Not trying to be a a smartass, but why are yall using a puller for the rear drums? If you crack the lugs loose ( just enough for the wheel to shift around), set it down and pull a few tight turns each direction and they come right off. Maybe spray the centers with pb blaster ahead of time for good measure. Mine made a kind of unnerving "pop" when they came loose, so I knew they were ready to cooperate. Most used replacement parts are available from French Lake auto, and bearings and seals from rock auto and ebay.
-
I just went through this with my car also. As others have said, the steering wheel center trim/horn cover must be secured. If the screws are loose, the ring will touch and honk. If you disconnect the tribar and pull it out a little so it doesnt ground on the spring, it should not honk. If it does, or does intermittently, the wire is likely shorting out. I had to run new wire from my relay all the way up to my tribar, because of a internal short, somewhere in the column.
-
Look under the passenger side dash. Those hoses are running to somthing, most likely an earlier model or aftermarket heater. Does the hose coming from the back of the head have a shutoff valve? What controls are on the dash? If none of them turn the fan, you may just need to diagnose fan switch/wiring.
-
Happy Thanksgiving y'all!
-
I adjusted my valves hot. With standard lenght wrenches and a split exhaust manifold, burnt hands are a real possibility. I bought a pair of long "tappet" wrenches and 12" feeler gages for next time. Adjust the valves, but then i think you will still need to do some diagnostic work. I would hook up a vacuum gauge, and note the readings at good idle, rough idle, cruise, and average acceleration. Check that your vacuum advance canister isnt leaking air. Check your points are clean, and that the dwell is in spec. Test your condenser, if possible. Check that the advance plate/points plat can move correctly and that the connector wires are not shorting out. Check for leaky sparkplug wires. Check your base ignition timing. Check if the carb is wet when it starts acting up. Check it for vacuum leaks. Once everything is in spec, you can start adjusting things, a little at a time, noting any changes in the vacuum readings as you go. It may not be one thing wrong, but a cumulative effect of several minor things adding up.
-
My p15 had a very similar problem. When it sat for 10+ minutes after driving it would be very hard to start. When this happened the carb base wpuld be wet with gas. I added an under carb heat shield from a '55, but it made little difference. Finally I lowered my float, and the problem seems to have gone away completely. It also seems to have leaned out the fuel mix a little. I only have a mechanical fuel pump, heat riser gutted. Your car is beautiful, I am glad to hear you are using it as a daily!
-
From the illustrations, it looks like a 90* terminal. These might be a good choice, but they also have a 1 piece style. https://brillman.com/product/better-right-angle-crimp-spark-plug-terminal/ They also have the correct looking wire.


