


Sniper
-
Posts
6,307 -
Joined
-
Last visited
-
Days Won
142
Everything posted by Sniper
-
I kind of look at it this way as long as the hose connecting my PCV to the carburetor doesn't have oil in it I don't need to catch can. If it does have oil in it I probably need better baffling in my valve cover
-
Without getting super technical As much as possible anyway Here's why wiring a coil up backwards is not a good thing period And while it might work in some applications and it won't work in others It doesn't matter Because it won't be working optimally regardless. And ignition coil is essentially two Loops of wire sharing a common ground. The loop that is connected to the points creates a primary magnetic field when the points are closed. This in turn also creates a secondary magnetic field in the part of the coil that is ultimately connected to the spark plug. When the points open the primary magnetic field collapses which also causes the secondary magnetic field to collapse. The energy in the secondary is what jumps the Gap in the spark plug. Only two things those two coils or Loops of wire physically share is the ground. When you wire the coil up incorrectly you are no longer sharing that ground and the magnetic field in the primary and secondary fight each other because the path to ground for the secondary is now through the primary Loop of wire. So the output of the secondary is reduced. Sometimes it is reduced to the point the car will not start or runs poorly so just do yourself a favor and hook it up properly and anybody that tells you oh it'll work backwards doesn't really know what they're telling you. If I ever get my engine oscilloscope project up and running I'll try to take pictures of the waveform wired both ways so we'll have a visual representation of the difference. Heck there might already be pictures on the internet of that already I don't know.
-
If you're still the original 6 volt positive ground system then you want the positive of the coil wired to the points.
-
Shorten the pin an inch or two
-
You are going to have to find a custom glass shop that's good at making windows. Either that or you know how to make the templates and have them cut to fit the templates. Fortunately it's all flat glass. I hope
-
For anyone following along in this Saga might be wise to clean the block before you go to the machine shop. When I had the Machine Shop redo the kingpins on my 51 I had to run them through my parts washer and cleaned it all up. When I took it there The Machinist asked me if I had blasted the spindles and uprights. I told him no I just ran them through my parts washer that's how clean they were. If you clean the block first then when all the Machine Works done you just give it a final clean and Assemble.
-
The difference between the two is the element, the part that heats up. But as Donald said buy a 12 volt power port at the parts store and wire it to your battery. Then you won't have to do anything to your car.
-
Vinegar removes light rust.
-
.125 inches works out to 3.175 mm. So your disc, when new, should be 3.175 mm thick.
-
Winding a coil isn't hard. Getting the right gauge magnet wire and the number of turns is important. Just pull the old wire off, carefully, measure the length and gauge, then cut a new piece of the same gauge magnet wire to the same length and wind it up.
-
I tried those, they leak and the wings slip. So I got two of these, one for the block, the other for the radiator https://www.amazon.com/gp/product/B07Q2NGJV7/ref=ppx_yo_dt_b_search_asin_title?ie=UTF8&psc=1
-
That is an interior floor mat, not a trunk mat.
-
More modern starters are shorter, but wider than the older ones. Did the 83 truck starter clear? You might want to look at a clockable ministarter, something like this https://www.manciniracing.com/poultohispst.html
-
I guess I should add that cleaning all the crud out of the water jackets while you have the engine out and the plugs removed it also on the to do list. Maybe even a water distribution tube, lol. May as well run a torque wrench around the head bolts. Replace the block drain plugs with a petcock that has a nipple on it. The snow ball rolls.
-
Weatherguard makes a universal, trim to fit, mat they list for a 41 Dodge. Looks nothing like stock though. https://www.weathertech.com/dodge/1941/custom-series-d-19/trim-to-fit-cargo-mat/ If you want to go that route and are looking for something more original looking, Home Dept sells ribbed rubber matting you can trim to fit using your original as a guide,=. Not going to look 11100% original, but it'll look it more so than the Weatherguard mat.
-
When I went thru my front suspension I put as much caster in as I could get. It wasn't much compared to modern cars but it was better than stock. More positive caster makes the car more stable in straight line steering, it also increases the effort at the steering wheel. Camber may need addressed too. I think I put a half degree into mine. https://www.motortrend.com/how-to/sucp-1004-muscle-car-front-end-alignment-basics/ Shows the difference in specifications of bias vs radial tires and talks a bit about why.
-
Bench test it before you install it, lol
-
Last time I greased my Plymouth, I think I counted 27 fittings, lol. there area a lot of them. Might see how hard it is to shift just the levers on the trans without the linkage attached. If it's hard there it's inside the trans. If not, then it's the linkages or the adjustment.
-
 Journal sizing isn't really a show stopper. Journals can be turned down to fit, to a point. However, is there room for the crank throws and the rods, that wold be a show stopper there. Might be easier to just buy a core 230, build it and swap it in, saving your original engine
 -
My philosophy on replacing a leaky core plug? Pull the engine, replace them all. If one is going odds are others are close. May as well clean up the engine, pull the pan and desludge it, seal up the rear main if need be, repaint the engine. Then you are done with it and no more farting about replacing them as they start to leak. Be a good winter project for those of you that live in the snow belt. This is something I would do with my son as a project since my grandson is only three months old.
-
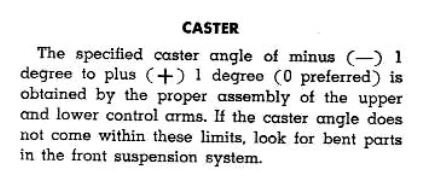
I assume you have a service manual? If so, it's in the front suspension section. If not, get one. Here's my Plymouth manual's description of how to adjust it and the specs needed to do so.

-
https://www.summitracing.com/parts/snn-t4 https://www.napaonline.com/en/p/BK_7031412 https://www.rockauto.com/en/moreinfo.php?pk=4592436&cc=0&pt=2068&jsn=273
-
Relays can be polarity sensitive, they usually show a diode on them to indicate that. But these are generally ones you'd see on something light a head light setup, not a starter. The purpose of the diode would be to control back EMF when the magnetic field in the coil collapses as the relay is de-energized. It's a noise thing mostly for the computers int eh car.
-
They were fuel injectioning multipiston aircraft engines in WWII
-
If they are then it is usually marked. Which is not to say someone didn't mark it. I would pull it out and test it on the work bench using jumper cables and a battery. Try is positive ground and if it doesn't work try it negative ground, that would answer the question for you.

