


lostviking
-
Posts
787 -
Joined
-
Last visited
-
Days Won
7
Content Type
Links Directory
Profiles
Articles
Forums
Downloads
Store
Gallery
Blogs
Events
Everything posted by lostviking
-

Bypass oil filter- should canister be full?
lostviking replied to jsd245's topic in Mopar Flathead Truck Forum
I'd be interested in seeing the oils path, the way you have it modified. I too like the idea of having all the oil go through a modern filter. I haven't worked on it yet, but I purchased a remote PH8A (I think) adapter that fill fit inside the canister. Externally it will seem stock. I'll probably reverse the way the lines connect to the canister, but that won't be so noticeable. I'd like to see how the oil lines connect to the block in your mod, so I can incorporate that. -
How noisy should the generator be?
lostviking replied to jsd245's topic in Mopar Flathead Truck Forum
Depends on if it's just noisy or a grinding sound. I'd add the oil immediately. Let it soak in and add a bit more. When it doesn't need any more, the felt won't suck it up right away. -
Help! 1941 Dodge WC-1. Crank but no start.
lostviking replied to shane_thompson's topic in Mopar Flathead Truck Forum
It should be cranking "normal speed" with the plugs in. As slow as yours is cranking 1) battery cables too small and dropping lots of volts, 2) battery isn't fully charged. -
1946 WD15 rear end swap...and full replumb of brakes
lostviking replied to lostviking's topic in Mopar Flathead Truck Forum
Finally got that side done. Need to move the truck out of the garage to pull the axle when I do the other side, so not today. Even though I bought new wheel cylinders, they didn't seem to be leaking, so I didn't change them. Seem. I didn't think to squeeze the outer boot. When I did I got fluid. Changed the cylinder. After putting it back together maybe a dozen times so far, this time went pretty smooth. I guess you can only make the same mistakes so many times. I had zero problems using my pliers to get the retaining springs on the pins. After getting it all back together, the wheel spins with only minor drag and doesn't jam up. I think the top of at least one shoe was stuck out too far. With the adjusters at min, it was maybe allowing the shoe to cock and jam on one end. Either way it seems OK now. I'll bleed them after I get the other side done. Thanks for the supporting comments. -
1946 WD15 rear end swap...and full replumb of brakes
lostviking replied to lostviking's topic in Mopar Flathead Truck Forum
What an ordeal! I haven't had drum brakes on anything in so long, I can't even remember the last time I did a brake job. It's been so long, I bought the nice tool for removing and installing the heavy springs at the top of the shoes, forgetting I had one in my tool box already. Oh well, now I have two. Two I wish to never use again. So I studied the YouTube videos leading up to this simple task, just to remind myself. Not too bad really, pretty simple. Right! Disassembly was easy. I pulled the axle on the side I was going to do, changed the studs to the longer ones I needed, then popped it back into place. Next I removed all the old pieces, being smart enough to arrange them as installed. So far so good. I cleaned the backing plates, cleaned the pieces that were going to get reused...maybe a bit late, but made sure the new shoes matched the old. No problem. I dabbed a bit of hi temp axle grease on the three rub points, for each shoe, used some copper anti-seize on the adjuster...ready to reassemble. First, got rid of the old too short parking brake cable, popped the nice shiny new one in...slipped the end into the parking brake lever and proceeded to put the shoes in. I don't have the fancy little tool for putting the small springs and retainers/pins that go at the center of the shoes. I've never had it, just used a pair of pliers. Today, with crappy light and bi-focals, I couldn't get the damn things on. They are slightly different than the stock ones. The stock one are wound with a small "nose" that goes into the shoe and keeps it from moving around. You know, while you hold the 800 parts together. Along with my not being able to see well enough to get the pin through the hole, then rotate the keeper to lock it, the damn parking brake lever keep falling off. More times than I care to repeat, I was putting that damn lever back into place. I was NOT going to pull the stinking pins again, so I did it with the brake shoe in place. I got pretty good at it actually. The struggle continued with me getting the other shoe in. In both cases, I eventually just used the old springs and new pins. They were both the same height, but without that nose sticking through the shoe, the new ones put a bit more tension on things. Maybe I'm just getting old. So I continued the vacation, got all the remaining parts at the top done, the small cable that loops down to the auto adjuster...and then started to put the adjuster in. The parking brake cable wouldn't let me put it in. The replacement, which is not the Cherokee one, but IS for another Jeep that also uses the 8.25 rear, ended up having a longer spring on the inner end. It was maybe .25 to .375 longer, but it seemed to be just enough extra length to cause the section to bow out and jam up the tensioner. This was not going to work. Period. So I removed the parking brake cable. Problem solved. I don't really think there is a problem with having the parking brake level behind the shoe. With nothing pulling on it, I didn't see that it was going to do anything. I had just adjusted the stock parking brake, and it worked well enough when I forgot to release it I couldn't at first figure out why I couldn't rotate the rear to remove the axle. So in every video they suggested adjusting the tensioner to it's narrowest, which I did. I put the wheel adapters and wheels back on, thinking all I needed to do now was adjust the brake...I only did the drivers side today as I can't schedule use of the driveway with my boss...er ah wife. Rotating the tire there is more resistance than I expected. Yes, brand new drums, brand new shoes, but the adjusters are slacked off completely. They are not bound, but I just don't remember them ever being so tight before. Maybe my memory is failing too and they will loosen up right away. Not that I want to, but I may be back in there to take another look. I think I might just put the rear on jack stands and start it up. Try it a little in first gear to see what happens. Comments welcome. -
The term common was used because I don't usually expect other people to have 40 years of engineering behind them, and it was used because the diagram showed it "going" to each of the other terminals. I explained the relay in common terms, not the functions specific to the application. It was only meant to illustrate that power goes in the terminal on the left, the load is connected to the upper right and the coil, shown, is grounded at the lower left. The white wire in house wiring is not ground. It is neutral. There is a very big difference.
-
Do you have or would you start a thread telling us how to do the TK5 swap? I find machining the OD on the bellhousing to be pretty minor. What else did you need to do and what exact parts combination did you use? I have a 46 truck. Thanks.
-
I have to disagree. The chain does not properly fit the crank sprocket. The mismatch is visible in the second picture, as you pointed out. Since there is a lot less sprocket, the small spacing error between the OEM sprockets and the chain never gets as large, but the chain is not correct. Edit: should have read them all, especially your last. Yes.
-
Time to talk exhaust and it's gonna have to be custom
lostviking replied to bkahler's topic in Mopar Flathead Truck Forum
I'd run 2 inch pipe, one on top of the other following the stock route. After the cab, is where I would mount the 2 into 1 muffler. Then I'd continue out using the stock route and 2-1/2 inch tubing. The motor isn't huge, and it doesn't rev high. That is more than enough to give it a lot of breathing. To each their own, but that is how I plan to do my 230 after I rebuild it. It will use the dual carb intake I have, Red's 3 into 1 headers, an Edgy head...but one of the new designs that the Montana Mopar boy's are working on, one of their cams also. If I'm rolling in money, which isn't likely but heck...I can dream a bit, I'll use a set of those CP forged pistons and H-beam rods. They are expensive, but with the oiling done right and the crank prep'd I will be able to rev quite a bit over stock. Or maybe, just the first part of all that, and no piston/rods. It will still be a very nice motor and sound great. -
Master cylinder upgrade to 2 chamber style
lostviking replied to George Anderson's topic in Mopar Flathead Truck Forum
Page 5-9 of the parts book. Item 25. -
Master cylinder upgrade to 2 chamber style
lostviking replied to George Anderson's topic in Mopar Flathead Truck Forum
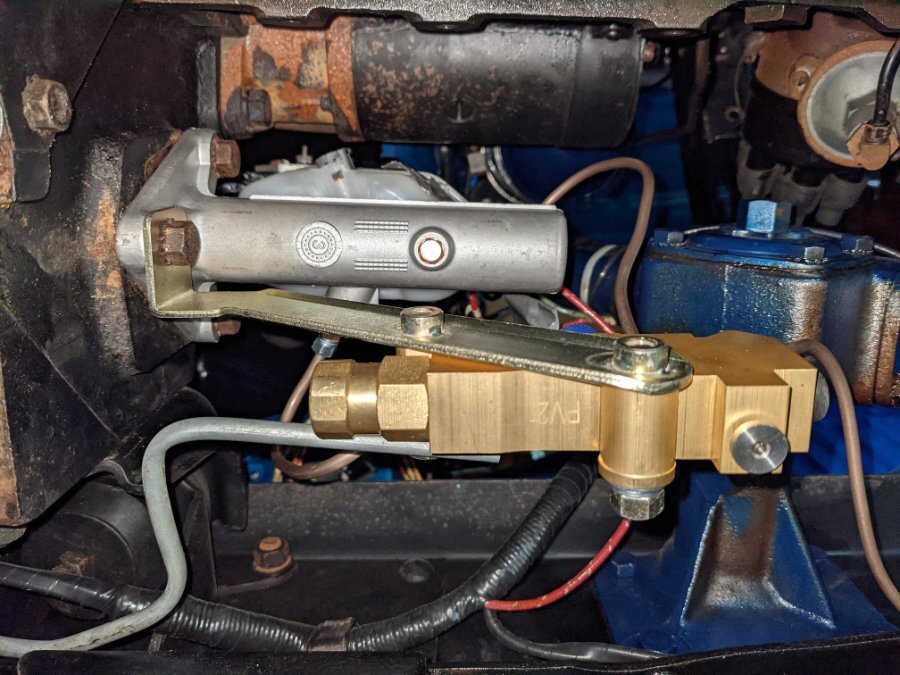
On my 46 WD15, there is a return spring on the brake pedal. Also, the rod can't come out of the master cylinder unless I go under there and slack off the adjustment on the rod length itself. I have disks on the front and drums on the rear. The PV2 is designed for that, and is not adjustable. I must point out, that I have not driven the truck yet, as there are still things to finish. -
Hot goes to the common terminal. The line, top right goes to the load. The right coil goes to whatever switches it.
-
Vintage Dodge truck horn repair
lostviking replied to 1937 Dodge's topic in Mopar Flathead Truck Forum
Two six volt horns, then run them in series. In parallel they both still see 12V. -
Master cylinder upgrade to 2 chamber style
lostviking replied to George Anderson's topic in Mopar Flathead Truck Forum
I talked to the people at Scarebird. I went over the complete system with them, and they said I wouldn't need residual valves. -
Master cylinder upgrade to 2 chamber style
lostviking replied to George Anderson's topic in Mopar Flathead Truck Forum
Here is the proportioning valve attached and the two just sitting on my work bench.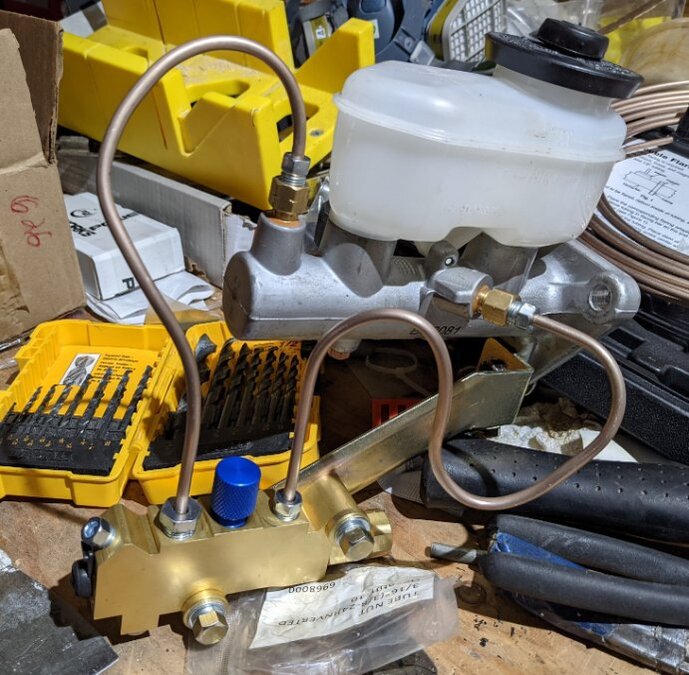
-
Master cylinder upgrade to 2 chamber style
lostviking replied to George Anderson's topic in Mopar Flathead Truck Forum
Here is a picture of mine installed, and another with a PV2 proportioning valve attached and mounted.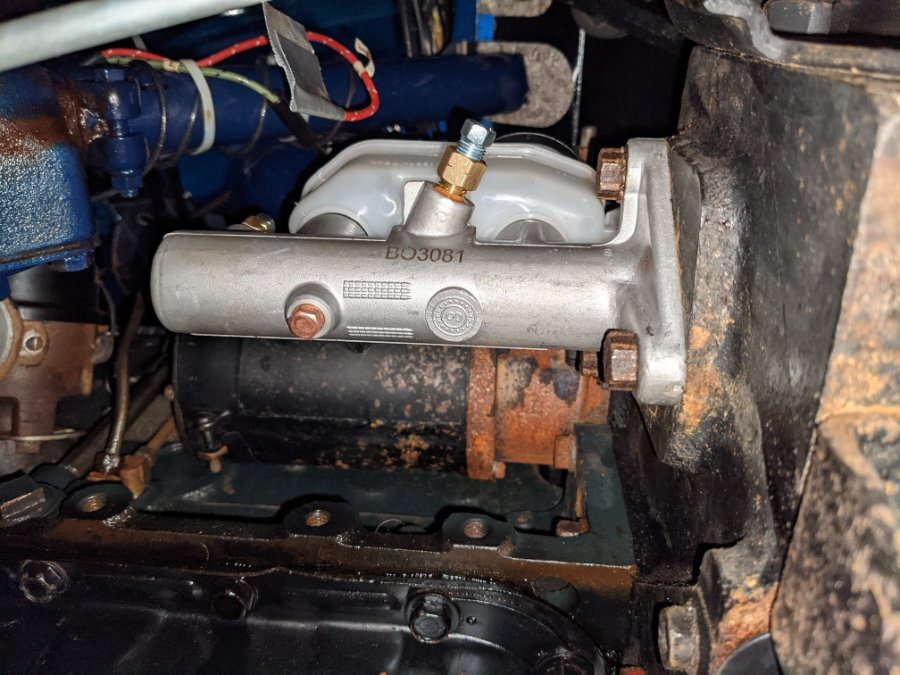
-
Master cylinder upgrade to 2 chamber style
lostviking replied to George Anderson's topic in Mopar Flathead Truck Forum
The Toyota is a slightly different bolt circle. I used a couple drills to step the holes up until I was able to bolt it into place (46 Dodge WD15). I forget the exact drill I ended at, but I was just hitting the inside of the aluminum with the bolts. It leaves plenty of meat in the mounting flange on the master cylinder. -
Thanks for the link. They have a lot of nice stuff that might come in handy.
-
I took the drivers drum off and I don't really like the idea of just pulling the cable anymore. I'm not sure about leaving or removing the mechanism in there. I did a bit more reading and the Jeep guy's have figured it out. When they do a lift, they end up with the same problem. The solution is to use two passenger side cables from a 91 or newer Wrangler. The moved the control from the console to the drivers foot well, so the cables on the passenger side had to be longer. I ordered them and will install next week. Now I just need to figure out how to connect the front cable to my stock handle. What could possibly go wrong?
-
I'm not really happy with what I am seeing trying to connect the Jeep e-brake cables to the front of the truck. For one, I will have to get a custom cable made for the drivers side, it's just too short for any mounting point. The passengers side is doable, but... I still have the stock setup and it works fine. My question is can I just remove the cables from the Jeep rear end and plug the holes? Do I need anything connected inside the drums? Merry Christmas to everyone. Tim
-
That part I bought was not going to be long enough for the exposed lengths of the cables. Not even close, so it makes me wonder what it was for. I went up to the local metal supply store today and bought a piece of .120 wall rectangular 2x3 tubing. I laid the cables out and gave myself a generous portion of the threaded adjuster, then cut the tubing to length. About 16 inches is what I came up with. I used a cutoff wheel and then cut one of the wider walls out also. I cut off the end of the part I bought that the two rear cables go through, and welded it into one of the ends. I did the same for the front, but it is so much narrower, I just didn't like how it came out, so I "removed" it. I'm going to weld a rectangle of the wall I cut out into the open end. Then I'll just cut the hole for the front cable entry. My plan is to cut and remove the jacket on that cable, near the mounting point that goes into the new box I'm making. That can act as the guide and I figure it's nylon lined, so the central cable can ride on it. I'll figure out something to mount it to the stock lever once I get that far. I've heard they don't move enough to engage the rear e-brake, so maybe that will require an extension of the lever. We'll see.
-
1946 WD15 rear end swap...and full replumb of brakes
lostviking replied to lostviking's topic in Mopar Flathead Truck Forum
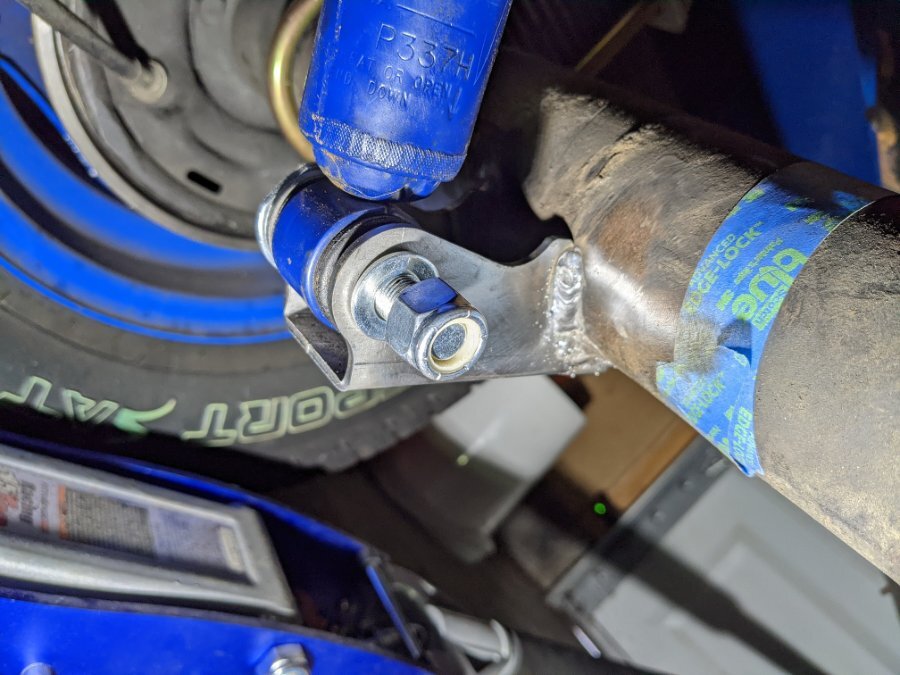
Welded in the lower shock mounts today. I don't claim to be a welder, because I'm not. These are my third set of welds since getting a decent welder. I have a Harbor Freight welder I converted the DCEN, but I'm very much a student at this point. I think I got the settings pretty good, and where I was able to use both hands and see what I was doing they aren't too bad. Even the really ugly one is a solid mechanical weld. Just the emergency brake and the longer studs in the axles left.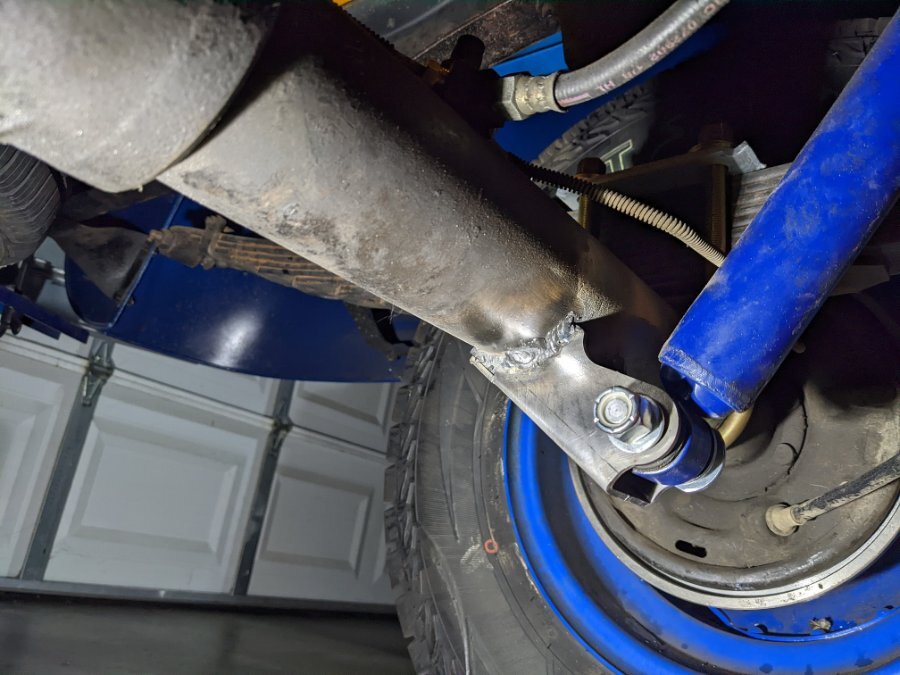
-
1946 WD15 rear end swap...and full replumb of brakes
lostviking replied to lostviking's topic in Mopar Flathead Truck Forum
I did the final bleed of the system today, and got the brake light switch working. I used an adapter from 1/8 NPT to 3//8-24 and reused the original brake light switch. I rerouted the wires slightly because I'm using an unused port on the PV2 proportioning valve. Hooked the battery back up and I have brake lights. The saga will continue a bit though, as I haven't gotten the emergency brake in the rear end hooked up yet. The stock setup is still installed. I also need to pull the axles to install longer studs due to my wheel adapters. I've got them, but I want to pull the truck out of the garage to do it. That needed the brakes to be working. All that is left right now, besides the e-brake, is to swap the studs on the axles, clean the differential with some brake cleaner and then reinstall the cover. Fill her up and I should be mobile again. -
$20?
-
The Montana Mopar boys became the sole distributor awhile ago. They have made some improvements to the heads also. The story is best read on their site, rather than relayed by me. All you questions are a website away. Considering their past records, I do think they know a thing or two, however not everyone wants to get more than stock performance. I get that and see nothing wrong with that approach.

