


lostviking
-
Posts
687 -
Joined
-
Last visited
-
Days Won
6
Content Type
Links Directory
Profiles
Articles
Forums
Downloads
Store
Gallery
Blogs
Events
Classifieds
Everything posted by lostviking
-

ANSWERED Upgrading master cylinder
lostviking replied to dgrinnan's topic in Mopar Flathead Truck Forum
Other than using a Scarebird kit, that is exactly what several of us have done and documented in thread here. I added the Wilwood residual valves later, but I'm sure we are using the same parts. I also didn't come up with the Toyo master, another person who had already documented it supplied that for me. I'm back to that right now btw. Funny thing is, every time I've had the lines off and master dry, I've been able to fill it up and wait over night...then just pump. Never had to bench bleed the master -
Random talk about my engine, nothin special
lostviking replied to lostviking's topic in Mopar Flathead Truck Forum
When I stopped developing my AoK clone intake, it wasn't because I thought it was a bad idea. In fact I also stopped working on an adapter plate for the 833 transmission. I did that because I found out from Tim Kingsbury, that George Asche might have some plates still available. He did, so I bought one. He actually did a new run of them so I got one that was just finished. In talking with Robert, one of his sons, about the plate I tossed out a question I thought I knew the answer to...were there any AoK intakes still available? I was shocked when he told me they might have one I could buy. I sent them a check the very next day In all it's glory, here is where I am with it. I'm just getting started mocking up the linkage. George will do that for you, and it would most likely be better. I'm using my Carter WA-1's though and George prefers the B&B. Besides the fact that I like to do my own tinkering. I drilled the tabs for the linkage rod a bit over and epoxied 5/16 oilite bronze bushing in place. I used the rod as a jig to get them in the right alignment, using my digital angle finder and some wire to pull the rods until is was as close to perfect as I can get it. I still need to add a threaded hole to locate the bell crank, which I'll take off my stock manifold. The right carb is just lightly bolted back together for the photo. I am taking it into work tomorrow to use one of our mills to drill for the custom bushings I'm making for the throttle shaft. The machine shop manager (We are an electronics company in simple terms) is helping me plan. I'm going to redo the bushings from some oilite bronze they have at .375 dia. I don't think the cast iron base has the wall thickness to go that far, so we will take a look and go with something that has more like a .020 wall thickness. We make cryogenic equipment (physics instruments) primarily, although I work on our SEM/AFM fusionscope project team. Anyway, I have liquid nitrogen I can use to freeze the bushings and after we heat the cast iron the plan is to have about a .0005 interference fit. Pretty tight sounding, but our guy's do tighter than that. I'll hone the bushings to size from my initial .3105 reamer. Should be fun. You never find cool things, if you don't ask. I don't know if there are any more intakes available or not. The truth is, if you don't have to pay for anything but the raw materials (machine yourself, welding is free) you can do a pretty good job of imitation using the design I started. But it won't have George Asche Jr's name on it. Miles of smiles here.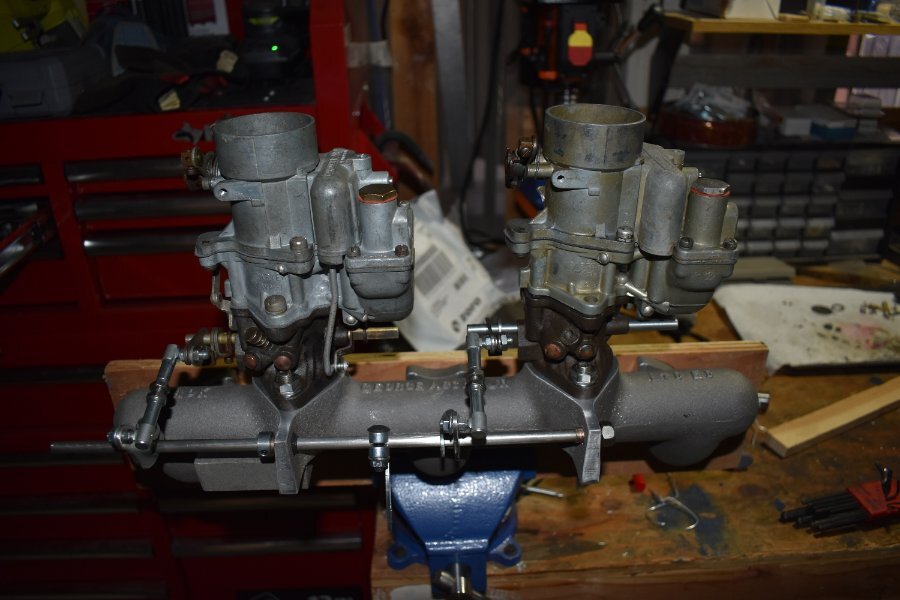
-
ANSWERED Upgrading master cylinder
lostviking replied to dgrinnan's topic in Mopar Flathead Truck Forum
Before anyone else makes the same mistake. I tried fitting that master cylinder in the truck today, but there just isn't enough room. It's longer than the stock one was, so it hits the steering box, and it might hit the starter also, I just couldn't tell. Bummer. I'll keep it and give it a try if I get an IFS installed some day. -
Cleaning carbs without toxic chemicals
lostviking replied to lostviking's topic in Mopar Flathead Truck Forum
Books are good. -
Cleaning carbs without toxic chemicals
lostviking replied to lostviking's topic in Mopar Flathead Truck Forum
Just bought a .3105 reamer to finish this off. Then I'll just cut a couple to length.
-
Cleaning carbs without toxic chemicals
lostviking replied to lostviking's topic in Mopar Flathead Truck Forum
The bushing I purchased came in over size and I won't use them. I just stepped away from the lathe, making my own. I turned the OD to .376, which I can reduce if I need to, but by freezing them I think I can put them into the cast iron (which I'll heat). That should give me a nice tight fit. I'm going to drill the ID just under and them ream using a .310 reamer. That should give me .001 (or .0005 on each side) and a pretty much perfect fit. I used standard bronze, because we have it and because this is almost a static surface for a throttle shaft. Either way, it's a lot less severe of an interface than the shaft against cast iron. Now I just need to turn a shaft long enough to go through both sides of the body, to use as an alignment tool for my drill press. I'll have it in the DP vise, clamp it and use the "tool" to align the body perfectly. Then just swap the "tool" for the reamer. Then I'll have two perfectly aligned .375 holes to push the bushing into. -
Cleaning carbs without toxic chemicals
lostviking replied to lostviking's topic in Mopar Flathead Truck Forum
Oilite bushings are almost alway ream to fit. IDK where you see someone saying to not ream them. Take a look at the Practical Machinist or a bunch of other sites regarding reaming bushings. Spec is .001, not .002 which is probably fine, but looser than one of my carbs is now. It's doubtful I'll need to do anything after installation due to the method of installing the bushings. -
Cleaning carbs without toxic chemicals
lostviking replied to lostviking's topic in Mopar Flathead Truck Forum
To repair the thottle shaft wear, after measuring it's in the cast iron part, the shaft doesn't have any real wear. I bought some 5/16 ID, 3/8 OD bronze bushings and a 3/8 reamer on Amazon. It has a flute area longer than the carb diameter and a nice long shaft. I can stick it through the two holes in the carb base to align things and ream "backwards". The bushing are smooth, so I will use some JB Weld steel repair to epoxy them in place. After they are completely cured, I'll use another 5/16 reamer to align bore the bushing, just in case there is any issues. I'll check the throttle shaft first and if it's easy to go in and fits freely, I won't do the final ream. Should end up with a nice tight rebuild on this one. I cleaned all the linkage up with some wire brush heads and my Dremel. I'm definitely going to take the bottom off the other carb and do this also, as it still has some rust and can get rid of. I'll just need to replace the butterfly screws again. Pretty much wraps up the rebuild thread for the carbs. After that I just need to put them on my AoK intake and fab the linkage. I'll just model mine after what George does, because that works fine. -
Cleaning carbs without toxic chemicals
lostviking replied to lostviking's topic in Mopar Flathead Truck Forum
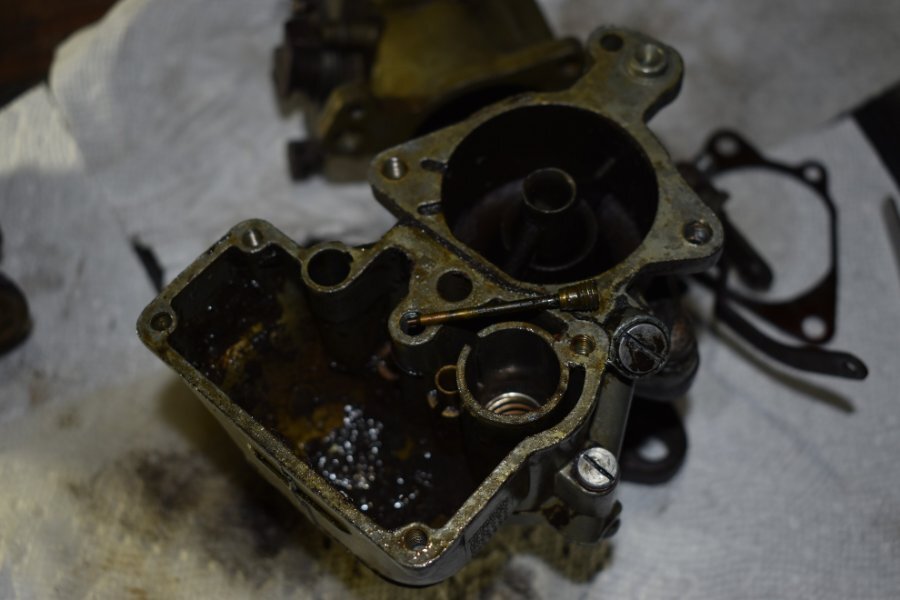
Here's some before and after action. The surface has been sprayed with carb cleaner to displace the water, then PB Blaster to keep it from rusting right away.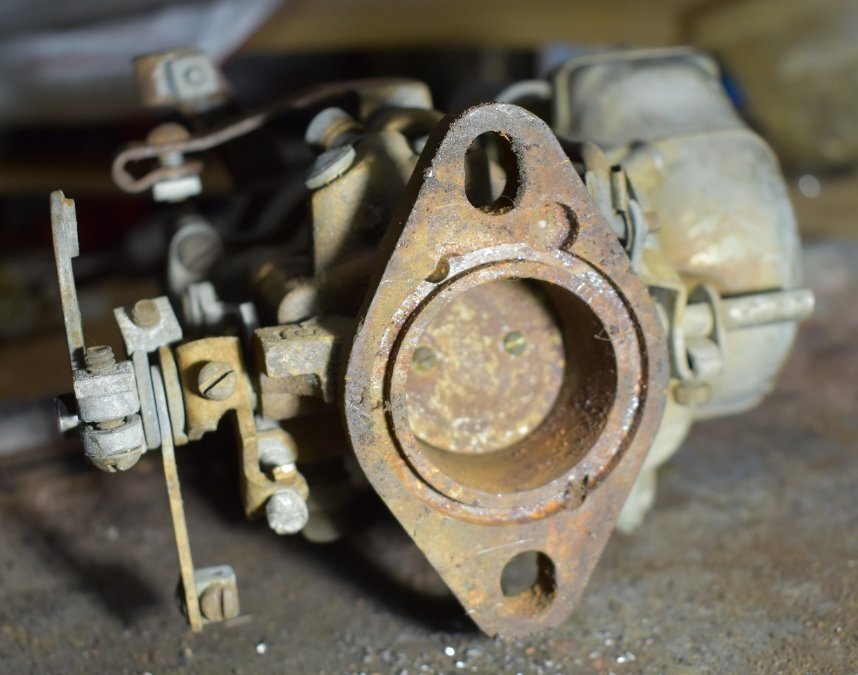
-
Cleaning carbs without toxic chemicals
lostviking replied to lostviking's topic in Mopar Flathead Truck Forum
I took the throttle shaft out today and measured. Yep, about .010 clearance. .001 is about what it should be, so definitely need to bush this one. While it was just iron, I popped it into a plastic container of water/washing soda and I'm removing all the rust with electrolysis. Same technique I used to restore the rusty heater I bought awhile back. It will be spotless. Probably take the bottom off the first carb and do it also, just not today.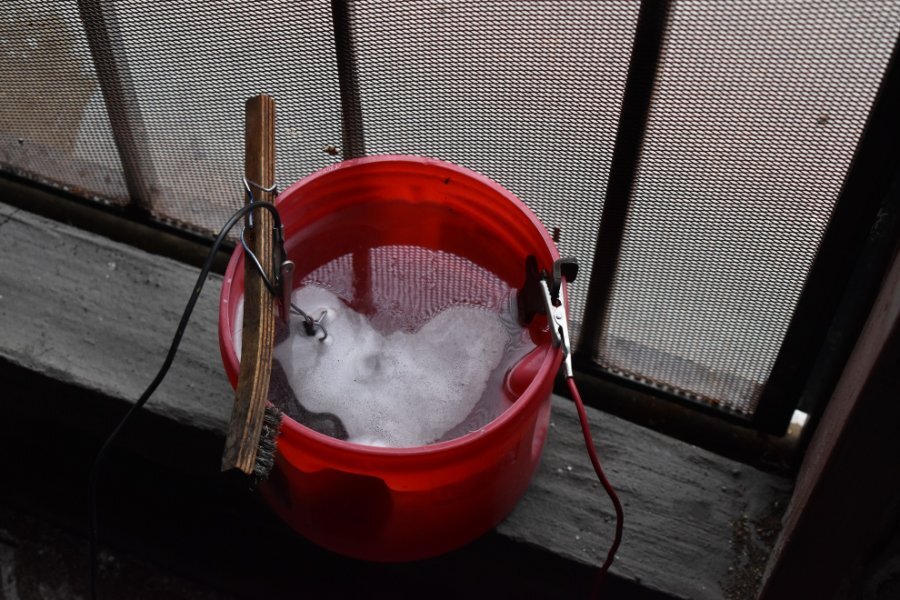

-
Someone else asked about the exhaust flanges I had made, so I'll post the drawing and anyone who wants can use it. exhaust flange.DXF
-
Do a google search. There are a number I have used, but it's been awhile. I use Solidworks and Draftsight, so... No, SendCutSend only takes DXF files.
-
You should make sure that the scaling of the DXF export is correct, it does happen. I usually dimension the drawings also. Keep any issues like that from happening, because they have the dimensions I say it is right in the drawing. The only problem I had was in the first part I sent them, I sent a top and side view, as I would most vendors. They sent me both parts
-
Its a place called SendCutSend. You just send them a drawing of the part, tell them the material and thickness and bam. I've used them a couple times now. Better than going to a traditional machine shop, or even just doing it yourself some times.
-
Cleaning carbs without toxic chemicals
lostviking replied to lostviking's topic in Mopar Flathead Truck Forum
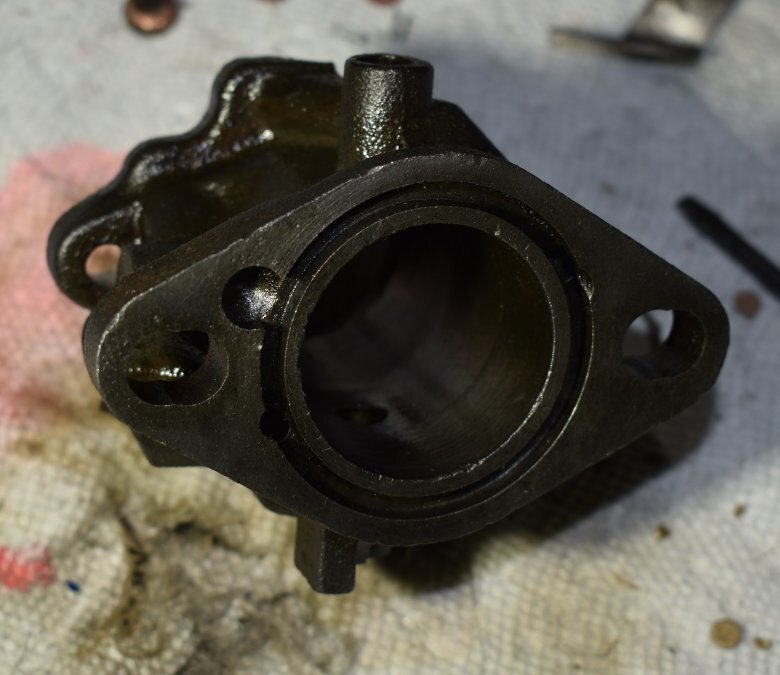
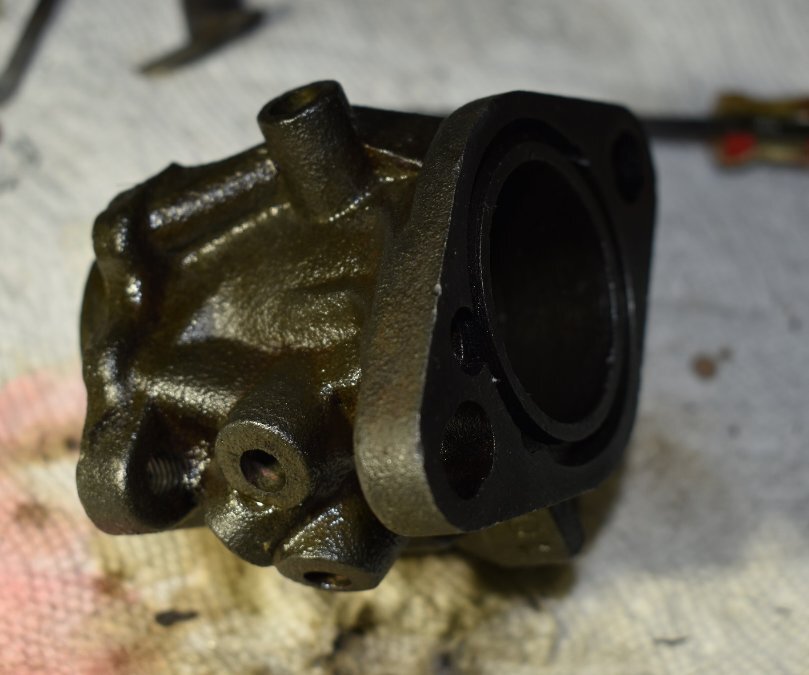
Same part as above, after 40 mins in the ultrasonic cleaner. It's amazing how the surface stains show up in the picture. In real life it looks a lot better.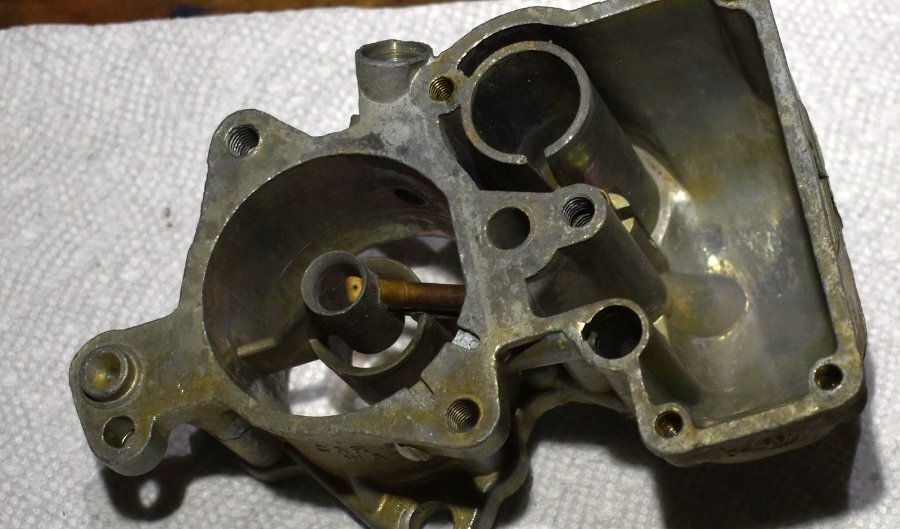
-
Cleaning carbs without toxic chemicals
lostviking replied to lostviking's topic in Mopar Flathead Truck Forum
Of course. I did say I was going to write up a detailed guide. That takes good pictures. Maybe read the post before you start laughing next time. No, I don't need them today, but who knows when I'll need them in the future. 65 year old brain cells don't get better with time I've heard. -
ANSWERED Upgrading master cylinder
lostviking replied to dgrinnan's topic in Mopar Flathead Truck Forum
I just ordered this master cylinder, https://www.rockauto.com/en/moreinfo.php?pk=10960916&cc=1089020&pt=1836&jsn=13 It's for disk/drum on a 1975 Dodge Dart. It has a four bolt mount, so I'm going to build a .250 thick plate of steel and adapt the stock three bolt to that. I'll use some flathead screws to secure the plate to the truck, and put four flathead screws into the plate, facing the master to act as studs. I'll weld the heads in place to keep them from turning. I'll let you know how it goes. -
Cleaning carbs without toxic chemicals
lostviking replied to lostviking's topic in Mopar Flathead Truck Forum
Another thing I might do is use electrolytic rust removal on the rusty the steel linkage parts. I've got everything I need, just need to set it up in a little pint container. Or I might just take them to work and media blast them in our machine shop. -
Cleaning carbs without toxic chemicals
lostviking replied to lostviking's topic in Mopar Flathead Truck Forum
I took the second carb apart today, and took another 40 or so hi-res pictures. This one was the dirty one, but inside it was in great shape. Not a bit of corrosion, so it's a good rebuild core. The bowl area in the first one had zinc oxide in places, especially the accel bore. The only defect is the throttle shaft has nearly .010 of play, so it's going to need to be bushed. I may take the bottom off the first carb and use it on this one. That way I'd have one nearly perfect one. We'll see.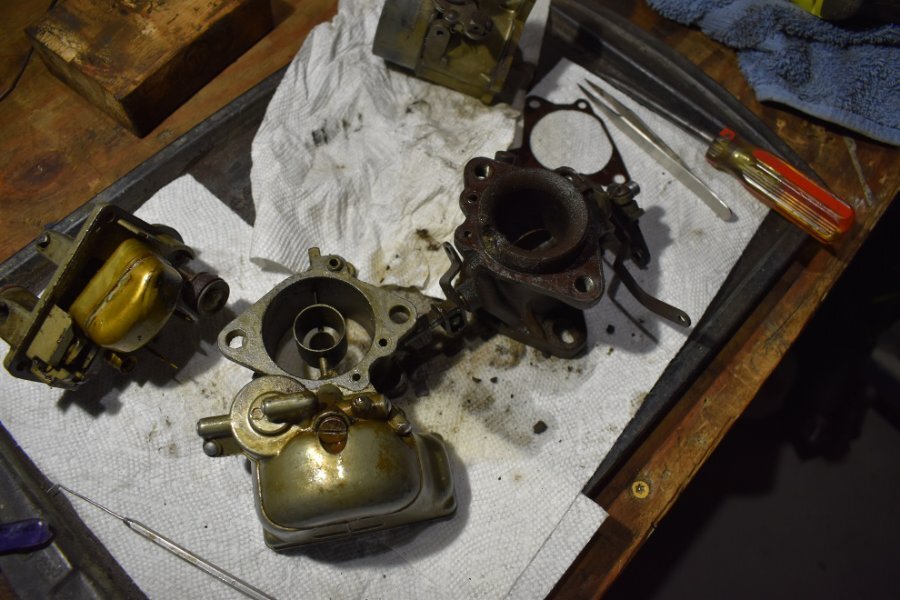
-
ANSWERED Upgrading master cylinder
lostviking replied to dgrinnan's topic in Mopar Flathead Truck Forum
I have zero leaks, because all the fittings were correct and the flares were textbook. I have a pressure bleeder, so that isn't an issue either. I've repeated the bleeding a couple times. I do get a firm pedal, but it's much longer of a push that I believe it should be, in fact a partial push and release with a quick second push put the pedal near the top. Changing the bore diameter of a master cylinder is well known to affect these things. It's a simple matter of PSI and volume. Other than the similar flange, I don't really like the Toyo master. I prefer a nice cast metal master with two separate chambers for fluid. Unless someone used the same 95 Jeep Cherokee rear, to get the same wheel cylinders, and used the same Scarebird conversion (and same calipers), the results are apples and oranges. -
ANSWERED Upgrading master cylinder
lostviking replied to dgrinnan's topic in Mopar Flathead Truck Forum
I've done it using the Toyo master, but did disk brakes up front and drums in the rear. I used a PV2 proportioning valve, and also added residual valves. I added the residual valves because I'm not really happy with how it all is working. There is a lot of pedal travel for one, and the rear brakes don't lock hard. I'm planning on swapping in a Dodge master cylinder in the near future, and just adapting it to the mounting locations. That will also answer the question of which is front and which is rear the Los brought up. Don't know which one yet, but something dual circuit and no power brakes. I'll do a thread when I get to that. I'm hoping it will make my brakes work more like they should. Having the wrong size bore in your master cylinder leads to either too much pedal effort of too long of a travel. Maybe to the point of having to pump the brake pedal more than once. -
Cleaning carbs without toxic chemicals
lostviking replied to lostviking's topic in Mopar Flathead Truck Forum
I actually took pictures with a digital camera. I used an older one, since my hands were dirty, but the auto-focus kind of sucked. I also have a very nice Nikon DSLR, so I took a bunch of pictures of the second one today. They have great focus, so I did think of that. Old eyes and a small screen didn't let me know the focus on the first disassembly pictures were so bad. What I have are detail pictures of it assembled, showing everything I didn't have a clear shot of today. But I'll be going very slowly on the disassembly and stopping often to clean my hands, so I can use the good camera and look at the pictures. I'll be using two light sources also to make sure there aren't any shadows hiding details I need. Then I'm going to expand on the Carter rebuild guide, with nicer pictures and better detailed instructions. I write assembly instructions as a part of my day job, so I'll have a pretty good one when I'm finished. I'll convert it to PDF and share it in case it will help anyone. Here is an example, although I didn't use the two lights for this one, just the camera flash.
-
Cleaning carbs without toxic chemicals
lostviking replied to lostviking's topic in Mopar Flathead Truck Forum
I put the first carb back together today. It was a very good idea NOT to take the second one apart, and have it as an example. Every YouTube video I found for Carter WA-1 carbs didn't look exactly the same as mine. Both of mine are identical, but the metering rod and accelerator pump linkage was different in the online videos. I have a copy of a 1939 Carter rebuild guide also, but it isn't very good, or detailed. I definitely stumbled and had to back up...more than once. But it's together and everything seems to move and such correctly. Comparing the two, everything is again the same. I used the second as a guide to get some of the adjustments "close" I hope. We'll see once I put them on my truck and try to make them work. At least it's clean, and has all new gaskets. Some of the brass jets and needles in the kit were not used, because there was no visible wear on the old ones. I'll keep all that.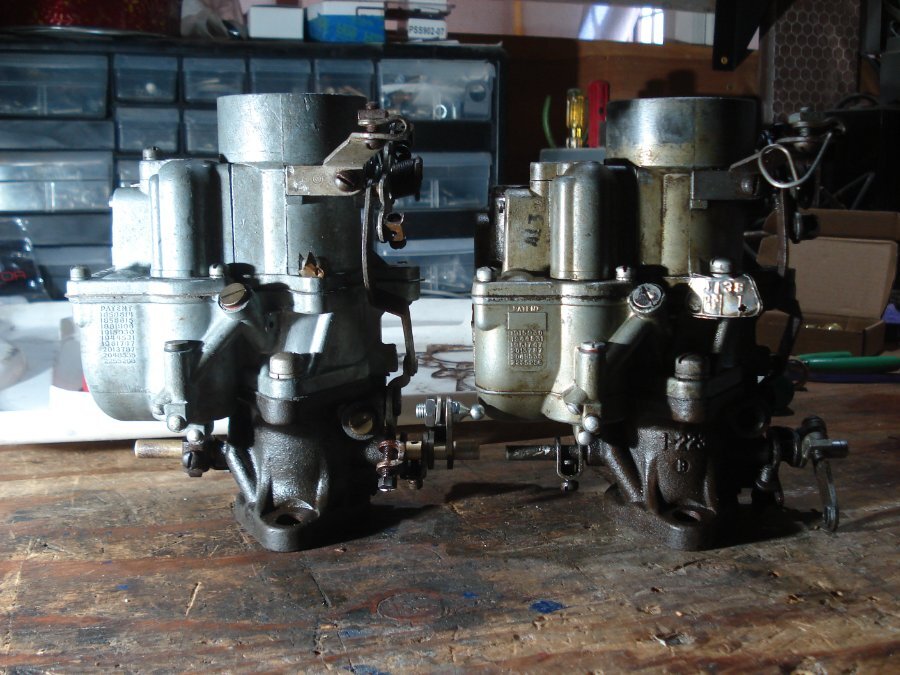
-
https://www.t137.com/registry/help/otherengines/dengines.html 230 Dodge car engine 1946-48
-
Cleaning carbs without toxic chemicals
lostviking replied to lostviking's topic in Mopar Flathead Truck Forum
Was able to hook the little "air brushing" wand up to my main compressor today. I hoped with full air pressure, and even a bit too high, it would work. It did not. Even using the supplied media it didn't take off most of the zinc oxide deposits. Those are very small on the piece I tried, but I'm going to have to use small brushes to clean the surfaces. It was so cheap, I'm not returning the air brush. I'll use it to touch-up the paint on the truck so I don't have to mix a bunch of paint and toss it. Easier to clean up also. I guess that makes it not a total waste of money. I wish I could have the soda blaster I used in the corrosion control shop when I was in the Navy. IT removed crap like this. Oh well, manual it is then I'll finish the first carb. I'll get some before and after pictures of the second one so you can see how well the ultra sonic/Zep works.

