keithb7
-
Posts
3,467 -
Joined
-
Last visited
-
Days Won
193
Content Type
Links Directory
Profiles
Articles
Forums
Downloads
Store
Gallery
Blogs
Events
Everything posted by keithb7
-
Pretty easy to hook a bulb up to a 12V or 6V battery and see how bright it is. Compare it to a known 12V if you like. Easiest is look at the number on the bulb base and google it.
-
You done good.
-
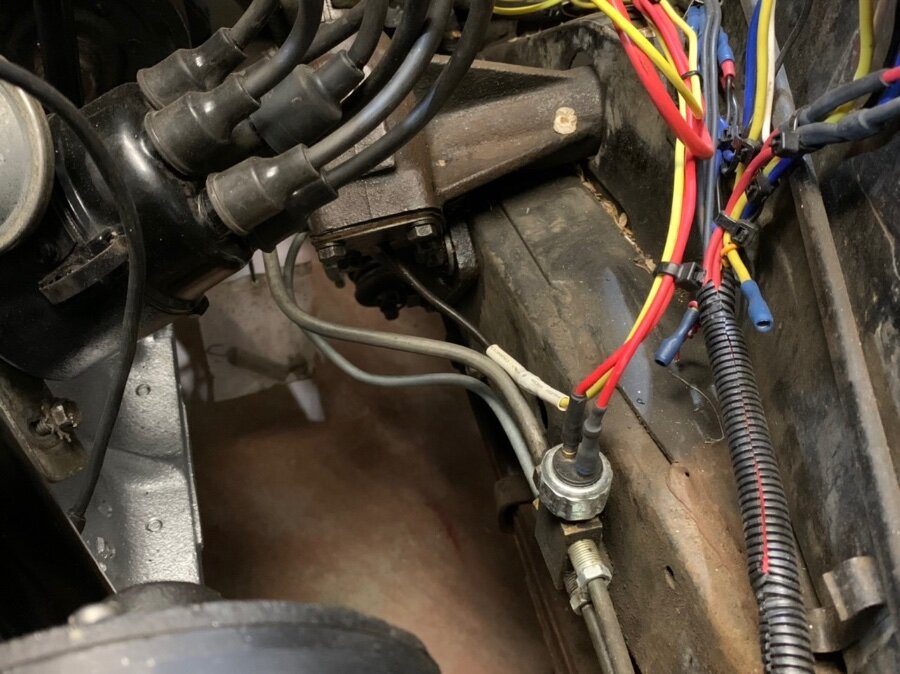
6 cylinder. The rear of block upper line seen comes from the master cylinder. The bottom line comes out of the distribution block and heads to the rear axles. That line splits in two at the rear distribution block mounted at the rear axle. The two front lines seen go to the front brakes. They get their own separate line each,right off this first distribution block, located in the engine bay. This ‘38 car has the earlier type master cylinder. Located near the firewall/cowel. Down low near the floor. Yours is likely located further back, under the driver’s floor of your ‘48. Is that correct? There are no fuel lines shown in the pic above. Only brake lines.
-

Three Speed with Overdrive Reference Photos
keithb7 replied to James_Douglas's topic in P15-D24 Forum
Nice work. I’m impressed! -
Aha. The old “electrons taking the quickest path back to battery” trick. They’ll do that given the smallest opportunity. If electron movement wasn’t so hard to see with the naked eye, life for a hobby mechanic would be a lot easier. Glad you found it. Congrats!
-
Hopefully someone will up my meagre anté and show you pics from a ‘48. Here is what took place in 1938. Driver’s side of engine bay. See steering gear box and engine distributor for reference. That’s a generic brake light switch you see. I bought it at local parts store for like $10. It threaded in perfectly to the brake line distribution block. Don’t mind the wiring mess. Its a driver. And still a “work in progress” sorta deal.
-
I stayed with stock line sizing. I have made many brake and fuel lines. No issues. I see no reason enlarge stock brakes. The stock master and wheel cylinders are engineered as a system with the line size chosen. I trust their engineering over my 2 bit education. A new brake switch is easy to find. They are generic and readily available. Original style and proper stock fitting junction blocks can be tricky to source. Modern ones can work with some custom fabrication I suppose. I rounded up some old spare axles and scavenged parts off them. Junction blocks were saved for spares!
-
Acquiring tools and making your own brake lines is character building. It can be humbling at times. You may end up with 3 or 4 different tube benders to try and make the job easier. You may end up with a couple of different flaring tools. After one or two initial tool purchases turned into useless junk, after 5 or so double flares are completed. In the end it's rewarding work. A good skill to have in your arsenal. I only trust my own work when it comes to brakes. Actually any work on my old Mopar. Nobody else lays a "finger on my butterfinger". Just me. So when I need brakes lines, I rise to the task. Not without humbling errors and re-dos. Alas we smile when we hit the original brakes on the big hill in our old Mopars. My old Mopars have given me the opportunity to learn so many new skills that I use on many cars well outside of the flathead era. Just last month I installed a new Master Cylinder in a 2006 car. Piece of cake. Attributed to so much old Mopar brake work! Indeed go buy yourself a double flaring tool and a long piece of brake line. Get at it and you'll get 'er done. It not hard. Just trying sometimes, depending on the line you need to make. I bought this one. A better tool in my experience than the horseshoe clamp traditional one. https://www.amazon.com/Cal-Van-Tools-165-Master-Flaring/dp/B00AOTBVJQ/ref=sr_1_3?crid=JLS8A4UNUHZX&keywords=CAl+van+brake+line+flare+kit&qid=1641532314&sprefix=cal+van+brake+line+flare+kit%2Caps%2C112&sr=8-3Keith PS. Purchase more brake line that you think you need! Trust me.
-
Happy New Year! A special mention to anyone that owns a 1922 Mopar. Congrats on your car hitting 100! I resolve to have 2 running, driving Mopars again in 2022.
-
I get into this topic here: Maybe I am wrong but I thought that no matter where you decide to index your pump and distributor, as long as the spark plug wires are placed accordingly, #1 position at TDC #1, could be anywhere it the circle of the distributor cap. Sure you might be out one tooth. I have done this before. You can remove the distributor rotating lock bolt and twist it father than normal. Then when the engine fires and runs, you know you are are out. Pull the distributor, set it back a tooth and give 'er another go.
-
"What happens if engine timing is too advanced? Overheating. If ignition timing is too far advanced, it will cause the fuel-and-air mixture to ignite too early in the combustion cycle. This can cause the amount of heat generated by the combustion process to increase and lead to overheating of the engine."
-
Very cool! Sure would love to be able to go to that car show. It looks fantastic.
-
Be sure to get that block tested for cracks before spending any money ordering rebuild parts, or doing any machining.
-
@BryanI purchased a Fowler Dial Bore gage set. https://www.fowlerprecision.com/Products/Dial-Bore-Gage/
-
Check linkage and hook up. Ensure its able to cycle the breaker plate. Try spraying penetrating oil in any holes in the vacuum pot. Get a vacuum on there. Try getting the diaphragm moving again. Might be just rusted up internally. Perhaps you can free it up. Worth a try. Worked for me once on a 1998 4x4 engagement diaphragm that had stopped functioning. if the rubber seal inside is compromised, a new assembly is likely needed.
-
There’s not much you can rebuild. If the diaphragm has failed; https://www.ebay.ca/itm/384572169771?hash=item598a499e2b:g:IFIAAOSw8UdhrkOs
-
Sad to hear of your prognosis Knuckleharley. Sounds like you have a good attitude considering what you are coping with. I too enjoy your posts here. We're all rootin' for good news as you kick cancer in the a s s.
-
Keep a sharp eye out for this little bugger.
-
I’d wager yes, throttle shaft wear leads to rough running. You have to control all air entry into the engine. Allowing all air to enter via the carb intake only. A tell-tale sign of a vacuum leak in the lower throttle valve area is , when twisting the idle a/F mixture screw has little to no effect at engine idle.
-
See that makes sense, and would have been ideal when they built this house. That was long before I took over risk mitigation of this house.
-
Yes we were lucky. It could have been very bad. We were out for the evening. Got home at 10 pm. The front door has a keyless entry lock. It was not working. Due to cold temps too maybe? We had to go into the house via the garage. Opened the garage door and saw the water. Oh crap! We jumped on it. Had we come in the front door, we would have just gone to bed and found a Mississippi tributary in the morning. Disaster averted. Phew.
-
Congrats. That's how many of get it done. Trial and error. Best end result is when we study theory a little bit before, during or after the fix. Let it sink in. Then we retain it and become better troubleshooters!
-
Congrats! Building confidence and skills is a great thing too.
-
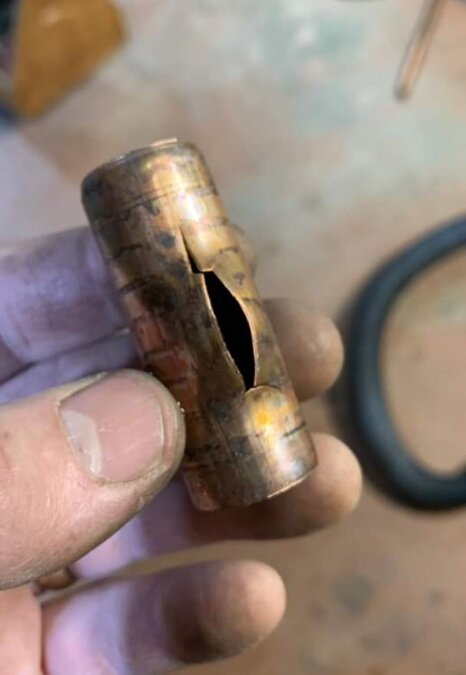
Lol. I imagined 7 zillion, so you seem cheap! ? We were successful on 5 out of 6 solder joints. One must have had a drop of water behind it. 1 did not 100% seal. The 1 bad sweat joint dripped 1 drop every 1-2 seconds. I put a tupperware container under it and went to be at 2AM. This morning I headed to Home depot bought a Shark Bite union and inserted it. All fixed! Just the clean up still. Need to reclaim my garage now and get my 38 Plym back in there. She spent the night out in the driveway at -30. I don't think my radiant hydronic baseboard heater in the shop can radiate heat with Pex. I assume I'd need some type of new fan-dangled wall mount radiant unit. This madness occurred because 4 years ago I shut off the hot water feeding the garage. I did not want to heat it 24/7. All seemed fine. 3 winters later no issues. I assumed incorrectly, that the heater pipes would have been filled with some type of anti-freeze. As this 4th winter, disaster. The pipe split open. Actually in 2 spots. So for now, we will cycle hot water through it. I'll set the garage thermostat to about 35F. If I do decide to shut off that heat , I will insert 2 ball valves and a drain. So I can evacuate any water in that particular loop through the garage. Later if wanted, when it warms up!
-
Best laid car work plans thwarted again today. Came home last night to water on the floor in the garage. Burst copper pipe. Of course the water attempted to find its way to the ocean and ended up in the basement too. Damages not too bad. No insurance claim will be made. My wife and I rounded up tools at 10 pm. We were cutting copper and soldering until 2 AM. The burst was part of the the main hydronic heating system in the house. We shut off the heat for about 3.5 hours. At -30 things were cooling off quickly. Great motivation to get creative real quick and come up with an emergency repair. We know what caused this and have addressed it. My wife is a good hand and was right in there with the repair.