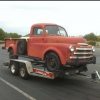
Dingo's 48 Posted March 31, 2013 Report Share Posted March 31, 2013 I stumbled on to a 1948 Dodge B1D on craigslist. It was only posted for a few hours and I responded. I received no response. Six weeks later, i received an email from the seller apologizing for not responding as family life situations got in the way. He sent me his number and asked me to call if interested. I chatted with the gentleman and was surprised to find that the truck was still available. He told me about the truck and I agreed to buy it sight unseen and would be there next weekend to purchase it. What I purchased: I arrived to find a dodge truck in good condition. It would not start, the brakes didn't work and it had two flat tires. The truck was purchased by this gentleman's great grandfather and had stayed on a farm in Fresno most of it's life. This gentlemen had received it from the estate 12 years prior as a fun project for him and his son. They would get it running and drive it once a year and had dreams of restoring it. They never got around to it and it sat at their residence in Redding for those 12 years. I loaded the truck onto a trailer and towed it home. and hour after i unloaded the truck, she was purring like a kitten and the brakes were bled and in fine working order. The truck has no rust holes, minor surface rust, broken leafs on the front springs. Yesterday I put a remanufactured carter B&B 1BBL carb on it and ohhh what a difference in performance. This next week, my son and I will remove the front springs and take the to SAcramento Spring INC and they will rebuild them and make new U-bolts to match the ones that come off. We have had the truck for a year and I have been debating all the avenues of what to do to the truck....... My sone wants to keep it "old School" so we are opting to do the following. Wet sand the faded paint and just clearcoat it with flat clearcoat. I would like to update the brakes to disc but other than that it will remain stock. I will convert it to 12, negative ground just for durabilities sake. I found an electrical company in Lodi, CA that will convert the starter to 12 volt negative ground for the same cost as rebuilding it as a 6 volt. I need to find wood, bolts and metal for the bed replacement. It is the 9 foot bed. I also need to find every seal for the rear axle. I need seals for the 4 speed transmission. I need to find a company that can either restore the old radio or find a radio to replace the original. I need a fuel pump rebuild kit. If anyone has a source I would greatly appreciate direction. If anyone needs a carter B&B for there truck, go to : carb-x.com, call the number and ask for Herman. The carb I got for 189.00 included being rebushed and preset. I put it on and fired it up. If you need springs I recommend Sacramento Spring Inc. They are on the web. They do most of the restorations and hotrods here in Nor-Cal. I have rambled enough about our truck and I hope some find this post of interest. In closing I can say I have never been hounded so much in my life. People knock on the door and want to buy our truck, we go to the farm shows and people want it, we get stopped in town and people want it. Thanks for reading the Mopar rookies diatribe. Dingo 1 Quote Link to comment Share on other sites More sharing options...
Merle Coggins Posted March 31, 2013 Report Share Posted March 31, 2013 Welcome to our "little" family. First off, what so unreliable about 6 volt systems? I have not had any issues with my truck, related to being 6v, since I built it. I have added a 6v-12v converter to power a modern radio and power outlet for my GPS, but otherwise it's stock 6v + ground. And even if you do convert to 12v you could leave your starter alone. I've heard of many guys that have done the conversion and haven't touched the starter. I will spin faster, but can tolerate the higher voltage for the short periods that it is energized. For your fuel pump I highly recommend Antique Auto Parts Cellar. They have rebuild kits made with parts capable of tolerating modern oxygenated fuels. http://www.maritimedragracing.com/antique_auto_parts_cellar.htm I got all of my truck bed parts from Mar-K and have been very happy with their service. http://www.mar-k.com/ Others will tell you that Bruce Hornkey is the guy to go to for bed parts. http://www.horkeyswoodandparts.com/ And others will claim that Midwest Military is the only place that has "correct" bed strips. http://www.midwestmilitary.net/ Good Luck with your truck, Merle By the way, have you heard about our BBQ party coming up next week in Lodi / Clements? Quote Link to comment Share on other sites More sharing options...
Dingo's 48 Posted March 31, 2013 Author Report Share Posted March 31, 2013 Thanks Merle I may rethink the 6 volt issue. I do have time as the Springs come first. Dingo Quote Link to comment Share on other sites More sharing options...
B1B Keven Posted March 31, 2013 Report Share Posted March 31, 2013 Welcome! X's 2 on the 6 volt. Parts are readily available. I had my radio rebuilt here: http://www.nostalgiasounds.com/ There's another member here from Isleton. Screen name is Boss Hog. Keven Quote Link to comment Share on other sites More sharing options...
Dingo's 48 Posted March 31, 2013 Author Report Share Posted March 31, 2013 Thanks Keven, Dingo Quote Link to comment Share on other sites More sharing options...
B1B Keven Posted March 31, 2013 Report Share Posted March 31, 2013 Thanks Keven, Dingo You're welcome. Interior goodies. http://www.pilothouseinteriors.com/ http://www.quietride.com/catalogpdfs/dodge_truck_catalog.pdf Quote Link to comment Share on other sites More sharing options...
Scruffy49 Posted March 31, 2013 Report Share Posted March 31, 2013 Unless you plan (as I do) for a bunch of late model donor stuff in your truck (ac, stereo, cb, power windows, etc) the 6v stuff is fine. Only reason I'm going that route is I have a complete wrecked Ranger (bent frame) to rob parts off of. Including transmission and rear axle. People were always stopping here and wanting to buy my 49. They've stopped since I put a sign in the yard that says "Pickers and scrappers will be shot". They'd already taken my father in law for 2 ski boats, 1963 F250 and 1985 F250HD, a 68 Beetle and a 46 CJ2A. Plus countless other items from the barn. I do have people while I'm out and about inquiring about buying my 69 Dodge, $10 a pound usually gets the message across pretty well (the 400 pound cattle rack helps too). Bed wood... if you are going to use it as a truck, just buy a few 10' Doug fir 1x10s or 1x8s and cut them down to fit. Generic galvanized or stainless carriage bolts and eye bolts for the main hold downs. Bed floor in 1948 was oak painted flat black, seems a waste of money to buy hardwood and then paint it... Locally sourced wood, Thompson's Water Seal, and have fun with it. Look in the kick panel "pockets", I found a switch blade and an early Playboy Party Jokes book in mine. And a really nice antler "pipe bowl" under the seat. Guess my stoner uncle turned button down business man who's since forgotten his roots wasn't always a waste of space... If your starter works as is, leave it alone. 12v will slightly accelerate wear on the copper in the plunger contact switch, but you can get new switch guts cheap at Tractor Supply or NAPA if the counterman isn't lazy... Nice looking truck per your avatar. You and your son should really enoy the refresh and use process. Quote Link to comment Share on other sites More sharing options...
Dave72dt Posted March 31, 2013 Report Share Posted March 31, 2013 Welcome to the Moparty. One thing I usually mention is to replace all the brake lines instead of just bleeding them. They may look good on the outside but brake lines corrode on the inside as well. It's too late to reconsider replacing them when bearing down on a vehicle in front of you and the brake pedal is resting in the floor. Quote Link to comment Share on other sites More sharing options...
ggdad1951 Posted March 31, 2013 Report Share Posted March 31, 2013 welcome aboard! More pictures! There are lots of threads on here talking directly about lots of the things on your laundry list of "to do". Quote Link to comment Share on other sites More sharing options...
lugnut123 Posted April 1, 2013 Report Share Posted April 1, 2013 good lookin old truck noel in nm Quote Link to comment Share on other sites More sharing options...
Apittslife Posted April 1, 2013 Report Share Posted April 1, 2013 Kewl Truck, Welcome to the forum Quote Link to comment Share on other sites More sharing options...
wallytoo Posted April 1, 2013 Report Share Posted April 1, 2013 if you do convert to 12-volt, and your starter works fine right now, leave it alone. it will be able to handle 12-volts. my truck was converted to 12 volts, but the starter is original, and has been working fine for several years. it's only in operation for 3 to 5 seconds at a time. Quote Link to comment Share on other sites More sharing options...
Dingo's 48 Posted April 2, 2013 Author Report Share Posted April 2, 2013 I Thank everyone for the responses. I am surprised at the outpouring of shared ideas and knowledge. I will post more pictures of the truck in the next few days. (Actually, my wife will post them) STEERING: Driving the truck is a little bit like guiding a wandering goat. Is there a way to tighten up the play in the steering gear? Are there rebuild kits for these? What are my choices????? if any??? Dingo Quote Link to comment Share on other sites More sharing options...
JBNeal Posted April 2, 2013 Report Share Posted April 2, 2013 The steering gearbox can be adjusted fairly easily with a 5/8" open-end wrench & a screw-driver. Find the steering center by turning the steering wheel all the way to the left, then count the turns required to turn the wheel all the way to the right, then turn the steering wheel 1/2 the number of turns to locate steering center. Next to the fill cap, there is a hex-shaped cover that unscrews to reveal the sector gear adjustment. Remove the cap to remove the star-shaped sector lock. Jack the front wheels off of the ground to remove the load from the steering box, then turn the screw adjustment so that there is no binding. The steering adjustment in my '48 was off by a few turns and it wandered all over the road, even with all of the steering components tight. Once I made this adjustment, the steering became true & effortless. I've written a few descriptions of this in my '49 build thread, and Greybeard wrote an article about steering adjustment that talked about finding the high point on the worm gear in the gear box. 1 Quote Link to comment Share on other sites More sharing options...
Dingo's 48 Posted April 2, 2013 Author Report Share Posted April 2, 2013 Thanks JBNeal. Todays project awaits me. lol Quote Link to comment Share on other sites More sharing options...
B1B Keven Posted April 2, 2013 Report Share Posted April 2, 2013 Dingo, Can you make it to the BBQ in Clements this Saturday? Quote Link to comment Share on other sites More sharing options...
Dingo's 48 Posted April 3, 2013 Author Report Share Posted April 3, 2013 Keven Sorry we already have commitments. Thank you though. Quote Link to comment Share on other sites More sharing options...
Dingo's 48 Posted April 3, 2013 Author Report Share Posted April 3, 2013 Installed the remanufactured carburator from CARB-X.com. Engine fired right up and runs better than ever. Dingo 1 Quote Link to comment Share on other sites More sharing options...
pflaming Posted April 3, 2013 Report Share Posted April 3, 2013 I kept my original paint also. First i cleaned it with lacquer thiinner, then I wet sanded it. I was too aggressive at first, then went to 800 and 1000 grit wet and took the rust off slowly. I have not waxed nor clear coated it. Steering, check youi king pins first. I replaced mine, had a machine shop press in the bushings and true the pins. Welcome, you just found a great fraternity. 1 Quote Link to comment Share on other sites More sharing options...
Don Coatney Posted April 3, 2013 Report Share Posted April 3, 2013 Good deal. Glad it runs great. Might be easier for us to track your progress if you keep the reports all in one thread. Perhaps a moderator could move this to the thread already started on this project. http://mopar.pairserver.com/p15d24ph_forum/index.php?/topic/32713-1948-b1d-project-truck/ Quote Link to comment Share on other sites More sharing options...
HanksB3B Posted April 3, 2013 Report Share Posted April 3, 2013 I Thank everyone for the responses. I am surprised at the outpouring of shared ideas and knowledge. STEERING: Driving the truck is a little bit like guiding a wandering goat. Is there a way to tighten up the play in the steering gear? Are there rebuild kits for these? What are my choices????? if any??? Dingo Dingo, We got your back. This is a great forum with a great bunch of guys. Here's my $0.02 worth on the steering: (mine used to drive like a bad shopping cart...wandering goat works too) http://mopar.pairserver.com/p15d24ph_forum/index.php?showtopic=19395 In post #9 there are are some gasket patterns Regards, Hank Quote Link to comment Share on other sites More sharing options...
Dingo's 48 Posted April 6, 2013 Author Report Share Posted April 6, 2013 Took the truck to Rio Vista today. About 26 miles or so round trip. My eight year old son was smiling and said: " She is is good old girl".. I think the name stuck because now that is all she calls the truck..."The Old girl" On highway 12 at sixty MPH, I opened the vent. Next thing I know is the cab is filled with leaves, dust and twigs. We must have been a sight walking into the NAPA store covered in dust and laughing. Picked up an oil filter, oil, oil pan gasket and valve cover gaskets. Tried to find a pinion seal but NAPA did not have a listing for it. Any ideas out there? I am thinking that I should change the rear main seal while I have the pan off. I believe it is probably a rope seal. Haven't done one of those since 1973 or so. Any information on parts sources for engine and trans parts for this truck? I need king pins for it too. (Haven't done king pins since the seventies either. lol I did take someones advice and checked the kick panels. Found a brand new in the box spare voltage regulator...lol. In closing, Our drive today was fun. We were laughing the entire trip. It is amazing how much fun you get out of an old truck. 1 Quote Link to comment Share on other sites More sharing options...
Don Coatney Posted April 6, 2013 Report Share Posted April 6, 2013 Sounds like you may have had some critters residing in your vent. What engine and transmission parts are you looking for. There are several sources for both. Click on the resources tab found on the brown toolbar above. 1 Quote Link to comment Share on other sites More sharing options...
Merle Coggins Posted April 6, 2013 Report Share Posted April 6, 2013 Napa has the king pins, and they likely have the seal you need too. You just need to find a cross to a more modern CR or National seal P/N. they should have most engine parts you need too, the just probably won't have them in stock. Merle Quote Link to comment Share on other sites More sharing options...
1952B3b23 Posted April 6, 2013 Report Share Posted April 6, 2013 I just bought king pins for my '52 B3b from NAPA. They're a special order item so they take about a week to get here (MA) from CA but seeing as your in CA you could probably have them in a day or so. Quote Link to comment Share on other sites More sharing options...

Recommended Posts
Join the conversation
You can post now and register later. If you have an account, sign in now to post with your account.