JBNeal
-
Posts
7,185 -
Joined
-
Last visited
-
Days Won
79
Content Type
Links Directory
Profiles
Articles
Forums
Downloads
Store
Gallery
Blogs
Events
Everything posted by JBNeal
-
VINTAGEPIC: saw this B-1or2 panel over on The HAMB
-

1951 B-1-D-126 BUILD THREAD Flatbed Red
JBNeal replied to JBNeal's topic in Mopar Flathead Truck Forum
It took a bit of finaglin', but I pried the lock rings off of the rims of the '51 dually and the '49 1-ton. The '51 tires must be from the 70s judging from the DOT numbers and are as hard a rock. The tires I put on the '49 are about 12 yrs old and are starting to dry rot. But since the '49 tires were a li'l newer, they were actually stuck to the rim; the old tires on the '51 were so dried out and hard that they popped loose from the rim. And the dually rims had no flaps...hmmm. Anyhow, from the measurements I took, the '51 does take 6.50x16s and the '49 takes 7.50x16s. I'm only hoping the newer tires, tubes & flaps will go on easier than the old ones came off...I'd hate to straighten & clean up these rims only to beat the tar out of'm trying to install some new rubber -
Do Some Book Learnin And Make Your Project A Little Easier...
JBNeal commented on P15-D24's blog entry in P15-D24's Website Blog
After I got the engine running on my '48 back in '95, I heard about Hemmings Motor News, found a reproduction shop manual, stuck a check in the mail and 6-10 weeks later got some highly informative reading in a brown paper wrapper. I've amassed a small collection of Service Reference Manuals featuring Tech the trainer; they're entertaining to read, full of useful information, including service charts, exploded views, and allll kinds of diagrams. I've also collected a few sales brochures from back in the day...pictured in the corner of a B-2 brochure is a small black & white picture/sketch of a Spring Special...others have cutaway views of cabs, motors, transmissions, axles...GOOD STUFF -
when driving to town a lot, the '48 w/ 218+3spd+4.10 and the '49 w/ 230+4spd+4.10 got around 12-14 mpg...this was when I would drive them upwards of 45 mph, I reckon if I took some of the lead out of my right foot the mileage would go up a tad
-
Ammeter Wiring For A 6 V Positive Ground Alternator
JBNeal replied to Jeff Balazs's topic in Mopar Flathead Truck Forum
I'd be a li'l nervous about putting more amperage thru the gauge than what it's rated for on a regular basis. I recall reading somewhar that with the amp gauge connected in series with the charging circuit, that amp gauge failure or malfunction can adversely affect battery charging. I haven't looked too much into it, but wiring the amp gauge in parallel seems like it might help, but I don't know how accurate the gauge reading would be. I wonder if anyone has tried some sort of Hall-effect amp gauge or how accurate it would be... -
my 2 cents: lubricate the cable with weedeater drive shaft lubricant...pull the cable out of the housing, clean it & the housing of the old lubricant, then take the tube of new lubricant with the nozzle in housing and feed the cable into the housing while applying lubricant, twisting & running the cable in & out of the housing every few inches to coat the cable. Then chuck the cable end in a drill and spin that cable for a little bit to slick up the housing a little more btw weedeater drive shaft lubricant is very similar to water pump lubricant
-
that 3 spd is funny like that: there's an output shaft seal, but no seal on the countershaft that's held in place with a metal bar. I dunno if there is a fix for this as there's no provision for a seal in the transmission case, there's not a lot of gasket surface to make a difference, and putting silicone on the outside of the case is only a temporary solution. Checking the fluid level regularly and putting some cardboard or kitty litter down under the truck when parked are about the only ways I've been able to deal with this bit of old Dodge character
-
a trailer supply store?
-
I think the trick is ya have to crack the vent windows open a li'l bit so that there is less of a dew point gradient inside the cab. I've driven a car where the AC didn't have a charge, so when I would set it on defrost, the windows still fogged up cuz I was blowing warm moist air onto the cool glass
-
I've pulled the oil pan by removing the front wheels, then jacking up the frame to let the suspension drop out of the way. Removing the dipstick tube increases clearance, and the oil pan should tilt down and slide out
-
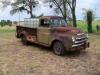
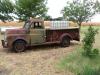
truck picture B-1-D-126: '49 at sunset:

-
Old Technology Doesn't Always Mean Obsolete Technology!
JBNeal commented on P15-D24's blog entry in P15-D24's Website Blog
In 10 yrs, I put 10k on the odometer on my '48 B1B...recently I emptied the original oil bath air cleaner and put the oil in a glass pickle jar to observe what might be floating in there. The oil was a little darker than fresh oil, and there was some crud at the bottom of the oil bath, but that was it. And I drive on a fair share of dusty back roads and cattle pastures. On a couple of occasions, I misjudged the pasture I was driving thru & caught a li'l air, so the oil bath sloshed a tad, and on one occasion, I forgot to tighten the ring clamp and that first right turn spilled most of the contents onto the engine. I like the idea of the paper element conversion cuz it would not have been as messy as these spills, but I'm gonna stick with the oil baths on the flatheads...I've even got a conversion I'm testing that routes PCV gases into the original oil bath air cleaner housing -
I've dealt with the Renu folks in Waller & Austin, and the results have been good. The '48 had a hole in the top that I could put my arm in to scrape out the sludge that had built up from sitting next to the barn for 20+ yrs. I had patched that hole and painted the tank, but the perimeter seam was peppered with pin holes. So I bit the bullet from reading about Renu in Hemmings Motor News back in '96. They cut holes in each end of the tank, cleaned it out & coated the innerds, then patched them holes and coated the outside (drain plug included). It has stayed intact, hasn't flaked off any of the rubberized coating...a sound investment. Did the same for the tank in the '49 back in '04, even though it appeared to be in decent shape (with a 1 inch thick layer of sludge in the bottom). The perimeter seam is prone to pin holes if the tank is left dry for years, so coating the inside & outside is a good repair to make on any truck that's been parked for an extended period. A few hunnert bucks spent on the tank have provided me with peace of mind for decades...I highly recommend'm
-
just saw this post while repairing some embedded links on previous posts...a few days after I posted this, most of that '53 was absconded by scrap metal thieves about a year and a half later, I picked up another '53 B4B116...this one was an almost complete Spring Special, listed on Dallas CL as a '52 Dodge $1
-
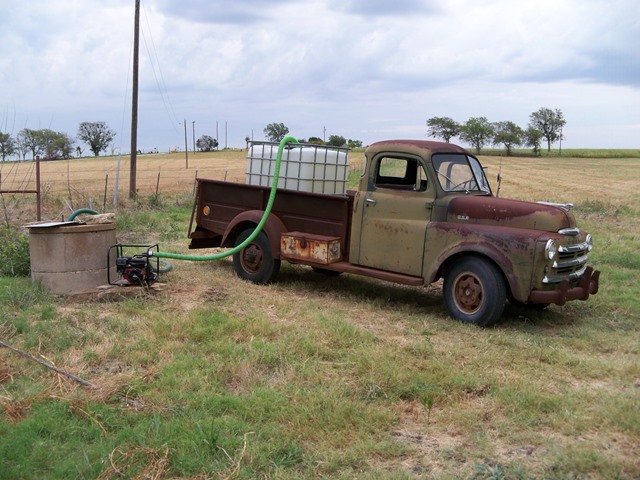
I took a few more pics on the 2nd day of water hauling...the day's chores were abruptly cut short by an afternoon of thunderstorms & showers that have been rolling thru the past 4 days. I've put 200 gallons of H2O in the back of the '48 1/2 ton as seen here, and that would squat the rear down to the axle bumpers, and raise the front axle enough to make the steering light. The '49 1 ton squats down but not all the way to the axle bumpers, and the front axle actually lowers some, but with no effect on steering effort. When I get around to getting the '51 dually rolling, I'd be interested to see how that sprung axle reacts to a similar load... To clarify: the filled 275 gallon tote tank weighs closer to 2300#, and the 1 ton handled it adequately; on occasion, I would fill four 50 gallon plastic barrels that probably tipped the scales upwards of 1700#, and the 1/2 ton would squat down and struggle as the gearing was not as low as the 1 ton. To ease the load, I reduced to three barrels, and the B1B could handle it, even with the frame groaning from the strain

-
Because of a string of 100o days, I had to ramp up my efforts to put the ol' beast back to work. The hydraulic brakes were assembled but not adjusted, but the hand brake still worked once I lubed up the sticking release button. So I cleaned out the cab & the bed, put 5 gallons in the gas tank, and loaded up a 275 gallon tote tank for a trip down to the well for some ice cold high quality H2O. I got the truck up to 10mph in 1st, using the hand throttle to control engine speed as the floor boards were sitting in the garage waiting for anti-squeak to be installed (.040 EPDM scraps from a roofing job back in 2000). It was an interesting test of hand-eye coordination to operate the throttle AND the brake by hand. By the third trip down the hill, I had it figgered out and the pucker factor was waaay down (did I mention I misplaced the steering wheel nut?). Going up the hill in bull gear seemed almost effortless to the stock 230 with nearly 2300# over the rear axle. It was like I was piloting a wagon under its own power...a powered wagon of sorts With so much weight over the rear axle, I didn't want to get in too big of a hurry. The weight rolling over unpaved terrain really knocked the rust out from between the spring leaves, as the squeaking rear on the first trip got really quiet on subsequent trips. The flat spots on the tires went away too, as they would squat down under the weight (front & rear, I measured). Braking was a combination of using the hand brake and the driveline's low gearing. As I watched the speedo touch 10, I wondered "who thought it would be a good idea to put 80 on this speedometer...they must've been hopped up on opium"
-
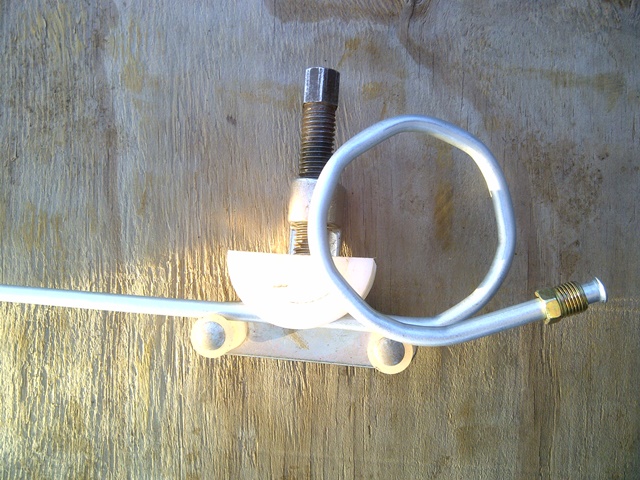
Since I parked the '49 back in '08, the DOT 5 had leaked out of the master cylinder. I pulled the line from the MC, and the flare at the brass elbow had a small split in it. So I made another line, complete with pigtail...but I made one for a Ute instead of the 1-ton, so I started over with another tube. I hadn't bent lines in some time, so it took me a li'l practice to get back into the hang of it. The steel lines available in these parts are not very flexible and are very easy to kink. Making a 90 turn can be a li'l frustrating, and anything over that can bring out the creative German language. But I eventually remembered that the trick is just like forming metal: ya don't bend it in one pass; ya take several tacks at it. So I would make a bend a tad over the diameter of the tube, reset the bend point to mid span of the previous bend, repeat several times over while alternating on each side of the 1st bend, do some massaging fine tuning, then BAM a pigtail without a kink. It's not factory perfect, but it works good enough for me So I filled the MC, pumped the brakes a few times, then did some other stuff for a couple of days. Sure enough, there's some weeping at the brass elbow. Hmmmph...maybe that elbow is messed up, so I drained the MC & pulled it out to get a better look. I tried to get a pic of it, but couldn't get the details to show up to illustrate how the cone in the brass had become distorted and almost flattened out. So this is why the tubing was leaking: the flare was not seated. During my lunch break the next day, I walked across the street from Burger Boy to pick up some new brass elbows and some tire tools (story to follow). With a new brass elbow installed on the cleaned/installed/filled MC, I put the new line back in went to do some other stuff for a couple of days. So far, no more DOT 5 has been seen weeping from the brake lines. I'll need to clean the dirt dobber nests out of the bleed screws on the wheel cylinders with a drill bit, then bleed the brakes...I suppose I'll need to fab up a brake shoe adjustment tool at some point, as I only adjusted them by ear back in '04
-
I was fiddling with the '49 this afternoon and was scratching my head again as the carb kept running dry. Eventually I pulled the fuel pump and found one of the check valves fell out again and jammed the plunger. This happened back in the fall, and I'm still unsure why this is happening now as I put over 1000 miles on that truck before it was put up on blocks back in '08 and I did not have this problem. I popped the check valve back in its bore, tried to pull it out with a pair of needle-nose, then tried to slap it out on my hand, and it wasn't budging. So I put it all back together and it fired up right away. I let it idle for about 1/2 hour, and the engine ran smooth with the occasional stumble. And then I put it in bull gear and aimed it down the driveway for the first time in 5 yrs, with the floor boards sitting in the garage, using the hand throttle to rev the motor, and only the hand brake to whoa it up. I took it across the road into the old pasture in 1st gear, down the hill & back up again, clocking about 1/2 mile on the odometer. I wanted to get some oil on the leather & rubber seals without tearing them up so I reckon seeing 2nd gear will have to wait until the hydraulic brakes are working again
-
I took some time on Independence Day around sunset to fiddle with the '49, as it may be used to run water to trees & whutnot in the short term. While airing up the tires, I noticed something out of the corner of my eye; turns out to have been a yellowjackets' nest...they weren't too happy I was jostlin' around in their neighborhood. I put some gas in the tank, fuel bowls & carb, a shot of ether down the Stromberg and a stomp on the starter and it fired right up. But this good news was short lived, as all I needed to do was turn the truck around (only the park brake works right now) and a tire went down. Turns out that one of the 10yr old tubes decided to shed one of its valve stems, so the nearly new 10yr old tires will probably need to get yanked off to replace them tubes/flaps. I wasn't planning on cleaning up the wheels on this beast, but I may do one at a time just to get the ball rolling on fixing this truck up. I haven't taken apart a locking ring rim before either, but I've seen it done plenty of times so I might give it a try after reading up on the subject...SAFETY FIRST
-
Tater- My 49 Dodge Truck Build
JBNeal replied to TexasPilothouse's topic in Mopar Flathead Truck Forum
whut's up with the plate on the frame? extra weight fer improved traction? -
If'n ya had a build thread going that described your progress & roadblocks, then folks might be falling over themselves to help out...btw nice lookin' engine ya got thar
-
I had seen on the Westach site some time back that they offered 6V tachs but had not see a listing in their catalog...do ya pick a style and request it to be 6V and 3500 RPM? Or do they have a limited availability of styles? I had been looking at a 270o sweep, but the style you picked out looks pretty good too.
-
Roll Of Toilet Paper For Oil Filter
JBNeal replied to Bobacuda's topic in Mopar Flathead Truck Forum
John Wayne toilet paper...it'll keep yer innerds clean, pilgrim -
Troubleshooting....the Solution May Bite You!
JBNeal replied to Stumpy(NH)'s topic in Mopar Flathead Truck Forum
A co-worker bought a gently used Pontiac Grand Prix a few years ago...a fine automobile it was, but it didn't sound right, like it had a miss or sumthin'ruther. So we go out to the parking lot at lunch and fire it up, revving the motor a couple of times, and it definitely was not running smooth. I start pulling plug wires off the coil pack, one at a time. Cylinder 1: OK; Cylinder 2: OK; and so forth until I get to cylinder 5. When I completed my firm grip on the boot, I commenced to doing my best Emmett Fitz-Hume impersonation for a couple of seconds before I tossed the plug wire. Skipping ahead a bit, it turns out the coil pack for 5 & 6 was grounding out...coil pack replacement was like putting a new motor in that car, cuz it would fly in a heartbeat, and the economy went up considerably. But my co-worker would on occasion bring up this shocking incident as one of the funniest things he'd ever seen...at least I got a cheeseburger basket for my trouble -
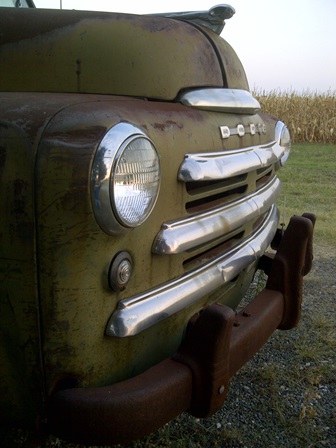
Pilot House Front Grill Differences
JBNeal replied to Gizzardsniffer's topic in Mopar Flathead Truck Forum
...and then there are the Aussie Pilot-House trucks