

Dan Hiebert
-
Posts
2,129 -
Joined
-
Last visited
-
Days Won
15
Content Type
Links Directory
Profiles
Articles
Forums
Downloads
Store
Gallery
Blogs
Events
Classifieds
Everything posted by Dan Hiebert
-
How time flies. Almost done with the BIL's '57 Ford sedan. Had to do much more body work than planned, the whole bottom of the car body is now "new", about the only thing I didn't have to replace was the trunk floor. Anyway - the reason for the original post - the transmission issue with shifting seems to be fixed. I found a repair kit for the synchronizer gear, it has new tabs so I could replace the broken one. Sourced some replacement needle bearings and thrust washers that were in better condition from a friend who often works on older Fords. And that thorough cleaning already mentioned. First road tests are encouraging with the shifting but have to get an alignment done before I try highway speeds. I think the broken synchronizer tab, bad thrust washers, and extreme "gunkiness" were the cause of the shifting issues, since I fixed all of those and the tranny now works. Manual transmissions are very similar between makes, so my hope is that this may assist others if they have similar issues.
-
I don't have pictures handy, but I've seen aftermarket mirrors designed just for hanging from the top of the door a la DonaldSmith's solution above. They clamp directly to the door frame so you don't need to fabricate an additional bracket. You have to get used to looking a tad further back to catch the mirror, though. Hot rod and custom supply shops may be the best option to find those. EBay occasionally has swan's neck mirrors that everyone seems to like both the aesthetics and function of, but some you have to drill into the door frame to bolt on.
-
Yes, both front wheel cylinders are supposed to move in unison. If one is sluggish, there may be a bit of crud or some fallout from the rebuild restricting fluid movement to/from that one cylinder. It doesn't take much. Would hold true for being slow to return as well, which is what could be causing the overheating - that one shoe dragging. I don't know if there is a technical term for it, but is it the second, lower cylinder in the system that is sluggish? That one can be affected by issues with the first one and is supposed to be bled first, I always switch back and forth an extra time or two when bleeding the front cylinders. I usually get a bubble or two that's snuck past the first bleed. I'd echo Doug&Deb, assuming from you writing they "needed rebuild" that you've rebuilt them, a thorough bleed may do the trick.
-
hole in generator´s oilite bearing needed??
Dan Hiebert replied to Go Fleiter's topic in P15-D24 Forum
Don't fret, "new" ones don't look porous at all, but they will indeed soak up oil. They will not be slick or otherwise seem to even have any lubrication qualities. Your NOS ones have likely been sitting for quite some time, you may want to check my reasoning whether this is necessary or not but doing the hot oil thing Eneto-55 mentions wouldn't hurt. Some of the oil in them may have aged too much, or seeped out, or both. -
ANSWERED "One of these things is not like the others..."
Dan Hiebert replied to Bob Riding's topic in P15-D24 Forum
I think you only have to worry about the plugs if they're already suspect in the first place. If they are "new" or you have a well maintained system, then you're right, no concerns. I don't think a new heater core would be much of a concern, although 98% of coolant system failure leaks I've ever had issues with were heater cores. Thankfully they were all work vehicles. Relatively new at the time but saw hard use. -
An option, perhaps not the least expensive, but in the long run the least taxing on your patience - Most competent radiator shops also do gas tanks. First things first, they'll let you know if your tank is even restorable. Clean, solder or patch if necessary, seal, etc. They use chemicals to clean them, vs. beating them up with inserted foreign objects, and test them to insure they don't leak. You don't have to worry about handling any chemicals, sealants, or still explosive old gasoline vapor. I've had two gas tanks restored by radiator shops with no issues.
-
ANSWERED "One of these things is not like the others..."
Dan Hiebert replied to Bob Riding's topic in P15-D24 Forum
The original equipment radiator cap was 7lbs. Pressurized cooling systems are intended to allow for a wider coolant temperature operating range, so your car can run hotter than one with a non-pressurized system without venting coolant. The adverse effect of too high a pressure cap is too much heat deteriorating components that the heat and pressure combination would then cause to fail, more so hoses and other rubber components. Not so much the freeze plugs. The original radiators in these cars were also not intended / designed to withstand a lot of pressure. If the Champion radiator folks have included a 13lb cap, then it stands to reason their unit is engineered for 13lbs. With modern materials in new hoses and such, you will have no problems with running that 13 lbs. cap. -
ANSWERED Correct linkage position for BXVD 3 accelerator pump...
Dan Hiebert replied to SwannySwanson's topic in P15-D24 Forum
FWIW - The manual also says that running the car with the summer setting all the time will provide "slightly better" fuel economy, but at the expense of low end performance. -
ANSWERED Correct linkage position for BXVD 3 accelerator pump...
Dan Hiebert replied to SwannySwanson's topic in P15-D24 Forum
Been running mine on the center hole from TX to NM to MI to NY and now in ME. No problems until recently, which have nothing to do with the pump setting. -
That particular kit was not correct for my carburetor, but they do have the correct one. Thanks again!
-
I had seen that, but the model numbers listed still didn't match. I haven't gotten to the contacting vendors point just yet. Thanks for the heads up!
-
I have been looking for a carburetor kit for our '48 D24. It has been about thirty years since I rebuilt it, with an occasional thorough cleaning in the interim. Meaning not removed, but the exterior thoroughly cleaned with carb cleaner and lubricated where appropriate, and adjustments checked with so far never a need to tweak anything. Until two years ago I've had absolutely no problems with it (didn't run the car at all last year) when the car began to be difficult to get started after it had been driven. After the initial "normal" spring start up this year, it has been difficult to get started all the time, yet runs quite well once it gets running. It may be coincidence, but this all started after I put a new fuel filter in it, somewhat bigger than what I had been running. Reading the "hard start" threads, I want to rebuild the carb. I have not removed or disassembled it because I haven't found a matching kit. Here's the rub, the carb in our D24 is marked BXUV-3, rather than BXVD-3, and the carb number is 3-77. I have found kits for "BX series" carbs, but then the numbers don't get below 3-82. It is my understanding that "3" indicates the carb was built for Dodges, and "77" is the sequential application or model number, meaning it was the 77th version of that carb. Outwardly, it looks exactly like a BXVD carb, but I know the differences would be internal. Do any of you sage individuals know whether or not a BX compliant kit will work on this carb, even though the model number doesn't exactly match? I imagine the main things I will need will be the leather accelerator pump piston, the gaskets, and the float needle, so this may be like playing with hand grenades...close will be OK? I haven't paid a whole lot of attention to past discussions on the different carburetor topic, because I didn't need to at the time, and until today didn't know I had a different carburetor than normal. I haven't exhausted all sources, yet, but that difference in numbers is throwing my searching off, and I wanted to ping you'uns for advice before I get frustrated. The filter wasn't in a good place, so I removed it altogether. It was still hard to get started, but there was no fuel in the line from the carb to the pump.
-
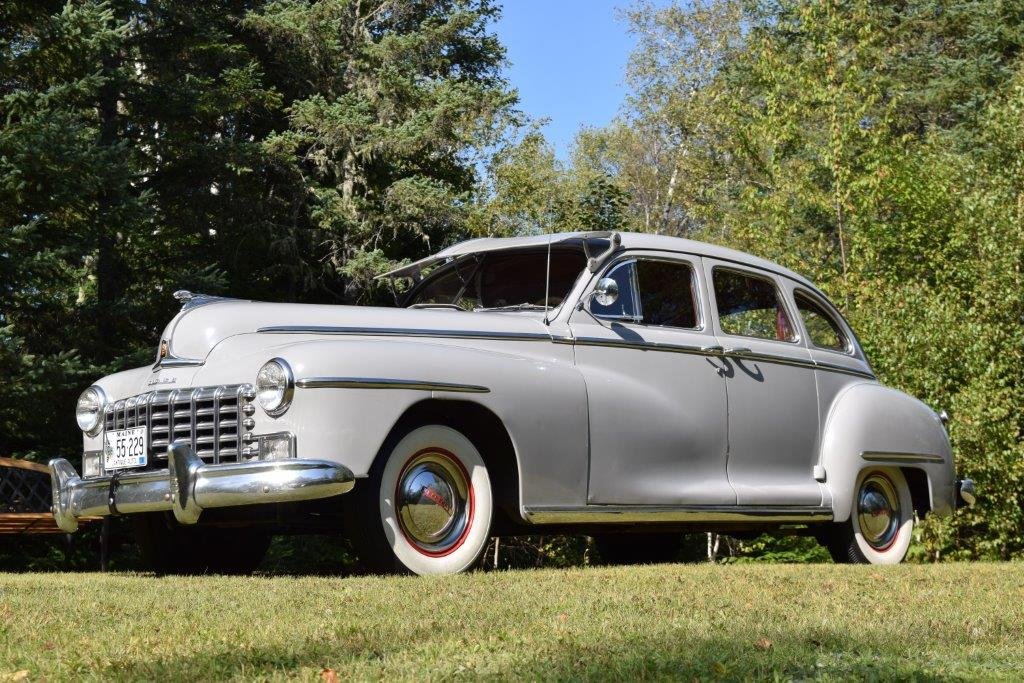
So, to answer your question, 7.10x15s are OK for your car. I don't know off hand what the original tire size was on '51s, but there is a good chance that is the original size tire for your car anyway, or really close to it. 7.00x15 was the original size on our '48 D24. You will have different handling and ride than you do with the radials, but it's hard to beat the WWW bias look. I was awfully fond of the bias plies on our D24, but they were not a good match with the general condition of roads in this area.
-
ANSWERED Softer shock absorbers (?)
Dan Hiebert replied to '41 Fat Bottom Girl's topic in P15-D24 Forum
Yes, look at how many PSI you have in the tires, that may be all you need to adjust to get a better ride. I have radials on our D24, there is a big difference between how 32, 30, and 28 PSI rides. I keep 28 in mine for the best ride. Depends on the weight of the car, and our cars are not as heavy as people think. Too much PSI and they ride like an ox cart. -
Some call the panel(s) I'm talking about "gravel shields", but I've always called them valance panels, even though Dodge called them stone deflectors. I'll go with stone deflectors here. They're the panels that fill the gap between the bumper and body/grill. The panel that fills the space between the bottom of the radiator and grill is the "radiator front dust shield". There is a "lower radiator crossbar" that goes between the lower inner corners at the front of fenders. For reference, the front of the dust shield attaches to that crossbar. The lower rear of the grill is also attached to the front of that crossbar, you have to access the nuts from under the car, at the rear of the crossbar. They're kind of a PIA to get to because they're in the bottom of that u-channel that the crossbar is made from. The stone deflector is attached to the bottom of the grill from underneath as noted above. The brackets at the bottom of the grill accommodate the screw holes for the stone deflectors, as well as the studs that mount to the crossbar. So, to sum it up, there are two rows where the bottom of the grill attaches to the car, from underneath through the stone deflectors, and from the rear through that crossbar. It took me a bit to get my head around that when I took my grill off the first time, then a while to remember that when I did it the second time - both many years ago.
-
Yes, as Doug&Deb notes, the bottom of the grill is also attached to the valance panel. Access those bolts from under the car. I didn't break the bolts, I broke some of the brackets they screw into. The current grill in my car is a replacement that was pulled by someone else, they broke the brackets as well, so I only have two bolts holding the grill onto the valance panel.
-
I found a lot 6v bulbs, including for the dash, at YnZ Yesterday's Parts; ynzyesterdaysparts.com. They had some obscure ones I needed for our Terraplane, too.
-
The door latching mechanisms were not originally painted, they were installed at the factory after the body was painted. The color on your firewall and inside lip of the fender are your car's original color. Plymouth would have called it something else in 1940, Dodge called it Fortress Gray in 1948. MoPar kept the same basic color palette for several years in a row, but named the colors differently between the makes and years so the consumer would think they're getting something new or different. Supposedly we can thank Henry Ford for Phillips head screws being prevalent in auto manufacturing, reasons as Donaldsmith pointed out.
-
The bugbear of working on cars after a PO didn't have any attention to detail and/or took shortcuts. Those terminal blocks ahead of the radiator are essentially out in the weather, they are on my annual service checklist to look for corrosion.
-
ANSWERED Knobs and switches and buttons and bows...
Dan Hiebert replied to SwannySwanson's topic in P15-D24 Forum
The two knobs either side of the Dodge emblem below the speaker - the one on the left turns on the dash lights, off / low / high. The one on the right turns on the map light that is behind that emblem. -
Your interim plan looks good to me. I prefer originality as much as possible myself, if it's in presentable condition. But originality that looks and smells bad (not that well-seasoned old car smell, that always reminds me of my Grandpas' cars) just doesn't blow my kilt up. For consideration, this is what I did with our D24; There were no kits available back then, either. I did not take the car to an upholstery shop, and like you, I didn't have the equipment, or see myself doing all that work to do the whole thing myself. This being 30 years ago there were options available for materials that closely matched the original, in theory there should be more now. But I had a reputable shop make a kit for me with non-original style materials, but original patterns. I don't know where they got the patterns, but it was an old well-established shop. If they had needed something from my car for a pattern they would have asked, but they didn't. So, a local shop made the kit, and I installed it. A little more expensive than if a kit had been available off the shelf, but significantly less expensive than taking the car to a shop. Original appearing materials are available that are more durable than the original, and that the vast majority can't tell the difference in appearance.
-
The scroll of credits at the end of the story... I ended up with three original radiators in hand. All of them leaked. I took each one to radiator shops and they all failed the pressure checks. None of the shops anywhere in Maine could even get to rebuilding one during 2022, a couple didn't even want to do the work at all. We ended up taking all three to American Honeycomb in Bowdoin, ME, a shop that specializes in antique and collector auto radiator restoration, for them to make one radiator out of. One upper tank had the original equipment Dodge part number on it, and happened to be in the best condition, the other two had Dodge replacement part numbers - one of which was the one in our car, even though I'm pretty sure it was the original radiator, but there's no way to be sure. Anyway, we opted to have a recored unit built with a close to original style core (the original Diamond pattern is no longer made, the closest pattern, only available from England is an Auburn pattern core). I took it to American Honeycomb in November and got it back in April - actually a month ahead of schedule. That was the same basic timeline I got from everywhere I checked in New England. I'll wager that it looks better than a new original, I was almost afraid to put it back in the car for fear of scratching it or getting it dirty. Big difference between a mass produced unit, and one that a craftsman paid singular attention to. I won't go into the cost, it was indeed expensive but cheaper than we had planned for, and I'll never have to worry about it again. Only downside is that now I'm compelled to clean up the engine bay to keep the radiator in good company. The proprietor of American Honeycomb is a really good dude but is semi-retired. You have to call him first, but it doesn't take a whole lot to talk him into doing some work for you. (The email address earlier in this thread is no longer in use, I did everything by phone.) He's keen on getting cars back on the road, I believe he was the Classic Car Club of America's New England VP for a while. I know the shop is a far piece from most of you, but I highly recommend it.
-
This past weekend was simply awesome up here, low 70's, clear skies, and just enough wind to keep this year's spring crop of bugs down. (Back in the 50's today.) Anyway, after not running for almost a full year due to that radiator issue, I got the ol' D24 fired up just as "quickly" as ever. Fuel bowl was, of course, dry. So, I primed the carb with gasoline with a bit of MMO, 3/4 choke (I installed a manual choke many years ago), full gas pedal, four or five times over with cranking and she started right up, stumbled until the fuel pump got the carb caught up, and settled right down into that nice flat-6 burble. Brought it up to operating temperature and let it idle for a while, since this was also the first start with the "new" radiator. Can't quite drive it yet, I have a "field expedient" paint booth set up between it and the garage door for another week or two. Only issue I had was that I did not tighten all the coolant hoses once it warmed up, and it leaked coolant once it started cooling down. I remain impressed by how she always happily cranks right up every spring, managing expectations I usually assume I'm going to have a struggle waking her up, but that has yet to be the case.
-
No reason to be a stranger! With all the work you did to that '52, I'm sure you successfully tackled something that someone else who visits this Forum could use some advice or help with. Granted, sounds like you've got a few projects going on there even without the Plymouth, but pop in and see what we're up to once in a while.
-
When we lived in Port Huron, all the Big Boy restaurants in southeast MI would have a cruise-in night. Not all on the same night, so you could do a cruise-in to Big Boy every night of the week except Monday. Of course, you could pop into the restaurant for refreshments, and they all had a DJ at least. One night a year each restaurant would have live music, the more popular ones would have live music more often. The one in Port Huron on M25 (24th St.) was always fun, the one in Marysville on Gratiot was "just OK", but it was only a few blocks from where we lived, so we hit it more often. 98% of the cars tended to be hot rods and muscle cars, but when we showed up with the D24, it'd get a lot of attention. No judging, no fees, but your car would probably get smudged and get little kid faceprints on the windows. We left Michigan in 2008, so I don't know if all the Big Boys still do that, but my son says the one in Port Huron does. When we lived in western NY, the big cruise-in destination for the entire Buffalo area was Pautler's Drive-In on Transit Rd. in East Amherst. No fee, but really good chow that you couldn't pass up. I think the cruise night was Thursdays, but there were always older cars there. Matter of fact, Google Earth shows their lot full of old cars.

