-
Posts
5,034 -
Joined
-
Last visited
-
Days Won
58
Content Type
Links Directory
Profiles
Articles
Forums
Downloads
Store
Gallery
Blogs
Events
Everything posted by desoto1939
-

Auto choke connection on carburetor. 48 DeSoto
desoto1939 replied to MarcDeSoto's topic in P15-D24 Forum
Marc: This is the reason why we all belong to the Forum. We all learn something new everyday. The clips to connect the sisson choke rod are very common clips. You might even get them at NAPA or even try Restoratio n Supply in Windber PA. They carry alot of clips and connecters. Rich Hartung -

Auto choke connection on carburetor. 48 DeSoto
desoto1939 replied to MarcDeSoto's topic in P15-D24 Forum
On you desoto the choke should mount benhind the carb on the flat spot on the manifold. The arm should be facing the head and the alignment hole should be facing out toward you. The gasket are all the same. The adjustment is made via loosening the bolt on the arm and then moving that arm up or down to lock the choke in place. refer to the choke adjustment section in your service manual. Rich Hartung cell 484-431-8157 desoto1939@aol.com -

Auto choke connection on carburetor. 48 DeSoto
desoto1939 replied to MarcDeSoto's topic in P15-D24 Forum
I have attached the sisson choke rod lengths PDF file so you can determine the correct rod and length that you need. First check the first page to determine the appropriate rod number then go to the last page and you will see the illustration and dimension of the specific rod for your car and year. Again having the appropriate cross reference catalog has come in handy. Rich Hartung Desoto1939@aol.com Sisson Coke rod lengths by years.pdf -
Since you are new to drum brakes and also have an early MoPar car there are some baisc tools that you are going to need especially for the rear drums. Since the rear drums have a tapered axle, you are going to need to purchase or borrow a three arm drum puller. Do not get the ones that grab around the edge of the drum you will warp the drum. Get a good book on adjusting the brakes and get the service manual for your car before you even attempt to do a brake shoe replacement. You have Lockheed brakes and there are several specialized tools that you need to get them adjusted properly. If you do want to see what is going on the pull the front brakes first to understand the brake system and also get someone that understands how brakes work and get a MoPar guy that has the Lockheed brake system. If this is aboe your level of skill then get the car to a qualified mechanic that can work on the Lockheed brakes and also be able to adjust them properly. This braking system is not typical to the Bendix brake system. Also ask a lot of questions and take lots of pictures with your cell phone to document what the system looks like as you start the job and on the internal brake shoe setup. Rich Hartung desoto1939@aol.com
-
Sniper you are correct the bulbs are 1158 bulbs typo on my part. Also i just checked and there is someone selling 1158 bulbs on Ebay. For some reason these bulbs are getting harder to find at the swap meets just like everything else Rich Hartung desoto1939@aol.com
-
If you are wiring in Brake and turn signal lamps along with your regular light you will need a socket that has two contact buttons. One of the buttons is for the running light and the second is for the brake light which is the larger filament inthe bulb. The larger filament when you step on the brake pedal makes the light brighter and when the turn signal is attached to the same wire it makes this brighter filament blink. If you have it setup the other way the turn signal light will not be bright enough to let people know you are turning or applying the brakes. Rich Hartung Desoto1939@aol.com
-
the dual filament bulb for lights/brake and turn signal is 1185. These are the 6v olts bulbs I use these in my 39 Desoto.
-
quality workmanship. I noticed how the upholster also lined up the stripes onthe panel with the stripes on the arm rests. This shows that the person does quality work. I like what you have done. Rich Hartung
-
Castrol GTX classic 20-50 oil zddp & Phosphorus.pdfCastrol GTX classic 20-50 oil zddp & Phosphorus.pdfcould also use redline Break-in oil when cranking over the motor. Also does the engine have an oil filter? There isa new Castrol Product Castrol GTX Classic 20/50 weight that has the largest amount of ZDDP, Phosphorus and Boron in the oil. Might want to read up on the product. I did a posting on this oil a while ago. This oil can not be used in modern cars because it will damage the catalytic converters. All modern oils do contain lower amts of ZDDP, Phosphorus and boron so that the newer cars will run without damage to the convertors. Valvoline VR1 is another good quality oil. When speaking to the Castrol rep he told me that basically any quality oil even the WalMart brand is better than the old oils that were used when these cars and engine were first produced. The flat tappets do need some form of zddp but we are not putting on the extremem pressure on them or the cams like the cars that have the roller cams and are reving up to higher rpms. Most cars ran around 50 mph and when we started froma light we came off the line around 10mph then did a shift at 20 and then again at 30 and then got the cars upto 50 MPH which was the standard mph for our cars. refer to the two articles from Castrol and also Egge on ZDDP. Great reading material and information on ZDDP. Rich Hartung Desoto1939@aol.com ZDDP Egge Information.docx
-
Awhile ago a member posted that they were looking for the return spring that is part of the push rod assembly on the early cars and trucks. I have searched ebay and found that Wick Wire produced these return springs but they only covered from approx 1935-1938. After 1939 You can not find any more information. I havea 1936-42 Master Pats Catalog for my 39 Desoto and discovered that the return spring is the same number and was used for 1939-40 on the Desoto and i am going to assume on the Dodge and Plymouth and possibly the Chryslers. I was able to get four of the appropriate NOS spring 852018 from a new contact: Brads NOS Parts they are located at 1420 Lake Dogwood Drive West Columbia SC 29170. They specializse in NOS and Used Mopar Parts mainly 1955-95 models. But this is a good contact to have in your favorites list on your computer. I received the 4 springs in todays mail and they were all tied together with an appropriate MoPar Parts number tag Rich Hartung Desoto1939@aol.com
-
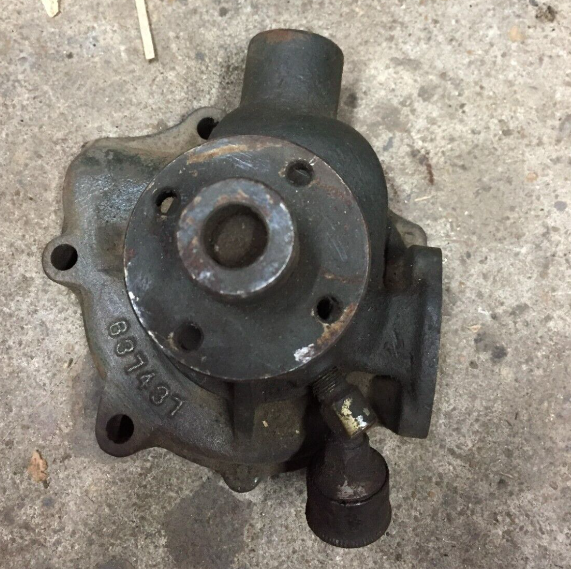
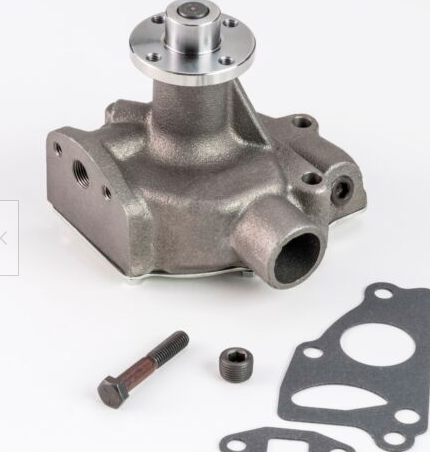
Yes everyone is correct that on the New Reproduction Gates water pumps for the flat head six engines they made the body thicker and if you have an original three stud setup on your motor then this pump will not be a direct replacement pump. These newer pumps have the sealed bearing which is an improvement over the old graphite washer style that eventually does leak. When looking head on at the body of the newer pump the lower left mounting hole is inthe same location but the original WP's where only approx 1/2 thick at this point so that the mounting stud would protrude through the body and you could continue to use the nut to secure the wp to the front of the engine block. When the new replacements were made they increased the body thickness and provide you with a bolt that will screw into the front of the engine block. But if you still have the original three studs then you will have to remove the stud and yese there isa potential to beak the stud. Several years ago, back in 2016, my WP started to leak. I had a replacement pump in my stock, but to my surprise it was the newer replacement style and I have the original style on my 39 Desoto. This is when I discovered the change in the body of the WP. But I was able to find two rebuild WP's that had the sealed bearing and had the 1/2 body thickness and this solved my problem. So beware when ordering a new replacement WP. Ask the seller which pump it is that you are purchasing. I have seen many MoPar vendors that tell me the new pumps are eact replacement pumps and then I tell the real facts about how the older pumps are different. They replay with the statement of just pullthe stud and use the bolt. Yes can be done but when a stud has been in an engine and is also in the ari of the water jacket there is a very good chance that it will snap off. When I was at Hershey I stopped by the Art Gould waterpump and fuel pump repair. They told me that if there is enough thickness in the older style wp Body that they can bore out the main bearing hle to accept and install the sealed bearing. They gave me a price around $100 and up to do they rebuild. So if you consider the cost of a repoped wp and then the cost to remove the studs and if there are any issues than that is not a bad price. So during your travels when you see a WP for our cars examine the body to see if it is th eolder style or the new reproduced style. If you have the older style pump on your can and the price is a good price then pick it up as a spare. These older pumps were tossed into the scrap heap and sold as scrap metal. The first picture shows the original style at at 12 o-clock near the outlet hole you will see the original thin body.. on the second picture you will see the extra thickness of the body near the return outlet and the new bolt. Rich Hartung Desoto1939@aol.com
-
you could also ship via Grayhound Bus. I did that for some chrome molding for a 1942 Desoto. Rich Hartung
-
I thought all convertibles did not have cloth panels or seat material because of the possibility of when the top was down and it started to rain the cloth material would get soaked but with leather is was more water proof. Rich Hartung
-
I have but has not eliminated the issue. Get the vapor lock after the car has run and I have a glass fuel filter just before the carb. What happens is the heat from the manifold heats the gas and it evaporates. Have to use my electric pump to get it restarted. Rich Hartung Desoto1939@aol.com
-
The small screw is used to lengthen the arm for a bigger sweep. you might have to bend the wiper blade arm to get a full contact on the glass. Also kleen off the glass completely with a good window cleaner to get all of the oil and grime that has gotten on the glass. Then get some Ceramic coating spray and spray some on your glass. I do this on my regular car windows and the rain just get wiped off the glass and do this on my 39 Desoto. Use the rainex extreme glass cleaner to cut the oil and film on the windshield then clean it off with a clean microfiber towle and dry completely then use the ceramic spray on the glass. Rich Hartung.
-
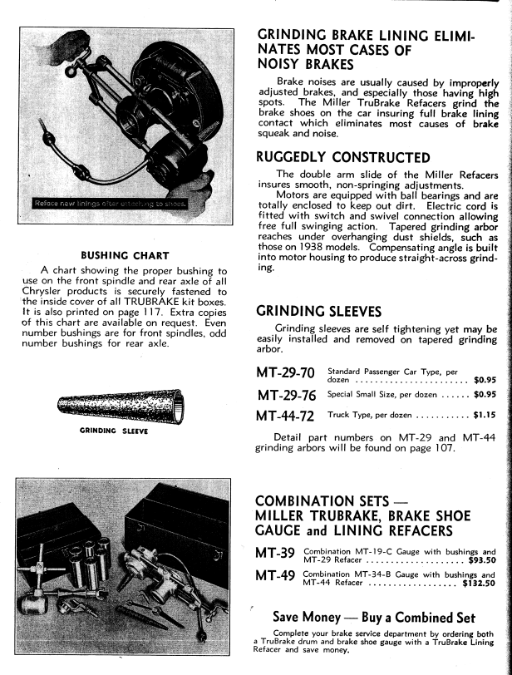
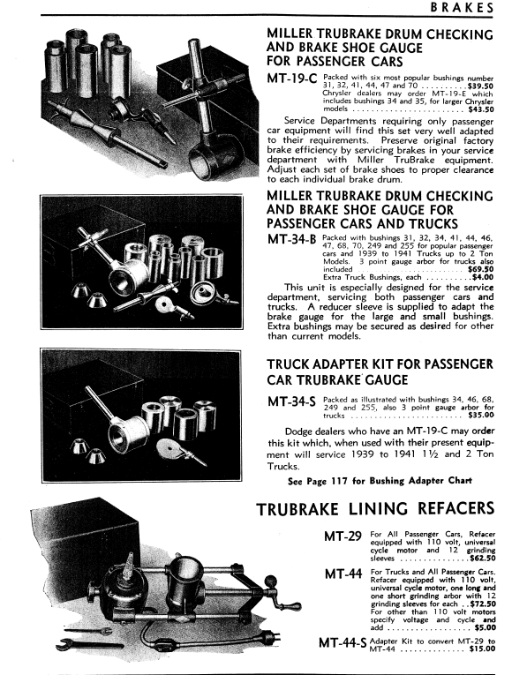
I have been fortunate enough to have purchased both the Miller MT19 Brake gage tool with the 7 sleeves and also the Miller Try-Brake tool that is used in conjunction with the appropriate MT19 sleeves. The try brake tool is used to cut down the high point on each individual shoe lining to make it concentric with each drum. I have attached the picture of the tool from the Miller Tool catalog. I also have the Ammco 175 brake tool. According to my documentation you initially setup the shoes to the drum setting with the MT19 for both sides of the shoes front and rear for each drum. By setting up to the drum setting you will then find the high point on each shoe and then will have to grind down this section until you have a complete arc from top to bottom so there is no high spot and then the shoes are concentric to your drum. I have used this tool and it does is a great tool. This is an early version of the Ammco Safe Arc cam driven brake arcing tool but Miller Tool was the tool maker for Chrylser Dealerships. Have to wear a face mask and also mark over your mouth and nose to protect from any shoe lining. I try to do this when there is no wind to push the lining material around in the air. When ever I decide to sell my 39 Desoto these tools will go up for sale but not until then. Thes tool were used from 1928 upto 1955 that had the lockheed brakes with the eccentric pins. 1956 starter to use the centerplane brakes. Rich Hartung Desoto1939@aol.com
-
I have been reading everyone comments, thanks. But here isa question for the experienced guys. My cooling system holds 19 quarts, but how many qts are in the engine block only? Here is my plan: Put in the cooling system flush and run the car for a run and get it up to temp to open the thermostat. Then dump the radiator. Then pour in clean water 1 qt at a time to determine the number of qts needed in my radiator and then subtract that from 19. That should provide me with an approx number of qts in the engine block. After flushing the rad and letting the engine cool then at the rear of the head is the connection for my heater supply hose. Take off the hose and install a coupling so I can attach my water hose . Open the block petcock and then flush the block. May be do this several time to get a clear stream of water. Then close the block petcock. ia the heater hose opening inthe top of the block via a funnel pout in straight AF number of qts based on my calculations, a pint of radiator Water pump and anti rust agent and then some distilled water until the water level is near the top of the block. Install the shutoff valve and reconnect the hose to the heater. Then pour in the approriate amt of AF in the rad and distilled water and antirust agent. Run the engine up to temp, check for any leaks. Then check the levels again and also check the level of protection. Sounds like alot of work but this my way of flushing the engine and rad. What are your thoughts. Rich Hartung desoto1939@aol.com
-
My advise is to go to your local auto supply store and purchase these specific tools. Getting the spring off can be done with a long screw driver but getting them back on is easier with the proper tool. The spring release and install tool has a hook and the long handles permit you to stretch the hook end of the spring so you can get the hook back into the hole on each brake shoe. It will take some practice but once you have done one it is a very simple tool to use. The proper tools always makes the job easier. Rich Hartung desoto1939@aol.com
-
sniper thanks for th einfo. Since I have on the head a hole for the heater value to thread into the head I thought that I could also use this hole with some adapters to perform the back flush of the engine block. I have the bypass external metal connector on my engine and I also have a manual shutoff valve and the rubber line runs back to the heater. This line would be the return line back to the water pump. If I used the hole in the head for the heater then I could use the garden hose to back flush the engine and open the petcock on the driver side of the block to flush out the block. Would this work? Would that be an easier way to do the flush? Yes also have to drain the rad first and also flush that out with clean water. Then put inthe flushing and cleaning chemical and run the engine upto temp. Let the engine cool down then empty the radiator of water and then do the backflow flushing as described above. Rich Hartung
-
My 39 Desoto 6 volt positive ground came with the factory installed electric wiper motor. This bolts up under the dash and then the linkage runs to the two wiper transmissions that connect to the wiper arms. It is a three wire system that runs from the wiper switch on the lower dash control and I use either a 10 or 11 wiper blade. Rich Hartung Desoto1939@aol.com
-
OK, so I want to flush and drain the radiator and engine block. I know there is a petcock at the lower bottom of the radiator. And this is used to drain the rad. On the engine block on the driver side is another petcock to drain the engine block. I want to put into some Prestone radiator flush and cleaner and then run the engine up to temp. Then drain the rad. Then want to drain the engine block via the petcocks. And then refil with water to flush out the entire system prior to installing the new green antifreeze. Question I have what is the best way to perform this maintenance: 1. Put in the flush cleaner and run the engine up to 160-180 to circulate the cleaner. 2. Dump the radiator and then open the petcock on the engine block. 3. Now when I refill the system, I assume that I fill the radiator to the top and then start the engine and the water will then start to flow back into the engine block OR do I need to remove the thermostat housing and the thermostat and then fill the system with water and or antifreeze. Not real sure of the best way to perform this maintenance and not damage the engine. Any and All advise is welcome. Rich Hartung Desoto1939@aol.com
-
Sniper: Yes I did read the article from Autolite, but I disagree with the not changing the crush washer after removing a plug and then installing the same plug. Here is my thinking, the copper or steel washer is a crush washer and has space between the two halves of the lips upper and lower. So this is called a crush washer to make a secure seal on the flat part of the spark plug hole on the head and then also on the flat of the bottom of the plug. So you torque down the plug and the gasket not crushes to make the seal as is it designed. When you remove the plug that was under pressure the old gasket had been crushed to make a good seal and I doubt that the gasket will return to its original size and opening when first installed. So therefore the old crushed washer is not performing the required duty to make a good seal at the treads. I know techniques have changed but we are still dealing with old technology with these flat head engines so I feel that we should put new gaskets on every time you pull a plug. You can get the copper gaskets on Ebay. Just my 2 cents on the topic. Rich Hartung desoto1939@aol.com
-
I do not that when you had carbon buildup the old school mechanics would get the car running and pull the acceleraltor rod to race the engine and then pour a small stream of water down the cab to cleanout the carbon. Also plese read the posting that I just did about replaceing the gasket after a sparkplug has been removed. This was taken from the Autolite maintenance school for all certified mechanics. The statement is two posting above this posting. Rich Hartung
-
Ok, I have an old Autolite Mechanics Training Manual that was used back in 1938. The training class is what a dealership would send their Head Mechanic to the Autolite Headquaters to be certified with the Autolite electrical systems. This was prior to the new ASE certification that our current mechanics should have. I have copied the section from the Autolite Spark Plug educations and traing in regards to the use of a new gasket when a spark plug is being installed. As per the copy of the training manual it clearly state on the second sentence: Use a new gasket each time a plug is installed. So with my understanding the copper gasket gets compressed and this also helps with the transfer of heat and cooling of the plug. each gasket compresses when the spark plug is tightened down to the cylinder head. So I have to go by the Autolite Schooling Technical Manual information. This manual is approx 6 inch thick and is very intensive training that the mechanic had to pass to be an Autolite Certified mechanic.l
-
My electric pump will push fuel through the mechanical pump and when using the electric pump I can see fuel filling my glass gas filter unit just prior to the carb. I have used the electric pump for 25+ years as a backup and primer pump. Rich Hartung


