-
Posts
1,612 -
Joined
-
Last visited
-
Days Won
13
Content Type
Links Directory
Profiles
Articles
Forums
Downloads
Store
Gallery
Blogs
Events
Everything posted by Bryan
-
Any luck on solving it yet?
-
Nice list, but is it under the Reference section of the forum on this site? Didn't see it. Just found the Body and Sheet metal book today under downloads. Is that what you mean?
-
Only thing I learned about towing is when I changed the ring and pinion set on my 1992 Dodge Dakota. In the manufacturer's info it had tow ratings..said 3.2 ratio "not recommended". Then it listed higher ratios..towing capacity increased for higher ratios 3.9 etc. Also seen other info where rear tire load ratings were important, plus ratings on the hitch. Bumper alone had a rating, then higher would be a rated hitch attached to the frame. That's all I know..
-
I just ordered a bunch of panels for my 1958 Dodge Coronet. First panel I ordered to see quality was $79.99. Got it, weeks later (now) ordered the rest of the panels..but they were $99.99 each. They are the only source I know.. They have panels for the 1948 D24, some at $79.99. I would be careful about ordering from them..if you see them on sale and want to order don't go back.. I'm not sure but I sent them this email... "I just ordered about $XXx worth of 1958 Dodge Coronet parts. The first time I ordered one panel to see the quality was order xxx, and one panel was $79.99. When I went to order all the panels for my 1958 Dodge, they were all $99.99. I figured, oh well, shipping problems or something made the parts go up. So I order. Then I’m looking at panels for a 1948 Dodge, another car I have ..they are all magically $79.99 on sale each for the side panels. I’m wondering if I’m getting screwed by some computer algorithm that raises the price on a part once you’ve shown interest in it. Not happy… Bryan" I'll see how they respond. The quality of panels is great...just feel like I got screwed over by some game. Hope this is the right section to post this..
-
Thanks, I ordered 316 stainless. Appreciate the advice..
-
Thanks, but I wouldn't consider them for any engine parts or anything with stress. Was looking at high strength stuff too. What I ordered was for bolts that were badly rusted. In all the Technical tips and reference materials on this site never seen a listing for bolts. And I doubt if I asked I would have gotten any answer from members. I asked about how to remove an engine and didn't get zip, must have been too silly..
-
I'm about to find out. My D24 Dodge has a P 18 # engine in it. Always had a fluid drive because my father showed me it working and I drove it myself.
-
When I get well I'm going to start again on my car. Have a few questions. There are several Youtube videos and instructions here how to overhaul a motor and reassemble. I even have a so call service manual. Problem is, the manual will say stuff like "remove transmission", then "remove clutch", etc without showing any real details. When I do a specific search here I get specific issues like linkages, aligning clutches, etc..but not a general step by step with pictures of how to remove the motor from underneath the car (D24 Dodge). I can handle the linkages, wires etc. under the hood. Just need more info what to do at the clutch, fluid drive, transmission, bellhousing area to remove the engine and later put it back in.
-
Cut out the audio and replace it with some easy going music..seen that before, works well.
-
Bet you're no fun at a party... I have thought about buying a 1967-72 car for driving instead of the next new one. Maybe a Ford Galaxie with 240 straight 6 or a Dodge with 225 slant six. 1967 was about the time they had collapsible, padded steering wheels, padded dashes (that crack), shoulder belts and headrests. 1972 was right before standard electronic ignition and a lot of the emission controls. But, anyway..antique cars are a hobby. Same as I did hopping my single gear moped up to do 50 mph when I was 25..it's fun.
-
Been a bad boy...was in McMaster-Carr buying stainless hardware...sheesh .
-
Start checking the relief valve before anything else. Wouldn't run it long without oil pressure.
-
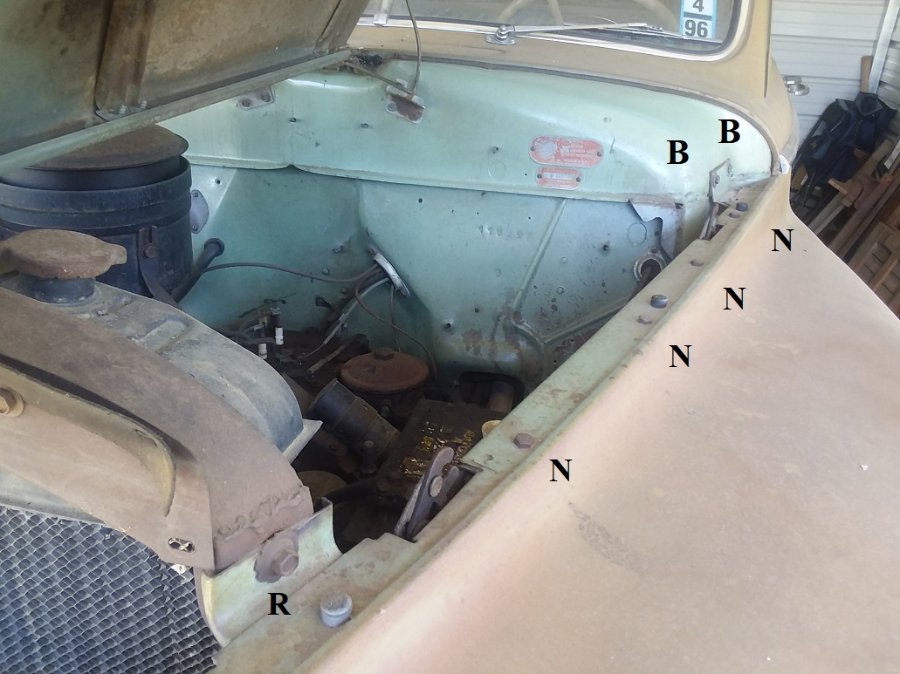
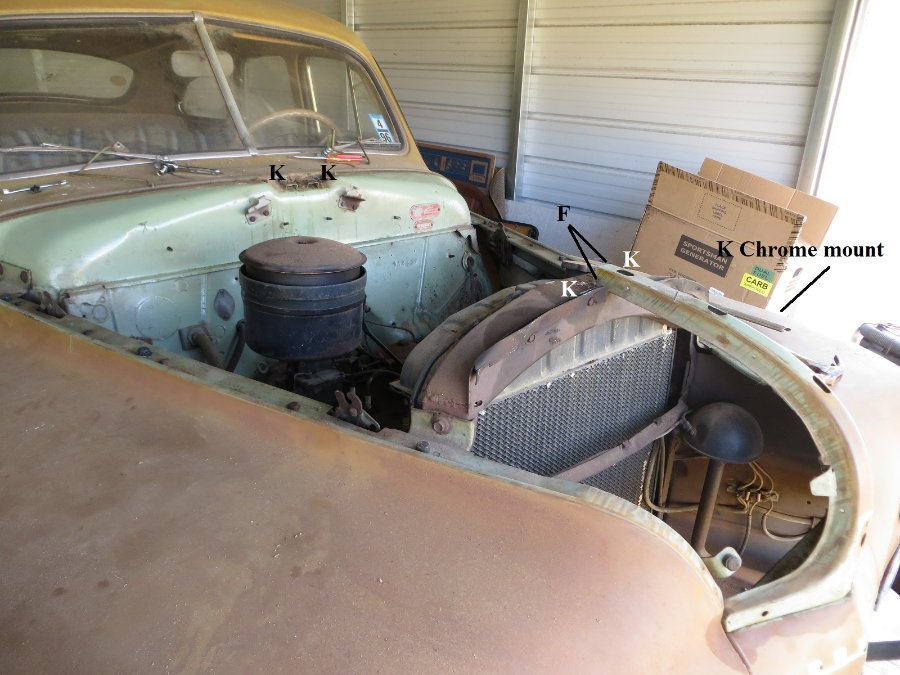
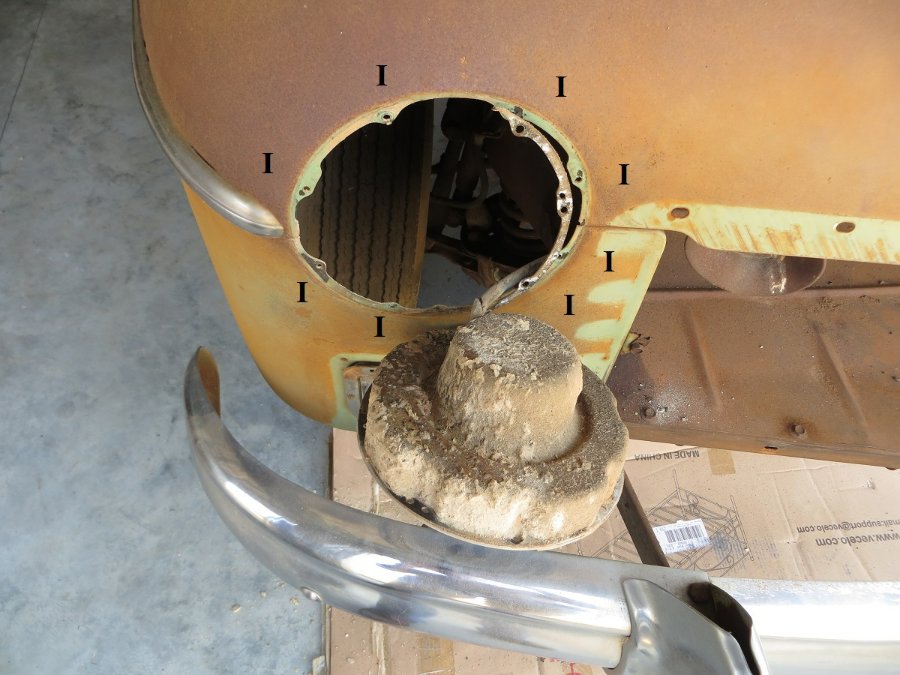
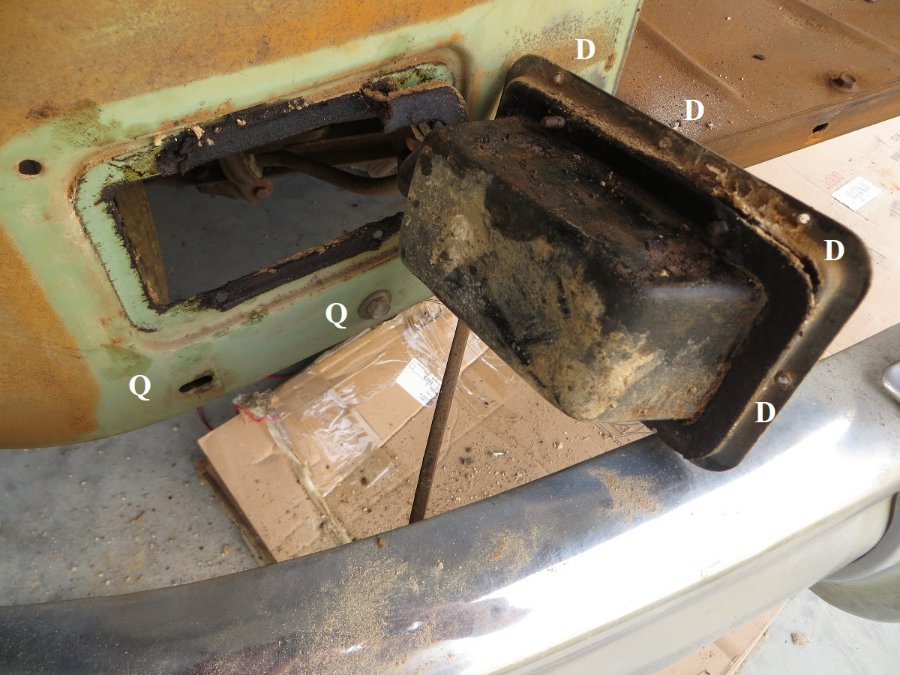
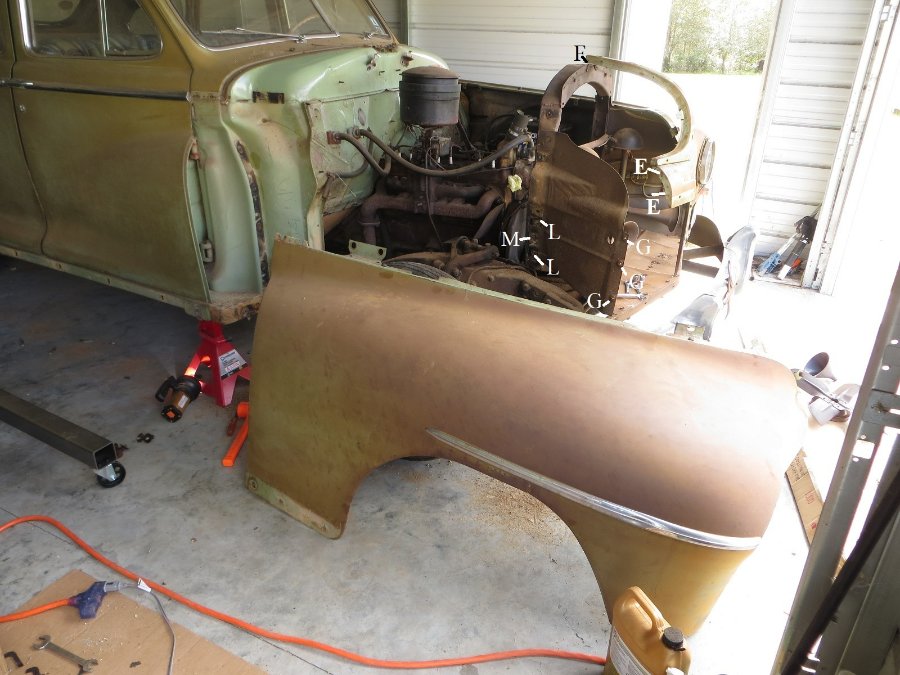
Here's the text version..should have thought of making it searchable. A. 2 - Bottom rear fender bolt hidden by rocker chrome under door 3/8” – 16 with 1/4” shank under head then 6/8” long threads with tapping cuts on end. 1 3/8” wide washer that is 1/4” domed. B. 4 - Top rear side fender bolts under hood corners 1/4” – 20 with 1” long threads with tapping cuts on end. 7/8” wide washer with inside teeth. C. 2 - Fender bolt on extension wing at bottom rear of fender 1/4” – 20 with 1/8” shank at head plus 5/8” thread length. Bolt head 7/16” wide. 7/8” wide washer with inside teeth. D. 8 – Nuts on back of park lights (rusty). #8 – 32 8 – Park light frame screw to body 1/4” long threads. (?? – same ?? Seemed smaller thread than #8.) E. 4 – Vertical fender bolt to front “Dodge” cowl. 1/4” - 20 with 1/8” shank at head then 1/2 ” threads. Bolt head 7/16” wide. 3/4” wide washer with inside teeth. 7/16” wide nut. F. 2 – T cowl to radiator mount screw. Round top single slot screw #10-32. 1/2” long threads from head bottom. 9/16” wide tooted washer. G. 6 - Vertical fender bolts near park lights. 1/4" – 20 with 1/8” shank at head then 1/2" long threads. 7/16” wide bolt head. 3/4" wide washer with teeth. H. 12 - Bolt for lower to upper motor vertical protection pan. 1/4" – 28 with 1/8” shank then 3/8” threads. 3/4” wide washer with teeth. I. 16 - Headlight frame to body screw #10-32 with 4/8” long threads then 1/8” shank on tip. J. 4 - Front nuts in wide chrome piece under door 1/4” – 20 with 7/16” wide nut, 3/4" wide washer with 5/16” hole, 1/2” wide toothed lock washer. K. 4 – Bolts for hood mount, 2 on radiator support, 2 at rear on top of firewall. 1/4" – 20 with 1/8” shank at head then 1/2" long threads. L. 4 – Studs upper and lower vertical radiator support to fender. 3/8” – 24 with stud overall length 1 1/2". Stud is 4/8” long threads then 1/8” shank near center then 7/8” long threads. Washer is 13/16” wide, can be 7/8 – 1”. If substituting with a bolt can use 1/2" long threads with 9/16” wide and 5/16” thick head. M. 2 – Bolts in middle of vertical radiator mount between above studs. 1/4" – 20 then 1/2” long threads. In same bag as studs. N. 16 – Top fender bolts along outer hood edges. 5/16” - 24 with 5/8” long threads from bottom of head. 1/2" wide nut, 1/4” thick. O. 8 – hood latch bolts 1/4" – 20 with 1/8” shank then 3/8” long threads. Bolt has 7/16” wide head. 3/4" wide toothed washer. P. 4 – Radiator fan bolts. 5/16” – 18 with 5/8” long threads from head bottom. 1/2" wide head that is 1/4" thick. Q. 4 – Rectangular arm bolts for pan extension fender front under park light. 1/4" – 20 with 5/8” long threads from head. 3/4" wide washer. R. 2 – Bolts for side upper radiator mount to green fender tabs. 5/16” – 18 with 1/4" long shank then 6/8” long threads. (1” total from under head to tip) Washer is a 1/4" dome that is 1 1/8” wide with outer teeth. S. 4 – Radiator bolts to radiator support (vertical along sides). 1/4" – 20 with 1/8” long shank then 4/8” long threads. Washer is 3/4" wide with inner teeth. T. 12 – Rear studs for vertical edge of fender at firewall. 3/8” – 16 inner threads in body. Total length of stud is 1 1/2" long. Outer threads rusted (different finer pitch) at 5/8” long with 3/16” shank then 5/8” long inner threads. Plan to substitute with bolt having shank and 5/8” long threads. U. 4 – Bolt for chrome bracket between door and hood. 1/4" – 20 with 1/8” shank and 7/8” long threads with cutter grooves on tip. 3/4” wide washer with inner teeth.
-
Since I couldn't work 2 weeks due to an operation I decided to check all the bolts I had bagged using my thread checker, and measuring with a tape measure. Here's a detailed list that I tied to tag to pictures.
-
Ask my brother that had his hand pulled in alternator by long loose sleeves. Lost a finger.
-
Make sure fan isn't rubbing against radiator lightly.
-
Okay..see how it works.
-
Radiator Support - Replace studs w bolts? Manifold/Head bolt sizes?
Bryan replied to Bryan's topic in P15-D24 Forum
And it's a split half hood..over the radiator. You have to take the hood off. I've worked on a lot of cars.. This wasn't as simple as it should have been. -
Radiator Support - Replace studs w bolts? Manifold/Head bolt sizes?
Bryan replied to Bryan's topic in P15-D24 Forum
Mine's a 48 Dodge and the radiator was binding on a 4" wide section of the support. Would not come out. I reckon if I would have had a rachet type box end wrench I could have taken the fan off..no room. Got two of the bolts off. That's what the manual stated, take the fan off.. -
-
When I was removing the radiator it would have been a lot easier to unbolt the radiator, then unbolt the support, lift the support out and lift the radiator out. The manual said to remove the fan first but I couldn't get to it. Only a flat wrench worked, and only on the 2 fan bolts that were in the wide spaced blades. Anybody see a problem replacing the support studs with new bolts? Off topic - does anybody know the size/length/strength of head bolts/studs and the intake/exhaust manifold bolts/studs? Thought if I order the bolts for the radiator I could order the others. I've seen different sales of bolt sets for the head/manifold..just don't know the quality.
-
Does drive shaft need to be balanced after installing U-joints?
Bryan replied to MarcDeSoto's topic in P15-D24 Forum
Dang...come work on my car. If they looked normal from the outside (not a lot of corrosion and dirt) and have no play like you said I would leave them alone. Go riding instead and enjoy. Maybe check the rear axle bearings by jacking it up and trying to move the wheel up and down. (That's how I ended up with mission creep and overhauling the rear end on my 92 Dakota).


