keithb7
-
Posts
3,470 -
Joined
-
Last visited
-
Days Won
193
Everything posted by keithb7
-
My experience is the 6V led light bulbs are absolute junk. Maybe the ones you found are better. I’m skeptical. “USA Seller” is trickery and means nothing.
-

Chrysler Rotating Recessed Crank with Radiator stand in-place
keithb7 replied to wagoneer's topic in P15-D24 Forum
Did you loosen all the spark plugs? -
I wouldn't sweat being out a ½ thou. That's finer than frog's hair. Me? I'd be inclined to resume with reassembly. Some books I have here show .0005 to .002 specs. The Chrysler Industrial engine book I have here states .0005 to .0015, maximum allowable .002 I look forward to what others have to say!
-
48 DeSoto engine start up after 40 year ago rebuild
keithb7 replied to MarcDeSoto's topic in P15-D24 Forum
I like that flathead 6 rumble. Made my day. -
48 DeSoto engine start up after 40 year ago rebuild
keithb7 replied to MarcDeSoto's topic in P15-D24 Forum
It sounds pretty decent to me. Congrats on getting it running. Tell us what you sealed the joint with, between the exhaust pipe and the exhaust manifold flange. How long ago did you assemble this joint? Are the bolts tight? Does it have a gasket? Or some type of goop? Are both iron mating surfaces of the joint true and square? If you have good engine oil pressure, I’d plan to move forward with car reassembly. Break the engine in later. If the engine has to come back out after extensive break-in time, so be it. You won’t need to take the body off the frame to do so. ? How’s your coolant look? Any air bubbles? Any oil in coolant? -
Out here in BC we are fortunate to have lots of snow and glaciers. Rain too, as moisture evaporates off the pacific ocean and condenses up against the mountains. We have lots of hilly terrain. All this snow and ice that melts, the rain water, it all fills lakes and rivers that all eventually works its way tirelessly to the sea again. Elevation and gravity are creating seemingly endless energy to move all that water. We dam powerful rivers, create water reservoirs, flood valleys, divert a portion of rivers to power generating turbines. I'll guess that probably 99% all our electricity here in BC comes from moving water. Hydro-electricity is a household word. So common, that the electrical bill is called the "hydro bill". Yes mostly all of us just call the entire process, "hydro". Hydro is pretty green and renewable. Yet an incredible amount of concrete, steel and copper are used to build these hydro dams and turbines. All products that are mined from the earth and processed. Coal is usually burned to dry the materials needed to make concrete. Copper mines here in BC are massive. Steel is shipped-in to BC on trains , trucks and boats from other areas. Shipping methods that all need fossil fuel to move the steel here. There is no way to get around mining and carbon emissions, yet hydro-electricity is pretty darn clean once it is all set up and running. The nature and wildlife preservationists are dead-set against flooding river valleys with the introduction of a new dam. It's never easy. Yet we all need and love our electricity. It has to come from somewhere. Hydro seems to be the least risky and damaging long-term of all electricity generation methods.
-
Introduction To My 1948 Desoto & A Young Vintage Mopar Owner
keithb7 replied to CarlN-NDC's topic in P15-D24 Forum
A hearty welcome Carl! I think I'm gonna like you...Reading, learning and understanding first. Then you put your new found skills to the test. That my friend is a plan. By doing so you are not "hoping" to fix this car. You are "planning" to. A hope, is a just dream without a plan. I suspect you may have watched some of my YT educational videos on these old Mopars. I live here on this site and will happy to help you out where I can. As will many other members here. These cars are so simple, they are fantastic cars to learn all about automotive systems. You can indeed lap valves. You could just have the machine shop cut the right seat angle and install new guides. Then you can do the rest. Lapping and sealing valves is very rewarding work. The experience gives you insight and feeds your brain. The more work you do yourself, the better you feel. The better you feel, the more new projects you'll take on. The better you understand things on a foundational level. You'll be able to troubleshoot almost any problem. Whether in the garage, or on the side of the road. In terms of the stuck engine, I came into possession of one like you describe. The piston rings rusted to the cylinder walls. I got everything out of the way. I flipped the block over on my stand and used a couple pieces of 1"x1" dimensional lumber and a 3 lb sledge. After soaking both upper and lower parts of the rings with penetrating oil for weeks, I finally took a swing of rye and started pounding the pistons from the bottom side out the top. I know I split up a few pieces of the wood in the process. The job was was a bit of a bugger, but they came out. Done carefully, I can't see this doing a whole lot of cylinder wall damage. You can hone the top of the cylinders above the pistons before you run them out. The damage is already there with the rust. Just don't pound on any rod ends. You could bend them slightly. You want to try and re-use your rods. Mucho $$ to replace the rods with new. Keep in mind, if you look around, 25" block engine cores can be found for cheap. You can rewire that whole car yourself. Make your own harnesses. I did so, in my '38 Plymouth. Fun and again, very rewarding. It will provide excellent training and experience that you'll have for the rest of your life. I started with old Mopars about 2016 I think it was. I learned more about cars in the past 7 years than I probably did the first 30 years of my adult life. I wish I had started way earlier. 22 years old sounds about perfect. I look forward to seeing you work through this car. Don't be scarce around here. Feel free to ask any questions. There are no dumb questions. Tons of people here to ask for great advice. Keith- 23 replies
-
- 4
-

-
- tip-toe shift gyromatic
- desoto
- (and 1 more)
-
Welcome @hbpaints to the forum. Lots of knowledgeable and helpful folks here. A very important point to make about your Canadian car is the engine. It will likely be a 25” long 218 ci. Do not confuse this with the 23” long 218 ci engine built in the USA. Different bore and stroke. Crank. Rods pistons, bearings etc don’t interchange. I read and understand that the “C” on the end of the engine SN indicates it is a Canadian built engine. I have doubts that it means custom. That engine could go into countless different applications. Custom on the block SN meaning custom what? The car itself, the trim, the options, color, upholstery, map light, etc indeed could indicate it is a factory built model Dodge Custom. I don’t think the C on the engine is an indicator. I could be mistaken. Anyone else have any thoughts on that?
-
That is a Borg & Beck clutch assembly. Type 9A7, model 955 I see there. I wish I could locate some Borg & Beck published info on what the numbers mean. I have seen a few different model numbers in Mopars. I can only assume clutch springs of various strength are used. Compensating for larger engines, more torque, bigger cars, more payload. I have a feeling my current 237 ci engine in my 1938 Plymouth that is mated to my 1938 to a stock clutch, could use some heavier clutch springs.
-
We have been above freezing every day since about Dec 28. Certainly a bit odd for where I am. The past few years we have seen several extreme weather events. We've had insane heat. We've had many years of extreme forest fires and related smoke. We hit -33C just before Christmas. Coldest I've seen it since I have lived here. I am in my 20th year here. We just experienced the warmest September I can ever recall. Sunny and warm all month. I have been doing a little bit of research to try and at least grasp what is going on with our environment. What I am mainly finding, is far from good.
-
This one fits my '38 Plym which shares its transmission with your 35 Plym. Yet I am not 100% sure this park brake drum will fit your '35 plym. Maybe call them and ask?

-
Plymouth Transmission help - Year made/Gear Clusted needed
keithb7 replied to rrunnertexas's topic in P15-D24 Forum
Looks like a 35-37 park brake assy to me. The tranny looks right for a '35 also. Although I don't have access to the transmission housing casting numbers to prove it. I think you're probably on the right track for a 1935 stock tranny. -
Plymouth Transmission help - Year made/Gear Clusted needed
keithb7 replied to rrunnertexas's topic in P15-D24 Forum
Is the park brake activation linkage on the RH of the tranny? A long lever that travels up through the floor, to pull on the brake? -
Plymouth Transmission help - Year made/Gear Clusted needed
keithb7 replied to rrunnertexas's topic in P15-D24 Forum
According to my Hollander Exchange book the 1935 Plym PJ has the same transmission unit as the 36, 37 and 38 Plymouth cars. (not same park brake extension though) I happen to have a 1938 parts book here, so I can tell you that the cluster gear is Mopar part # 661302. Same used in P5, P6, D8, D9. See options on Ebay. I like the rusty one. Clean it up and it'll be like new!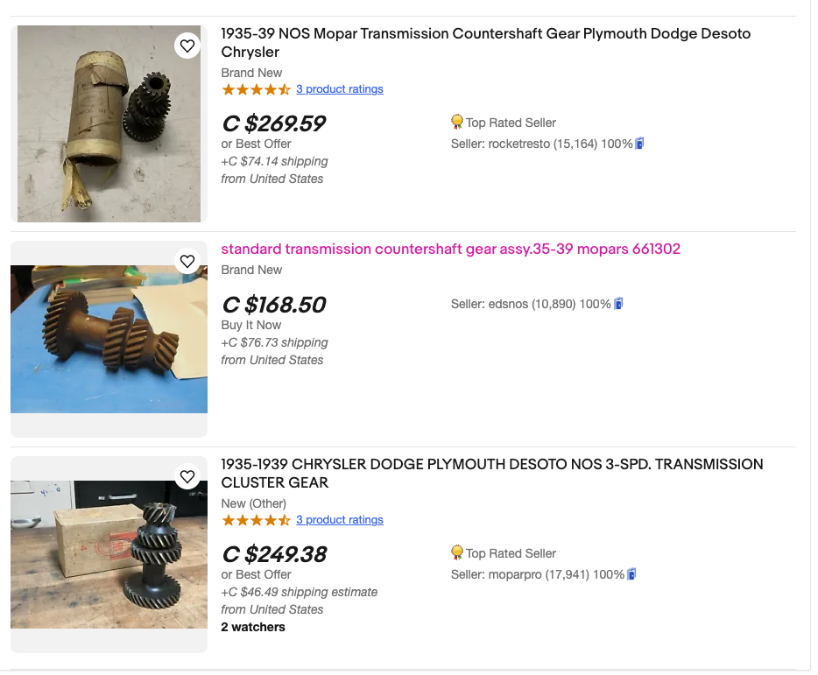
-
Plymouth Transmission help - Year made/Gear Clusted needed
keithb7 replied to rrunnertexas's topic in P15-D24 Forum
Are you able to post a photo that shows your entire transmission from end to end? -
Thanks for the promotion LeRoy. I won’t claim to be an expert. I am learning as I go and showing others how the various systems work. Truth be known I am often proving theory that I have studied. I go in there for my own benefit. Studying internals sharpens my backyard mechanic skill.
-
Optima battery suddenly too weak to crank on 48 DeSoto!
keithb7 replied to MarcDeSoto's topic in P15-D24 Forum
I suggest you email the seller and ask him for an explanation. If his answer is not satisfactory ask for a refund. Please consider posting his response. I’m sure interested in hearing it. Going on my rant now… OEM parts are high quality and fit perfectly for many reasons. The engineers designed and and tested their parts for fitment and reliability. The corporation’s reputation is on the line. High quality parts cost more and are worth it. The parts fit right do what you expect them to do. Sending out OEM parts to the cheapest manufacturer to reproduce them won’t end well. Selling parts under the premise that you are a knowledgeable expert may attract buyers at least once. A reputable seller should have controls in place to ensure quality and fitment for the consumer. A manufacturer of parts should at least have a designer/engineer on speed dial to monitor production, review and tweak products as needed. I try a and seek out good quality Mopar parts wherever I can. OEM new is the best. Good used is my 2nd choice. New aftermarket 3rd. The new aftermarket manufacturer should be reputable and strive to provide high quality parts. Constantly improving where needed. I avoid some sellers at all costs. Some will take your money and leave you cold. Some put lipstick on a pig and sell you boat anchor. Buyer beware. -
Optima battery suddenly too weak to crank on 48 DeSoto!
keithb7 replied to MarcDeSoto's topic in P15-D24 Forum
Are you rebuilding the engine and re-using old plug wires of unknown age? -
An alternative that I have used, for stubborn small engines with gummed-up carbs is propane. A typical plumber’s torch. Open the gas valve on the torch. Don’t light it. Douse the engine intake filter. Pull the cord, she’s likely to go. I can get away with this for a year or two. Then she gives up the ghost. Time to pull the carb and clean it.
-
Optima battery suddenly too weak to crank on 48 DeSoto!
keithb7 replied to MarcDeSoto's topic in P15-D24 Forum
This is why I always push automotive system fundamentals. A person cannot troubleshoot and find a problem if they don't understand how the very fundamental things function. If you don't understand exactly what 4 stroke means and valves and what they do and why, how can you troubleshoot for no start? Then add the ignition system. Things get more complex then. Another variable added. How does it work? Why, and what is it supposed to do? Make a spark is not the right answer, showing not enough understanding. Next add the fuel system. 7 circuits of a carb. WTH does that mean? Fuel pump? Choke? Fuel pressure? More confusion added. WTH does all this do? Knowing we need all systems to work to start the car is not enough. When you understand the basics you can easily eliminate some variables and get the engine started. A shop manual eliminates all the fundmental info. They expect you are not a first year apprentice when you read the shop manual. Reading it will help you maybe get things going, but likely not if you don't understand the basics. If you do get the engine going with some info in the manual, you won't be able to explain why. I heard a saying one time....If you can't explain it simply to others who have no knowledge, you do not know the subject well enough yourself. Get some books. Read them. Today I will highly recommend the book "Automotive Fundamentals" by Frazee & Bedell. Published from 1949 to 1958. If you want to work on your own old Mapar, a book like this is a priority to own before socket sets and screwdrivers. https://www.amazon.com/Automotive-Fundamentals-Frazee-Bedell/dp/B0013ZH02W PS: I suppose owing the book is not enough. You have to read it. -
In the color wiring image posted earlier: Look at the ignition wiring. See the red wire from the ammeter to the ignition switch. This is hot, live 6V from the battery. It is connected to the input side of your ignition switch. When the the ignition switch if off, 6V does not flow out past the switch via the green dotted line to the coil, nor the black dotted line to (hard to see diagram is cut off) the starter solenoid. If you have power leaving the key switch, with the ignition turned off and key in your pocket, you may have an incorrectly wired system. Of you could have a bad wire worn though somewhere. Touching something it shouldn't be. You'll need a digital multi-meter and be able to read the wiring layout diagram to troubleshoot and find your problem. The Sisson auto-choke is supposed to be hooked up to the 6V wire feeding the starter. The choke is given a shot of 6V only while the starter is cranking. In your case, while the starter solenoid is excited. The 6V activates the internal coil within the choke and cycles the choke to close. The choke does not need steady voltage to remain closed. The linkage is designed to hold the choke plate closed until the manifold get hots, and heats up the bimetallic spring inside the choke. Then choke starts to open again As soon as you let off the starter cranking button, the voltage to the starter is cut-off. Also cutting the 6V to the choke. In theory the engine is now running because you aren't applying the starter anymore. So you likely have no problems related to the choke. You can do the trial and error thing. Remove a wire at the starter button. Hook up your battery again. Does starter still start cranking over? Then it's not the push button its likely the steady 6V being fed to the start solenoid from somewhere. Start by removing 1 wire at a time at the solenoid and try hooking up battery again to find which wire is feeding steady 6V to the solenoid. Rinse and repeat hooking wires back up and removing wires 1 at a time at starter solenoid to isolate the delinquent wire. Its definitely an easier and quicker process if you have a digital multi-meter. You can also check wires for continuity to ground, or end to end to learn exactly what the wires are or aren't doing, or where they are hooked up. Then compare to the wiring layout diagram.
-
I've never had a need to use starter fluid. I would try all other methods to start a cold tired engine, using a little starting fluid as a last resort. It's a very flammable gas that I believe causes extremely high combustion pressures inside your cylinders when ignited. Higher pressures than your gas engine was ever designed to tolerate. Likely leading to broken piston rings and scored cylinder walls. Bent connecting rods. Expect to find lower compression readings from a gas engine that has seen its share of starting fluid. A diesel engine would likely tolerate starting fluid as diesels have an extremely high compression ratio compared to gas engines. Diesel engines are engineered and built way stronger, heavier blocks and heads, pistons, rings etc, to operate under extreme combustion cycles from such high combustion pressures. Diesel engines make massive power and torque due to the extremely powerful combustion process that occurs inside the cylinders. Gas engines, not so much. Starting fluid, like a shot of a drug may wake the your gas engine up, but it will take its toll.
-
Optima battery suddenly too weak to crank on 48 DeSoto!
keithb7 replied to MarcDeSoto's topic in P15-D24 Forum
Many of us have tried to explain this in earlier posts in this thread. " #1 TDC on the compression stoke" has been mentioned a few times. A piston has to travel up and down 2 times, to complete a 4 stroke cycle of the engine. In order to do that the crank has to make 2 full complete revolutions. Every time the piston travels up or down that is 1 stoke. A piston goes down. Intake valve opens. It sucks in Air/fuel mixture. Stoke one is now complete. Crank has turned 180 degrees. Piston travels up. Intake valve closes. Piston compresses air/fuel mixture. Piston continues to travel up until it stops. Where it stops is TDC on compression stroke. Stroke 2 is now complete. Crank has travelled 180 again, Spark plug fires just BEFORE piston reaches TDC. Exactly how soon before TDC depends on piston travel speed. Actual firing position is manipulated by mechanical and vacuum advance. We call this timing. Timing is adjusted and you need to get the timing in the ball park before air/fuel mixture will fire and go bang! Violent combustion forces the piston down to the bottom of the cylinder bore. The explosion creates torque on the crank. Stroke #3 is now complete. Crank has turned 180 degrees again. Piston travels back up. Exhaust valve opens. Spent gasses are pushed out the cylinder by way of the exhaust valve. Crank has turned 180 degrees again. Stroke 4 is now complete. Piston again reaches TDC but not at compression stroke. So spark does not fire here. The 4 strokes of a 4 stroke engine are now all done. The process start over again. A home mechanic rebuilding an engine needs to understand this. One should strive to research, read and understand it. #1 and #6 piston both travel at exactly the same time and motion. They are exactly 180 degrees out. When #6 is at TDC compression stroke, #1 is at TDC intake stroke. When #1 TDC is on compression stroke, #6 TDC is on intake stroke. Every single time the crank turns 360 degrees the timing mark on the front pulley passes the TDC mark. You must know how and why ½ if the time it,s not accurate for TDC on #1 compression stroke. What really seems to screw people up is they set a wood dowel down the timing pin hole above cylinder #6. They turn the crank over until #6 is at TDC, and think they've got it. They have a 50/50 chance of being right, on the compression stroke. Why the heck is the darned tootin' timing pin hole above #6? Shouldn't it be above #1 cylinder? People are confused! It is because above #1 piston there is a thermostat and waterneck in the way. You can't place the timing pin hole there. The engineers and mechanics were like, "ya sure. Put it above #6 cylinder instead. #6 and #1 travel the same anyway. We got it"... 100 years later people are still often mistaken. I am convinced in another 100 years nobody will have an inkling how all this works. The difference between #1 piston and #6 piston movement in the block is nothing, The real difference is the valve timing. Valve timing dictates what cylinder is currently on what stroke. -
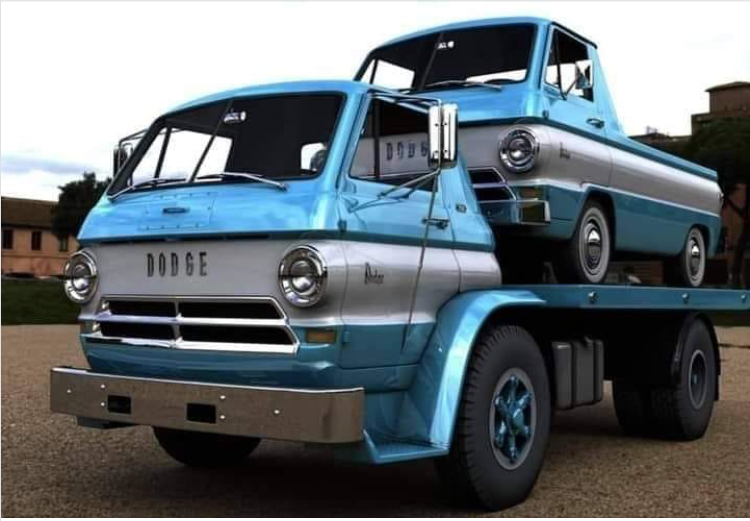
Extremely cool. It makes me weak in the knees. I am not typically a 60's Mopar lover, but these cool little cab over trucks with a hopped-up 318? Its futile for me to resist.
-
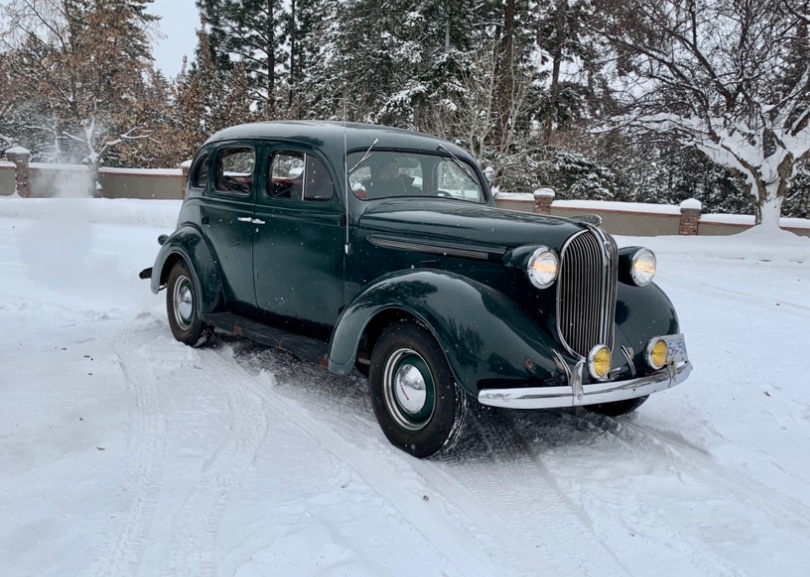
My cars go into the garage just like every other day. They have good A/Freeze even though the garage is heated. I fire them up a couple of times over the winter. Keeps seals and gaskets well lubed. Pump the brakes now and then. Heck I ‘ll even back them out into my snowy driveway for some nice winter-esque pics. I question, why drain the engine oil in the fall and put new oil in? New oil oxidizes and breaks down just by sitting in your crankcase all winter. Its not ideal to drive next year on that “new oil” that sat all winter. Perhaps you dump that new fall oil in the spring again? How many miles does the average vintage car get each year. Mine about 1000. The oil is not real dirty and due in Oct. So I leave it in. I Get it hot in March. Flush out all last year’s oil and refill with new 20W40. Then run ‘er all summer and fall. Rinse and repeat. Keep in mind I do run modern detergent oil. Just last week we were having fun. Cars that sit around too much go bad. They need to be loved and get regular attention.