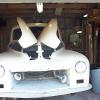
Conn47D24 Posted December 22, 2018 Report Posted December 22, 2018 (edited) Mopar 1064520 Does anyone have the instructions for installation that they would share please? I checked our download section but nothing there. Mine arrived without any. Im sure ive seen them somewhere but no luck yet. Thanks and Merry Christmas to all ! Edited December 22, 2018 by Conn47D24 Spell Quote
knuckleharley Posted December 22, 2018 Report Posted December 22, 2018 46 minutes ago, Conn47D24 said: Mopar 1064520 Does anyone have the instructions for installation that they would share please? I checked our download section but nothing there. Mine arrived without any. Im sure ive seen them somewhere but no luck yet. Thanks and Merry Christmas to all ! Looks to me like the clamps at the bottom of your photo clamp to your bumper,and the lights attach to the other end. If you want them chromed,sent them out for chroming now. 1 Quote
chrysler1941 Posted December 22, 2018 Report Posted December 22, 2018 (edited) 46 minutes ago, knuckleharley said: Looks to me like the clamps at the bottom of your photo clamp to your bumper,and the lights attach to the other end. If you want them chromed,sent them out for chroming now. Agree but not bumper . They clamp bumper brackets. Edited December 22, 2018 by chrysler1941 Quote
desoto1939 Posted December 22, 2018 Report Posted December 22, 2018 Correct the bottom rectangular pieces attach to the bumper brackets. But on the upper or top section the runed part should be point upper and this goes into the bottom of the fog lights. The roundness helps so you can rotate left to right and up and down when getting them aligned. Rich Hartung desoto1939@aol.com 1 Quote
Conn47D24 Posted December 23, 2018 Author Report Posted December 23, 2018 Is there a space btwn the gravel shield and bumper ? Or is the shield drilled for the bolt? Quote
desoto1939 Posted December 23, 2018 Report Posted December 23, 2018 If I remember correctly the rubber ring should fit over the metal cylinder of the upright. The ring should have a slot around the entire circumference of the ring. I thenthink the hole in the gravel guard is the size of the interteirot size of the slot on the rubber ring outside endge then fits into the hole to form a seal then the cylinder is slide into the rubber ring and thenthe fog light is attached to the top section and of course the unit is bolted to the bumper bracket. I would try this first on some sheet metal before making the final hole in the gravel guard to make sure this is what you are trying to do. Rich Hartung 1 Quote
T120 Posted December 23, 2018 Report Posted December 23, 2018 (edited) If you require drilling the front stone guard for the brackets, I would suggest using a step drill bit of the proper size to match the (inside) diameter of the slot in the rubber grommet. Edited December 23, 2018 by T120 1 Quote
Conn47D24 Posted December 23, 2018 Author Report Posted December 23, 2018 Good idea to mock up on scrap sheet 1st ! I will invest in a step drill bit. Thanks all ! Quote
Conn47D24 Posted October 15, 2020 Author Report Posted October 15, 2020 Update: As recommended I mocked up a mount on a piece of scrap metal. 1 & 1/2 " hole drill worked well. Now to measure ( several times ) and mount to the D24. 1 Quote
desoto1939 Posted October 15, 2020 Report Posted October 15, 2020 Clay Measure and remeasure several time to make sure the hole is the perfect fit. You only have one shot at this onthe painted front gravel shield. Also put some good quality tape down onthe metal plate prior to drilling the hole to help with stopping paint chipping. Slow and easy on the pressure. I know when I drill the holes in my fender for the fender lamps I was totally scared but got through it patience is your friend. Good Luck Rich Hartung 2 1 Quote
Conn47D24 Posted October 17, 2020 Author Report Posted October 17, 2020 Looking good ! Here's how I got there. Drilled a pilot hole from under the shield ,lined up through the bracket holes. Traced around the hole drill, and scored the paint to minimize damage. Drilled hole , filed the rough edges installed grommets. Assembled lights on chromed top pieces. 1 Quote
sidevalvepete Posted October 17, 2020 Report Posted October 17, 2020 Looks really good. Like the size you have chosen. Are you going to run indicators? If so , which lights will you use, front and rear? Quote
Conn47D24 Posted October 17, 2020 Author Report Posted October 17, 2020 Pete, Thanks. Explain indicators? Parking lights, turn signals? Quote
greg g Posted October 18, 2020 Report Posted October 18, 2020 Indicaters in non American English is turn signals. 1 Quote
sidevalvepete Posted October 18, 2020 Report Posted October 18, 2020 (edited) Yes. I meant the turn signals. Just interested, that's all. Going to do something on mine. Edited October 18, 2020 by sidevalvepete added.... Quote
Conn47D24 Posted October 18, 2020 Author Report Posted October 18, 2020 Ok Pete, I'll just use these as fog lights. And of course to look cool! Not much night, or fog driving in my future. Lol My D24 has the turn signal option. Front parking lights, tail lights. Quote
greg g Posted October 18, 2020 Report Posted October 18, 2020 Pete to adapt indicators into the fronts you can add dual element pigtails to your parking light fixtures to accept dual filiment bulbs then wire accordingly to power the blinkers. You can do same to rear lights also. I am not familiar with the rear lighting scheme but on my 46, I added motorcycle lamps with brake light fixtures for rear blinkers. 1 Quote
greg g Posted October 18, 2020 Report Posted October 18, 2020 Somebody did similar to their 38. Do both lights function as brake lights? If so, wiring seperate fixtures is the easiest way to accomplish indicators as you don't need to tap into the brake light circuit. Quote
sidevalvepete Posted October 18, 2020 Report Posted October 18, 2020 Ok. Thanks to you both. Will try to do something that looks fitting for the vehicle Quote
Andydodge Posted October 18, 2020 Report Posted October 18, 2020 I've used these motorbike blinkers/indicators for 40 yrs tho' last year I replaced the rear ones with a pair of smaller "harley"style ones, have got a pair of the "harley" style for the front that will be done soon........I originally tried to adapt the front parking lights and the rear tailights to both work as indicators but space was an issue so the bolt on bike ones were used........hopefully saves an idiot hitting the car..........andyd 1 Quote
busycoupe Posted October 18, 2020 Report Posted October 18, 2020 my car has turn signals added by a previous owner. They use the front parking lights with dual filament bulbs, but the rear has separate added lights, with blue dot lenses. 1 Quote
sidevalvepete Posted October 18, 2020 Report Posted October 18, 2020 I like that tattoo on the bumper!? 1 Quote

Recommended Posts
Join the conversation
You can post now and register later. If you have an account, sign in now to post with your account.