Fireball Posted September 14, 2009 Author Report Posted September 14, 2009 This is not a catastrophy yet, I sprayed two bigger areas today and still like the colour. So I think I'll stick with it. My phones camera obviously doesn't tell the exact truth of the colour, it's more green than in the pics Quote
Joe Flanagan Posted September 14, 2009 Report Posted September 14, 2009 Shows up better in the second picture. I really like the color. On my screen it looks like it has quite a bit of blue in it compared to the color I'm using. By the way, I'm painting right now and I'm having a heck of a time with runs. I'm a rookie painter and still getting used to it. What I'm learning is that if you think you're taking your time, slow down and take more time. Man, I just shot the back fenders and trunk lid for the third time trying to correct mistakes and it looks like I'll be going back for a fourth attempt. Quote
Fireball Posted September 16, 2009 Author Report Posted September 16, 2009 Sprayed the roof today, and can't say I'm satisfied about my work. To my eye the spray pattern is too visible, the paint should flatten more. That's usually the reason of too thick mixture, but I have already reduced twice the recommended amount, and changing the gun pressure doesn't help either. The surface is not orange peel, but kinda wavy. Well it's only lots of wetsand and polish ahead which I would do anyway. Quote
Plymouthy Adams Posted September 16, 2009 Report Posted September 16, 2009 not all paint is going to thin per the recommended amount as per directions on the can..age of the paint has a lot to do with the mix..a viscosity cup will get you closer to what you need per your paint tip...remember, size of the tip makes a difference in viscosity as of now..the paint may not have had time enough to properly lay down..give it a bit more time..depending on the brand name..it could take up to a month for proper lay down this is definitely a characteristic of DuPont Centari..it will continue to cookout for about 30 days.. Quote
Joe Flanagan Posted September 16, 2009 Report Posted September 16, 2009 (edited) Wow, that looks beautiful. Is it a single stage paint? I'm using a two stage system, PPG's Deltron base coat with Omni clear. It's coming out nicely but the learning curve is wearing my sorry behind out. I've had to redo a few things from start because I messed them up. I'm discovering you can't be careful enough around this stuff because even little ding or smear requires a hell of a lot of work to repair. To top it off, a couple of days ago, I was not careful enough with my respirator and I managed to inhale enough of this stuff to make me pretty sick. What I think I did was go back into the garage to check my work some time after spraying and I assumed the fumes had dissipated so I didn't wear my respirator. A couple of hours later, I started coughing and had a very irritated airway and a headache. This lasted for a couple of days. Felt just like I had the flu, which I hope was the case. Finally, last night, I had a fever and was hotter than heck. This morning I started sweating like a horse and couldn't stop. Then it was over and now I feel fine. But this stuff is nothing to fool around with and I hope I haven't just killed myself. This paint has isocyanates in it, which cause cancer in animals but they say they don't know whether it does in humans. Which I take to mean it causes cancer in humans. Confirmed is what they call occupational asthma. It will either give you asthma or produce chronic asthma-like symptoms. From now on, I'm covered head to toe and start each session with brand new cartridges for my mask. The clear coat is what did it and that's the stuff that has the worst reputation. Edited September 16, 2009 by Joe Flanagan misspell Quote
alan32433 Posted September 17, 2009 Report Posted September 17, 2009 I'd like to add something to this post. I'm not a professional painter but I have painted quite a few cars with really good results. I got so tired of trying to paint in my dirty workshop, that I built a ventilated paint booth inside my 35X50 shop. My 48 DeSoto is in primer now, I'm waiting for cooler weather (Florida) to paint. When talking about mixing paint to a factory original color, be careful when going to your local paint supplier. Make sure they don't use "offsets" to mix your color. Using an offset means they pick a color from their paint chip book that is close to yours, then they tint to get it "correct". Problem is when they do that, different light levels and so forth cause the finished paint to look different when you spray it. You should always make sure they have the original formula and mix it to that exact specification. Also, if you are looking to save money on materials, I've had excellent results using a lower priced color coat, and spending the big bucks on a quality clear coat. The clear coat provides all the shine and durability anyway, plus the premium clears are really easy to sand and buff for show quality. Quote
Joe Flanagan Posted September 17, 2009 Report Posted September 17, 2009 Ditto on the clear coat. I spent extra on that for the reasons you mentioned. I saved money on the primer-surfacer (or high build primer) because it just needs to stick and not react to anything it touches. I couldn't see shelling out a lot of money for that and got advice from pros not to. I did spend money for PPG epoxy primer. Mostly because I'm staying within the PPG system and I've been told it has excellent corrosion resistance and is a good, stable substrate for anything you put on top of it. I have had my car's roof, pillars, and firewall in epoxy for over 7 years without a single sign of rust and it spent a good amount of that time outside under a cover. The rest of the time it's been in an unheated, un-air conditioned garage that is not completely closed to the elements. I just started color sanding the clear on one of my fenders and it's incredible, how smooth it is. I do see mistakes, though, which the clear will accentuate. Quote
55 Fargo Posted September 17, 2009 Report Posted September 17, 2009 Wow, that looks beautiful. Is it a single stage paint? I'm using a two stage system, PPG's Deltron base coat with Omni clear. It's coming out nicely but the learning curve is wearing my sorry behind out. I've had to redo a few things from start because I messed them up. I'm discovering you can't be careful enough around this stuff because even little ding or smear requires a hell of a lot of work to repair. To top it off, a couple of days ago, I was not careful enough with my respirator and I managed to inhale enough of this stuff to make me pretty sick. What I think I did was go back into the garage to check my work some time after spraying and I assumed the fumes had dissipated so I didn't wear my respirator. A couple of hours later, I started coughing and had a very irritated airway and a headache. This lasted for a couple of days. Felt just like I had the flu, which I hope was the case. Finally, last night, I had a fever and was hotter than heck. This morning I started sweating like a horse and couldn't stop. Then it was over and now I feel fine. But this stuff is nothing to fool around with and I hope I haven't just killed myself. This paint has isocyanates in it, which cause cancer in animals but they say they don't know whether it does in humans. Which I take to mean it causes cancer in humans. Confirmed is what they call occupational asthma. It will either give you asthma or produce chronic asthma-like symptoms. From now on, I'm covered head to toe and start each session with brand new cartridges for my mask. The clear coat is what did it and that's the stuff that has the worst reputation. Hi Joe, you be careful my Friend, ISO poisoning/exposure can be lethal. Or you can get so sick, any sniff of a chemical will give yuor lungs and upper respiratory system a shock. Where the best protection you can afford, have the air moving, stay out of the vapor cloud (overspray), change your carbon cartridges often. Exposure to ISO, can be very dangerous, and the health hazard very far reaching, use all procautions available. The clear is probably the worst for getting sick from, the primer the least. I have used the urethane primers, but am too chicken to ever use BC/CC in a home garage, would do it in a proper spraybooth with an air fed mask only, this is just for me only, others have had no problems spraying at home with these products, but some have gotten real sick, as you have had some exposure, and it ain't no fun.Joe be careful, good luck, even if you do all the Base coat, then let someone spray the clear, might help you with good results. A Mopar guy up here has recently done this, did all prep, primer, base coat coor, then sent out car and pieces for a shop to spray the final clear coats, that way no worry about all the contaminants in a home garage, or having screw-ups, by inexperience.......Fred Quote
RobertKB Posted September 17, 2009 Report Posted September 17, 2009 I admire all you guys that do your own painting but Joe's type of story is one reason I am farming out my '48 Dodge D25's paint job. I know nothing about body and paint work except I don't want to spend the time and money getting familiar with the work. I would have to buy all the tools, spray guns, decent compressor, etc. Then there is the health issue. I have just decided to let the professionals handle it. However, to those of you who do their own painting, good luck and stay healthy. Quote
Fireball Posted September 17, 2009 Author Report Posted September 17, 2009 Joe, yes this time I'm using single stage acrylic enamel. My first time with this German brand Mipa. Tim that is true, and I also heard that my HVLP gun is not the best alternative for shooting acryls but I have to live with it now Quote
Plymouthy Adams Posted September 17, 2009 Report Posted September 17, 2009 I like my HVLP...I shoot single stage acrylic enamal all the time..prior to the HVLP (I use Sharpe) I used Binks Model 18's one for primers the other only my topcoats..I do the same for my Sharpe guns, I have a primer gun, topcoat gun and a door jamb gun..the HVLP does an excellent job of transfer, less bounce and overspray is at a minimum..paint use is less...fallout is less..and clean up of the gun compared to conventional..painless.. is your HVLP gun a true HVLP or is it listed under the HVLP compliant..there is a difference...Not all HVLP paint guns are equal.. Another item of grave importance with the HVLP is the use of solvent ..it is not ever recommended to use a fast reducer with the HVLP..medium or possibily a slow solvent to flow out the finish...this may be what you need to do, change solvent speed to get the immediate laydown look you are accustomed to with the conventional gun.. Quote
Frank Elder Posted September 17, 2009 Report Posted September 17, 2009 I have never painted a car before, a case of beer and a case of rattle cans doesn't count.....but why do you need a different gun just for door jams? Quote
Plymouthy Adams Posted September 17, 2009 Report Posted September 17, 2009 smaller physical size allow access to areas restricted by the physical size of the standard paint gun assembly...about the only way to best this is using a remote pressure pot..few out there that are located on the person belt for paint supply and just the liquid hose and air line to the paint head...with use of "EL's" this can give a spray head a very small foot print...I do have a paint pot I have used in the past to shoot under cars etc to reach areas otherwise impossible as you cannot turn a paint gun in many angles and still prevent leakage or no siphon conditions..with the paint pot..the gun will shoot in any position/angle.. Quote
Joe Flanagan Posted September 17, 2009 Report Posted September 17, 2009 Well, my plan is to do the body next. Right now I'm working on the four fenders, the hood, and the trunk lid. Once I get all that done, if the weather is still good enough to paint in, I'll try to paint the body (without the doors on it). That way, over the winter, when it's too cold to paint, I can install the engine and do all the other building. The doors can wait. The body and doors are bare metal right now with a coating of Picklex 20. I'd at least like to get them coated with epoxy primer and some high build before the winter. I'm reassessing my whole safety situation too. Quote
Fireball Posted September 18, 2009 Author Report Posted September 18, 2009 Tim the gun is a true HVLP as far as I know, although it's some five-six years old and not the newest tech. But I believe you just found my issue with that reducer speed. That and one or two sizes smaller nozzle would do miracles in my case, I believe. Quote
Fireball Posted September 20, 2009 Author Report Posted September 20, 2009 This is getting exciting. Rear fenders, the last section just got primered, ready for final three coats of acryl in three hours and the whole car is done It'll be hard time waiting up until tomorrow to get to see the whole car in new colour and see the big picture. Eeeeeasy now... BTW Tim, the finish smoothened whole lot better with reducing 20% instead of instructed 10%, and lowering the nozzle pressure far below recommended. Amazing how all the brands work differently out of the same gun and guy. Quote
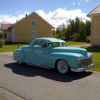
Fireball Posted September 21, 2009 Author Report Posted September 21, 2009 Consider it done. I'll let it settle for month or two and do the final wetsand and buff later. Colour and garage painting turned out quite ok, with some pinstriping it'll be just nice when finished. I have to admit I was a bit worried at start if it'll be too much "lollipop" in just one colour, this particular seafoam, but no. Luckily it looks good to my eye. Some may disagree though, but hey that's their problem SO WHAT DOES THE JURY SAY? It would be nice to hear some opinions and ideas, no worries if this doesn't fit to your taste, just let me know, I like feedback. Quote
Uncle-Pekka Posted September 21, 2009 Report Posted September 21, 2009 Congratulations Fireball! Choice of the colour is a jackpot and looks are stunning! Interesting that you painted the car area by area. I considered the same when I someday get that far. Painting the entire car at "one shot" probably goes far beyond my skills... I've been doing the primer jobs for years and also have painted smaller "objects", such as bike tanks, fenders etc. , but never a car this big... Looking fwd to see more photos of your coop' soon. /Pekka P.s. Are you going to do even the pinstriping by yourself? Quote
Plymouthy Adams Posted September 21, 2009 Report Posted September 21, 2009 there will not be a lollipop look to this car once the chrome is back as it will break up the lines and panels and make that car really "pop"..these larger cars look much better in lighter shades also..shows off their true size..get them too dark and well. you just have a dark car..the big butts are truly in a class by themselves anyway..congrats on the paint job... Quote
T120 Posted September 21, 2009 Report Posted September 21, 2009 ..I like it.Good choice on colour. Quote
55 Fargo Posted September 21, 2009 Report Posted September 21, 2009 Fireball, looks great, can hardly wait to see your car with all the trim back on. You did good........Fred Quote
Niel Hoback Posted September 21, 2009 Report Posted September 21, 2009 Absolutely beautiful! No room for second thoughts here, it's perfect. Just call me "green with envy". Quote
Joe Flanagan Posted September 22, 2009 Report Posted September 22, 2009 Of course I like it because it's practically the same color I'm painting mine. It looks absolutely perfect, Fireball. Great job. Amazing that you did it in your garage. Did you get any debris in your paint? I'm doing a base coat/clear coat system and man am I having a time with stuff getting in my clear coat. Hair, mosquitoes, dust nibs, you name it. I've had to go back and do numerous repairs after the clear has hardened. Not easy. Your car looks fantastic, though. Quote
pflaming Posted September 22, 2009 Report Posted September 22, 2009 When you get it all back together, send us MORE pictures! It is fantastic! Quote

Recommended Posts
Join the conversation
You can post now and register later. If you have an account, sign in now to post with your account.