-
Posts
1,233 -
Joined
-
Last visited
-
Days Won
17
Everything posted by Radarsonwheels
-
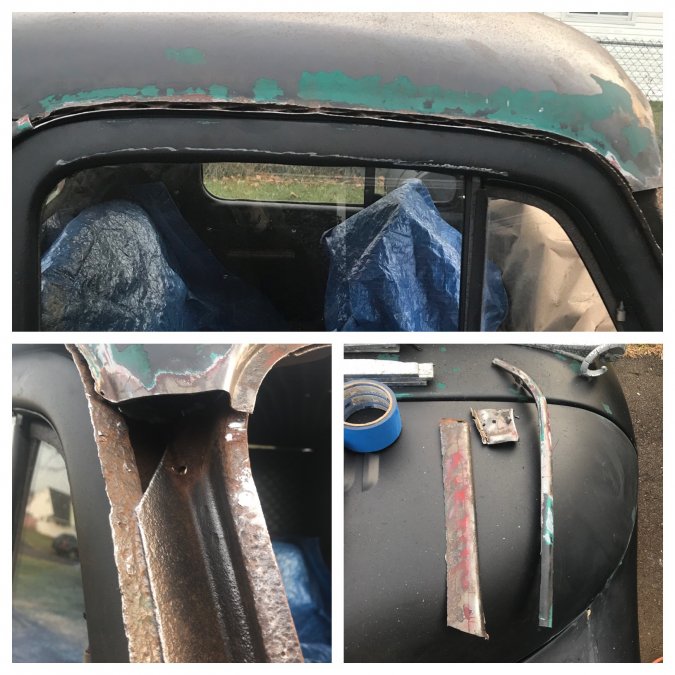
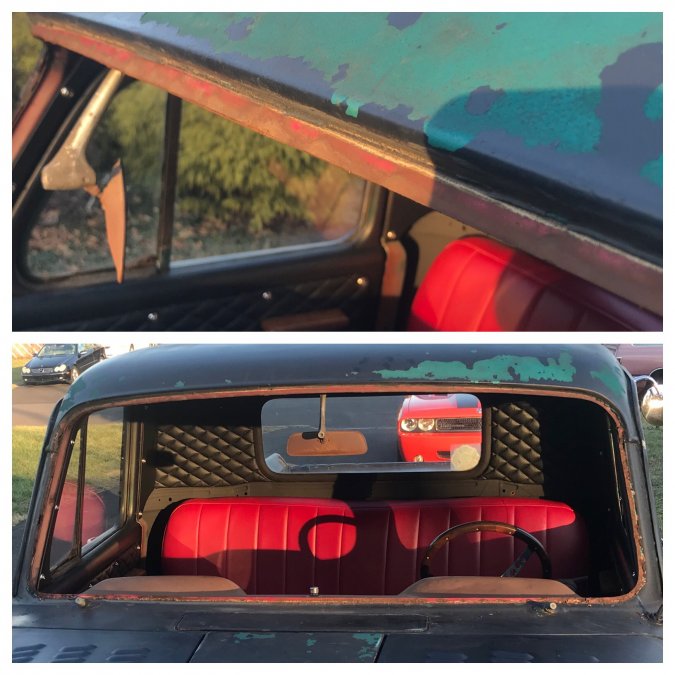
Any advice on handling the drip rail layers is appreciated! I am not afraid of cleaning and chemically de-rusting between the layers but I’m not sure how to put it back leak free. The rail attaches to the bottom layer above the window. The front edge of the drip rail was pretty rusty so I cut it all off but the horizontal upper portion I left the spot welded flange and zipped off the rest to get access to assess and clean out.
-
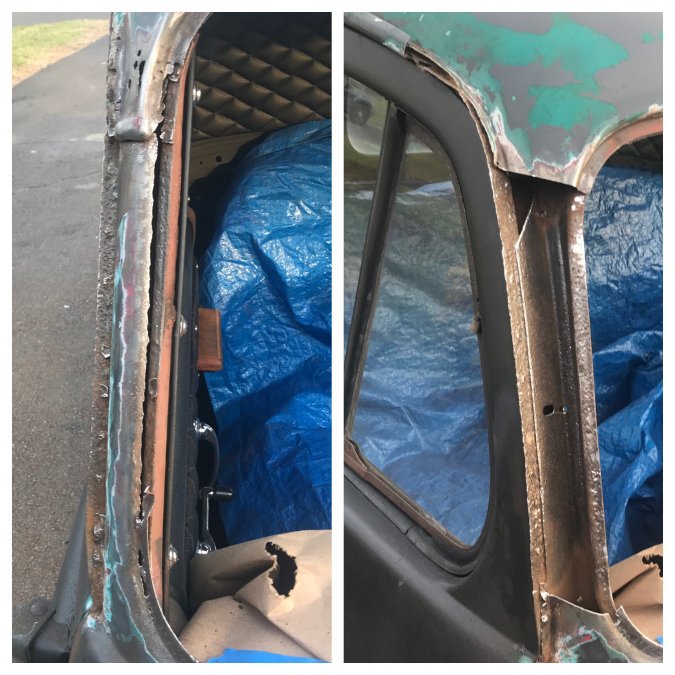
I knew after wirebrushing I would find more rust and pinholes. Well it turns out that the entire front skin of the A pillar was competely rusted through on both sides and only attached on the bottom edge that flows into the cowl. I zipped it off and saved it. The upper portion where the roof skin lops over also had a bunch of rust holes so it came off too. Then I couldn’t be sure that the drip rail wasn’t letting water in and couldn’t get inside it to clean and look for holes so it got zipped off and saved too. Talk about one step forward five steps back! I am not going to have time to start fabricating patches yet. I’m not sure what needs to happen with the area under the drip rail- there are three layers there, somewhat delaminated and not too rusty but not great. The front face and lop over portion I think I will add new metal to the existing pieces I trimmed off and weld them back on. The driver’s side is not as bad but I’m sure it will need a bunch of similar work too. For now I’m leaving it so I can copy what’s there as I re-do the passenger side.
-
1938 Dodge RC Pickup Build
Radarsonwheels replied to vikingminer49er's topic in Mopar Flathead Truck Forum
It’ll feel much better to bolt it back together with clean parts -
Pics please! And another request for p/n
-
Cool truck!
-
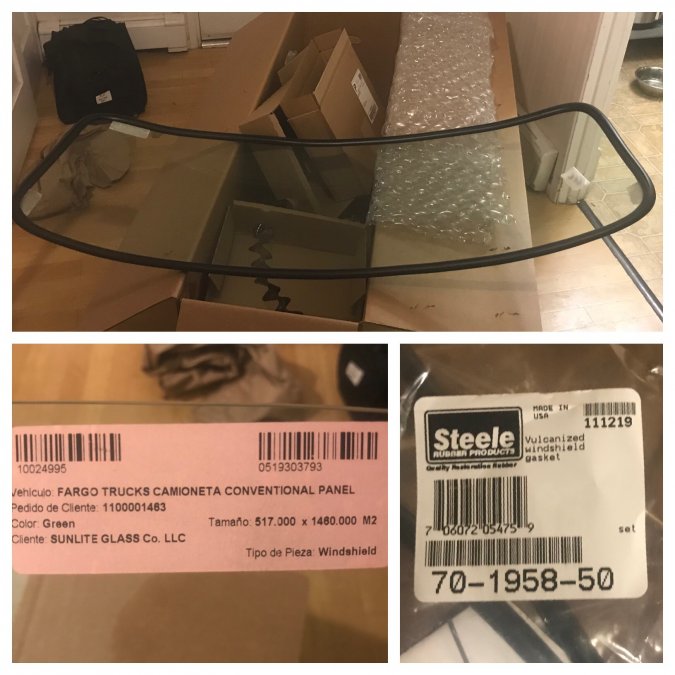
Yep. I got a “Steele” brand one piece gasket. I tried it on the new glass and it was a comfortable stretch. The corners are not molded which might actually make it easier in one way because I won’t have to make sure it is properly positioned in the window frame and harder because the lockstrip gap is tighter around the radius. The gasket was around $200 so I am going to take it slowly on installation!
-
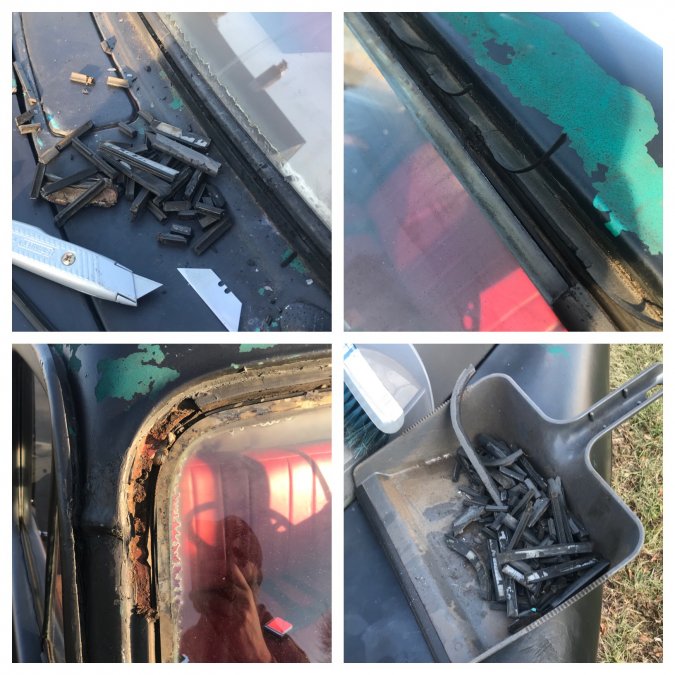
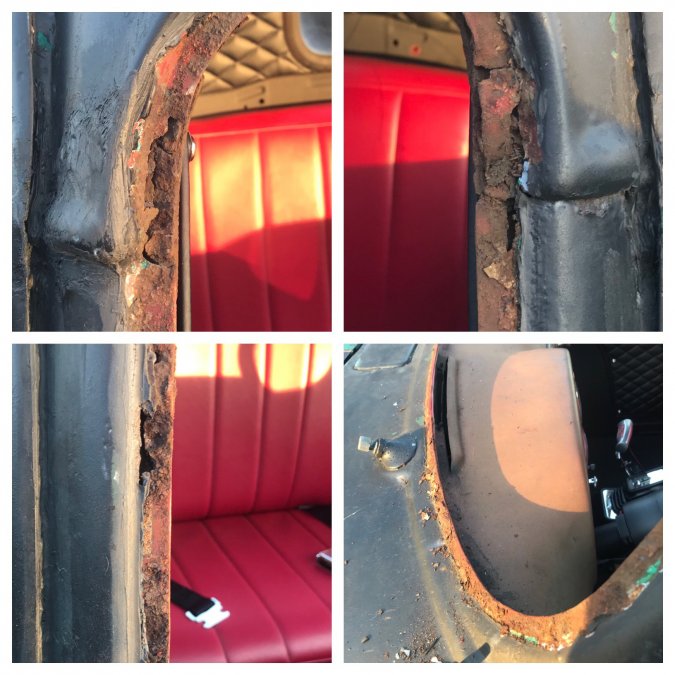
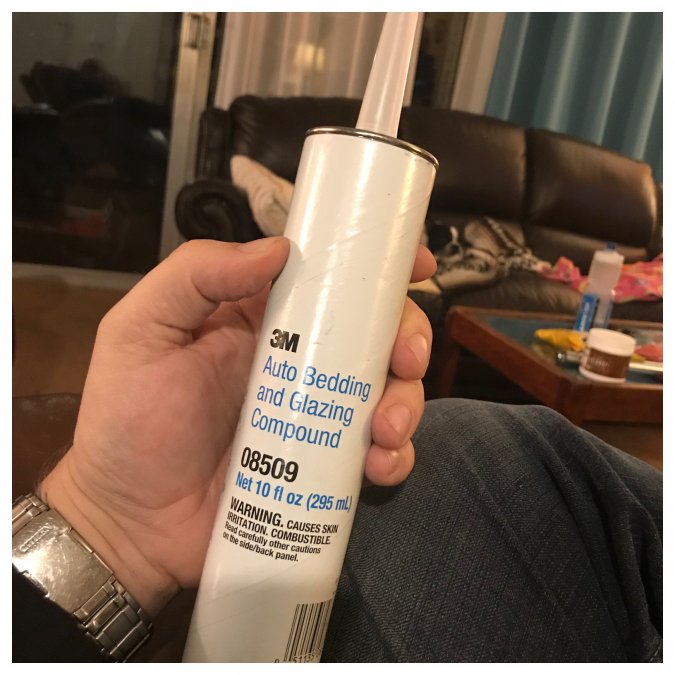
It got a little warmer this afternoon and the rubber floormats seemed to bend easily so I started in on the windshield project. I really couldn’t wait to find out how bad it would be in there. The windshield gasket was reasonably rubbery for its age- not exactly soft but not rock hard and chunks split off rather than shattering. Maybe it was swapped out in the 80s? No way to know. I used a hook pick to pull out the lock strip in 1-3” sections. It was pretty brittle. Once that was out the structure of the gasket was severely compromised making it easy to break off and razorblade the outer lip that holds the glass. I did that all the way around except a few feet of the center bottom. I spent a while on the phone looking for some free hands and finally found a couple fellas close by that could spare 15 mins to swing by. When they got here I ran a plastic knife around the inside lip of the gasket and pushed the top of the glass out toward them. Once it hinged forward in the remaining bottom rubber channel they were able to lift it out and set it on a towel in the bed. It’s in fairly sorry shape but I’m keeping it for a spare. Then it was the moment of truth- we peeled off the stock rubber and hack-applied RTV (it was me ha!) from the pinch weld. Not too bad! The interior pinch weld flange is mostly all in good shape. The bottom and top edges of both flanges are in amazing shape and the bottom is still wearing a lot of factory paint untouched by the sun for 66 years. The A pillars have some rot and metal missing especially near the top and bottom edges. I’ll have to tarp out the interior and get in there with a wire cup to blast out all the crap. Hopefully it isn’t a lot worse than it looks. Then I have to decide how much metal work to do or if I can get by with a little 3m panelbond or tigerhair. This is my best chance to do it right the first time though! pics!
-
My 54 C-1-C had the steering box outside the frame rail if I remember properly? Like the last pic by 55 fargo? I do remember that my frame rails curved or pinched in to follow the inner fenders like in that pic. The earlier pics 55 Fargo posted of the installed v8 it looks like the rails are straight and the steering box is inside the rails? Is this B vs C series? Am I remembering wrong?
-
Well I have a built 512 and if I could afford an 8-71 roots blower to stick on top I’d do it. My 3200 lb dodge A-body was very tame and drivable with a built 408 LA stroker. My 318 with a cam 4 barrel and headers in a ramcharger (heavier truck) is still not at all fast- part of that is the 31” tires but all my 318s are just rumbly cruisers none of them can scare you at WOT. I’m guessing the gen 1 hemi will be similar power but a lot more money and a lot more class & underhood bling
-
Haha just saw you managed to quote me before I fixed the typo from lick to luck haha ?
-
Ken and my posts seem to have crossed in space from the satellite but we are mostly in agreement. When I was planning my engine setback I did a lot of research on it and found a few things. In a lot of racing classes they limit setback to the first sparkplug even with the steering knuckle so there is definitely a handling advantage but it is not as drastic as you might think. You have to really get radical to start seeing a big change in front to back weight ratio. I combined a 10” setback with a 10” altered wheelbase and a very heavy bed floor to get 51% nose weight, and that’s with an aluminum top end and headers that make my big block close to stock small block weight. Practically going a little high with the driveline will cost you more in trans & driveshaft tunnel fabrication time and effort than in handling. It is a noticable change in handling but in a bouncy truck with a bench seat I don’t know that you’d really be able to drive a whole lot more aggressively- it’s not like you’re going up on two tires.
-
Ideally you want it as low and far back as practically possible. In reality you will have to deal with clearance issues on all sides. Is your steering still stock? Front suspension? You need the oil pan to clear these things and allow suspension travel and not hit the steering link. You can change the shape of the pan and pickup by welding in whatever sump you want but that’s normal for a race shop not a backyard swap. More likely is swapping in a rear sump or whatever is necessary if it has a car sump currently. The exhaust outlets need to be at least aimed at an area open enough to make a free flowing curve in the downpipe- the more open the better. If the manifold aims at the edge of the frame you can notch and reinforce it but again not a novice job. Also you want enough room to put a stock fan on the water pump pulley that sits 1/2 deep into the radiator shroud. You might have to move the rad closer to the grille or use an electric fan. I used a replacement HHR fan for a chevy- those trucks had a small grille opening and needed a powerful fan. They are way less than $100 on rockauto and come with a shroud that’s easy to adapt. Make sure the motor has room to vibrate and move around a little and won’t be buzzing up against stuff. It’s tight front to back and possibly between the frame steering and exhaust too. It’s not as tight up toward the top of the hood which is a generous bubble. Also think about sparkplug exhaust and bellhousing tool access, and don’t forget that the distributor is in the back by the firewall. good luck! Rdr
-
Yup normal. I have mix n matched them badly before and had them throw sparks! Usually the belt will triangulate with the ps pump or alternator. Sometimes you need to shim them into alignment too. Then you cross your fingers that the speeds will all play nice which they usually will. You can get under & overdrive pulleys from March but they are expensive and will work but aren’t always designed for a low rpm daily driver. Of course the best is a matching set from a donor but it’s not that crucial- the accessories can mostly operate in a large range of rpms
-

1938 Dodge RC Pickup Build
Radarsonwheels replied to vikingminer49er's topic in Mopar Flathead Truck Forum
I love seeing the full on restoration effort on the body and trim and the modern hemi is gonna haul the mail! Keep up that momentum and keep posting pics I’m droolin’! -
Thanks BK No fingernails?! Ouch! Do you mean from chewing them to the quick being nervous about breaking my new glass? I have a nice set of plastic tools for gently prying the gasket in place and I should be able to recruit some help so there will be a set of hands on both sides of the glass both in removal and on installation of the new windshield. I am kind of looking forward to seeing how bad the A pillars actually are. I haven’t been able to really find the source of the water- it drips from the bottom passenger side of the gasket but could be getting in anywhere and running to the low spot.
-
I like the early cabs with the split windshield better and I like the late beds with the big round wheel tubs better. Are you going to restore all 3? Max and match the best parts you have on hand? I agree the ford or chevy tubs on a dodge box look wierd. The later tubs kinda slope down toward the back which I always liked.
-
Big news- I’ve spent some money and almost guaranteed myself a month of metalwork and downtime! I found a windshield on Ebay and got a Steele gasket for it and they’ve arrived on my doorstep. The glass when overlayed on the existing windshield looks like it’s just right using the very scientific method of setting it down on there under the wiper blades by myself in the driveway after dark. It is listed as green tinted which is subtle and not darker on the top. I have green lights in my gauges so that works. The gasket doesn’t appear to have corners molded in but again using the very scientific method of popping it onto the glass in my living room also looks like it will conform to the curves without wrinkling and has a reasonable amount of snugness. In other words it looks like it’s gonna fit!! I have looked around for glass before and since 1953 is two flat planes and 1955 wraps around way farther (even changing the door shape to accommodate the wrap) I knew I was dealing with a magical “one year only” part. A unicorn. I kind of figured the $1000 pricetag including shipping and a gasket would scare me away until I finally was ready to make a move at which time the part would be permanently unavailable. It was $300 plus $90 to ship cross country to a residential address in a box big enough for a speedboat which seems actually very reasonable. The Steele brand rubber gasket (locking strip style, installed inside out on my test fit in the pic) was $200 shipped. Ouch but no more 70 year old glass sandblasted by years of driving with wiper grooves and cracked rubber that leaks into my new interior every time it rains. The actual glass swap should take a half a day but I know my A-pillars are made of rust and forgotten dreams. Now is the time to grind out all the rot, fix the driver’s door frame, and cross my fingers that there is any pinch weld there at all under the old gasket. I will have to remove the interior, tape off the dash, disconnect the electronics, fun fun fun. At least it’s bitter cold winter outside! I could wait till spring but then it’ll just rain every day. pictures!
-

251 cid radiator cap rate?
Radarsonwheels replied to Fernando Mendes's topic in Mopar Flathead Truck Forum
It held for a few hundred miles then started weeping. I pulled the whole heater and covered the holes in the firewall with blue painter’s tape ? The big motor keeps it warm enough in there with the windows up despite all my insulating for now. The long term plan is to resto-mod the stock heater box with a 12v fan and either a new core or new tubes and fins furnace brazed to the original tanks. I do want a defroster hose to the windshield and a working heater would be spiffy too. -

251 cid radiator cap rate?
Radarsonwheels replied to Fernando Mendes's topic in Mopar Flathead Truck Forum
My heater core never leaked until I hooked it up to a modern (‘70s) cooling system -
My input- I butchered my 54 for a v8 but what I got was around a 500% increase in horsepower and 300% torque, so a lot of other stuff had to change to support that. I loved my healthy 230, especially with a 3.55 rear, front disc brakes, and later a t5 five on the floor transmission. My steering sucked and my body was rotting from the bottom up. My hotrod grew from wanting to build a stroker big block, then needing somewhere to put it. If you have your heart set on the 318 it’s very do-able. Mark your chassis for where the radiator sits. Pull your doghouse and driveline. Crib up the motor where you think it should go and make mounts plus make a crossmember for the trans. Then its just a ton of day long projects- exhaust, kickdown linkage, driveshaft, new radiator probably pushed forward some, new axle, parking brake cables, bla bla bla. It is a lot to do but not too bad. You just have to keep plugging away at it. radar
-

Model 61, 62, 65 heater core
Radarsonwheels replied to bkahler's topic in Mopar Flathead Truck Forum
I’m paying attention and appreciating this bigtime! Thanks -
Hey man I love the truck and great job on the doors! I gotta do mine soon!


