


Radarsonwheels
-
Posts
1,233 -
Joined
-
Last visited
-
Days Won
17
Everything posted by Radarsonwheels
-

C series front fender mounting
Radarsonwheels replied to kencombs's topic in Mopar Flathead Truck Forum
Are you talking about where the inner and outer front fenders join with the rad support area? I usually find that areas that let water escape are fine but areas where water stays like two flanges flat on each other is where water likes to hang out and rot. Sometimes sealer keeps water out, sometimes it keeps it in. Also I think some of those type areas on my C series had tar or whatever inbetween to keep from being squeaky and give a more solid ride? Mine had some of that too. -
Hey Los That’s funny I’m about to throw new .030” over pistons in my aftermarket 120” harley motor- 4.280” bore! I have done the take it easy break in on them and the beat on it hard and soon break in on piston rings before- despite ny/sil steel or straight iron liners/blocks and iron or fancy rings there’s a few ways to successfully skin that cat. Luckily harleys have hydraulic rollers in them stock so there’s no adding zinc or scary flat tappet cam break in involved.
-
I got a chance to read Wilwood’s take on it and they were pretty close to Ken’s technique when you click “pad bedding steps”. Increase pad heat slowly and smoothly then thoroughly cool them before any full stops. The funny part is the next FAQ under that is proper bedding procedure for street pads where they tell you to just go drive like a normal person and let the pads wear in. It makes sense that modern street pad compounds would be made for real world service conditions as in swap the pads, give the lady her car back, get paid. I know that serious racing pads don’t even bite until they are -ripping- hot so it makes sense that modern street compounds would be the opposite- designed to work without much fancy break in and to never fade in normal lawful driving outside of long steep descents. I’m still going to do a break in heat cycle on these after I chuck em in. I love nerding out on these things though!
-
As far as I know all brakes need a bunch of hard stops from 30-40mph followed by some easy driving to cool them and the rotors back down- both so that the compounds can cook and offgas and so that the rotors and pads can bed in and begin to develop proper contact and wear. But I’m not too cool to learn something new I’ll check it out- thanks!
-
Howdy moparnauts! I still haven’t messed with the heater core parts I bought- way too hot out this summer to even drive her much except to work here & there. I did spend a few bucks on what (fingers crossed) will be a brake upgrade. I found a company called “stainless brakes” that sells drilled and slotted hub/rotors on CarID and I am not autocrossing so I’d rather have more surface area than more cooling. But they also sell ceramic pads that are billed as aggressive street compound. The truck with decent but slightly groovy 1987 rotors and sintered pads from rockauto slows down quickly but doesn’t have any bite at low speed. I want a more sporty grabby feel and there is not a lot available for gen 1 dakota. I know I can mill the rotors off a set of hubs and pinch in a big rotor from like a late mustang or something then make caliper brackets for some kinda sporty big junkyard or aftermarket calipers but jeez that’s a lot of work. So I ordered a set of the ceramic pads and a new set of rotors/hubs with new skf wheel bearings to give the new pads the best chance possible to bed in and work right. Just got the email that the parts are at my house so hopefully in the next few weeks I’ll get time to install the setup. I have a little vacation coming up and I’m rebuilding a 120” harley evo motor right now so my plate is a little full… I hope everyone is well Radar
-
I have a cricut joy. It can do about 5” wide by infinity vinyl stickers. I use it to make resists for electro-etching metal so I only have a roll of white vinyl with a thick backing for cricut use and a big roll of clear transfer tape. It has limitations but I just made an indian logo set for my buddy’s vintage Indian minibike that came out nice. It was less than $200 investment but I’m sure a local sign shop could bust you out a handful of vinyl stickers already weeded with transfer tape on them for tens of dollars. good luck!
-
Help me understand door adjustment.
Radarsonwheels replied to Los_Control's topic in Mopar Flathead Truck Forum
Hey Los I’ve been off the forum for a minute- glad to see you’re making some good progress! On the welding thing the biggest advance in my sheet metal welding came when I started overlapping tacks instead of overlapping drags. For thicker stuff I get it clean, chamfer/bevel the joint so the weld has someplace to go and more than surface metal to bite, tack it in the corners, verify it’s in the right spot, and let her rip sometimes dragging sometimes swirling or drag/pause whatever it takes to get the penetration right and good profile. I find that ‘in position’ like welding side to side flat on a bench is easy and the settings work like they’re printed. ‘Out of position’ like vertical and overhead might need more heat and speed adjustment and a lot of practice. On sheetmetal you end up fighting burn-thru and warping more than anything. Even one inch drags moved around and patiently cooled can pull and wrinkle metal and threaten to burn through. What works for me on sheetmetal is a series of hot tacks that overlap. If you lay in a nice tack then move next to it and hit it on a 45° angle the previous tack is a little thicker than the sheetmetal and is more forgiving on burn thru. It happens fast but you want to flow a little bead into the gap next to that tack and have it grab the metal on both sides, then you stop and do the next one. A thin consistent gap between sheets will show you any warping or shrinking as it cools- do like an inch then move to a different spot or wait a bit. Be just as slow and careful if you grind down or dress any welds that show. Things that get hot will shrink and pull as they cool- that’s why hammer welding is so awesome it cools and flattens the welds as you go. Clear as mud? Hope I helped -
Wait that’s not how you’re supposed to do it?
-
I was lowkey dreading riding home in the truck after a long day but it ended up putting a big smile on my face. It was storming all day, and super hot and steamy all morning. And even though the toe is just ballparked it drove nice and straight. In the wet she’ll bark (or hiss)the tires with any kind of quick throttle but I’m always kind of amazed how tame it is if you’re easy on the loud button. I took a clip of the idle when I got home lesse if this link works to youtoob
-
So I have the donor dakota column except I gutted it and smoothed over the shifter, key boss, and turn stalk holes. It came stock with double D shaft and I had to weld in a support bearing perch and install a universal joint or two to bend it around the headers to mate back up with the dakota steering rack. It always sucks working after a bad mechanic and it’s sometimes worse working on something not engineered to be serviced. It had been long enough since I built the steering that I was pleased to find that I had made it easy to service and pretty safe/solid. There is an allen set screw and locknut in the top of a universal joint which allows the bottom half of the steering shaft to drop out but there isn’t enough slack to remove it until the rack is unbolted from the frame. This worked out well because the bottom is securely captured and the set screw only adds rigidity instead of being a possible point of catastrophic failure. Also the female spline to the rack is secured with a roll pin which is much easier to replace on the bench than in a cramped engine bay. ...to make a short story long the double D shaft must have been reinstalled 180° out!
-
Thanks fellas! She’s back in action but I still need to grease the new tierod ends and get the toe set on a real alignment rack. I only put about a mile on it. So far no more leaking or puking PS fluid and the steering feels just as good as before. We counted turns and duplicated the threading on the tierod ends- it didn’t feel squirrley or like only one tire or the other was steering so it must be close. Of course the steering wheel is upside down- dunno if they usually pull it and reinstall when a pro does an alignment but I’ll probably do that just so it looks right when I’m driving. We’re all vaccinated and feeling closer to normal at my house and my shop which is nice. I hope everyone is well out there in dodge truck land!
-
Hey y’all I’ve been wrenching a little lately. Finally got a modern heatercore with 12v fans to adapt, and this week I replaced my leaky old dakota steering rack with a rebuilt unit. I’m also replacing the pump, lines, and tie rod ends. It’s kind of the last of the service parts to get replaced from the donor dakota. The tie rods were whupped, the frame mount bushings on the rack were all split and starting to dryrot, and it generally all leaked and puked despite giving good road feel and easy steering. So far the rack, hoses, and tie rod ends are mounted, the toe is in the ballpark to drive to an alignment, and the stubborn pulley is swapped onto the new pump along with its mounting bracket. It should be back on the road really soon! I hope everybody is well. radar
-
1956 daddy/daughter build thread
Radarsonwheels replied to sluggish01's topic in Mopar Flathead Truck Forum
Oops somehow I missed the SRT IRS install. My ‘09 srt8 6.1 rear was kinda great and I also kind of viewed it as an underbuilt computerized timebomb. It would easily go into violent wheelhop if I didn’t get a launch just right with my 6spd. Also from what I understand (could be wrong) the limited slip and three levels of traction control were all done by computer controlling the brakes using wheel speed sensors and piggybacking the ABS system. I’m a wrench and a fabricator but I’m glad I sold my srt8 before I broke anything expensive. I’m interested in hearing your take on all this srt rear stuff and seeing your solutions. -
1956 daddy/daughter build thread
Radarsonwheels replied to sluggish01's topic in Mopar Flathead Truck Forum
Howdy Cool truck! I just read the whole thread. I think your problem with determining rear axle gear ratio could be that when you do the spin and count trick on an open (one legger) rear you need to keep one tire on the ground or else the tire you are reading isn’t really locked to the driveshaft. I suspect with the big hemi you will want a dana 60 or aftermarket 9” behind there anyway. I did a 512 stroker big block with manual valvebody 727 in mine but I came up with what I thought was a really smart budget alternative for my rear axle. The mopar 9.25” axle came behind ramchargers in nice ratios and you can find them cheap with sure grip or throw a locker in them. They are strong. They come in widths that work in our trucks. They come with 5x4.5” bolt circle axles. The weaknesses of the axle are the C-clip design which can allow the whole axle to slide out if the clip or inner stub breaks. I solved this problem by throwing a set of disc brakes on from a 90s zj jeep grand cherokee. If the clip fails the caliper will retain the wheel/axle assembly and allow for a safe breakdown. The zj brakes bolt right up you just need to open the inner circle diameter of the caliper bracket with a die grinder. The bolt pattern is the same and they didn’t need any shimming to just use off the shelf zj rotors and calipers. The other weakness of the 9.25” is the pinion depth is set by a crush sleeve. With a lot of power or holeshots they can self clearance- that’s why all the 2000s 1500 ram trucks that used a modern 9.25 with a different width and wheel bolt pattern are famous for clunking when they go into gear. This problem can be solved by using a shim kit instead of the crush sleeve to set pinion depth. Then you get the backlash right and it stays that way. You might also want to retrofit modern or muscle car era leaf spring mounts to get away from the skinny springs our trucks came with. Then you can use off the shelf, repro, or even super stock springs. A cool feature of the muscle car era SS leafs is that unlike brand X they had a shorter front spring section in front of the axle mounting point, making them act more like stiff trailing arms and resisting spring wrap and wheel hop when you get aggressive. So about your hemi- are you doing the complete harness with EFI? Or an expensive aftermarket intake with a holley carb? Maybe a complete aftermarket timing and EFI system? I did the sniper and hyperspark setup on my 512 but kept a retrofitted set of autometer gauges in my dash so it doesn’t look too much like a spaceship inside. I had a 6.1 6spd srt8 challenger. It was a lot of fun but I wouldn’t give it to a 16 year old. At least a stickshift will require enough attention to keep her mind on driving. I don’t know anything about your IFS setup but I assume it will have easy steering, great brakes, and a smooth ride. Feel free to ask if I can help you out in any way and good luck with your project it looks super cool! -radar -
Hit & Run damage today
Radarsonwheels replied to Jerry Roberts's topic in Mopar Flathead Truck Forum
Dang. Sorry man -
Bodywork is lookin good! Have you seen the setups where an airbag is positioned near the pivot of a trailing or leading arm? They seem to allow the chassis to put a lot more leverage on the bag making a softer ride while using more of the bag’s working psi. I have bags on my ‘54 right over the axle- they set ride height which would be close to the bumpstops without them. My bags get really rock hard above 30-35psi and I lose a ton of the bag’s operating range. They work fine but it’s something to think about.
-
Well if a portion of the proceeds goes to this website then it’d be your duty! I think the two pics are the same girl. Apparently whatever the government puts in the water now there’s girls with round butts and skinny legs instead of one or the other? That chick would be freezing in my truck I still haven’t made a new heater to replace the old one. The OEM hearer core gave up the ghost after a few months of 15psi or whatever modern radiator cap and closed cooling system, and the 6v fan was a little decrepit to be turning a million rpm with 12v. It did work though- I have a 3 way switch with a 70s dodge ignition ballast resistor inline with one position for off/kinda fast/way too fast operation. I reeeeeaaaly want a heater because I want to hook up the defrost vents. The windows fog easily in cold weather and I have to keep a towel in the cab to constantly wipe them clean. And it’s too cold to just rainex the inside and out again which I should have done in early fall... I think I’m going to end up making a new box to hold a modern heater core and fan and I will try to use as much as possible of the original stock heater box and face.
-
Oh and I haven’t logged on here for a bit but now that it’s the holiday season y’all got butts on here?! Haha wow glad the bills are gettin paid no matter how hard it is to look at ?

-
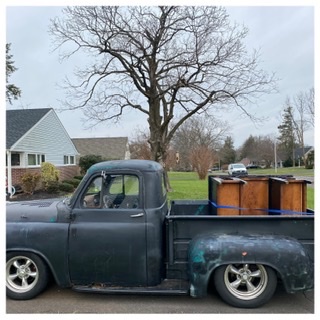
Howdy fellas! Got her goin pretty good lately! I blew a couple super thick vacuum caps I was using as heater hose delete caps with hose clamps and at the same time the water neck (thermostat housing) developed a pinhole in the gasket area. I looped a hose and pulled the neck off, trued it in the lathe, and put it back on with a buttered gasket. The fixes are seeming to hold but I wish I had a stock iron water neck they don’t warp! Hopefully whatever warping my pot metal piece was gonna do are done and now it’s “seasoned” haha Beyond that I have re-discovered leaving my manual valvbody 727 trans in 2nd gear. It pulls hard in 3rd but 2nd gear is more violent and fun with the motor actually revving above stall speed! Also I picked up an oak desk last week. I mean I “installed it as a prop in my antique vehicle then tested it to ensure parade worthyness” haha no work technically allowed for retired trucks with antique plates. Dunno if a cop would bust balls until I was really dangerously overloaded sanford & son style
-
1946 Dodge WC 1/2 Ton Pickup Frame Swap
Radarsonwheels replied to JeffH's topic in Mopar Flathead Truck Forum
Mine is on an ‘87 iirc. Look up 1st gen there is a wiki page -
Yup but that assumes you have a drill or a ton of patience.
-
Way too far for me to come with tools. yeah if you can drill holes or use holes bailing wire could help or it could draw sparks and cause problems. Maybe scuff with sandpaper or a rough rock and epoxy that sucker? A parts store or drugstore even wally world parking lot around?
-
Oof. Sorry to hear that man. There’s always epoxy, jb-weld, duct tape, and bailing wire. Just don’t forget to fix it right when you get back. Good job checking the spark a lot of people would start twiddling the carb immediately and make things worse. Sounds like you found the problem but a lot of times problems that made me limp home involved intake and exhaust leaks too. Where are you? Near Philly by chance?
-
Engine Machine Work Questions
Radarsonwheels replied to billrigsby's topic in Mopar Flathead Truck Forum
Well you want the work done right the first time but these are simple reliable engines it’s not rocket science. Good luck! -
318 and a904 swap into 51 b3b
Radarsonwheels replied to jerseycj8's topic in Mopar Flathead Truck Forum
If the carb pad is close don’t worry about it. Like was said above the pinion and transmission output want to be parallel but don’t have to be in line. The part that inspires debate (besides dummies that are measuring from the ground instead of from rear to crank/trans) is that when you put power to the tires the pinion tries to climb the ring gear. So the pinion tries to nose up as you get traction. That’s why mopar sells a pinion snubber and chevy guys use slapper bars- to limit spring wrap, axle windup, and keep the pinion parallel to the driveline under power. So some dragstrip cars might run the nose pretty far down on a leaf spring car so that when it winds up you get it where you want it. A couple or few degrees nose down is good for a street car with unspectacular torque and traction. More than that will have you feeling the vibrations on the highway any time you’re cruising and not applying power. I just added wedge shims to mine today to correct that very issue- it drives great around town but had highway vibes that I hope are gone now!
